SpringBoot 2.0 整合 Mybatis
写在前言:
学习前后端分离也有一段时间了,基于Vue + Spring Boot + mybaits + webpack2
恰逢得知Spring Boot已经升级到2.0,闲来无事研究了下Spring Boot 2.0
整合了一个Spring Boot2.0 + Mybatis 的demo 并成功运行。
搭建期间也遇到很多坑,好在一一解决~
本文主要分享 SpringBoot2.0 和 mybatis 整合搭建的过程 ~
首先聊一下Spring Boot 和 Spring 的区别特征
- Spring Boot可以建立独立的Spring应用程序;
- Spring Boot内嵌例如Tomcat、Jetty和Undertow等这样常见的部署容器,可以直接点击run或者debug按钮运行。(琢磨了好久怎么启动SpringBoot项目怎么启动,囧~);
- 无需如传统Spring搭建需要成吨繁琐的XML配置文件,转而使用更加简洁的yml配置文件;
- 可以自动配置Spring;
- 提供了部分现有功能,如量度工具,表单数据校验和一些外部配置这样的三方功能;
- 提供的POM可以简化Maven的配置;
其次聊一下Spring Boot 2.0 和 Spring Boot 1.0 的区别
- SpringBoot 2基于Spring5和JDK8,而Spring 1x则用的是降低版本,带来的为可能是你的应用服务必须支持JDK8
- 使用SpringBoo2,建议使用较新的Maven版本,以及较新的JDK,尤其是IDE工具,以免Maven在IDE里的视图报出警告信息
- MVC部分,有些定制类改动了,比如WebMvcConfiguer,由抽象类改为接口,这是因为JDK8对接口有新的支持形式
- JPA中,findById 返回了一个Optional对象,改动较大,会直接影响所有业务代码
- SpringBoot配置,web应用的ContextPath 配置属性已经改动,另外配置文件的中文可以直接读取,而不需要转码。另外,自动装配里Boot提供的JavaVersion类报名改动了。根据jdk版本自动装配的需要调整代码
- Sagger UI变化较大
- Acutator,本章SpringBoot1.x和2变化较大,默认情况,不再启用所有监控,另外编写自己监控信息,完全需要重写,HealthIndicator,EndPoint 变化很大
环境/版本一览:
- 开发工具:IntelliJ IDEA 2018.1.3 x64
- http请求测试工具:Postman
- Spring Boot : 2.0.1.RELEASE
- jdk:10.0.0.1
- maven:3.3.9
- alibaba Druid 数据库连接池:1.1.9
额外功能:
- PageHelper 分页插件
- mybatis generator 自动生成代码插件
开始搭建:
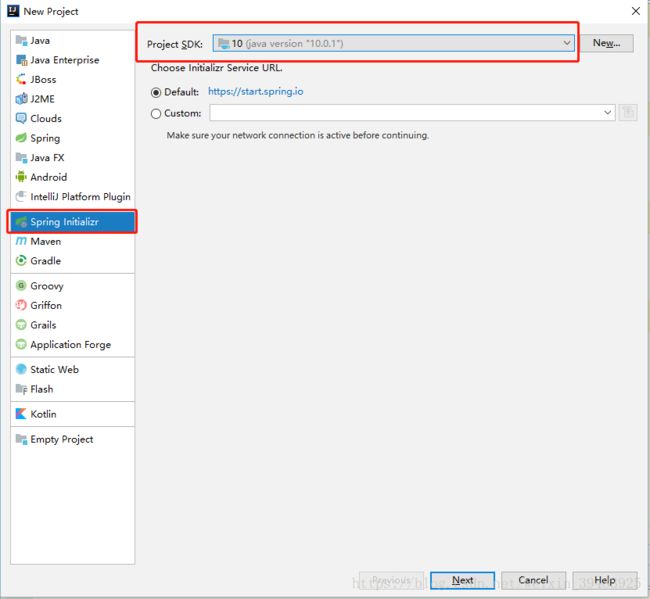
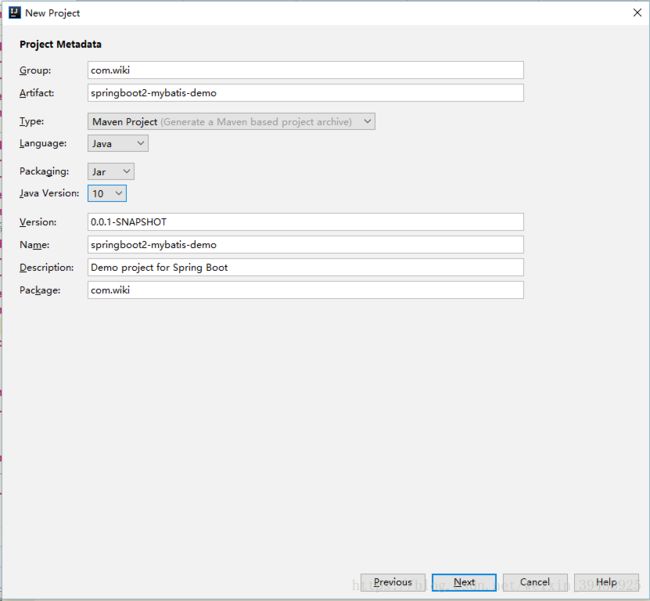
创建项目
- 我用的是JDK10,不同版本的同学可以选择自己对应的JDK版本
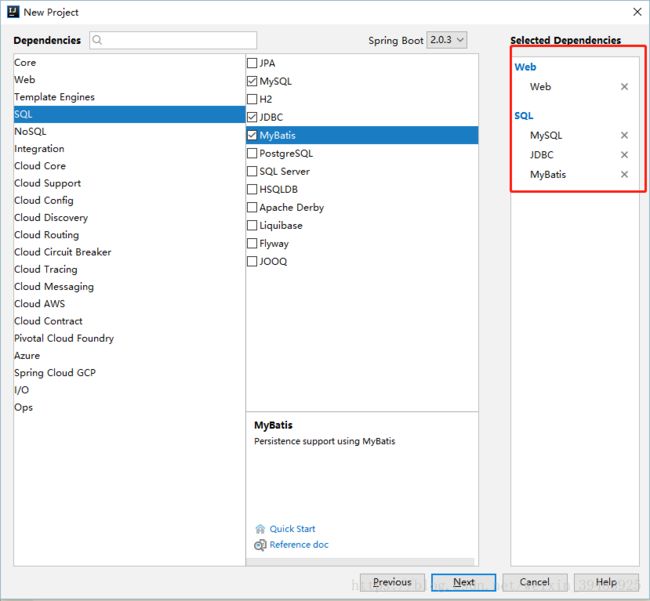
- 添加基础的依赖
依赖文件,各位同学按照POM文件补齐所需依赖
    4.0.0

    com.wiki
    springboot2-mybatis-demo
    0.0.1-SNAPSHOT
    jar

    springboot2-mybatis-demo
    Demo project for Spring Boot


        org.springframework.boot
        spring-boot-starter-parent
        2.0.3.RELEASE


        UTF-8
        UTF-8
        10


            org.springframework.boot
            spring-boot-starter-jdbc


            org.springframework.boot
            spring-boot-starter-web


            org.mybatis.spring.boot
            mybatis-spring-boot-starter
            1.3.2


            mysql
            mysql-connector-java
            runtime


            org.springframework.boot
            spring-boot-starter-test
            test


            org.apache.commons
            commons-lang3
            3.4


            com.fasterxml.jackson.core
            jackson-core


            com.fasterxml.jackson.core
            jackson-databind


            com.fasterxml.jackson.datatype
            jackson-datatype-joda


            com.fasterxml.jackson.module
            jackson-module-parameter-names


            com.github.pagehelper
            pagehelper-spring-boot-starter
            1.2.5


            com.alibaba
            druid-spring-boot-starter
            1.1.9


            org.springframework.cloud
            spring-cloud-starter-netflix-zuul
            2.0.0.RELEASE


                org.springframework.boot
                spring-boot-maven-plugin


                org.mybatis.generator
                mybatis-generator-maven-plugin
                1.3.2

                    ${basedir}/src/main/resources/generator/generatorConfig.xml
                    true
                    true
配置文件
-
可以根据个人使用习惯选择使用
properties或者yml文件, - 本项目使用的是yml配置文件,所以把原本
application.properties删除,创建一个application.yml文件
server:
  port: 8080


spring:
    datasource:
        name: mysql_test
        type: com.alibaba.druid.pool.DruidDataSource
        #druid相关配置
        druid:
          #监控统计拦截的filters
          filters: stat
          driver-class-name: com.mysql.jdbc.Driver
          #基本属性
          url: jdbc:mysql://127.0.0.1:3306/gameWiki?useUnicode=true&characterEncoding=UTF-8&allowMultiQueries=true&useSSL=true
          username: root
          password: root
          #配置初始化大小/最小/最大
          initial-size: 1
          min-idle: 1
          max-active: 20
          #获取连接等待超时时间
          max-wait: 60000
          #间隔多久进行一次检测,检测需要关闭的空闲连接
          time-between-eviction-runs-millis: 60000
          #一个连接在池中最小生存的时间
          min-evictable-idle-time-millis: 300000
          validation-query: SELECT 'x'
          test-while-idle: true
          test-on-borrow: false
          test-on-return: false
          #打开PSCache,并指定每个连接上PSCache的大小。oracle设为true,mysql设为false。分库分表较多推荐设置为false
          pool-prepared-statements: false
          max-pool-prepared-statement-per-connection-size: 20

mybatis:
  mapper-locations: classpath:mapper/*.xml
  type-aliases-package: com.wiki.model

#pagehelper
pagehelper:
    helperDialect: mysql
    reasonable: true
    supportMethodsArguments: true
    params: count=countSql
    returnPageInfo: check
创建测试用数据库
CREATE DATABASE mytest;

CREATE TABLE t_user(
  user_id INT NOT NULL PRIMARY KEY AUTO_INCREMENT,
  username VARCHAR(255) NOT NULL ,
  password VARCHAR(255) NOT NULL ,
  phone VARCHAR(255) NOT NULL
) ENGINE=INNODB AUTO_INCREMENT=1000 DEFAULT CHARSET=utf8;
使用mybatis generator 自动生成代码:
- 上文的pom依赖文件中我们已经配置了对应的依赖文件
- pom.xml中generator 插件所对应的配置文件 ${basedir}/src/main/resources/generator/generatorConfig.xml
- 在对应路径新建generatorConfig.xml文件

- 对应配置文件内容:注意下自己对应路径的package是否存在
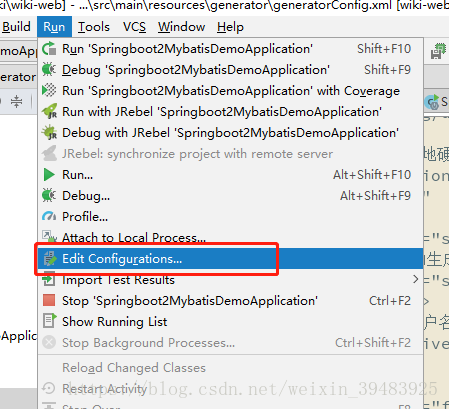
- 点击run-Edit Configurations
- 选择Maven启动项,并添加配置
运行
![]()
注意!!!同一张表一定不要运行多次,因为mapper的映射文件中会生成多次的代码,导致报错,切记 !!!!!
项目结构
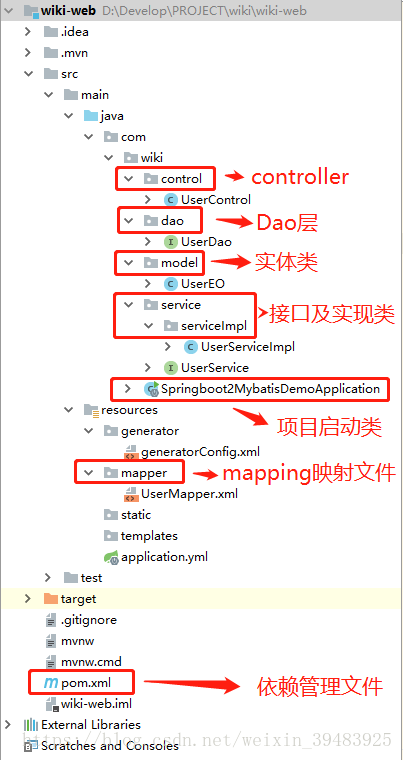
- 至此项目结构应如下图所示,我自己修改了对应的类名,个人习惯。
- 各位同学可自行修改路径和对应实体类命名规则
项目启动类:
- Springboot2MybatisDemoApplication
- 注解意思为为该路径包下所有的文件批量注解@Mapper
- 注意第二行的注解!如果未添加将会提示
- MyBatis: No MyBatis mapper was found in '[xx.mapper]' package. Please check your configuration.
package com.wiki;

import org.mybatis.spring.annotation.MapperScan;
import org.springframework.boot.SpringApplication;
import org.springframework.boot.autoconfigure.SpringBootApplication;

@SpringBootApplication
@MapperScan("com.wiki.dao")
public class Springboot2MybatisDemoApplication {

    public static void main(String[] args) {
        SpringApplication.run(Springboot2MybatisDemoApplication.class, args);
    }
}
实体类UserEO.java
package com.wiki.model;

public class UserEO {
    private Integer user_id;

    private String username;

    private String password;

    private String phone;

    public Integer getUser_Id() {
        return user_id;
    }

    public void setUser_Id(Integer user_id) {
        this.user_id = user_id;
    }

    public String getUsername() {
        return username;
    }

    public void setUsername(String username) {
        this.username = username == null ? null : username.trim();
    }

    public String getPassword() {
        return password;
    }

    public void setPassword(String password) {
        this.password = password == null ? null : password.trim();
    }

    public String getPhone() {
        return phone;
    }

    public void setPhone(String phone) {
        this.phone = phone == null ? null : phone.trim();
    }
}
UserControl.java
package com.wiki.control;

import com.wiki.model.UserEO;
import com.wiki.service.UserService;
import org.springframework.beans.factory.annotation.Autowired;
import org.springframework.stereotype.Controller;
import org.springframework.web.bind.annotation.*;

/**
 * Created by Administrator on 2017/8/16.
 */
@Controller
@RequestMapping(value = "/user")
public class UserControl {

    @Autowired
    private UserService userService;

    @ResponseBody
    @PostMapping("/add")
    public int addUser(UserEO userEO){
        return userService.addUser(userEO);
    }

    @ResponseBody
    @GetMapping("/all")
    public Object findAllUser(
            @RequestParam(name = "pageNum", required = false, defaultValue = "1")
                    int pageNum,
            @RequestParam(name = "pageSize", required = false, defaultValue = "10")
                    int pageSize){
        return userService.findAllUser(pageNum,pageSize);
    }
}
UserService.java
package com.wiki.service;

import com.github.pagehelper.PageInfo;
import com.wiki.model.UserEO;

/**
 * Created by Administrator on 2018/4/19.
 */
public interface UserService {

    int addUser(UserEO userEO);

    PageInfo findAllUser(int pageNum, int pageSize);
}
UserServiceImpl.java
package com.wiki.service.serviceImpl;

import com.github.pagehelper.PageHelper;
import com.github.pagehelper.PageInfo;
import com.wiki.dao.UserDao;
import com.wiki.model.UserEO;
import com.wiki.service.UserService;
import org.springframework.beans.factory.annotation.Autowired;
import org.springframework.stereotype.Service;

import java.util.List;

/**
 * Created by Administrator on 2017/8/16.
 */
@Service(value = "userService")
public class UserServiceImpl implements UserService {

    @Autowired
    private UserDao userDao;//这里会报错,但是并不会影响

    @Override
    public int addUser(UserEO userEO) {

        return userDao.insert(userEO);
    }

    /*
     * 这个方法中用到了我们开头配置依赖的分页插件pagehelper
     * 很简单,只需要在service层传入参数,然后将参数传递给一个插件的一个静态方法即可;
     * pageNum 开始页数
     * pageSize 每页显示的数据条数
     * */
    @Override
    public PageInfo findAllUser(int pageNum, int pageSize) {
        //将参数传给这个方法就可以实现物理分页了,非常简单。
        PageHelper.startPage(pageNum, pageSize);
        List userDomains = userDao.selectUsers();
        PageInfo result = new PageInfo(userDomains);
        return result;
    }
}
UserDao.java
package com.wiki.dao;

import com.wiki.model.UserEO;

import java.util.List;


public interface UserDao {
    int insert(UserEO record);

    int insertSelective(UserEO record);

    List selectUsers();
}
UserMapper.xml映射文件
t_user
user_id,username,password,phone
insert into t_user (user_id, username, password,
phone)
values (#{userId,jdbcType=INTEGER}, #{username,jdbcType=VARCHAR}, #{password,jdbcType=VARCHAR},
#{phone,jdbcType=VARCHAR})
insert into t_user
user_id,
username,
password,
phone,
#{userId,jdbcType=INTEGER},
#{username,jdbcType=VARCHAR},
#{password,jdbcType=VARCHAR},
#{phone,jdbcType=VARCHAR},
到这里项目基本已经整合搭建完成,如果有同学依旧报错,请仔细检查下配置文件以及文件包路径是否有误
搭建环境本就是一个不断修复BUG的过程 , hhhhh ~ 加油!!!
测试
启动项目
这样表示启动成功
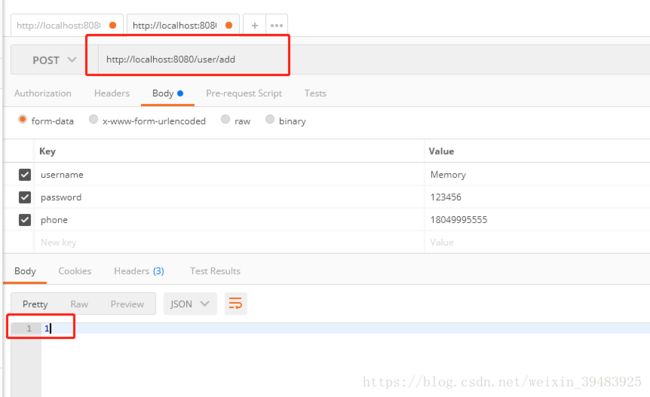
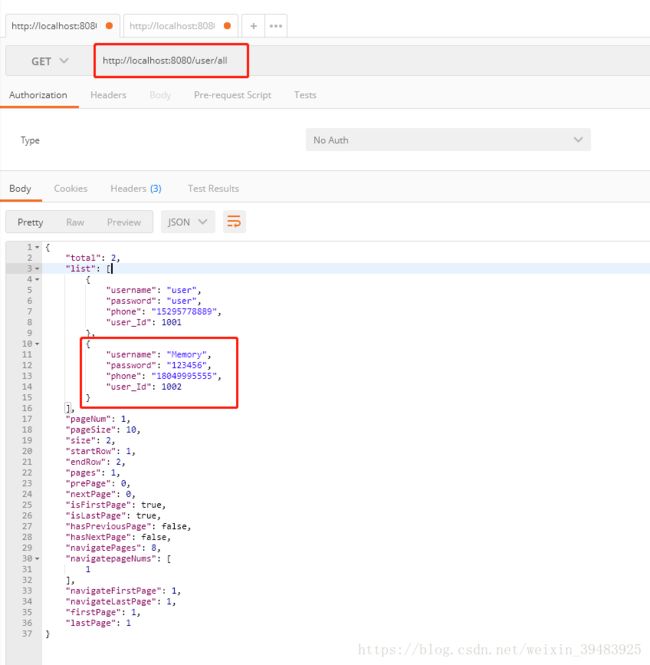
现在开始测试,我习惯用Postman,一个http请求工具,同学们可根据个人习惯自行选择
新增数据
查询数据
大功告成!!!
PS:常见的几个坑
1. 项目启动时 ,一定注意自己启动的是哪个服务(本项目中使用了俩个)
- Maven - mybatis generator
- 项目启动类 - Springboot2MybatisDemoApplication
2. 若无意中重复运行mybatis generator ,请检查对应Mapper、Dao、Model 是否有覆盖修改新增的行为。及时修正 !
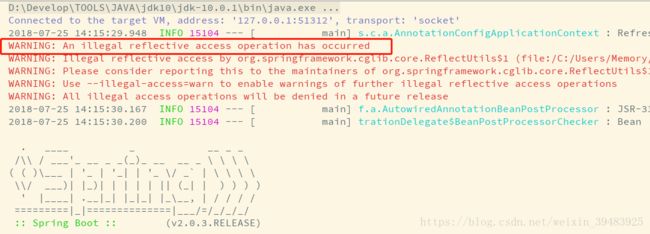
3. 本文中使用了JDK10 , 会报非法映射错误,如下图
后期JDK版本会予以修正,暂时请忽略Warning
