Ansible自动化管理(1)---ansible基本概述和主机清单配置
Ansible自动化管理(1)
1.ansbile基本概述
自动化运维工具:
shell脚本/Ansible(无客户端)/Saltstack(有客户端master-minio)
服务器部署流程
买云主机—环境部署—软件部署—配置部署—启动服务—测试—加入集群
1.1.ansible能做什么
ansible可以帮助我们完成一些批量任务,或者完成一些需要经常重复的工作
1.同时在100台服务器上安装nginx,并在安装后启动服务
2.将某个文件一次性拷贝到100台服务器上
3.每当有新服务器加入工作环境时,都要为服务器部署某个服务,要经常重复性的完成相同的工作
这些场景我们都可以使用ansible
1.2.ansible软件特点
1.ansible不需要单独安装客户端,ssh相当于ansible客户端
2.ansible不需要启动任何服务,仅需安装对应工具即可
3.ansible依赖大量的python模块实现批量管理
4.ansible配置文件/etc/ansible/ansible.cfg
1.3.ansible基础结构
1.连接插件(connector plugins)用于连接主机,用来连接被管理端
2.核心模块(core modules)连接主机实现操作,它依赖于具体的模块来做具体的事情
3.自定义模块(custom modules)根据自己的需求编写具体的模块
4.插件(plugins)完成模块功能的补充
5.剧本(playbooks)ansible的配置文件,将多个任务定义在剧本中,由ansible自动执行
6.主机清单(host inventory)定义ansible需要操作主机的范围
最重要的一点是ansible是模块化的,他所有的操作都依赖于模块
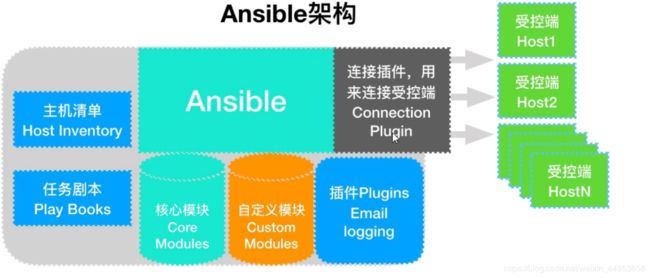
ansible工作架构:首先通过connection插件连接受控端所有主机,受控端有n个,可能针对于不同的服务器集群,因此我们就要对受控端进行合理的分配,将不同的集群做成不同的清单,保存在主机清单文件中,主机清单位于/etc/ansible/hosts文件中,在通过核心模块来传达指令,如果懂python也可以自定义模块,最后将各个模块组合在一起形成任务剧本,最终实现运维自动化
2.ansible安装配置
2.1.环境概述
| 主机名 | IP | 角色 |
|---|---|---|
| ansible | 192.168.81.210 | ansible管理端 |
| web | 192.168.81.220 | web服务器 |
| nfs | 192.168.81.230 | nfs存储 |
| backup | 192.168.81.240 | rsync备份服务器 |
2.2.安装ansible
[root@ansible ~]# yum -y install ansible
[root@ansible ~]# ansible --version
ansible 2.9.9
2.3.ansible借助公钥批量管理
利用非交互式实现批量分发公钥与批量管理服务器
1生成公钥文件
[root@ansible ~]# ssh-keygen -t rsa -P '' -f ~/.ssh/id_rsa

2.将公钥推送至远程服务器
[root@ansible ~]# ssh-copy-id -i ~/.ssh/id_rsa.pub [email protected]
[root@ansible ~]# ssh-copy-id -i ~/.ssh/id_rsa.pub [email protected]
[root@ansible ~]# ssh-copy-id -i ~/.ssh/id_rsa.pub [email protected]

3.能正常登录即可
[root@ansible ~]# ssh 192.168.81.220
Last login: Mon Jun  1 22:08:16 2020 from 192.168.81.1
[root@web ~]# exit
登出
Connection to 192.168.81.220 closed.
[root@ansible ~]# ssh 192.168.81.230
Last login: Mon Jun  1 22:10:56 2020 from 192.168.81.1
[root@nfs ~]# exit
登出
Connection to 192.168.81.230 closed.
[root@ansible ~]# ssh 192.168.81.240
Last login: Mon Jun  1 22:10:02 2020 from 192.168.81.1
[root@mysql ~]# exit
登出
Connection to 192.168.81.240 closed.
2.4.配置ansible主机清单
清单文件位于/etc/ansible/hosts
[root@ansible ~]# vim /etc/ansible/hosts
[web_clust]			//定义清单名
192.168.81.220			//主机ip
192.168.81.230
192.168.81.240
2.5.验证ansible是否可用
[root@ansible ~]# ansible web_clust -m ping
192.168.81.240 | SUCCESS => {
    "ansible_facts": {
        "discovered_interpreter_python": "/usr/bin/python"
    },
    "changed": false,
    "ping": "pong"
}
192.168.81.230 | SUCCESS => {
    "ansible_facts": {
        "discovered_interpreter_python": "/usr/bin/python"
    },
    "changed": false,
    "ping": "pong"
}
192.168.81.220 | SUCCESS => {
    "ansible_facts": {
        "discovered_interpreter_python": "/usr/bin/python"
    },
    "changed": false,
    "ping": "pong"
}
如果提示permission denied(publickey.gssapi-keyex…)表示ssh生成的公钥有问题
3.ansible命令语法格式
ansible 主机组模块名 -m 模块名 -a 指定利用模块执行的动作参数 批量执行操作动作

command模块和shell模块的区别
command模块只是调用一个命令,不能添加类似|、&&、;、>这种的符号,也不能调用命令别名,shell模块相当于提供一个shell环境,可以使用管道、定向、并且等这种逻辑性的符号
3.1.获取主机清单中所有服务器的主机名
[root@ansible ~]# ansible web_clust -m command -a "hostname"
192.168.81.230 | CHANGED | rc=0 >>
nfs
192.168.81.240 | CHANGED | rc=0 >>
backup
192.168.81.220 | CHANGED | rc=0 >>
web
3.2.获取主机清单中所有服务器的ip地址
[root@ansible ~]# ansible web_clust -m shell -a "ifconfig ens33 | awk '{if(NR==2){print $1}}'"
192.168.81.240 | CHANGED | rc=0 >>
        inet 192.168.81.240  netmask 255.255.255.0  broadcast 192.168.81.255
192.168.81.230 | CHANGED | rc=0 >>
        inet 192.168.81.230  netmask 255.255.255.0  broadcast 192.168.81.255
192.168.81.220 | CHANGED | rc=0 >>
        inet 192.168.81.220  netmask 255.255.255.0  broadcast 192.168.81.255
4ansible清单配置
inventory文件通常用于定义要管理主机的认证信息,例如ssh登录用户名、登录密码以及key相关信息。
清单位置文件位于/etc/ansible/hosts
可以配置主机、主机组
-
主机:
- 1.支持主机名通配以及正则表达式web[1:3].oldboy.com/192.168.81.2[2:4]
- 2.支持基于非标准的ssh端口,例如web1.oldboy.com:666
- 3.支持指定变量,可以对个别主机进行特殊配置
-
主机组:
- 1.支持嵌套组,例如[web_clust:children],web_clust模块下的所有主机都会被包含
- 2.指定变量,例如[web_clust:vars]在下面指定变量将会对所有web_clust模块中的所有主机生效
4.1.清单配置实例
添加三台主机至web_clust(升级版)
[root@ansible ~]# vim /etc/ansible/hosts
[web_clust]
192.168.81.220
192.168.81.230
192.168.81.240
添加三台主机至web_clust(升级版)
[root@ansible ~]# vim /etc/ansible/hosts
[web_clust]
192.168.81.2[2:4]0
4.2.清单配置实例2
添加三台主机并指定密码(初版)
[root@ansible ~]# vim /etc/ansible/hosts
[web_clust]
192.168.81.220	ansible_ssh_pass='redhat'
192.168.81.230	ansible_ssh_pass='redhat'
192.168.81.240	ansible_ssh_pass='redhat'
添加三台主机并指定密码(升级版)
[root@ansible ~]# vim /etc/ansible/hosts
[web_clust]
192.168.81.2[2:4]0

[web_clust:vars]
ansible_ssh_pass='redhat'
添加三台主机并指定密码(拆分版)
[root@ansible ~]# vim /etc/ansible/hosts
[web_clust]
192.168.81.220
192.168.81.230
192.168.81.240

[web_clust:vars]
ansible_ssh_pass='redhat'
5.ansible清单配置真实案例
5.1.环境概述
| 主机名 | IP | 角色 |
|---|---|---|
| ansible | 192.168.81.210 | ansible管理端 |
| web | 192.168.81.220 | web服务器 |
| nfs | 192.168.81.230 | nfs存储 |
| backup | 192.168.81.240 | mysql数据库 |
5.2.安装ansible
[root@ansible ~]# yum -y install ansible
[root@ansible ~]# ansible --version
ansible 2.9.9
5.3.配置主机清单
常用的配置是对应的主机做成对应的模块,然后将所有模块加入到主机组中
[root@ansible ~]# vim /etc/ansible/hosts
[web]
192.168.81.220
[nfs]
192.168.81.230
[mysql]
192.168.81.240

[web_clust:children]
web
nfs
backup
5.4.验证
既可以对整个组进行操作
[root@ansible ~]# ansible web_clust -m ping
192.168.81.230 | SUCCESS => {
    "ansible_facts": {
        "discovered_interpreter_python": "/usr/bin/python"
    },
    "changed": false,
    "ping": "pong"
}
192.168.81.240 | SUCCESS => {
    "ansible_facts": {
        "discovered_interpreter_python": "/usr/bin/python"
    },
    "changed": false,
    "ping": "pong"
}
192.168.81.220 | SUCCESS => {
    "ansible_facts": {
        "discovered_interpreter_python": "/usr/bin/python"
    },
    "changed": false,
    "ping": "pong"
}

也可以对单个模块进行操作
[root@ansible ~]# ansible web -m ping
192.168.81.220 | SUCCESS => {
    "ansible_facts": {
        "discovered_interpreter_python": "/usr/bin/python"
    },
    "changed": false,
    "ping": "pong"
}
[root@ansible ~]# ansible nfs -m ping
192.168.81.230 | SUCCESS => {
    "ansible_facts": {
        "discovered_interpreter_python": "/usr/bin/python"
    },
    "changed": false,
    "ping": "pong"
}
[root@ansible ~]# ansible mysql -m ping
192.168.81.240 | SUCCESS => {
    "ansible_facts": {
        "discovered_interpreter_python": "/usr/bin/python"
    },
    "changed": false,
    "ping": "pong"
}
6.主机清单常用变量
| 参数 | 用途 | 例子 |
|---|---|---|
| ansible_ssh_host | 定义hosts ssh地址 | ansible_ssh_host=192.168.81.220 |
| ansible_ssh_port | 定义hosts 端口号也可以在ip后面加:定义 | ansible_ssh_prrot=666 |
| ansibe_ssh_user | 定义hosts ssh认证用户 | ansible_ssh_user=user |
| ansible_ssh_pass | 定义hosts ssh认证密码 | ansible_ssh_pass=redhat |
| ansibe_sudo | 定义hosts sudo用户 | ansible_sudo=www |
| ansibe_sudo_pass | 定义hosts sudo用户的认证密码 | ansible_sudo_pass=redhat |
| ansibe_sudo_exe | 定义sudo命令的路径 | ansible_sudo_exe=/usr/bin/sudo |
| ansible_coneection | 定义hosts连接方式 | ansible_connection=local |
| ansible_ssh_private_key_file | 定义hosts私钥 | ansible_ssh_private_key_file=/root/key |
| ansible_ssh_shell_tyep | 定义hosts shell类型 | ansible_ssh_shell_type=bash |
| ansible_python_interpreter | 定义hosts任务执行python路径 | ansible_python_interpreter=/usr/bin/python2.6 |
| ansbile_*—interpreter | 定义hosts解析其他语言路径 | ansible_*-interpreter=/usr/bin/ruby(前后都是下划线) |
|
| ansible_ssh_shell_tyep | 定义hosts shell类型 | ansible_ssh_shell_type=bash |
| ansible_python_interpreter | 定义hosts任务执行python路径 | ansible_python_interpreter=/usr/bin/python2.6 |
| ansbile_—interpreter | 定义hosts解析其他语言路径 | ansible_-interpreter=/usr/bin/ruby(前后都是下划线) |