Hibernate入门第三讲——Hibernate的常见配置
在《Hibernate入门第一讲——Hibernate框架的快速入门》一讲中,我有讲到Hibernate的两个配置文件,今天就来详细地介绍这两个配置文件。在Hibernate中,我们主要使用两种配置文件:
- 核心配置文件——hibernate.cfg.xml(主要描述Hibernate的相关配置);
- 映射配置文件——xxx.hbm.xml。
映射配置文件
映射配置文件的名称是类名.hbm.xml,它一般放置在实体类所在的包下。这个配置文件的主要作用是建立表与类之间的映射关系。下面我来粗略地介绍一下该映射配置文件,当然你可以在以后的Hibernate学习中逐渐地补全一些细枝末节。
-
关于
- 该标签用来建立类与表的映射关系。
- 该标签中有如下这些属性:
- name属性:类的全路径
- table属性:映射到数据库里面的那个表的名称,如果表的名称与类名一致,那么table属性可以省略
- catalog属性:数据库名称,可以省略,如果省略,则参考核心配置文件中url路径中的库名称
-
关于
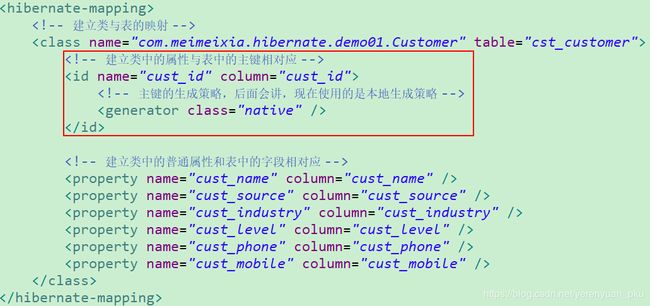
首先该标签必须存在,该标签用来建立类中的id属性与表中的主键的对应关系。该标签中有如下这些属性:- name:类中的属性名称
- column:表中的主键名称,类中的属性名和表中的字段名(主键名)如果一致,column可以省略
- length:字段长度,如果length忽略不写,且你的表是自动创建这种方案,那么length的默认长度是255(可以根据你的映射文件自动建表,如果现在数据库里面是没有表的,那么只要一运行咱们的程序,它就可以帮你把表建起来。如果你没有给定长度,那么它便会使用默认长度,像字符串的长度默认就是255)
- type:指定类型,你可以不用写,Hibernate会帮你自动转换
该标签中的
-
关于
- 该标签用来建立类中的普通属性与表中非主键字段的对应关系。
- 该标签中有如下这些属性:
- name:类中的属性名
- column:表中的字段名
- length:长度
- type:类型
- not-null:设置是否非空
- unique:设置唯一
关于Hibernate映射配置文件中的类型问题
对于type属性它的取值可以有三种:
- Java中的数据类型;
- Hibernate中的数据类型;
- SQL的数据类型。
可参考下表:
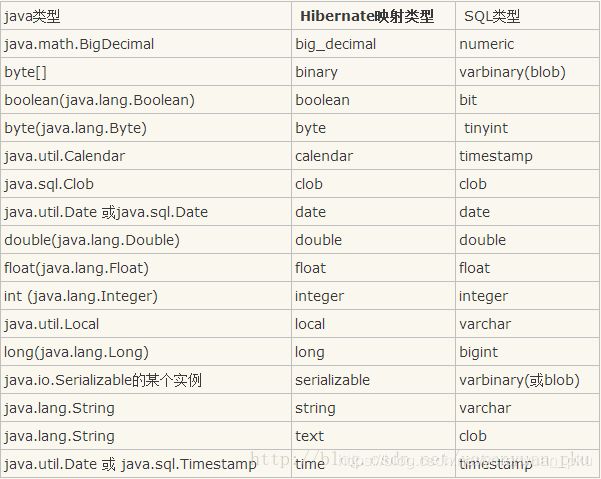
这样看来,我实体类(Customer.java)的映射配置文件可以写为:
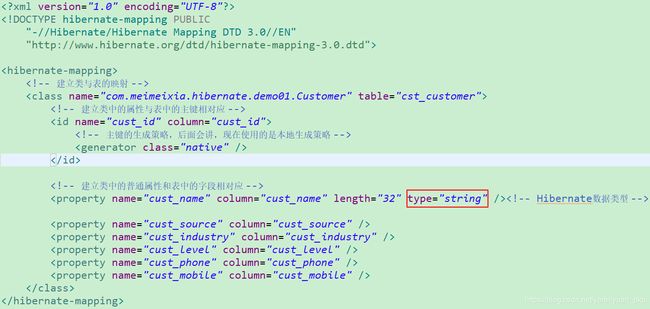
或者
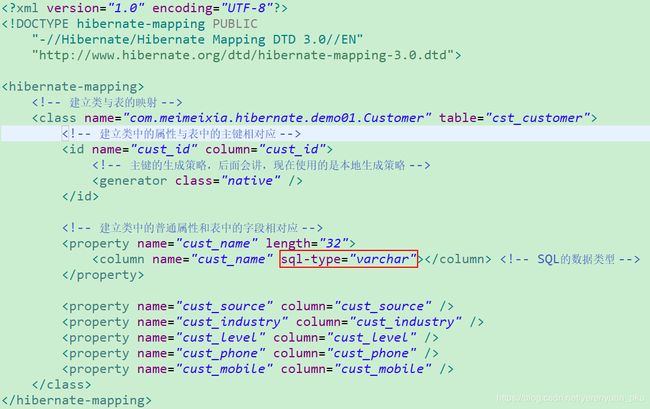
核心配置文件
Hibernate的核心配置文件,即hibernate.cfg.xml,主要用来描述Hibernate的相关配置。对于Hibernate的核心配置文件它有两种方式:
-
第一种方式:属性文件,即hibernate.properties,其内容应该是这样子的:
hibernate.connection.driver_class=com.mysql.jdbc.Driver
...
hibernate.show_sql=true
温馨提示:这种属性文件的方式不能引入映射文件,须手动编写代码加载映射文件。
-
第二种方式:XML文件,即hibernate.cfg.xml。
我们在开发中使用比较多的是hibernate.cfg.xml这种方式,原因是它的配置能力更强,并且易于修改。所以我主要讲解的是hibernate.cfg.xml这种配置方式。我就以《Hibernate入门第一讲——Hibernate框架的快速入门》一文案例中的hibernate.cfg.xml核心配置文件为例进行讲解。
<hibernate-configuration>
	<session-factory>


		<property name="hibernate.connection.driver_class">com.mysql.jdbc.Driverproperty>
		<property name="hibernate.connection.url">jdbc:mysql:///hibernate_demo01property>
		<property name="hibernate.connection.username">rootproperty>
		<property name="hibernate.connection.password">liayunproperty>


		<property name="hibernate.dialect">org.hibernate.dialect.MySQLDialectproperty>


		<property name="hibernate.show_sql">trueproperty>

		<property name="hibernate.format_sql">trueproperty>


		<mapping resource="com/meimeixia/hibernate/demo01/Customer.hbm.xml"/>
	session-factory>
hibernate-configuration>
可将以上配置文件的内容分为3部分来看待:
温馨提示:对于hibernate.cfg.xml配置文件中的要配置的内容可以参考project/etc/hibernate.properties文件中的配置。如果你查阅hibernate.properties文件,便可发现有如下内容:

那么hibernate.hbm2ddl.auto这个玩意到底是个什么东东呢?这儿我就来详解讲讲,先说结论:配置这个玩意之后,我们就可以进行表的自动创建。这个玩意有如下5个取值:
-
none:不使用Hibernate帮我们自动建表;
-
create:如果数据库中已经有了表,则删除原有表,重新创建;如果没有表,则新建表。即每次都会创建一个新的表,但不删除,一般在测试中使用。下面我来举例说明该属性值,要知道我也是在《Hibernate入门第一讲——Hibernate框架的快速入门》一文案例的基础上来讲解的。
首先在hibernate.cfg.xml配置文件中加入如下内容:<property name="hibernate.hbm2ddl.auto">createproperty>
然后执行单元测试类——HibernateDemo1.java中的demo1()方法:package com.meimeixia.hibernate.demo01; import org.hibernate.Session; import org.hibernate.SessionFactory; import org.hibernate.Transaction; import org.hibernate.cfg.Configuration; import org.junit.Test; /** * Hibernate的入门案例 * @author liayun * */ public class HibernateDemo1 { //保存用户的案例 @Test public void demo1() { //1. 加载Hibernate的核心配置文件 Configuration configuration = new Configuration().configure(); //如果在Hibernate的核心配置文件没有设置加载哪个映射文件,则可手动加载映射文件 //configuration.addResource("com/meimeixia/hibernate/demo01/Customer.hbm.xml"); //2. 创建SessionFactory对象,类似于JDBC中的连接池 SessionFactory sessionFactory = configuration.buildSessionFactory(); //3. 通过SessionFactory获取到Session对象,类似于JDBC中的Connection Session session = sessionFactory.openSession(); //4. 手动开启事务,(最好是手动开启事务) Transaction transaction = session.beginTransaction(); //5. 编写代码 Customer customer = new Customer(); customer.setCust_name("叶子"); session.save(customer);//保存一个用户 //6. 事务提交 transaction.commit(); //7. 释放资源 session.close(); sessionFactory.close(); } }此刻,hibernate_demo01数据库里面应该是有cst_customer表的,那么一旦运行以上测试方法,不出意外,我们就能在Eclipse的控制台上看到删表和建表的sql语句:
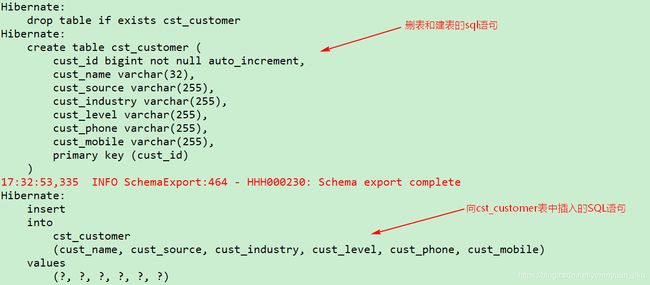
如果要是hibernate_demo01数据库里面没有cst_customer表,那么一旦运行以上测试方法,我们就只能在Eclipse的控制台上看到建表的sql语句了。 -
create-drop
如果数据库中已经有表,则删除原有表,再新建一个新表,然后执行操作,执行操作完毕之后再删除这个表(妈的,这可真是毛病啊!幸好,你以后不会用到它);如果没有表,则新建一个,使用完了删除该表,一般也是做测试时用。如果你要对create-drop该属性值进行测试,也很简单,可以像下面这样子做。
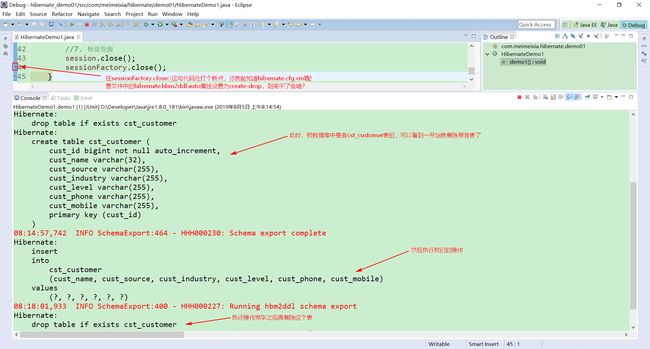
-
update
如果数据库中有表,则不创建,使用原有表;如果没有表则创建新表,并且如果映射不匹配,会自动更新表结构。下面我来说道说道该属性值,首先在hibernate.cfg.xml配置文件中加入如下内容:<property name="hibernate.hbm2ddl.auto">updateproperty>
然后在实体类——Customer.java中增加一个属性,比如说private String cust_sex。package com.meimeixia.hibernate.demo01; public class Customer { private Long cust_id; private String cust_name; private String cust_source; private String cust_industry; private String cust_level; private String cust_phone; private String cust_mobile; private String cust_sex; public Long getCust_id() { return cust_id; } public void setCust_id(Long cust_id) { this.cust_id = cust_id; } public String getCust_name() { return cust_name; } public void setCust_name(String cust_name) { this.cust_name = cust_name; } public String getCust_source() { return cust_source; } public void setCust_source(String cust_source) { this.cust_source = cust_source; } public String getCust_industry() { return cust_industry; } public void setCust_industry(String cust_industry) { this.cust_industry = cust_industry; } public String getCust_level() { return cust_level; } public void setCust_level(String cust_level) { this.cust_level = cust_level; } public String getCust_phone() { return cust_phone; } public void setCust_phone(String cust_phone) { this.cust_phone = cust_phone; } public String getCust_mobile() { return cust_mobile; } public void setCust_mobile(String cust_mobile) { this.cust_mobile = cust_mobile; } public String getCust_sex() { return cust_sex; } public void setCust_sex(String cust_sex) { this.cust_sex = cust_sex; } @Override public String toString() { return "Customer [cust_id=" + cust_id + ", cust_name=" + cust_name + ", cust_source=" + cust_source + ", cust_industry=" + cust_industry + ", cust_level=" + cust_level + ", cust_phone=" + cust_phone + ", cust_mobile=" + cust_mobile + "]"; } }接着修改实体类的映射配置文件(Customer.hbm.xml)的内容为:
<hibernate-mapping>

	<class name="com.meimeixia.hibernate.demo01.Customer" table="cst_customer">

		<id name="cust_id" column="cust_id">

			<generator class="native" />
		id>


		<property name="cust_name" column="cust_name" length="32" />
		<property name="cust_source" column="cust_source" />
		<property name="cust_industry" column="cust_industry" />
		<property name="cust_level" column="cust_level" />
		<property name="cust_phone" column="cust_phone" />
		<property name="cust_mobile" column="cust_mobile" />
		<property name="cust_sex" column="cust_sex" />
	class>
hibernate-mapping>
最后运行单元测试类(HibernateDemo1.java)中的demo1()方法:
package com.meimeixia.hibernate.demo01;

import org.hibernate.Session;
import org.hibernate.SessionFactory;
import org.hibernate.Transaction;
import org.hibernate.cfg.Configuration;
import org.junit.Test;

/**
 * Hibernate的入门案例
 * @author liayun
 *
 */
public class HibernateDemo1 {

	//保存用户的案例
	@Test
	public void demo1() {
		//1. 加载Hibernate的核心配置文件
		Configuration configuration = new Configuration().configure();
		//如果在Hibernate的核心配置文件没有设置加载哪个映射文件,则可手动加载映射文件
		//configuration.addResource("com/meimeixia/hibernate/demo01/Customer.hbm.xml");

		//2. 创建SessionFactory对象,类似于JDBC中的连接池
		SessionFactory sessionFactory = configuration.buildSessionFactory();

		//3. 通过SessionFactory获取到Session对象,类似于JDBC中的Connection
		Session session = sessionFactory.openSession();

		//4. 手动开启事务,(最好是手动开启事务)
		Transaction transaction = session.beginTransaction();

		//5. 编写代码
		Customer customer = new Customer();
		customer.setCust_name("叶美美");

		session.save(customer);//保存一个用户

		//6. 事务提交
		transaction.commit();

		//7. 释放资源
		session.close();
		sessionFactory.close();
	}

}
此时,我们只能在Eclipse的控制台上看到向cst_customer表中插入记录的sql语句了。

你这个时候再去查看cst_customer表可发现该表多出了一个cust_sex字段。

这就已说明了如果映射不匹配,会自动更新表结构。但是注意:只能添加,不能说我这个表里面有3个字段,我映射2个了,然后它就帮我删了,这是不行的! -
validate
如果没有表,不会创建表,只会使用数据库中原有的表。它的作用主要是校验映射关系和表结构。为了便于测试validate,先做这样子的准备工作:首先将实体类(Customer.java)中的cust_sex属性去掉,然后再在映射配置文件(Customer.hbm.xml)去掉该cust_sex属性和表中字段的映射,接着将hibernate.cfg.xml配置文件的hibernate.hbm2ddl.auto属性设置为create,最后运行单元测试类(HibernateDemo1.java)中的demo1()方法,这样数据库中就创建好了一个新的cst_customer表,并且已经插入一条记录。

这样,一切都是新的,会更方便我们测试validate。这里再次在实体类(Customer.java)中增加cust_sex属性,package com.meimeixia.hibernate.demo01; public class Customer { private Long cust_id; private String cust_name; private String cust_source; private String cust_industry; private String cust_level; private String cust_phone; private String cust_mobile; private String cust_sex; public Long getCust_id() { return cust_id; } public void setCust_id(Long cust_id) { this.cust_id = cust_id; } public String getCust_name() { return cust_name; } public void setCust_name(String cust_name) { this.cust_name = cust_name; } public String getCust_source() { return cust_source; } public void setCust_source(String cust_source) { this.cust_source = cust_source; } public String getCust_industry() { return cust_industry; } public void setCust_industry(String cust_industry) { this.cust_industry = cust_industry; } public String getCust_level() { return cust_level; } public void setCust_level(String cust_level) { this.cust_level = cust_level; } public String getCust_phone() { return cust_phone; } public void setCust_phone(String cust_phone) { this.cust_phone = cust_phone; } public String getCust_mobile() { return cust_mobile; } public void setCust_mobile(String cust_mobile) { this.cust_mobile = cust_mobile; } public String getCust_sex() { return cust_sex; } public void setCust_sex(String cust_sex) { this.cust_sex = cust_sex; } @Override public String toString() { return "Customer [cust_id=" + cust_id + ", cust_name=" + cust_name + ", cust_source=" + cust_source + ", cust_industry=" + cust_industry + ", cust_level=" + cust_level + ", cust_phone=" + cust_phone + ", cust_mobile=" + cust_mobile + "]"; } }接着在实体类的映射配置文件(Customer.hbm.xml)中加上该cust_sex属性和表中字段的映射。
<hibernate-mapping>

	<class name="com.meimeixia.hibernate.demo01.Customer" table="cst_customer">

		<id name="cust_id" column="cust_id">

			<generator class="native" />
		id>


		<property name="cust_name" column="cust_name" length="32" />
		<property name="cust_source" column="cust_source" />
		<property name="cust_industry" column="cust_industry" />
		<property name="cust_level" column="cust_level" />
		<property name="cust_phone" column="cust_phone" />
		<property name="cust_mobile" column="cust_mobile" />
		<property name="cust_sex" column="cust_sex" />
	class>
hibernate-mapping>
从上可以看出表结构与映射文件已经不匹配了。下面将hibernate.cfg.xml配置文件的hibernate.hbm2ddl.auto属性设置为validate。
<property name="hibernate.hbm2ddl.auto">validateproperty>
再次运行单元测试类(HibernateDemo1.java)中的demo1()方法,这时就能看到报如下异常:

也即说明了如果表结构与映射文件不匹配,会报异常。


