Android布局之---ConstraintLayout
Android布局之—ConstraintLayout
ConstraintLayout 是一个ViewGroup ,是一种约束布局,能以更灵活的方式定位内部控件的位置,减少嵌套,减少布局层级,优化性能(体现在一套布局若在Relativelayout,Linearlayout等作为根布局,会出现嵌套很多,层级很多的情况,但ConstraintLayout则不会出现这种情况),还有,虽然AndroidStudio支持在ConstraintLayout下可以拖动控件进行布局,但最好不要这么做,会让人对ConstraintLayout知其然而不知其所以然,当你手动去添加布局约束属性,而解决一个布局难题后,会让你更好的理解ConstraintLayout,及其属性以及属性间的组合。这都是经验,说起来都是泪啊!ConstraintLayout官方文档
AndroidStudio支持
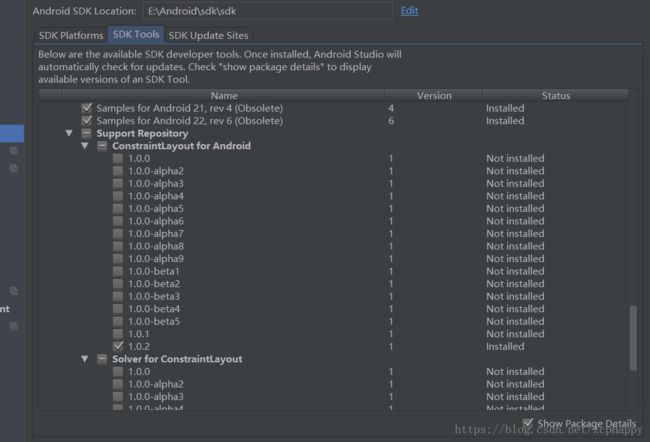
要想AndroidStudio支持Constraintlayout需要添加依赖
//我的环境是AndroidStudio3.1.2,支持库为1.0.2
compile 'com.android.support.constraint:constraint-layout:1.1.2'
并且在SDK Tools下的SupportRepository—Constraintlayout for android 要选中,这样在创建布局的时候,默认的根布局就是Constraintlayout了

Constraintlayout介绍
若想熟练的使用Constraintlayout,须对其属性了如指掌,才能做出任何布局。
相对定位:将控件的一侧约束到给定控件的一侧,分为水平方向约束和竖直方向约束。垂直轴是文字基线也可以做为约束条件
- 可用的约束列表
layout_constraintLeft_toLeftOf

layout_constraintLeft_toRightOf

layout_constraintRight_toLeftOf

layout_constraintRight_toRightOf

layout_constraintTop_toTopOf

layout_constraintTop_toBottomOf

layout_constraintBottom_toTopOf

layout_constraintBottom_toBottomOf

layout_constraintBaseline_toBaselineOf

layout_constraintStart_toEndOf

layout_constraintStart_toStartOf

layout_constraintEnd_toStartOf

layout_constraintEnd_toEndOf
例如:控件A需放在控件B的右侧:伪代码如下
<A
layout_constraintLeft_toRightOf="@+id/b"
/>
对上面(layout_constraintXXX_toRightXXX)的属性,记住一点即可:constraintXXX代表的是目标控件(上面的A)的属性(左上右下),toXXX代表的是依赖控件(上面的B)的属性(左上右下)

- 注意:对于Constrintlayout布局,若布局如下
<android.support.constraint.ConstraintLayout xmlns:android="http://schemas.android.com/apk/res/android"
    android:layout_width="match_parent"
    android:layout_height="wrap_content"
    android:background="@color/white_255"
    android:layout_marginBottom="@dimen/margin_14dp"
    android:id="@+id/cl_content"
    xmlns:app="http://schemas.android.com/apk/res-auto">

    <TextView
        android:id="@+id/tv_title"
        android:layout_width="wrap_content"
        android:layout_height="wrap_content"
        android:layout_marginTop="@dimen/margin_16dp"
        android:layout_marginLeft="@dimen/margin_14dp"
        android:layout_marginRight="@dimen/margin_28dp"
        android:text="标题"
        />
android.support.constraint.ConstraintLayout>
则以上margin属性是不起作用的,TextView找不到相互约束的对象,所以要设置以父布局为约束项,所以要加上一下属性
app:layout_constraintStart_toStartOf=“parent"
app:layout_constraintTop_toTopOf="parent"- 说一个使用技巧:如果我们想要一个横向布局,布局中只有两个控件,其中第一个控件wrap_content满足自身就行,另一个控件占满剩下的空间,我们第一时间想到的就是LinearLayout,但这样使用Constraintlayout的意义何在?其实Constraintlayout也能实现。

只要在B控件属性中加一下代码
//表示在控件A的右侧
app:layout_constraintLeft_toRightOf="@+id/iv_cover_logo"
//表示控件B的右侧和父布局的结尾对齐
app:layout_constraintEnd_toEndOf="parent"
//表示控件B的开始与控件A的结尾对齐
app:layout_constraintStart_toEndOf="@+id/iv_cover_logo"
还有最重要的一点是控件B的layout_width要设置为0,不能设置为match_parent。
- 边距margin,和平常布局的margin一样,若控件的可见行为GONE,这里可以使用
layout_goneMarginStart
layout_goneMarginEnd
layout_goneMarginLeft
layout_goneMarginTop
layout_goneMarginRight
layout_goneMarginBottom
居中定位和偏移
- ayout_constraintHorizontal_bias
layout_constraintVertical_bias
若一个控件想要居中显示,可以添加一下属性
app:layout_constraintLeft_toLeftOf="parent"
app:layout_constraintRight_toRightOf="parent"
偏移就是在居中情况下,向左向右 或向上向下的偏移百分比,控件加上如下属性
app:layout_constraintHorizontal_bias="0.3"
app:layout_constraintLeft_toLeftOf="parent"
app:layout_constraintRight_toRightOf="parent"
表示向左偏移30%,向右偏移30%,就设置成0.8即可
圆形定位:控件相对于另一个控件中心的位置
- layout_constraintCircle :引用另一个控件ID
layout_constraintCircleRadius :到其他控件中心的距离
layout_constraintCircleAngle :控件应该处于哪个角度(以度为单位,从0到360)
盗张图o-o

尺寸限制
- Constraintlayout上的尺寸限制,
自身定义最小和最大尺寸:
android:minWidth 设置布局的最小宽度
android:minHeight 设置布局的最小高度
android:maxWidth 设置布局的最大宽度
android:maxHeight 设置布局的最大高度- 内部控件尺寸限制:
使用特定宽高(文字值,例如123dp或Dimension)
使用WRAP_CONTENT:这将要求小部件计算自己的大小
使用0dp:相当于“ MATCH_CONSTRAINT”- 百分比
1.尺寸应设置为MATCH_CONSTRAINT(0dp)
2.默认值应设置为百分比app:layout_constraintWidth_default="percent" 或app:layout_constraintHeight_default="percent"
3.然后将layout_constraintWidth_percent 或layout_constraintHeight_percent属性设置为0到1之间的值- 宽高比:按一定的比例设置控件的宽高,其中宽或高最少有一个设置为0dp。
其中一个为0dp,这在设置Imageview上尤其有用,当我们加载一个后台API返回的Image时,可以显示正好的比例
//宽高比为9:5。
 "wrap_content"
 android:layout_height="0dp"
 app:layout_constraintDimensionRatio="9:5"
 android:scaleType="centerCrop"
 />
若宽高都设置为0dp,可以使用比率。在这种情况下,系统设置满足所有约束的最大尺寸并保持指定的纵横比。要根据另一个特定边的尺寸限制一个特定边,可以预先附加W,“或” H,分别约束宽度或高度。有一个条件必须满足,就是该控件的一条边必须有约束项
 <ImageView
 android:layout_width="0dp"
 android:layout_height="0dp"
 app:layout_constraintDimensionRatio="H,9:5"
 app:layout_constraintBottom_toBottomOf="parent"
 app:layout_constraintTop_toTopOf="parent"/>
按照9:5的比例设置按钮的高度,而按钮的宽度将匹配父项的约束。
链:一组控件通过双向连接链接在一起,则它们被视为链,链由链的第一个元素(链的“头部”)上设置的属性控制,水平链的头部是最左侧控件,垂直链的头部是最顶部控件。
- 设置链:本质上是两个相互约束的控件设置相反的依赖项,本且第一个控件设置链的样式,不设置的话为默认链式。如下:
id="@+id/tv1"
    android:layout_width="wrap_content"
    android:layout_height="wrap_content"
    android:background="@color/colorAccent"
    android:text="Hello World!"
    app:layout_constraintEnd_toStartOf="@+id/tv2"
    app:layout_constraintHorizontal_chainStyle="spread"
     />
 id="@+id/tv2"
    android:layout_width="wrap_content"
    android:layout_height="wrap_content"
    android:text="Hello World!"
    app:layout_constraintStart_toEndOf="@+id/tv1"
    />
最重要的就是这三条属性了
app:layout_constraintEnd_toStartOf="@+id/tv2"
//设置链的样式
app:layout_constraintHorizontal_chainStyle="spread"

app:layout_constraintStart_toEndOf="@+id/tv1"- 链的样式:链的第一个元素设置属性layout_constraintHorizontal_chainStyle或layout_constraintVertical_chainStyle,链的行为将根据指定的样式(默认值CHAIN_SPREAD)更改。
CHAIN_SPREAD - 元素将展开(默认样式)
加权链接CHAIN_SPREAD模式,如果设置了一些小部件MATCH_CONSTRAINT(0dp),它们将分割可用空间(还要设置app:layout_constraintHorizontal_weight="2"属性)
CHAIN_SPREAD_INSIDE - 类似,但链的端点不会分散
CHAIN_PACKED - 链条的元素将被包装在一起。然后,子项的水平或垂直偏差属性将影响打包元素的定位
Guideline:辅助对象,并不会显示在屏幕上,帮助我们能方便布局。
.support.constraint.Guideline
        android:layout_width="wrap_content"
        android:layout_height="wrap_content"
        android:id="@+id/gl"
        app:layout_constraintTop_toTopOf="parent"
        app:layout_constraintStart_toStartOf="parent"
        android:orientation="horizontal"
        app:layout_constraintGuide_begin="100dp"
        />
    "wrap_content"
        android:layout_height="wrap_content"
        android:text="GuidelineText"
        app:layout_constraintTop_toBottomOf="@+id/gl"/>
Guideline:有水平和横向两个方向,由orientation属性控制;三种不同的方式定位
layout_constraintGuide_begin(指定布局左侧或顶部的固定距离)
layout_constraintGuide_end(指定布局右侧或底部的固定距离)
layout_constraintGuide_percent(指定布局的宽度或高度的百分比)
优化器(Optimizer 1.1):Constraint Layout 1.1添加了几个新的优化,可以加快布局。优化作为单独的传递运行,并尝试减少布局视图所需的约束数。在ConstraintLayout下添加layout_optimizationLevel属性以启用优化。
.support.constraint.ConstraintLayout
    xmlns:android="http://schemas.android.com/apk/res/android"
    xmlns:app="http://schemas.android.com/apk/res-auto"
    xmlns:tools="http://schemas.android.com/tools"
    android:layout_width="match_parent"
    android:layout_height="match_parent"
    app:layout_optimizationLevel="chains|direct|standard"
    tools:context="com.example.zcpha.myapplication.MainActivity">
.support.constraint.ConstraintLayout>- 可优化项
none : 为应用任何优化(no optimizations are applied)
standard : 默认. 仅优化 直接和障碍约束(Optimize direct and barrier constraints only)
direct : 优化直接约束(optimize direct constraints)
barrier : 优化障碍限制(optimize barrier constraints)
chain : 优化链约束(实验)(optimize chain constraints (experimental))
dimensions :优化维度度量(实验),减少匹配约束元素的度量数量(optimize dimensions measures (experimental), reducing the number of measures of match constraints elements)
总结
其实ConstraintLayout和其他布局(RelativeLayout,LinearLayout等)都是一样的,也是很简单的,记住它的属性就可以了,若是真的有很难解决的布局问题,还可以在design页面拖动布局来解决嘛,然后在和text页面的属性相互验证,相信这样会明白很多东西。总之,加油吧!
