GitHubPages+Hexo搭建免费个人博客(windows平台)
文章前言
Welcome to Hexo! This is your very first post. Check documentation for more info. If you get any problems when using Hexo, you can find the answer in troubleshooting or you can ask me on GitHub.
文章概述
本篇文章记录,用github和hexo结合,搭建免费个人博客。
关键词简介
Hexo
Hexo 是一个基于 Nodejs 的静态博客网站生成器,作者是来自台湾的 Tommy Chen(https://zespia.tw/)。
博客搭建步骤
1、创建Github项目
github->create new respository->项目名称:xxx(用户名).github.io
2、安装 Git
3、安装 Nodejs(最好选择官方推荐版本进行下载安装)
4、安装 Hexo
hexo官网首页复制安装命令,打开git bash命令行工具,输入以下命令安装hexo:
$ npm install hexo-cli -g5、初始化本地博客
输入创建命令创建并初始化本地博客:
$ hexo init 用户名.github.io // 建议和创建仓库时使用同一个6、安装Next博客主题
注:经过上面步骤创建完本地博客之后,基本的博客系统就已经搭建好了,自带了 landscape 主题。
默认的主题此处不做介绍,这里我们使用Next主题,Next是 iissnan 在 GitHub 上开源的一个 Hexo 主题,主打简洁。
命令行工具定位到xxx.github.io本地目录,执行以下命令安装next主题:
$ git clone https://github.com/iissnan/hexo-theme-next themes/next下载好了next主题到themes目录下,做好备份,接下来我们就直接配置_config.yml主题文件。
7、修改配置文件相关配置,本地预览配置效果
注: 这里修改博客根目录xxx.github.io目录和主题目录themes/next目录下的_config.yml配置文件,一定注意,==属性和值之间一定要有一个空格==。
【站点配置文件】(博客根目录下的_config.yml)基本项修改
基础的配置,也就是必须要改动的配置如下:
title: xxx  # 博客的名字,也称站点名称
author: xxx # 作者名字
description: xxx # 对站点的描述,搜索引擎会抓取,可以自定义(这个还是加上比较好)
language: zh-Hans # 语言 简体中文
theme: next  # 配置主题
deploy: # 部署相关配置
    type: git # 使用 Git 提交
    repo: https://github.com/xxx/xxx.github.io.git # 就是存放博客的仓库地址
站点配置文件详细配置示例
# Hexo Configuration
## Docs: https://hexo.io/docs/configuration.html
## Source: https://github.com/hexojs/hexo/

# Site 这里的配置,哪项配置反映在哪里,可以参考我的博客
title: xxx # 博客的名字,也称站点名称
subtitle: xxx # 副标题
description: xxx # 对站点的描述,搜索引擎会抓取,可以自定义
author: xxx # 作者名字
language: zh-Hans # 语言 简体中文
timezone:  # 用默认的即可

# URL
# 这项暂时不需要配置,绑定域名后,要创建 sitemap.xml 时再配置该项
## If your site is put in a subdirectory, set url as 'http://yoursite.com/child' and root as '/child/'
url: # http://xxx.com
root: /
permalink: :year/:month/:day/:title/
permalink_defaults:

# Directory
# 目录,不要修改
source_dir: source
public_dir: public
tag_dir: tags
archive_dir: archives
category_dir: categories
code_dir: downloads/code
i18n_dir: :lang
skip_render:

# Writing
# 文章布局、写作格式的定义,不修改
new_post_name: :title.md # File name of new posts
default_layout: post
titlecase: false # Transform title into titlecase
external_link: true # Open external links in new tab
filename_case: 0
render_drafts: false
post_asset_folder: false
relative_link: false
future: true
highlight:
  enable: true
  line_number: true
  auto_detect: false
  tab_replace:

# Category & Tag
default_category: uncategorized
category_map:
tag_map:

# Date / Time format
# 日期 / 时间 格式,不要修改
## Hexo uses Moment.js to parse and display date
## You can customize the date format as defined in
## http://momentjs.com/docs/#/displaying/format/
date_format: MMM D YYYY
time_format: H:mm:ss

# Pagination
# 每页显示文章数,可以自定义
## Set per_page to 0 to disable pagination
per_page: 10
pagination_dir: page

# Extensions
# 配置站点所用主题和插件,这里将默认主题注释,修改为 next
## Plugins: https://hexo.io/plugins/
## Themes: https://hexo.io/themes/
theme: next
#theme: landscape

# 头像
# 注意:是 xxx.github.io/source 下的开始的相对路径,如果 source 文件夹下面没有 uploads 文件夹,那么新建一个。考虑到会博客中用很多图片,在 uploads 文件夹下请分好类,避免混乱
avatar: /uploads/images/avatar.jpg

# Deployment
# 本地博客部署到 github 上要配置这里
## Docs: https://hexo.io/docs/deployment.html
deploy:
  type: git # 使用 Git 提交
  repository: https://github.com/xxx/xxx.github.io.git # 就是存放博客的仓库地址
到这里,我们的博客基本可以在本地预览了,下面来看看效果:
输入以下命令,启动本地预览服务
$ hexo server根据命令行提示,在浏览器输入预览地址(http://localhost:4000/),查看效果。
【Next主题配置】
Next主题配置文件“,位于 xxx.github.io/themes/next 目录下,文件名为 _config.yml。
详细配置见next官网,一下是基本的配置:
# Set default keywords (Use a comma to separate)
# 设置关键字
keywords: "Android, DIY"

# Specify the date when the site was setup
# 设置博客开始时间
since: 2016

# When running the site in a subdirectory (e.g. domain.tld/blog), remove the leading slash (/archives -> archives)
# 设置菜单,就是[我的博客](http://diy-green.github.io)左侧那一列
menu:
  home: / # 在菜单上显示首页
  archives: /archives # 在菜单删显示全部
  categories: /categories # 在菜单上显示 分类
  tags: /tags # 在菜单上显示 标签
  about: /about # 在菜单上显示 关于
  #commonweal: /404.html

# Schemes
# 设置风格
#scheme: Muse
scheme: Mist # 紧凑风格,推荐使用
#scheme: Pisces # 双栏风格

# Automatically Excerpt. Not recommand.
# Please use  in the post to control excerpt accurately.
auto_excerpt:
  enable: true # 设置是否显示阅读全文,文章较多的话,有必要设置为 true
  length: 150

# 一些第三方服务设置,详情见参考官方介绍
# 这里说明:评论建议用网易云跟帖,多说评论系统将于2017-06-01停止使用。

# Code Highlight theme
# Available value:
#    normal | night | night eighties | night blue | night bright
# https://github.com/chriskempson/tomorrow-theme
#highlight_theme: normal
# 代码高亮主题
highlight_theme: night eighties

# 友情链接
links_title: Links
links:
  个人主页: http://cnlius.com/
提示:创建如分类、标签等索引,必须使用创建命令进行创建,否则报404,分类和
标签索引是由主题根据文章的头属性设置来自动维护。
8、MarkDown写博客文章注意
写*.md格式的博客文章,需要在文章头加类似如下设置,next主题才会自动对文章进行分类:
---
title: xxx # 文章标题
categories:
- Android # 一级分类
- Android Studio # 二级分类
tags:
- Android
- Android Studio
comments: true #开启评论
date: 2016-12-16
---
9、本地运行预览服务,查看效果
git bash定位到xxx.github.io文件夹根目录,输入以下命令启动本地预览服务器:
$ hexo s在浏览器中输入以下地址,查看效果:
http://localhost:4000
10、生成博客并部署到远程GitHubPage上
安装hexo自动部署工具
使用如下命令进行安装
$ npm install hexo-deployer-git --save发布到GitHubPages
方法一:依次执行如下命令来发布博客:
$ hexo clean #清除缓存 网页正常情况下可以忽略此条命令
$ hexo g #生成静态网页
$ hexo d #开始部署
方法二:也可一行命令完成发布:
$ hexo clean && hexo g && hexo d不同电脑上更新博客问题
我的方法是:将xxx.github.io文件夹内更改的文件备份到github上,在另一台电脑上下载更改的配置文件,
按以上步骤配置好本地博客环境,将下载的文件覆盖到xxx.github.io文件夹中即可。
将域名绑定到github pages 博客上
- 在xxx.github.io仓库根目录下添加一个CNAM文件,没有后缀名,里面内容为你的域名(如:test.com),不需要添加http/www等前缀。
ping xxx.github.io记录下IP地址:
$ ping username.github.io解析属性设置:
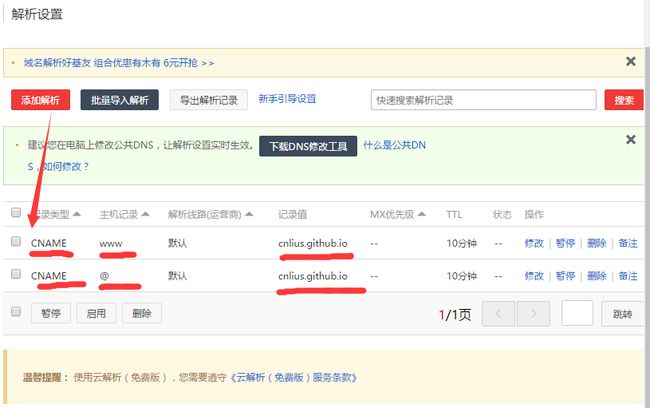
- 方法一:记录类型选CNAME类型,添加两个主机记录分别是@和www,记录值填写博客地址(推荐)。
- 方法二:记录类型选A类型,添加两个主机记录分别是@和www,记录值填写上一步ping出来的博客ip地址。
hexo部署博客常用命令
- 创建新的索引页面
案例1:创建分类页面
$ hexo new page categories案例2:创建标签页面
$ hexo new page "tags"More info: Writing
- 启动本地预览服务
$ hexo serverMore info: Server
- 生成静态网页文件
$ hexo generateMore info: Generating
- 部署到远程
$ hexo deployMore info: Deployment
- 一行命令实现博客的部署:clean,generate,deploy
$ hexo clean && hexo g && hexo d