海创软件组-20200614-Vue学习过程中的记录
海创软件组-20200613-Vue学习过程中的记录
- MacOS下的环境配置
- 通过Homebrew管理Node.js以及其他包
- Homebrew的安装
- Node.js的安装
- npm的下载源配置
- 通过npm下载前端开发框架工具Vue-cli(脚手架)
- 学习Vue途中遇到的问题及解决
- 1.Webstorm新建Vue项目时需要通过联网重新下载完整的模版
- 2.遍历对象数组的属性
- 3.element-ui中样式的修改
- 4.动态表格的绘制
MacOS下的环境配置
前端在MacOS中开发必不可少的软件包管理器Homebrew,它可以用来管理你mac上安装好的软件,以及一些AppStore中没有上架的软件,利用Homebrew可以让你的软件有着更合理的分布,便于平时的调试与管理。
通过Homebrew管理Node.js以及其他包
Homebrew的安装
	1.你首先需要安装CommandLineTools,请在Terminal中输入
	2.这里我们采用国人制作好的安装脚本来完成Homebrew的安装,省去很多不必要的麻烦
1.CommandLineTools
xcode-select --install
2.HomebrewCN
引自:https://gitee.com/cunkai/HomebrewCN
/bin/zsh -c "$(curl -fsSL https://gitee.com/cunkai/HomebrewCN/raw/master/Homebrew.sh)"
注1:在Max OS X 10.11(El Capitan)版本中,homebrew在安装软件时可能会碰到/usr/local目录不可写的权限问题。可以使用下面的命令修复:
sudo chown -R `whoami` /usr/local
注2:安装过程中会让你选择来自哪一方的下载源,务必选取中科大或者清华大学建立的源,这样让我们后续在安装一些文件的时候会有更理想的下载速度,否则极易导致安装失败,此外中科大和清华大学所建立的源也不是100%包含homebrew管理的所有的包,有的时候你可能还是需要去通过官方源来进行下载,下面就是重置下载源的方式。
# 重置brew.git:
cd "$(brew --repo)"
git remote set-url origin https://github.com/Homebrew/brew.git

# 重置homebrew-core.git:
cd "$(brew --repo)/Library/Taps/homebrew/homebrew-core"
git remote set-url origin https://github.com/Homebrew/homebrew-core.git
Node.js的安装
安装好Homebrew之后就可以通过它为我们安装包了,例如Node.js的安装
brew install node
安装成功之后通过 npm -v 的方式是可以检查到版本号的。
npm的下载源配置
官方提供的镜像源可能再国内是无法使用的,经常遇到连接失败的问题。
//设置镜像源为阿里源
npm set registry https://registry.npm.taobao.org/
//通过使用:
npm config list
//此时应该可以看到:
metrics-registry = "https://registry.npm.taobao.org/"
//证明你已经切换好了npm的下载镜像源
通过npm下载前端开发框架工具Vue-cli(脚手架)
注:你可能会需要切换为管理员才能全局安装vue-cli
sudo su
安装vue-cli(脚手架):
sudo npm install -g vue-cli
//安装后用
vue -V
//检查是否能够显示版本号。
学习Vue途中遇到的问题及解决
1.Webstorm新建Vue项目时需要通过联网重新下载完整的模版
在WebStorm新建的Vue项目会联网下载模版,之前我们以及配置好了npm的下载源,虽然说能够下载,但是新建一个项目需要再下载一次未免过于繁琐,我们可以从webpack中直接加载模版。

打开WebStorm右下角的终端,在命令行输入:
vue init webpack
这样就可以更快速的建立一个新的Vue项目。
2.遍历对象数组的属性
例如,为检测某一个页面的输入框或者选项框是否有内容,此时我们面对的不是一个,而是一组的输入框和选项框,我想到用的方法是for in 遍历,来识别他们绑定的v-model属性。
    export default {
        name: "Personal_info",
      data(){
          return{
            student:{
              name:'',
              stuid:'',
              sex:'',
              phone:'',
              email:'',
              classname:'',
              workid:'',
              employ:'',
              workaddress:'',
              wnatureid:'',
              windustryid:'',
            }
          }
      },
      methods:{
          submit_info(){

            //验证表单的完成情况
            //将data()中的对象student存入一个变量student中
            var student = this.student;
            //for in遍历来遍历student对象下的每一个属性,student[index]
            for (var index in student){
              console.log('student.'+ index + "=" + student[index])
              if (student[index] !== ''){
                  this.$router.push({path:'Graduation_cm'})
              }
              if (student[index] === ''){
              //如果遍历过程中发现student某个属性的属性值为初始设定的'',那么就跳出遍历,并提示
                alert('请输入正确的信息');
                break;
              }
            }

          },
      }
    }
3.element-ui中样式的修改
element-ui的样式修改,我本人比较习惯于外联样式,通过在外联样式设定el-xxx的样式,通过import在各个组件中使用。
样式修改不生效问题
element-ui本身提供了很多样式,但有时候想要稍微修改一下组件里面的样式,发现修改样式竟然不生效,此时需要用到一下两种方法
方法一:在设置样式属性时,前面加上>>>来修改样式,但是这个在使用scss的时候可能不会生效,那么此时就使用方法二
方法二:使用/deep/(记得用空格隔开)来修改样式,本质上和>>>是一样的,相当于别名
>>> .el-radio{
	.....
}
/deep/ .el-radio{
	.....
}
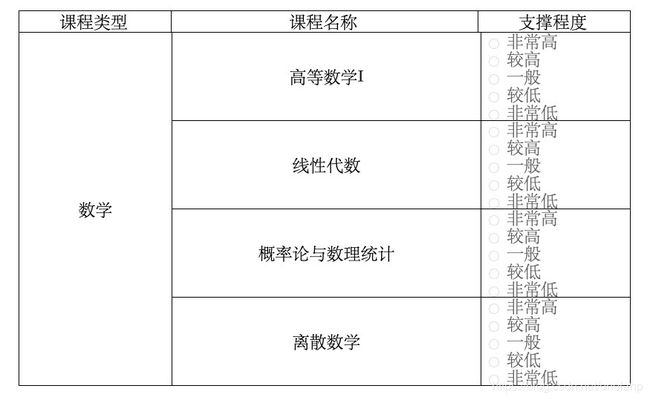
4.动态表格的绘制
<div id="Course_cm_form">
      <div id="Course_form_tital">
        <span>课程类型</span>
        <span>课程名称</span>
        <span>支撑程度</span>
      </div>
      <div id="Course_form_component">

        <ul v-for="(tableData,index) in tableDatas" :key="index">
          <div class="leftpart">
            <span>{{tableData.disname}}</span>
          </div>
          <li v-for="(i,index1) in tableData.another" :key="index1">
            <div class="rightpart" >
              <div class="subject">
                <div>
                  {{i.coursename}}
                </div>
              </div>
              <div class="selectlist">
                <el-radio-group v-model="i.ename">
                  <el-radio class="selectRadio" label="非常高">非常高</el-radio>
                  <el-radio class="selectRadio" label="较高">较高</el-radio>
                  <el-radio class="selectRadio" label="一般">一般</el-radio>
                  <el-radio class="selectRadio" label="较低">较低</el-radio>
                  <el-radio class="selectRadio" label="非常低">非常低</el-radio>
                </el-radio-group>
              </div>
            </div>
          </li>
        </ul>

      </div>
    </div>
设计这一个动态表格有一些值是需要固定的,例如课程名称中每一个的高度,这个将决定了左边课程类型的高度,整体ul是不设高的,而设定一个宽度,此外,课程类型的position:absolute,并且浮动在左侧,右侧部分内容则采用灵活一点的flex布局。
主要采用了一下的属性来布局
- display:flex
- position:absolute
- flex-direction: row
- flex-direction: column
- float:left
- float:right
部分Css的代码:
#Course_cm_form{
  margin: 50px 68px;
}
#Course_form_tital{
  border-top: 1px solid;
  border-left: 1px solid;
  border-right: 1px solid;
}
#Course_form_tital > span{
  display: inline-block;
  font-family: "Songti SC";
  font-size: 23px;
  /*文本居中*/
  text-align: center;
  font-weight: lighter;
  width: 200px;
  border-left:1px solid;
  /*垂直居中设置line-heigh和height一致即可*/
  line-height: 28px;
  height: 28px;
}
#Course_form_tital>span:first-child{
  border-left: none;
}
#Course_form_tital > span:nth-child(2){
  width: 408px;
  /*文本居中*/
}
#Course_form_component{
  border-left: 1px solid;
  border-bottom: 1px solid;
  border-right: 1px solid;
  font-family: "Songti SC";
  font-size: 23px;
  font-weight: lighter;
}
#Course_form_component>ul{
  position: relative;
  width: 100%;
}
.leftpart{
  position: absolute;
  width:205px ;
  height: 100%;
  border-top: 1px solid;
  border-right: 1px solid;
  text-align: center;
  display: flex;
  justify-content: center;
  align-items: center;
  float: left;
}
.rightpart{
  float: right;
  display: flex;
  flex-direction: row;
  height: 100%;
}
.subject{
  width:415px ;
  height: 119px;
  border-top: 1px solid;
  border-right: 1px solid;
  text-align: center;
  line-height: 119px;
}
.selectlist{
  border-top: 1px solid;
  float: right;
  width: 200px;
  display: flex;
  flex-direction: column;
}
.el-radio-group{
  display: flex;
  flex-direction: column;
  margin:0 10px;
}
以上是近两周来学习中的对我而言比较重要的方法和技巧,欢迎各位读者留下建议,我会十分感激您能指正我的错误之处,我会虚心学习。
