邮件服务器postfix的安装和简单的使用
本文只介绍postfix最基本的安装和调用Java代码来发送邮件的功能。
1. 安装postfix
在Ubuntu服务器上安装:
sudo apt-get update

sudo apt-get install postfix -y
安装过程中会让你选择一种Postfix配置类型。一般情况下,我们需要选择第二种类型:Internet Site。
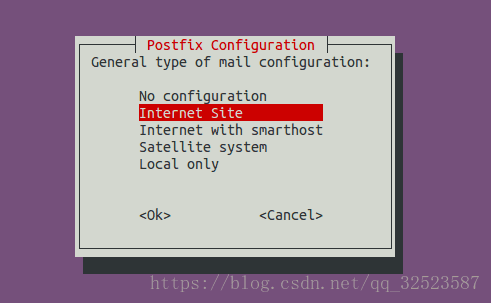
No configuration 表示不要做任何配置;
Internet Site 表示直接使用本地SMTP服务器发送和接收邮件;
Internet with smarthost 表示使用本地SMTP服务器接收邮件,但发送邮件时不直接使用本地SMTP服务器,而是使用第三方smart host来转发邮件;
Satellite system 表示邮件的发送和接收都是由第三方smarthost来完成。
Local only 表示邮件只能在本机用户之间发送和接收。
在第二个页面System mail name中填入你的域名,也就是邮箱地址@符号后面的域名,比如,我的邮箱地址是[email protected],所以我填的是linuxdashen.com。当发件人的域名地址没有指定时,Postfix会自动将这个域名添加到发件人的地址中。
2,发送测试邮件
echo "test email" | sendmail [email protected]3,使用mail客户端来发送邮件
安装邮箱客户端
sudo apt-get install mailutils发送命令:
mail [email protected]输入抄送人、标题、正文
user@mail:~$ mail [email protected]
Cc:
Subject: 2nd test email
I'm sending this email using the mail program.
输入主题和正文后,按Ctrl+D来发送邮件。
4,使用Java代码来调用postfix发邮件
下载jar包:javax.mail.jar
http://mvnrepository.com/artifact/com.sun.mail/javax.mail/1.5.6
代码如下:
public class EmailPush {
	public static Properties props;
	public static AtomicInteger a = new AtomicInteger(0);

	static {
		System.setProperty("mail.mime.splitlongparameters", "false");
		props = new Properties();
		props.put("mail.smtp.host", "192.168.10.13");
		props.put("mail.smtp.port", "25");
		props.put("mail.smtp.auth", "false");
	}

	public  static void sendMail(int tenantid, String mailMsg,String to,String subject){
        Session session = Session.getDefaultInstance(props);
        try {
            Message message = new MimeMessage(session);
            message.setFrom(new InternetAddress("[email protected]"));
            message.addRecipient(Message.RecipientType.TO, new InternetAddress(to));
            message.setSubject(subject);
            message.setText(mailMsg);

            Transport.send(message);
            System.out.println("发送完毕");
        } catch (AddressException e) {
        	e.printStackTrace();
        } catch (MessagingException e) {
        	e.printStackTrace();
        }

    }

/**
	 * 发送带附件的邮件
	 * @param tenantid
	 * @param mailMsg			邮件正文
	 * @param to				收件人
	 * @param subject			邮件标题
	 * @param bfile				附件的内容(byte[]格式)
	 * @param fileName			附件的名称	例如: 1.zip
	 * @param suffix			附件的后缀	例如: zip
	 */
	public  static void sendMail(int tenantid, String mailMsg,String to,String subject, byte[] bfile, String fileName, String suffix){
		String uuid = UUID.randomUUID().toString() + "." + suffix;
		File file = getFile(bfile, "email-file", uuid);

        Session session = Session.getDefaultInstance(props);
        try {
            Message message = new MimeMessage(session);

            // 6. 创建文本"节点"
            MimeBodyPart text = new MimeBodyPart();
            // 这里添加图片的方式是将整个图片包含到邮件内容中, 实际上也可以以 http 链接的形式添加网络图片
            text.setText(mailMsg);
//            text.setContent(mailMsg, "text/plain;charset=UTF-8");

	          // 创建附件"节点"
	          MimeBodyPart attachment = new MimeBodyPart();
	          // 读取本地文件
	          DataHandler dh2 = new DataHandler(new FileDataSource(file));
	          // 将附件数据添加到"节点"
	          attachment.setDataHandler(dh2);
	          // 设置附件的文件名(需要编码)
			  attachment.setFileName(MimeUtility.encodeText(fileName));

	          MimeMultipart mm = new MimeMultipart();
	          mm.addBodyPart(text);
	          mm.addBodyPart(attachment);     // 如果有多个附件,可以创建多个多次添加
	          mm.setSubType("mixed");         // 混合关系

	          // 11. 设置整个邮件的关系(将最终的混合"节点"作为邮件的内容添加到邮件对象)"text/html;charset=UTF-8"
	          message.setContent(mm);

            message.setFrom(new InternetAddress("[email protected]"));
            message.addRecipient(Message.RecipientType.TO, new InternetAddress(to));
            message.setSubject(subject);
//            message.setText(mailMsg);
            Transport.send(message);
            System.out.println("发送完毕");

            //删除本地文件
	          if (file.exists()) {
				file.delete();
			}
        } catch (AddressException e) {
            e.printStackTrace();
        } catch (MessagingException e) {
        	e.printStackTrace();
        } catch (UnsupportedEncodingException e) {
        	e.printStackTrace();
		}


    }

	/**
     * 根据byte数组,生成文件
     */
    public static File getFile(byte[] bfile, String filePath,String fileName) {
        BufferedOutputStream bos = null;
        FileOutputStream fos = null;
        File file = null;
        try {
            File dir = new File(filePath);
            if(!dir.exists()&&dir.isDirectory()){//判断文件目录是否存在
                dir.mkdirs();
            }
            file = new File(filePath+"\\"+fileName);
            fos = new FileOutputStream(file);
            bos = new BufferedOutputStream(fos);
            bos.write(bfile);
        } catch (Exception e) {
            e.printStackTrace();
        } finally {
            if (bos != null) {
                try {
                    bos.close();
                } catch (IOException e1) {
                    e1.printStackTrace();
                }
            }
            if (fos != null) {
                try {
                    fos.close();
                } catch (IOException e1) {
                    e1.printStackTrace();
                }
            }
        }
		return file;
    }


    public static void main(String[] args){

//    	sendMail(1, "this is one for you!", "[email protected]", "tips", Util.getBytes("src/卷帘门2_monthly_record_Jul_2018.zip"), "卷帘门2_monthly_record_Jul_2018.zip", "zip");
    	sendMail(1, "rrr", "[email protected]", "RRR");
	}
}
重载了sendMail方法,一个是普通的文本邮件,另一个是带有附件的邮件。
运行后,报出以下错误:
javax.mail.SendFailedException: Invalid Addresses;
  nested exception is:
	com.sun.mail.smtp.SMTPAddressFailedException: 454 4.7.1 : Relay access denied

	at com.sun.mail.smtp.SMTPTransport.rcptTo(SMTPTransport.java:1950)
	at com.sun.mail.smtp.SMTPTransport.sendMessage(SMTPTransport.java:1195)
	at javax.mail.Transport.send0(Transport.java:254)
	at javax.mail.Transport.send(Transport.java:124)
	at com.zhuyun.email.EmailPush.sendMail(EmailPush.java:52)
	at com.zhuyun.email.EmailPush.main(EmailPush.java:187)
Caused by: com.sun.mail.smtp.SMTPAddressFailedException: 454 4.7.1 : Relay access denied

	at com.sun.mail.smtp.SMTPTransport.rcptTo(SMTPTransport.java:1850)
	... 5 more
解决方案:
vim /etc/postfix/main.cf
将mynetworks改成0.0.0.0/0, 再重启postfix
service postfix restart
再运行代码,就可以发送邮件成功了。