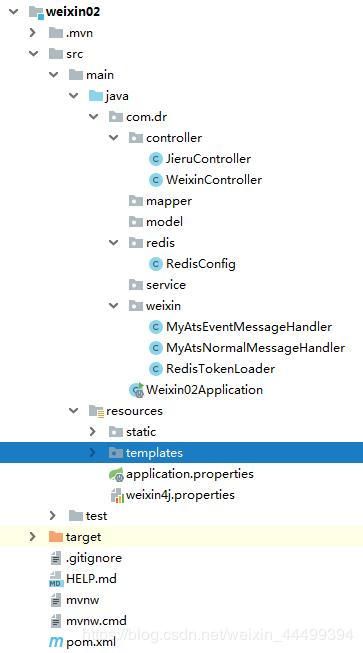
关于把项目接入到微信小程序中 springboot
首先就是项目结构图,下面的文件除了config.ini文件没有在项目中,其余的都在
接下来是用到的两个测试工具。一个是natapp_windows_amd64_2_3_8其中有config.ini的文件和natapp.exe.。另一个是redis数据库
config.ini文件
#将本文件放置于natapp同级目录 程序将读取 [default] 段
#在命令行参数模式如 natapp -authtoken=xxx 等相同参数将会覆盖掉此配置
#命令行参数 -config= 可以指定任意config.ini文件
[default]
authtoken= 0c4fdbb2faafd007    #对应一条隧道的authtoken
clienttoken=                    #对应客户端的clienttoken,将会忽略authtoken,若无请留空,
log=none                        #log 日志文件,可指定本地文件, none=不做记录,stdout=直接屏幕输出 ,默认为none
loglevel=ERROR                  #日志等级 DEBUG, INFO, WARNING, ERROR 默认为 DEBUG
http_proxy=                     #代理设置 如 http://10.123.10.10:3128 非代理上网用户请务必留空
authtoken= 0c4fdbb2faafd007 #对应一条隧道的authtoken。这个使用的是内网穿透工具所获得的永久唯一隧道,根据支付宝实名认证获得
redis数据库的开启服务操作
然后开启idear的服务,在浏览器输入localhost测试没有内网穿透的所提供的访问路径,成功后,在根据内网穿透所提供的访问路径来访问测试项目 例如http://epqt95.natappfree.cc,这个所代表的的就相当于localhost。然后我们把想接入的接口放在后面访问。
application.propertites文件
server.port=80
server.servlet.context-path=/

#配置数据库连接
spring.datasource.username=root
spring.datasource.password=123
spring.datasource.url=jdbc:mysql://localhost:3306/112?useUnicode=true&characterEncoding=utf8&serverTimezone=GMT%2B8&useSSL=false
spring.datasource.driver-class-name=com.mysql.cj.jdbc.Driver


#指定HttpServletRequest的属性是否可以覆盖controller的model的同名项
spring.freemarker.allow-request-override=false
#req访问request
spring.freemarker.request-context-attribute=req
#后缀名freemarker默认后缀为.ftl,当然你也可以改成自己习惯的.html
spring.freemarker.suffix=.ftl
#设置响应的内容类型
spring.freemarker.content-type=text/html;charset=utf-8
#是否允许mvc使用freemarker
spring.freemarker.enabled=true
#是否开启template caching
spring.freemarker.cache=false
#设定模板的加载路径,多个以逗号分隔,默认: [“classpath:/templates/”]
spring.freemarker.template-loader-path=classpath:/templates/
#设定Template的编码
spring.freemarker.charset=UTF-8
#数字格式化,无小数点
spring.freemarker.number_format=0.##


#配置redis
# REDIS (RedisProperties)
# Redis数据库索引(默认为0)
spring.redis.database=0
# Redis服务器地址
spring.redis.host=192.168.93.128
# Redis服务器连接端口
spring.redis.port=6379
# 连接池最大连接数(使用负值表示没有限制)
spring.redis.jedis.pool.max-active=8
# 连接池最大阻塞等待时间(使用负值表示没有限制)
spring.redis.jedis.pool.max-wait=-1
# 连接池中的最大空闲连接
spring.redis.lettuce.pool.max-idle=8
# 连接池中的最小空闲连接
spring.redis.jedis.pool.min-idle=0
# 连接超时时间(毫秒)
spring.redis.timeout=10000
其中的redis数据路索引所选择的是要操作的数据库,redis服务器地址就是redis的ip地址,用ifconfig获取
weixin4j.propertites文件
#微信SDK配置文件
#读取规则:优先读取System.getProperty()
#再从weixin4j.properties读取,key
#如果System.getProperty()与weixin4j.properties都没设置,则默认未NULL

#开发者调试设置
weixin4j.debug=true
#公众号Token
weixin4j.token=mytoken

#公众号原始ID
weixin4j.oauth.originalid=gh_3da3508f664d
#开发者第三方用户唯一凭证
weixin4j.oauth.appid=wx277b9c0aa8d498d8
#开发者第三方用户唯一凭证密钥
weixin4j.oauth.secret=04cb1cd3c08b156b9b4d56b8353cf086


#消息加密方式 0:明文模式(默认), 1:兼容模式, 2:安全模式(推荐)
weixin4j.oauth.encodingtype=0
#消息加密密钥(43位字符组成A-Za-z0-9)
weixin4j.oauth.encodingaeskey=0123456789abcedfghijklmnopqrstuvwxyzZXCVBNM
#网页安全授权URL
weixin4j.oauth.url=

#公众平台接口域名
#通用域名(api.weixin.qq.com),使用该域名将访问官方指定就近的接入点;
#上海域名(sh.api.weixin.qq.com),使用该域名将访问上海的接入点;
#深圳域名(sz.api.weixin.qq.com),使用该域名将访问深圳的接入点;
#香港域名(hk.api.weixin.qq.com),使用该域名将访问香港的接入点。
weixin4j.api.domain=api.weixin.qq.com

#微信支付_商户ID
weixin4j.pay.partner.id=
#微信支付_商户密钥
weixin4j.pay.partner.key=
#微信支付_通知URL
weixin4j.pay.notify_url=

#连接超时设置
weixin4j.http.connectionTimeout=25000
#请求超时设置
weixin4j.http.readTimeout=25000
#证书路径
weixin4j.http.cert.path=
weixin4j.http.cert.secret=

#默认消息处理函数
#weixin4j.handler=org.weixin4j.spi.DefaultMessageHandler
weixin4j.message.handler.normal=com.dr.weixin.MyAtsNormalMessageHandler
weixin4j.message.handler.event=com.dr.weixin.MyAtsEventMessageHandler
其中的公众号原始id就是根据https://mp.weixin.qq.com/debug/cgi-bin/sandboxinfo?action=showinfo&t=sandbox/index这个地址进入公众号测试端所获得的的右上角的微信号,开发者第三方用户唯一凭证就是测试号信息的appid。开发者第三方用户唯一凭证密钥就是测试信息的appsecret,这些东西弄好无误,基本就好了。
下面的默认消息处理函数中的后两个,一个是消息处理,weixin包下面的一个类,一个是事件处理,weixin包下面的另一个类。
MyAtsNormalMessageHandler文件
package com.dr.weixin;

import org.springframework.stereotype.Component;
import org.weixin4j.model.message.OutputMessage;
import org.weixin4j.model.message.event.*;
import org.weixin4j.model.message.output.TextOutputMessage;
import org.weixin4j.spi.IEventMessageHandler;

/**
 * 自定义事件消息处理器
 *
 * @author yangqisheng
 */
@Component
public class MyAtsEventMessageHandler implements IEventMessageHandler {

    @Override
    public OutputMessage subscribe(SubscribeEventMessage msg) {
        TextOutputMessage out = new TextOutputMessage();
        out.setContent("感谢您的关注!");
        return out;
    }

    @Override
    public OutputMessage unSubscribe(UnSubscribeEventMessage msg) {
        //取消关注
        return null;
    }

    @Override
    public OutputMessage qrsceneSubscribe(QrsceneSubscribeEventMessage msg) {
        TextOutputMessage out = new TextOutputMessage();
        out.setContent("感谢您的关注!,来源:" + msg.getEventKey());
        return out;
    }

    @Override
    public OutputMessage qrsceneScan(QrsceneScanEventMessage msg) {
        TextOutputMessage out = new TextOutputMessage();
        out.setContent("你的消息已经收到!A");
        return out;
    }

    @Override
    public OutputMessage location(LocationEventMessage msg) {
        TextOutputMessage out = new TextOutputMessage();
        out.setContent("你的消息已经收到!B");
        return out;
    }

    @Override
    public OutputMessage click(ClickEventMessage msg) {
        TextOutputMessage out = new TextOutputMessage();
        out.setContent("点击了菜单!C");
        return out;
    }

    @Override
    public OutputMessage view(ViewEventMessage msg) {
        TextOutputMessage out = new TextOutputMessage();
        out.setContent("点击了链接!D");
        return out;
    }

    @Override
    public OutputMessage scanCodePush(ScanCodePushEventMessage msg) {
        TextOutputMessage out = new TextOutputMessage();
        out.setContent("扫码!E");
        return out;
    }

    @Override
    public OutputMessage scanCodeWaitMsg(ScanCodeWaitMsgEventMessage msg) {
        TextOutputMessage out = new TextOutputMessage();
        out.setContent("扫码等待中!F");
        return out;
    }

    @Override
    public OutputMessage picSysPhoto(PicSysPhotoEventMessage msg) {
        TextOutputMessage out = new TextOutputMessage();
        out.setContent("发起拍照!G");
        return out;
    }

    @Override
    public OutputMessage picPhotoOrAlbum(PicPhotoOrAlbumEventMessage msg) {
        TextOutputMessage out = new TextOutputMessage();
        out.setContent("选择相册!H");
        return out;
    }

    @Override
    public OutputMessage picWeixin(PicWeixinEventMessage msg) {
        TextOutputMessage out = new TextOutputMessage();
        out.setContent("上次图片!I");
        return out;
    }

    @Override
    public OutputMessage locationSelect(LocationSelectEventMessage msg) {
        TextOutputMessage out = new TextOutputMessage();
        out.setContent("选择地理位置!J");
        return out;
    }

}
MyAtsEventMessageHandler文件
package com.dr.weixin;

import org.slf4j.Logger;
import org.slf4j.LoggerFactory;
import org.springframework.stereotype.Component;
import org.weixin4j.model.message.OutputMessage;
import org.weixin4j.model.message.normal.*;
import org.weixin4j.model.message.output.TextOutputMessage;
import org.weixin4j.spi.INormalMessageHandler;

/**
 * 自定义普通消息处理器
 *
 * @author yangqisheng
 */
@Component
public class MyAtsNormalMessageHandler implements INormalMessageHandler {

    protected final Logger LOG = LoggerFactory.getLogger(MyAtsNormalMessageHandler.class);

    @Override
    public OutputMessage textTypeMsg(TextInputMessage msg) {
        LOG.debug("文本消息:" + msg.getContent());
        TextOutputMessage out = new TextOutputMessage();
        String str=msg.getContent();

        if(str.equals("1")){
            out.setContent("本期谈谈明日之后");
        }else if(str.equals("2")){
            out.setContent("请发送亚瑟的出装");
        }else if(str.equals("3")){
            out.setContent("说说那把步枪的威力最高");
        }else if(str.equals("4")){
            out.setContent("1:游戏 2:策略 3:性价比");
        }else {
            out.setContent("本期还没有收录答案");
        }


        //if
        return out;
    }

    @Override
    public OutputMessage imageTypeMsg(ImageInputMessage msg) {
        TextOutputMessage out = new TextOutputMessage();
        out.setContent("你的消息已经收到!11");

        return out;
    }

    @Override
    public OutputMessage voiceTypeMsg(VoiceInputMessage msg) {

        TextOutputMessage out = new TextOutputMessage();

        out.setContent("你的消息已经收到!22");
        return out;
    }

    @Override
    public OutputMessage videoTypeMsg(VideoInputMessage msg) {
        TextOutputMessage out = new TextOutputMessage();
        out.setContent("你的消息已经收到!33");
        return out;
    }

    @Override
    public OutputMessage shortvideoTypeMsg(ShortVideoInputMessage msg) {
        TextOutputMessage out = new TextOutputMessage();
        out.setContent("你的消息已经收到!44");
        return out;
    }

    @Override
    public OutputMessage locationTypeMsg(LocationInputMessage msg) {
        TextOutputMessage out = new TextOutputMessage();
        out.setContent("你的消息已经收到!55");
        return out;
    }

    @Override
    public OutputMessage linkTypeMsg(LinkInputMessage msg) {
        TextOutputMessage out = new TextOutputMessage();
        out.setContent("你的消息已经收到!66");
        return out;
    }

}
RedisTokenLoad文件
package com.dr.weixin;

import com.alibaba.fastjson.JSON;
import org.slf4j.Logger;
import org.slf4j.LoggerFactory;
import org.springframework.beans.factory.annotation.Autowired;
import org.springframework.data.redis.core.StringRedisTemplate;
import org.springframework.stereotype.Component;
import org.weixin4j.Configuration;
import org.weixin4j.loader.ITokenLoader;
import org.weixin4j.model.base.Token;

import java.util.concurrent.TimeUnit;

@Component
public class RedisTokenLoader implements ITokenLoader {

    private static final Logger LOG = LoggerFactory.getLogger(RedisTokenLoader.class);

    private final String ACCESS_TOKEN_KEY = "ats_wx100000000001";//对应微信服务器提供的访问令牌

    @Autowired
    private StringRedisTemplate stringRedisTemplate;

    private String appid;

    public RedisTokenLoader() {
        this.appid = Configuration.getOAuthAppId();//从配置文件中读取
    }

    @Override
    public Token get() {
        String accessToken = stringRedisTemplate.opsForValue().get(ACCESS_TOKEN_KEY);
        LOG.info("wechat access_token:{}", accessToken);
        return JSON.parseObject(accessToken, Token.class);
    }

    @Override
    public void refresh(Token token) {
        LOG.info("refresh wechat access_token:{}", token.toString());
        String accessToken = JSON.toJSONString(token);
        //ticket.getExpires_in() - 600L,是为了提前10分钟过期
        stringRedisTemplate.opsForValue().set(ACCESS_TOKEN_KEY, accessToken, token.getExpires_in() - 600L, TimeUnit.SECONDS);
    }
}
RedisConfig
package com.dr.redis;


import org.springframework.cache.annotation.CachingConfigurerSupport;
import org.springframework.cache.annotation.EnableCaching;
import org.springframework.context.annotation.Bean;
import org.springframework.context.annotation.Configuration;
import org.springframework.data.redis.connection.RedisConnectionFactory;
import org.springframework.data.redis.core.StringRedisTemplate;

/**
 * redis配置类
 **/
@Configuration
@EnableCaching//开启注解式缓存
//继承CachingConfigurerSupport,为了自定义生成KEY的策略。可以不继承。
public class RedisConfig extends CachingConfigurerSupport {

    @Bean
    public StringRedisTemplate stringRedisTemplate(RedisConnectionFactory factory) {
        StringRedisTemplate stringRedisTemplate = new StringRedisTemplate();
        stringRedisTemplate.setConnectionFactory(factory);
        return stringRedisTemplate;
    }

}
WeixinController文件
package com.dr.controller;


import lombok.extern.slf4j.Slf4j;
import org.springframework.beans.factory.annotation.Autowired;
import org.springframework.stereotype.Controller;
import org.springframework.ui.Model;
import org.springframework.web.bind.annotation.RequestBody;
import org.springframework.web.bind.annotation.RequestMapping;
import org.springframework.web.bind.annotation.ResponseBody;
import org.weixin4j.Configuration;
import org.weixin4j.Weixin;
import org.weixin4j.WeixinBuilder;
import org.weixin4j.component.MenuComponent;
import org.weixin4j.factory.WeixinFactory;
import org.weixin4j.factory.defaults.DefaultWeixinFactory;
import org.weixin4j.http.HttpsClient;
import org.weixin4j.model.base.Token;
import org.weixin4j.model.menu.Menu;
import org.weixin4j.model.menu.SingleButton;
import org.weixin4j.model.menu.ViewButton;
import org.weixin4j.spring.WeixinTemplate;
import sun.applet.Main;
import sun.net.www.http.HttpClient;

import javax.annotation.Resource;
import javax.servlet.http.HttpServletRequest;
import java.util.ArrayList;
import java.util.HashMap;
import java.util.List;
import java.util.Map;

@Controller
@RequestMapping("/wx")
@Slf4j
public class WeixinController {


    @Autowired
    private WeixinTemplate weixinTemplate;

    @RequestMapping("/createMenu")
    @ResponseBody
    public Map createMenu(Model model, HttpServletRequest request) {

        log.info("WeixinController.createMenu");
        String ctx = request.getScheme() + "://" + request.getServerName() + ":" + request.getServerPort() + request.getContextPath();
        log.info("ctx=" + ctx);

        Map jsonData = new HashMap();
        jsonData.put("code", 0);
        jsonData.put("message", "微信菜单创建成功");
        try {
            Menu menu = new Menu();
            //创建菜单按钮
            List buttons = new ArrayList();
            menu.setButton(buttons);

            SingleButton btn1 = new ViewButton("待开发", ctx + "/jieru");
            buttons.add(btn1);


            SingleButton btn2 = new ViewButton("待开发", ctx + "/toHello");
            buttons.add(btn2);


            SingleButton btn3 = new ViewButton("待开发", ctx + "/toHello");
            buttons.add(btn3);

            //设置子菜单
            System.out.println(menu.toJSONObject().toString());

            //创建自定义菜单
            Weixin weixin = weixinTemplate.getWeixinFactory().getWeixin();
            MenuComponent menu1 = weixin.menu();
            menu1.create(menu);
            model.addAttribute("message", "微信菜单创建成功");
        } catch (Exception e) {
            log.error(e.getMessage());
            jsonData.put("code", -1);
            jsonData.put("message", "微信菜单创建失败,原因:" + e.getMessage());
        }

        return jsonData;
    }


    @RequestMapping("/test1")
    @ResponseBody
    public Map test1() {
        log.info("WeixinController.test1");
        Map jsonData = new HashMap();
        System.out.println("test");
        String s1 = Configuration.getProperty("weixin4j.message.handler.normal");
        String s2 = Configuration.getProperty("weixin4j.message.handler.event");

        jsonData.put("weixin4j.message.handler.normal", s1);
        jsonData.put("weixin4j.message.handler.event", s2);
        return jsonData;
    }
}
自己写的一个测试Controller
package com.dr.controller;

import org.springframework.stereotype.Controller;
import org.springframework.web.bind.annotation.RequestMapping;

@Controller
public class JieruController {

    @RequestMapping("jieru")
    public String jieru(){

        System.out.println(123+"ok");
        return "index";
    }
}
接下来是测试端的信息填写
其中的url就是根据内网穿透工具提供的路径和controller包中的WeixinController中的接口相组合然和在浏览器中访问,token就是weixin.propertites中的公众号token
最后就是pom.xml文件
            org.springframework.boot
            spring-boot-starter-web


            org.springframework.boot
            spring-boot-starter-test
            test


            org.springframework.boot
            spring-boot-starter-freemarker


            org.weixin4j.spring.boot
            weixin4j-spring-boot-starter
            1.0.0


            org.projectlombok
            lombok
            true


            org.springframework.boot
            spring-boot-starter-data-redis


            org.mybatis.spring.boot
            mybatis-spring-boot-starter
            1.3.2


            org.apache.commons
            commons-pool2
            2.0


            mysql
            mysql-connector-java
            runtime


            org.springframework.boot
            spring-boot-starter-jdbc
成功的标志就是在natapp_windows_amd64_2_3_8中的natapp.exe文件中出现200,并且会显示路径。在浏览器中可以访问所测试的项目,用手机扫描测试端的微信二维码可以出现你所运行的项目,基本就ok了


