CentOS8下安装配置GitLab
一、安装GitLab-ce社区版
1.1 安装依赖关系
[root@GitLab ~]# dnf install policycoreutils openssh-server postfix
1.2 开启SSH并设置开机启动
[root@GitLab ~]# systemctl enable sshd
[root@GitLab ~]# systemctl start sshd
1.3 开放系统防火墙的HTTP和HTTPS访问
[root@GitLab ~]# firewall-cmd --permanent --add-service=http
success
[root@GitLab ~]# firewall-cmd --permanent --add-service=https
Success
#开放端口后,需重新加载防火墙
[root@GitLab ~]# systemctl reload firewalld
1.4 配置Postfix邮件服务,设置开机启动
[root@GitLab ~]# systemctl enable postfix
[root@GitLab ~]# systemctl start postfix
1.5 添加GitLab软件包存储库
[root@GitLab ~]# curl -sS https://packages.gitlab.com/install/repositories/gitlab/gitlab-ce/script.rpm.sh | sudo bash
1.6 安装GitLab软件包
默认安装最新版GitLab-ce软件包,配置http://gitlab.example.com为访问地址,在浏览该URL时,GitLab将自动配置。
[root@GitLab ~]# sudo EXTERNAL_URL="http://gitlab.example.com" dnf install –y gitlab-ce
1.7 常规安装完成,访问网页
在软件包安装完成后,访问http://gitlab.example.com,修改默认账号root密码后登录,至此常规的GitLab安装已经完成。
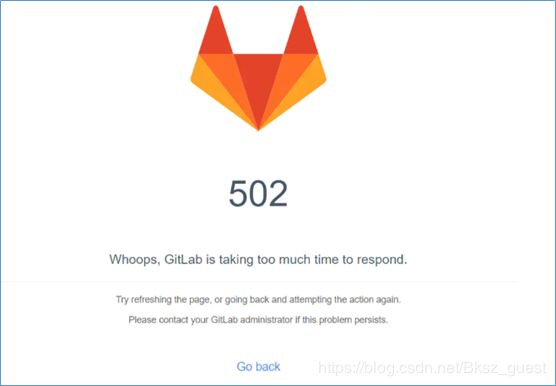
1.8 地址访问失败,自定义访问地址和端口
页面打开失败是因为防火墙未放行相关端口;访问显示502是因为端口被占用,都可通过修改端口解决。
- 自定义访问地址和端口:192.168.100.220:4567
[root@GitLab ~]# vi /etc/gitlab/gitlab.rb
#翻至此处
## GitLab URL
##! URL on which GitLab will be reachable.
##! For more details on configuring external_url see:
##! https://docs.gitlab.com/omnibus/settings/configuration.html#configuring-the-external-url-for-gitlab
##!
##! Note: During installation/upgrades, the value of the environment variable
##! EXTERNAL_URL will be used to populate/replace this value.
##! On AWS EC2 instances, we also attempt to fetch the public hostname/IP
##! address from AWS. For more details, see:
##! https://docs.aws.amazon.com/AWSEC2/latest/UserGuide/instancedata-data-retrieval.html
external_url 'http://192.168.100.220:4567'

#修改gitlab.rb文件后都需要重新配置服务
[root@GitLab ~]# gitlab-ctl reconfigure
#开放4567端口
[root@GitLab ~]# firewall-cmd --zone=public --add-port=4567/tcp --permanent
success
#重新加载防火墙
[root@GitLab ~]# firewall-cmd --reload
Success
#查看已开放端口,注意新加入的端口是否开启
[root@GitLab ~]# firewall-cmd --zone=public --list-ports
4567/tcp
#查看侦听的端口
[root@GitLab ~]# netstat -lnpt
Active Internet connections (only servers)
Proto Recv-Q Send-Q Local Address           Foreign Address         State       PID/Program name
tcp        0      0 0.0.0.0:111             0.0.0.0:*               LISTEN      1/system
......
#nginx使用4567端口
tcp        0      0 0.0.0.0:4567            0.0.0.0:*               LISTEN      8972/nginx: master
......

tcp6       0      0 :::9094                 :::*                    LISTEN      9721/alertmanager
二、关闭用户注册功能
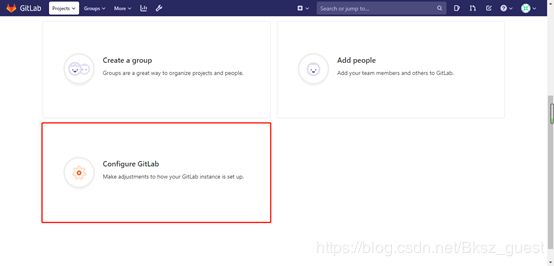
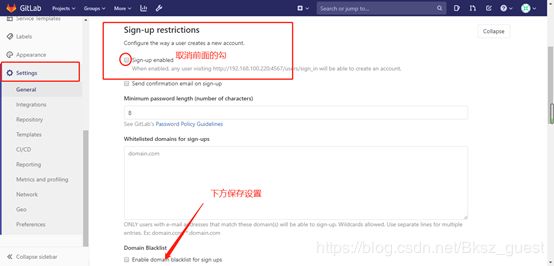
使用root账号登录GitLab后,选择“Configure GitLab”,选择“Setting”–“General”–“Sing-up restriction”–取消”Sing-up enabled”前面的勾,保存设置
三、实现LDAP登录
说明:
- 域地址:192.168.100.251
- AD域名:bj.china.local
- 配置绑定账号:Gitlab/Git@2020(此账号需要在AD域中实际存在)
- 账号路径:bj.china.local/users(cn=users,dc=bj,dc=china,dc=local)
[root@GitLab ~]# vi /etc/gitlab/gitlab.rb
#翻至此处
### LDAP Settings
###! Docs: https://docs.gitlab.com/omnibus/settings/ldap.html
###! **Be careful not to break the indentation in the ldap_servers block. It is
###!   in yaml format and the spaces must be retained. Using tabs will not work.**

gitlab_rails['ldap_enabled'] = true
gitlab_rails['ldap_servers'] = YAML.load <<-'EOS'
#GitLab-ee版可以配置多个LDAP服务器,ce版只能一个
main: # 'main' is the GitLab 'provider ID' of this LDAP server
     label: 'LDAP'
     host: '192.168.100.251'
     port: 389
     uid: 'sAMAccountName'
     bind_dn: 'cn=GitLab,cn=users,dc=bj,dc=china,dc=local'
     password: 'Git@2020'
     encryption: 'plain' # "start_tls" or "simple_tls" or "plain"
     verify_certificates: true
     active_directory: true
     allow_username_or_email_login: false
     lowercase_usernames: false
     block_auto_created_users: false
     base: 'cn=users,dc=bj,dc=china,dc=local'
     user_filter: ''
#注意此处可能会遗漏EOS以及没有删除前面的“#”
EOS

[root@GitLab ~]# gitlab-ctl reconfigure

[root@GitLab ~]# gitlab-ctl restart
#检查GItLab与AD 域的连接情况
[root@GitLab ~]# gitlab-rake gitlab:ldap:check
Checking LDAP ...

LDAP: ... Server: ldapmain
LDAP authentication... Success
LDAP users with access to your GitLab server (only showing the first 100 results)
     DN: cn=administrator,cn=users,dc=bj,dc=china,dc=local    sAMAccountName: Administrator
     ……
     #识别AD域中gitlab账号数据,LDAP配置成功
     DN: cn=gitlab,cn=users,dc=bj,dc=china,dc=local   sAMAccountName: GitLab

Checking LDAP ... Finished
四、数据存储目录
说明:
-
默认存储目录/var/opt/gitlab/git-data;默认备份目录/var/opt/gitlab/backups
-
以/DB目录为数据存储目录,/DB/backups为备份目录
-
以上操作在没有产生数据的情况下可直接进行,而已经产生数据的还需进行数据迁移
4.1 修改数据存储目录
[root@GitLab ~]# vi /etc/gitlab/gitlab.rb
### For setting up different data storing directory
###! Docs: https://docs.gitlab.com/omnibus/settings/configuration.html#storing-git-data-in-an-alternative-directory
###! **If you want to use a single non-default directory to store git data use a
###!   path that doesn't contain symlinks.**
# git_data_dirs({
#   "default" => {
#     "path" => "/mnt/nfs-01/git-data"
#    }
# })
git_data_dirs({ "default" => {"path" => "/DB" } })
4.2 修改备份目录
[root@GitLab ~]# vi /etc/gitlab/gitlab.rb
### Backup Settings
###! Docs: https://docs.gitlab.com/omnibus/settings/backups.html
# gitlab_rails['manage_backup_path'] = true
# gitlab_rails['backup_path'] = "/var/opt/gitlab/backups"
#修改备份文件夹 /DB/backups
gitlab_rails['backup_path'] = "/DB/backups"
4.3 产生数据的情况下修改数据存储目录以及数据迁移
在已经产生数据的情况下,修改存储目录后,还需进行数据的迁移。首先查看默认路径下的repositories文件信息,数据迁移至/DB下后,再次查看文件信息,确认数据迁移是否成功。
验证数据存储目录修改成功,访问GitLab页面,新建项目测试数据,保存后分别查看原默认路径和/DB下repositories文件信息是否变化。
#进入/var/opt/gitlab/git-data目录下,查看已产生的数据文件的详细信息
[root@GitLab ~]# cd /var/opt/gitlab/git-data
[root@GitLab git-data]# ll
total 0
#已经存在4月9日的数据库
drwxrws---. 4 git root 60 Apr  9 19:33 repositories
#关闭服务,防止迁移时,用户写入数据
[root@GitLab ~]#  gitlab-ctl stop
#将数据迁移至/DB
[root@GitLab ~]# rsync -av /var/opt/gitlab/git-data/repositories /DB
# 升级服务
[root@GitLab ~]# gitlab-ctl upgrade
# 切换至/DB目录下查看数据是否迁移成功
[root@GitLab ~]# cd /DB
[root@GitLab DB]# ls
backups  repositories
[root@GitLab DB]# ll
total 0
drwx------. 2 git root 60 Apr 14 15:19 backups
#4月9日的数据已迁移至/DB
drwxrws---. 4 git root 60 Apr  9 19:33 repositories
# 重启服务
[root@GitLab ~]#  gitlab-ctl start

#验证更改数据存储路径后,新生成数据是否会导入/DB/repositories
#进入GitLab页面新建项目数据,分别查看默认存储路径下/var/opt/gitlab/git-data/repositories和/DB/repositories信息是否有变化
[root@GitLab git-data]# ll
total 0
#数据未产生变化
drwxrws---. 4 git root 60 Apr  9 19:33 repositories
[root@GitLab DB]# ll
total 0
drwx------. 2 git root 60 Apr 14 15:19 backups
#数据产生变化,说明修改存储目录成功
drwxrws---. 4 git root 60 Apr 15 16:23 repositories