Docker使用 linuxserver/letsencrypt 生成SSL证书最全解析及实践
本文使用http和dns两种校验方式对docker下linuxserver/letsencrypt 项目进行了实践,生成SpringBoot可用证书,并使用nginx的htpasswd来对网站进行密码保护,并测试使用fail2ban防止htpasswd被暴力破解.全文基于linuxserver/letsencrypt 官方文档及其他官方资料并根据作者实践进行详细解析和记录.
文章目录
- 一 介绍
- linuxserver/letsencrypt
- 1 使用
- 2 参数
- 二 实践
- 使用**http**方式验证
- 使用**dns**方式验证
- 第一步 完成域名服务器配置
- 第二步 完成域名服务器API-KEY相关配置并启动
- 三 设置
- 1. 安全和密码保护
- 2. 站点配置和反向代理
- 1. 默认配置文件
- 2. 拒绝搜索引擎抓取
- 3. 使用预设的配置文件
- 3. 证书相关
- 1. 证书种类
- 2. 在其他容器中使用证书
- 3. 在SpringBoot 下使用
- 4. fail2ban
- 1. 文件结构
- 2. 使用说明
- 3. 默认配置
- 4. 测试
一 介绍
linuxserver/letsencrypt
这个容器设置了一个Nginx服务器,支持php的反向代理和一个内置的letsencrypt客户端,可以自动化生成或更新SSL服务器证书.它还包含用于防御入侵的fail2ban.
1 使用
docker create \
  --cap-add=NET_ADMIN \
  --name=letsencrypt \
  -v <path to data>:/config \
  -e PGID=<gid> -e PUID=<uid>  \
  -e EMAIL=<email> \
  -e URL=<url> \
  -e SUBDOMAINS=<subdomains> \
  -e VALIDATION=<method> \
  -p 80:80 -p 443:443 \
  -e TZ=<timezone> \
  linuxserver/letsencrypt
2 参数
-
--cap-add=NET_ADMINcap-add即Add Linux capabilities 添加linux内核能力,这里具体添加的能力是允许执行网络管理任务,这是因为fail2ban需要修改iptables -
-p 80 -p 443- 端口 -
-v /config- 包括webroot在内的所有配置文件都保存在此处 -
-e URL- 顶级域名 (完全拥有则如:“customdomain.com” , 动态dns则如"customsubdomain.ddnsprovider.com" ) -
-e SUBDOMAINS- 证书覆盖的子域名 (逗号分隔,无空格) .如www,ftp,cloud.对于通配符证书, 请将此明确地设置为通配符(通配符证书只允许通过dns方式验证) -
-e VALIDATION- letsencrypt验证方法,选项是http,tls-sni或者dns
不同校验方式的区别:- http校验
需要使用到80端口,故宿主机80端口应该转发到容器的80端口. - tls-sni校验
需要使用到443端口,故宿主机443端口应该转发到容器的443端口.
注意:由于安全漏洞,letsencrypt禁用了tls-sni验证,使用该方式会报错:Client with the currently selected authenticator does not support any combination of challenges that will satisfy the CA. - dns验证
需要设置DNSPLUGIN变量(不是所有的DNS服务商都支持),并且需要在/config/dns-conf文件夹下输入凭据到相应的ini文件里,但无法通过端口验证时可使用这种方法验证
- http校验
-
-e PGID设置 GroupID -
-e PUID设置 UserID
通过指定用户ID和所属群的ID来避免数据卷挂载(-v)时容器和宿主机直接可能产生的权限问题.最好让挂载的数据卷目录的拥有者和指定的用户统一.
另外,需要注意,不能指定root用户(即PGID=0,PUID=0),否则会一直报错(但不影响使用)
#宿主机root用户环境下使用例子(非官方,仅供参考)

#创建要挂载的目录,此时该目录属root用户和root组
mkdir /opt/letsencrypt
#创建docker用户(默认会顺带新建同名Group)
useradd dockeruser
#修改文件夹归属(R代表递归操作,文件夹下的也一并修改)
chown -R dockeruser:dockeruser /opt/letsencrypt
#查看dockeruser的用户id和群id
id dockeruser
-e TZ- 时区 如 America/New_York
注,上海时区为Asia/Shanghai
可选设置:
-e DNSPLUGIN- 如果VALIDATION设置为dns则此项必选. 选项有cloudflare,cloudxns,digitalocean,dnsimple,dnsmadeeasy,google,luadns,nsone,rfc2136androute53. 还需要在/config/dns-conf文件夹下输入凭据到相应的ini文件里,这里推荐使用cloudflare,免费而且好用.- 使用Cloudflare服务的话应确保设置为dns only而非dns + proxy(事实上Cloudflare的proxy已经提供免费自动SSL服务了,也就没有本文的必要)
- Google dns插件的使用对象是企业付费产品"Google Cloud DNS"而非"Google Domains DNS"
-e EMAIL- 您的证书注册和通知的电子邮件地址-e DHLEVEL- dhparams位值(默认值= 2048,可设置为1024或4096)-p 80-VALIDATION设置为http而不是dns或tls-sni时需要80端口进行转发-e ONLY_SUBDOMAINS- 仅为子域名获取证书(主域名可能托管在另外一台计算机且无法验证)时请将此项设置为true-e EXTRA_DOMAINS- 额外的完全限定域名(逗号分隔,无空格)如extradomain.com,subdomain.anotherdomain.org-e STAGING- 设置为true可以提高速率限制,但证书不会通过浏览器的安全测试,仅用于测试.-e HTTPVAL- 已弃用, 请用VALIDATION代替
二 实践
使用http方式验证
首先,你应该先保证要获取证书的域名(子域名)能正确地访问到主机,注意域名需要备案
这里我映射的宿主机目录为**/opt/letsencrypt1**,PGID和PUID有上文提到的方式获得,配置的域名为my.com和www.my.com(实际上我配置的是另外一个我自己真正拥有的域名,这里不贴出来)
注意使用http方式验证的话开发80端口就可以了,这里443端口也进行映射是为了证书获取成功后可以通过使用https登录该容器提供的默认首页进行确认
docker run -d \
--cap-add=NET_ADMIN \
--name=letsencrypt \
-v /opt/letsencrypt1:/config \
-e PGID=1002 -e PUID=1001  \
-e URL=my.com \
-e SUBDOMAINS=www \
-e VALIDATION=http \
-p 80:80 -p 443:443 \
-e TZ=Asia/Shanghai \
linuxserver/letsencrypt
容器会在后台运行,这个时候应该提供如下指令查看日志输出(CTRL+z退出)
docker logs -f letsencrypt
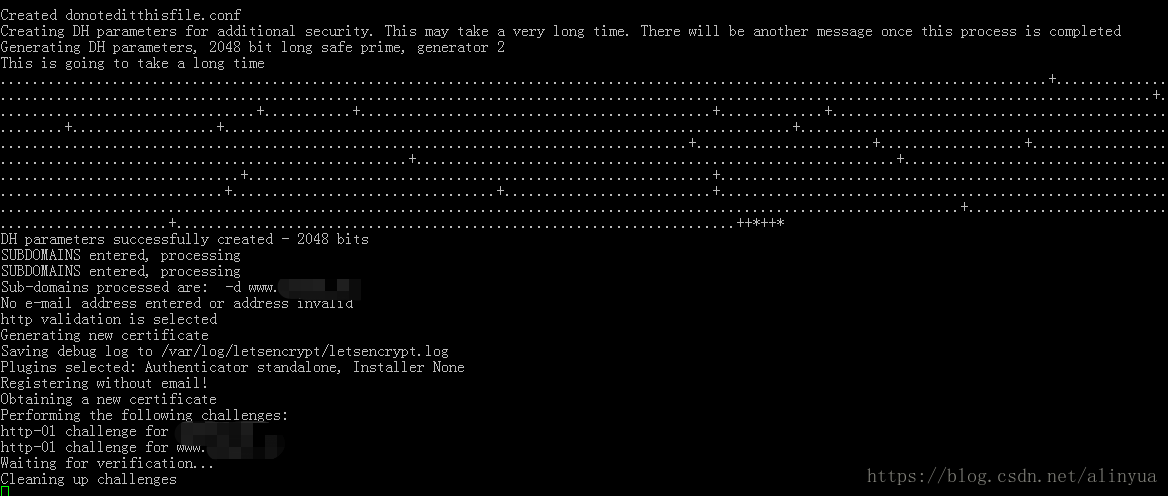
最后我卡在Cleaning up challenges这一步,这是因为我域名没有备案,无法通过域名访问到我所在的主机,这个时候打开域名链接被重定向到云主机提供商的网页禁止访问,Let’s encrypt没办法通过域名访问到本机,所以验证失败(事实上它也没有说失败,只是一直停在那里)
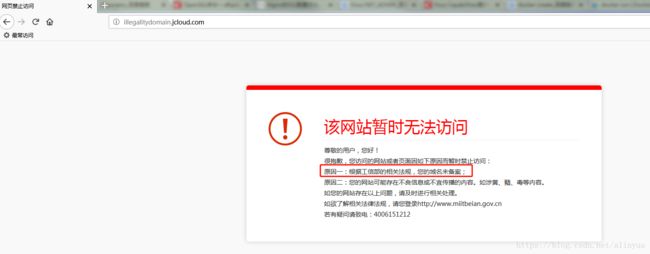
毋庸置疑,我是因为原因一被禁止访问的.
既然http(80端口)方式验证走不通,tls-sni本来就不行,那就只能用dns验证了
使用dns方式验证
这里以CloudFlare为例
第一步 完成域名服务器配置
首先要有一个cloudflare账号
然后在域名提供商那里将域名的dns服务器改成cloudflare提供的dns服务器
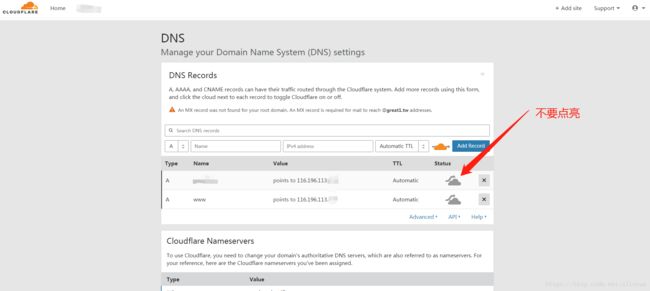
然后在cloudflare那里添加对应的解析记录
注意解析记录的Status那里的图标应该是灰色的,表示DNS only,如果亮了的话表示DNS and HTTP proay(CDN),要使用let’s encrypt的dns校验的话就不要再开http代理和CDN了.开了代理的话cloudflare会免费给你提供(及自动维护更新)SSL证书,就可以直接https访问了,不需要本文再干嘛了,而且还有免费CDN,可谓十分良心
第二步 完成域名服务器API-KEY相关配置并启动
这一步先正常启动,会启动失败,但会生成所有的配置文件,再根据相应的ini文件里的提示去域名服务器提供商那里找到相对应的凭证,修改ini文件,重新启动容器
启动如下,这次我映射到宿主机目录**/opt/letsencrypt2下,把VALIDATION改为dns**,增加DNSPLUGIN配置为cloudflare
docker run -d \
--cap-add=NET_ADMIN \
--name=letsencrypt \
-v /opt/letsencrypt2:/config \
-e PGID=1002 -e PUID=1001  \
-e URL=my.com \
-e SUBDOMAINS=www \
-e VALIDATION=dns \
-e DNSPLUGIN=cloudflare \
-p 80:80 -p 443:443 \
-e TZ=Asia/Shanghai \
linuxserver/letsencrypt
使用docker logs -f letsencrypt查看
这次是在Cleaning up challenges之后报错…错误提示也很明确,是Unknown X-Auth-Key or X-Auth-Email的问题,配置是在**/config/dns-conf/cloudflare.ini**这个文件里面
Cleaning up challenges
Error determining zone_id: 9103 Unknown X-Auth-Key or X-Auth-Email. Please confirm that you have supplied valid Cloudflare API credentials. (Did you enter the correct email address?)
IMPORTANT NOTES:
 - Your account credentials have been saved in your Certbot
   configuration directory at /etc/letsencrypt. You should make a
   secure backup of this folder now. This configuration directory will
   also contain certificates and private keys obtained by Certbot so
   making regular backups of this folder is ideal.
ERROR: Cert does not exist! Please see the validation error above. Make sure you entered correct credentials into the /config/dns-conf/cloudflare.ini file.
打开**/config/dns-conf/cloudflare.ini**可以看到
# Instructions: https://github.com/certbot/certbot/blob/master/certbot-dns-cloudflare/certbot_dns_cloudflare/__init__.py#L20
# Replace with your values
dns_cloudflare_email = [email protected]
dns_cloudflare_api_key = 0123456789abcdef0123456789abcdef01234567
感兴趣的可以到介绍的页面去查看相关信息,也可以直接到对应域名解析服务提供商那里去看
cloudflare查看的地址是https://dash.cloudflare.com/profile,最上面是email,最下面是API Keys
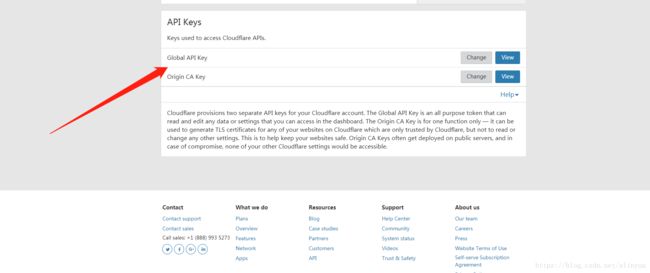
将对应内容替换到**/config/dns-conf/cloudflare.ini里面(即宿主机的/opt/letsencrypt2/dns-conf/cloudflare.ini**里面)
然后使用docker rm -f letsencrypt强制删掉原容器
再重新运行上面的docker run就可以成功启动了
查看日志如下

最终会停在Server ready这一行(如果用root用户的uid和gid的话现在会一直报错,但仍可使用),这个时候就可以用https打开了(内置的nginx只监听443端口,所以不能用http打开),显示如下界面即为正常
三 设置
1. 安全和密码保护
可以使用nginx的htpasswd来对网站进行密码保护,htpasswd的相关用法可见htpasswd命令
- 添加第一个密码访问用户(
-c参数表示创建一个加密文件,如果原来有的话则把原来的删掉)
docker exec -it letsencrypt htpasswd -c /config/nginx/.htpasswd <username>
- 继续添加密码访问用户(把
-c去掉即可)
docker exec -it letsencrypt htpasswd /config/nginx/.htpasswd <username>
如下为添加两个用户(lin和shen)

查看用户信息文件(/opt/letsencrypt2是我映射到容器/config的目录)

然后,还需要在nginx的配置文件(默认为**/config/nginx/site-confs/default**)里面开启auth_basic
如
	location / {
		try_files $uri $uri/ /index.html /index.php?$args =404;
		# 将下列两行放到location{}里面,**Restricted**是网站要求输入账号密码时的提示语,后面是指定的用户密码文件路径
		auth_basic "Restricted";
		auth_basic_user_file /config/nginx/.htpasswd;
	}
最后要使用docker restart letsencrypt重新启动容器使配置生效
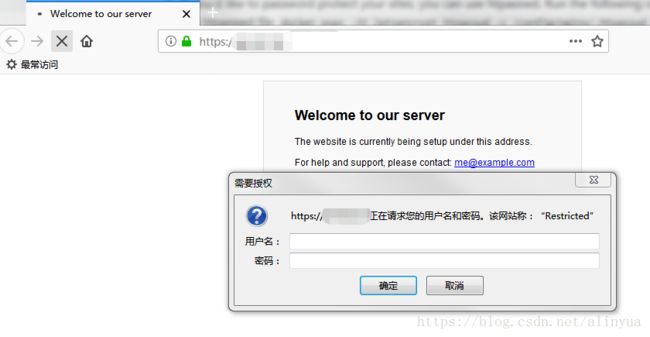
登录网站,提示如下(我用的是firefox,不同浏览器可能显示不一样)
2. 站点配置和反向代理
1. 默认配置文件
默认的站点配置文件位于**/config/nginx/site-confs/default**,可直接修改此文件完成配置,也可将其他的conf文件添加到此目录.但如果将此default文件删除的话,容器启动时对其重新创建.
2. 拒绝搜索引擎抓取
如果不希望网站被搜索引擎抓取,可以将以下命令添加到**/config/nginx文件夹下的ssl.conf**文件中
add_header X-Robots-Tag "noindex, nofollow, nosnippet, noarchive";
3. 使用预设的配置文件
本容器已经为热门应用添加了预设的反向代理配置文件,具体可以查看**/config/nginx/proxy_confs文件夹下的_readme**文件
/config/nginx/proxy_confs文件夹下的预设反向代理配置文件有两大类:
- .subfolder.conf : 这类型的配置文件将允许通过https://yourdomain.com/servicename的方式访问配置文件对应的服务
- .subdomain.conf : 这类型的配置文件将允许通过https://servicename.yourdomain.com的方式访问配置文件对应的服务
启用预设的配置文件:
- 第一步: 确保在默认站点配置文件(default文件)的server项内包含以下命令:
include /config/nginx/proxy-confs/*.subfolder.conf;
include /config/nginx/proxy-confs/*.subdomain.conf;
- 第二步: 重命名conf文件并删除结尾的**.sample**
- 第三步: 重启letsencrypt容器
3. 证书相关
1. 证书种类
- cert.pem,chain.pem,fullchain.pem和privkey.pem,其通过letsencrypt生成并由nginx的和其它各种应用使用
- privkey.pfx,Microsoft支持的格式,常用于Embnet Server等dotnet应用程序(无密码)
- priv-fullchain-bundle.pem,一个捆绑私钥和全链的pem证书,由ZNC等应用程序使用
2. 在其他容器中使用证书
证书在容器中的存放在**/config/etc/letsencrypt文件夹下,又因为/config文件夹被映射到宿主机,故如果需要在其他容器中使用,可以再把宿主机对应目录下的etc/letsencrypt**文件夹映射到需要用到证书的容器
3. 在SpringBoot 下使用
- 将pem证书转为为jks格式,在此过程需要输入密码。这里使用的是网上的 SSL证书格式转换工具(https://www.chinassl.net/ssltools/convert-ssl.html)
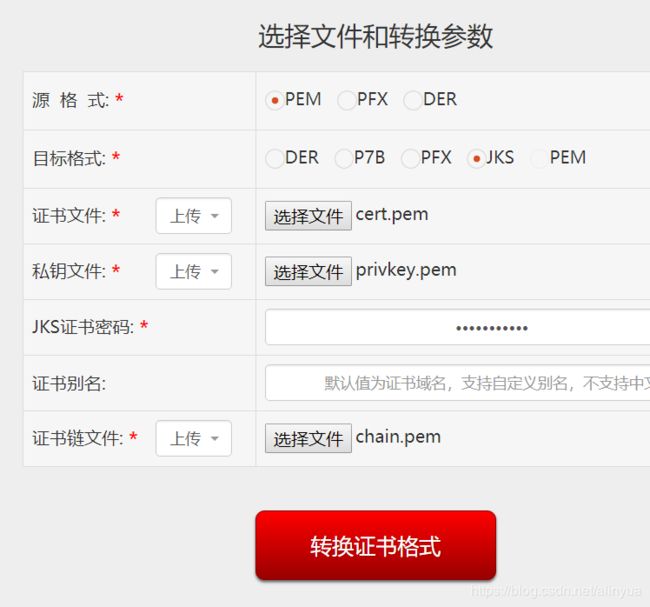
- 在SpringBoot 里面配置。有了JKS证书和密码后配置就很简单了,这里不贴出来。
4. fail2ban
fail2ban是一款实用软件,可以监视你的系统日志,然后匹配日志的错误信息(正则式匹配)执行相应的屏蔽动作。
多用于防止暴力破解和CC攻击.
1. 文件结构
/config/fail2ban目录下主要有一个jail.local文件和filter.d,action.d这两个文件夹,另外还有一个fail2ban.sqlite3的数据库文件,这个不用管
- jail.local文件 : 负责fail2ban的主要配置,统管所有的jail的启用和禁用和监控规,日志路径等等
- filter.d文件夹 : 存放各个jail的过滤器配置文件(如nginx-http-auth.conf文件等)
- action.d文件夹 : 存放各种功能对应的配置文件(如sendmail.conf文件等)
2. 使用说明
- 该容器内置的fail2ban默认包括(并开启)3个jail
- nginx-http-auth
- nginx-badbots
- nginx-botsearch
- 可以通过修改文件**/config/fail2ban/jail.local**去启用或禁用其他jail
- 要修改 filter.d文件夹或action.d文件夹下的配置文件时,不要直接编辑**.conf文件而应该创建一个同名的但以.local结尾的文件(如想要修改nginx-http-auth.conf的话就创建一个nginx-http-auth.local**).
这是因为当actions和fileter更新时,.conf文件会被覆写而使修改失效,而**.local文件是以追加到.conf文件后面的,不受.conf文件的变动的影响.
(根据对Dockerfile文件的分析,这些.conf文件应该是在构建docker镜像时下载的,所以更新镜像后即使复用原来的文件夹,.conf**文件也会被覆写) - 查看哪些jail是启用的
docker exec -it letsencrypt fail2ban-client status
- 查看特定jail的状态
docker exec -it letsencrypt fail2ban-client status <jail name>
- 设置特定jail对特定ip放行(注意:linuxserver/letsencrypt 给的教程是没有set的,会报指令错误,根据下面的fail2ban的官方命令我发现是要加set的)
docker exec -it letsencrypt fail2ban-client set <jail name> unbanip <IP>
- 命令列表:https://www.fail2ban.org/wiki/index.php/Commands
3. 默认配置
查看**/config/fail2ban/jail.local**文件,部分内容如下
[DEFAULT]
# "bantime" is the number of seconds that a host is banned.
bantime  = 600
# A host is banned if it has generated "maxretry" during the last "findtime"
# seconds.
findtime  = 600
# "maxretry" is the number of failures before a host get banned.
maxretry = 5

[nginx-http-auth]

enabled  = true
filter   = nginx-http-auth
port     = http,https
logpath  = /config/log/nginx/error.log
上方**[DEFAULT]的意思是 : 若在600秒内失败5次则禁止访问600秒
而[nginx-http-auth]的内容是启用,使用nginx-http-auth过滤器,监听http和https端口并把日志写在/config/log/nginx/error.log文件里,为配置的选项则同[DEFAULT]**,更多配置信息请看官方指南:http://www.fail2ban.org/wiki/index.php/MANUAL_0_8#General_settings
4. 测试
接下来当然是来测试一波啦
先确保网页http密码保护打开,然后登陆,任意错误登陆(但用户名不能为空)5次后网页就开始提示找不到服务器了
这个时候可以查看一下jail的状态,如下
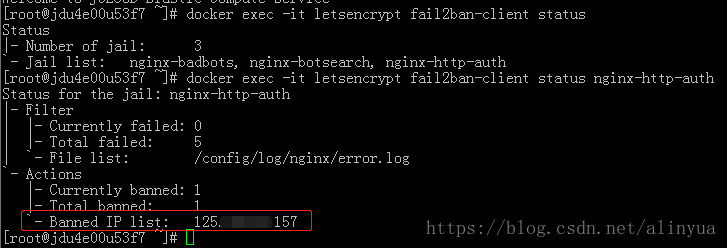
Total banned表示历史ban总记录,在Banned IP list中可以看到ip已经被封了
接下来再把ip解禁,如下
![]()
可以查看**/config/log/fail2ban/fail2ban.log**文件
这个是600秒后自动解禁的
2018-09-15 09:39:44,090 fail2ban.filter         [343]: INFO    [nginx-http-auth] Found 125.90.49.157 - 2018-09-15 09:39:44
2018-09-15 09:39:48,295 fail2ban.filter         [343]: INFO    [nginx-http-auth] Found 125.90.49.157 - 2018-09-15 09:39:48
2018-09-15 09:39:53,503 fail2ban.filter         [343]: INFO    [nginx-http-auth] Found 125.90.49.157 - 2018-09-15 09:39:53
2018-09-15 09:39:56,709 fail2ban.filter         [343]: INFO    [nginx-http-auth] Found 125.90.49.157 - 2018-09-15 09:39:56
2018-09-15 09:39:57,911 fail2ban.filter         [343]: INFO    [nginx-http-auth] Found 125.90.49.157 - 2018-09-15 09:39:57
2018-09-15 09:39:58,107 fail2ban.actions        [343]: NOTICE  [nginx-http-auth] Ban 125.90.49.157
2018-09-15 09:49:58,920 fail2ban.actions        [343]: NOTICE  [nginx-http-auth] Unban 125.90.49.157

这个是使用命令解禁的
2018-09-15 11:18:10,728 fail2ban.filter         [343]: INFO    [nginx-http-auth] Found 125.90.49.157 - 2018-09-15 11:18:10
2018-09-15 11:18:12,738 fail2ban.filter         [343]: INFO    [nginx-http-auth] Found 125.90.49.157 - 2018-09-15 11:18:12
2018-09-15 11:18:13,940 fail2ban.filter         [343]: INFO    [nginx-http-auth] Found 125.90.49.157 - 2018-09-15 11:18:13
2018-09-15 11:18:14,542 fail2ban.filter         [343]: INFO    [nginx-http-auth] Found 125.90.49.157 - 2018-09-15 11:18:14
2018-09-15 11:18:15,143 fail2ban.filter         [343]: INFO    [nginx-http-auth] Found 125.90.49.157 - 2018-09-15 11:18:14
2018-09-15 11:18:15,620 fail2ban.actions        [343]: NOTICE  [nginx-http-auth] Ban 125.90.49.157
2018-09-15 11:18:15,745 fail2ban.filter         [343]: INFO    [nginx-http-auth] Found 125.90.49.157 - 2018-09-15 11:18:15
2018-09-15 11:18:35,942 fail2ban.actions        [343]: NOTICE  [nginx-http-auth] Unban 125.90.49.157
参考地址:
github:https://github.com/linuxserver/docker-letsencrypt
dockerhub:https://hub.docker.com/r/linuxserver/letsencrypt/
fail2ban配置:http://www.fail2ban.org/wiki/index.php/MANUAL_0_8#General_settings
