- 数据结构进阶:使用链表实现栈和队列详解与示例(C, C#, C++)
文章目录1、栈与队列简介栈(Stack)队列(Queue)2、使用链表实现栈C语言实现C#语言实现C++语言实现3、使用链表实现队列C语言实现C#语言实现C++语言实现4、链表实现栈和队列的性能分析时间复杂度空间复杂度性能特点与其他实现的比较总结在软件开发中,数据结构是不可或缺的一部分。本文将详细介绍如何使用链表来实现栈和队列这两种基本的数据结构,并提供C、C#和C++三种语言的示例代码。1、栈与
- C#实现24种数据校验算法的综合指南及工具包.zip
语嫣凝冰
本文还有配套的精品资源,点击获取简介:在数据通信和网络编程中,数据的完整性和准确性是至关重要的。C#作为一种流行的开发语言,提供了强大的工具来实现各类数据校验算法。本压缩包包含了一个名为“WindowsFormsApp”的C#应用程序,用于展示和实验24种数据校验方法,涵盖从简单到复杂的各种算法。这包括CRC校验、MD5、SHA系列、Adler32、Checksum、ParityBit、LRC、H
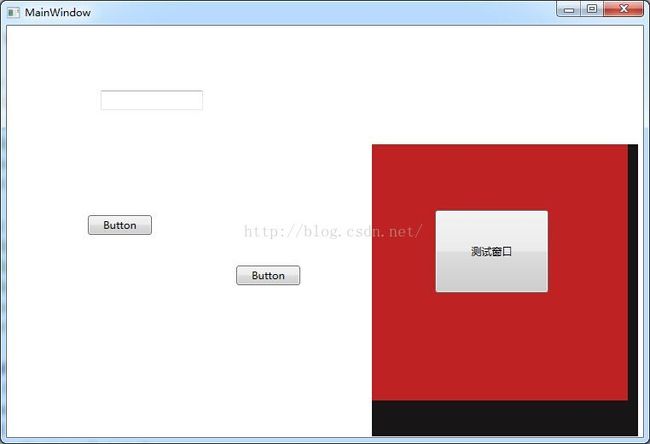
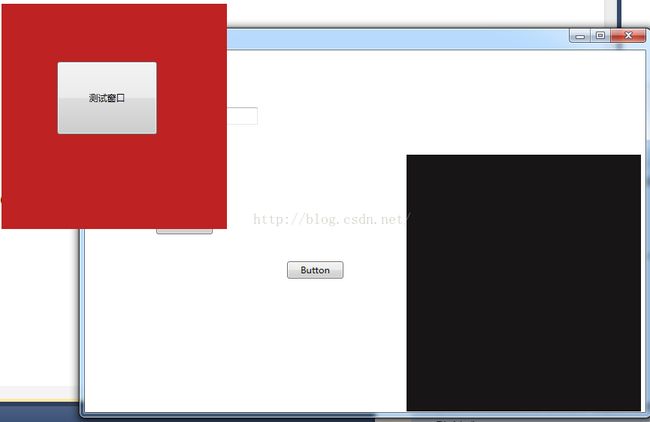
- WPF PRISM 绑定事件及拖拽研究
zhs1931
C#WPF
publicRelayCommandWindowSizeChangedCommand{get{if(WindowSizeChangedCommand==null)WindowSizeChangedCommand=newRelayCommand(param=>WidowSizeChanged(param));returnWindowSizeChangedCommand;}}publicvoidWin
- C# 实现:动态规划解决 0/1 背包问题
江沉晚呤时
C#算法代理模式.netcorec#microsoft.net.netcore算法
在生活中,我们经常面临选择和优化的问题。例如:在有限的资源(如时间、金钱、空间等)下,如何选择最有价值的物品?背包问题(KnapsackProblem)就是一种经典的优化问题,广泛应用于项目选择、投资决策、行李打包等领域。今天,我们将深入探讨0/1背包问题,并通过动态规划方法给出一种高效的解决方案。0/1背包问题0/1背包问题的基本描述是:给定一个容量为C的背包。有n个物品,每个物品有一个重量w[
- WPF——依赖属性
「千秋雪」
WPF
依赖属性简介依赖属性就是自己本身没有值,可以通过binding获取到数据源的值。具有依赖属性的对象称为依赖对象,依赖对象包含一般的控件(TextBox.text或ListBox.ItemsSourceProperty就是一个典型的依赖属性),也包含从有依赖属性的类生成的对象(后面会举例说明)。优点节省内存空间。每个CLR属性都包含一个非static的字段,如果一个实例具有多个属性,创建实例数目多的
- WPF启动画面实现指南
上海积分吴老师
本文还有配套的精品资源,点击获取简介:本文详细探讨了在WPF应用程序中实现启动画面的方法,包括创建独立线程以避免资源竞争,介绍了适用于Win8风格的等待控件,并通过代码示例展示了如何实现和优化用户体验。1.WPF启动画面的定义和重要性概述在WPF(WindowsPresentationFoundation)应用程序中,启动画面是用户打开应用程序时首先看到的界面。它不仅提升了用户体验,还可以在应用程
- WPF常用TriggerAction用法 (一)
weixin_34418883
Microsoft.Expression.Interactivity常用TriggerAction->CallMethodActionChangePropertyActionControlStoryboardActionGoToStateAction1,CallMethodAction用于调用后台和DataContext中公用,无参数,无返回值的方法.这里扩展了一个CallMethodTrigge
- 从PRISM开始学WPF(九)交互Interaction?
weixin_34204057
测试shell
原文:从PRISM开始学WPF(九)交互Interaction?0x07交互这是这个系列的最后一篇了,主要介绍了Prism中为我们提供几种弹窗交互的方式。Notification通知式Prism通过InteractionRequest来实现弹窗交互,它是一个泛型接口,不同的类型对应不同类型的弹窗方式。在使用InteractionRequest的时候需要在,xaml中需要注册一个Trigger:In
- 【WPF】自定义ScrollViewer中遇到的Name坑——“Name=PART_XXX”
_hmdyc
WPF
项目中遇到自定义ScrollViewer的需求,修改滑块样式,隐藏滑块边框。实现该功能的代码很容易找到,但是我在实现过程中遇到这样一个问题:鼠标无法拖动滑块。代码如下(修改后):<ScrollBarx:Name="PART_VerticalScrollBar"HorizontalAlignment="Right"Maximum="{TemplateBindingScrollableHeight}"
- C# 界面程序在23H2型号系统中无法退出
文明的救赎
c#
20250716记录环境:c#winform问题描述:主界面退出直接使用了Environment.Exit(0);程序假死,无法关闭解决措施://使用this.Close();以下代码目标:执行完程序自身后,删除指定文件(可用于程序文件db自我删除)已经在21H2型号执行完成,但在23H2(显示为win11系统,但注册表查询到为win10...)无法执行stringdeleteCommand=$"
- 【C#】C# 事件 两次 -= 会怎么样?
在C#中,事件(event)的+=和-=运算符用于添加和移除事件处理器(delegate)。以下是两次-=和+=的具体行为:两次-=(移除)示例代码:MyEvent-=Handler;MyEvent-=Handler;行为:第一次-=:如果Handler存在于事件列表中,它会被移除一次。第二次-=:如果此时Handler已不在事件中,则不会抛异常,也不会有任何效果。✅是安全的,即使事件处理器已经不
- 在 WPF 启动界面中心加载 GIF 动图
上元星如雨
C#&Godotwpf
在WPF启动界面中心加载GIF动图在WPF启动界面中心加载GIF动图可以通过多种方式实现。下面我将提供一个完整的解决方案,包括使用第三方库和纯WPF实现两种方法。方法一:使用WpfAnimatedGif库(推荐)这是最简单可靠的方法,使用专门处理GIF动画的库。实现步骤:安装NuGet包Install-PackageWpfAnimatedGif创建启动窗口(SplashScreen.xaml)在代
- WPF——为ListBox的Items设置布局面板
Paddi_z
WPFC#wpfc#xamllistbox
自定义ListBox的控件面板在默认情况下,ListBox的子项目显示类似于默认的StackPanel,在水平方向为Strench垂直方向进行堆叠.而有时候,为了控制子元素的布局方式,需要自定义ListBox的内部面板,例如为了实现下面的效果可以看到,上面采用的是双列布局,实际上用的是UniformGrid控件作为ListBox的内部面板,因此,对于绑定的数据集合,就相当于是在一个UniformG
- WPF——专用枚举器ListBox和ComboBox
寒冰屋
CSharp.NETwpf
目录介绍提供了什么本地定义的枚举器代码EnumItemList集合和EnumItem集合项附加属性使用代码结束语下载控件-141.8KB介绍几天前,我发布了这篇文章,其中描述了一种创建可观察的枚举器值集合的方法,以供在WPF应用程序中使用。在本文中,我将把这个想法带入一个更高的逻辑层次——创建专用于允许选择枚举器值的列表控件。最初的想法是为控件提供对C#中任何System枚举器的支持。这当然足够了
- C# 上位机开发进阶:利用 WinForms 与 WPF 创建智能化工业控制系统
威哥说编程
c#wpf开发语言
随着工业自动化和智能制造的不断发展,上位机系统作为人与机器之间的重要桥梁,已成为工业控制系统中不可或缺的一部分。在上位机系统开发中,C#提供了强大的开发框架,尤其是WinForms和WPF,两者在创建高效、智能化的工业控制系统中扮演着重要角色。本文将深入探讨如何利用C#中的WinForms和WPF构建智能化的工业控制系统,从界面设计、实时数据处理、设备通信协议到性能优化的全面技术方案,助力开发者提
- WPF利用NotifyIcon创建任务栏图标(菜鸟教程)
不喜欢打篮球的厨师不是好程序员
c#windows
学习目标:记录从WPF应用创建开始,一步步到任务栏图标创建的全过程。流程:1、环境:Win10+VS2017打开VS2017,选择文件->新建->项目->VisualC#->Windows桌面->WPF应用->更改项目名为TasbarIcon->确定2、添加图标类右键项目->添加->引用,找到System.Windows.Forms和System.Drawing两个程序集,打上勾添加进去。双击打开
- WPF 初始界面启动时播放背景音乐
上元星如雨
C#&Godotwpf
在WPF项目中实现启动时播放背景音乐且只播放一次,可以通过以下步骤实现。这里使用MediaPlayer类来播放音频,并确保音乐只播放一次:完整实现方案1.添加音频文件到项目在项目中创建Assets或Media文件夹添加音频文件(如background.mp3)设置文件属性:生成操作:Resource复制到输出目录:不复制2.修改App.xaml.csusingSystem.Windows;usin
- WPF——自定义ListBox
bianguanyue
WPFc#wpf
在阅读本文前,最好先看看WPF——自定义RadioButton背景WPF中实现单选功能通常有两种方案:-RadioButton组:传统方案,但代码冗余-ListBox定制:通过样式改造,兼顾数据绑定和UI灵活性需求一组选项中,选中某个选项(选项需要横向排列,同时选中效果与未选中效果要能明确显示),就将这个选项的值写入到后端。设计选型RadioButton方案通过RadioButton来实现,是肯定
- 工业上位机开发选型:WinForms稳、WPF炫、Avalonia跨平台
天机️灵韵
物联网架构设计硬件设备wpfgithub工控机工业上位机开发选型
针对工业上位机开发的框架选型,WinForms、WPF和Avalonia各有优势,选择需结合具体项目需求。以下是详细对比和建议:1.WinForms:稳定务实之选✅优势成熟稳定:20年+技术沉淀,兼容性极佳(包括WindowsXP嵌入式系统)。低硬件要求:运行在GDI+上,对老旧工控机(如2GB内存+机械硬盘)友好。开发效率高:拖拽式设计器+丰富第三方控件库(如DevExpress、Telerik
- C# 反射的使用及场景
灵感来自小西装
c#开发语言个人开发
1,使用反映将一个对象的同名属性赋值给另一个对象2,DataTable转换成一个实体3,使用反射动态执行方法4,根据属性信息来执行对应的方法usingSystem;usingSystem.Collections.Generic;usingSystem.ComponentModel;usingSystem.Data;usingSystem.Drawing;usingSystem.Linq;using
- C#编程,.Net 依赖注入IOC框架入门之一 CastleWindso
子不语
依赖注入.net依赖注入IOC
一、简介Castle是.net平台上的一个开源项目,为企业级开发和WEB应用程序开发提供完整的服务,用于提供IOC的解决方案.IOC被称为控制反转或者依赖注入(DependencyInjection)。Windsor是Castle的一个IOC容器。它构建于MicroKernel之上,功能非常之强大,能检测类并了解使用这些类时需要什么参数,检测类型和类型之间工作依赖性,并提供服务或者发生错误时提供预
- .NET依赖注入IOC你了解吗?
IOC在WebAPI中是经常使用的,但是在一些WPF项目并不是经常使用或者被人熟知的,我把相关依赖注入的内容又做了一次学习和整理什么是依赖注入?依赖注入是一种设计模式和软件设计原则,用于实现控制反转。它的核心思想是:将对象所依赖的其他对象的创建和管理职责从对象内部转移到外部容器或框架,从而降低代码的耦合度,提高可测试性、可维护性和灵活性。依赖注入的主要优点降低耦合度(Decoupling):○组件
- 从 C# 到 Python:项目实战第五天的飞跃
AI、少年郎
数据库c#开发语言
在前面三天的学习中,我们已经掌握了Python的基础语法、数据结构以及一些核心库的使用。今天,我们将通过三个实战项目,深入对比C#和Python在命令行工具开发、Web应用开发以及数据处理方面的差异,感受Python在实际项目中的强大魅力。一、命令行工具开发:文件批量处理命令行工具是开发者日常工作中经常用到的工具,无论是文件处理、数据转换还是系统管理,都离不开命令行工具的身影。下面我们就来对比一下
- 【设计模式&C#】工厂方法模式(相比简单工厂模式更加具有灵活性和扩展性的工厂模式)
是一种创建型设计模式。特点是解耦客户端对对象的创建,使用抽象的工厂类,让类的扩展更加容易,相比简单工厂模式更具有灵活性和扩展性。优点:工厂方法模式将对象的创建与使用分开,使客户端代码无需关心对象是如何创建的;扩展性强,且符合开闭原则。需要添加新的实现类时,无需修改原有代码,只需添加一个相应的工厂类即可;支持多态,在运行时子类可以被替换,从而支持多态编程;易于修改和维护;易于管理复杂的创建逻辑。缺点
- xLua热更新解决方案知识点汇总
窗外听轩雨
Lua热更新luaunityunity3d
XLua热更新解决方案知识点汇总文章目录XLua热更新解决方案知识点汇总前言热更新的本质C#CallLua相关知识点Lua解析器:LuaEnvC#获取Lua的基础类型C#获取Lua的全局函数functionC#获取Lua的表TableLuaCallC#相关知识点程序主入口Lua调用C#的类Lua调用C#枚举Lua调用C#的数组Lua调用C#的ListLua调用C#的DictionaryLua调用C
- XLua个人学习——C#访问Lua
一枚骰子
学习lua开发语言xLua
目录0.引言1.访问基本数据类型全局变量2.访问全局的table2.1.映射到class或struct2.2.映射到一个interface2.3.映射到List、Dictionary2.4.映射到LuaTable类3.访问全局函数3.1映射到delegate3.2映射到LuaFunction4.官方使用建议0.引言本文是个人学习xLua中C#访问Lua的一些知识点总结。参考教程的是官方教程:xLu
- c#集合排序
zls365365
c#windows开发语言
在C#中,集合排序是一种常见的操作,它可以帮助我们对集合中的元素进行排序。C#中提供了多种集合排序方法,包括Array.Sort、List.Sort、SortedList和SortedSet等。下面分别介绍一下这些集合排序方法的用法和注意事项:1.Array.SortArray.Sort是C#中的数组排序方法,可以对数组中的元素进行排序。Array.Sort方法可以使用默认的排序算法或者自定义的排
- Baumer工业相机堡盟工业相机如何通过YoloV8深度学习模型实现打架检测(C#代码,UI界面版)
格林威
工业相机机器视觉数码相机YOLO深度学习计算机视觉人工智能
Baumer工业相机堡盟工业相机如何通过YoloV8深度学习模型实现打架检测(C#代码,UI界面版)工业相机使用YoloV8模型实现打架检测工业相机通过YoloV8模型实现打架检测的技术背景在相机SDK中获取图像转换图像的代码分析工业相机图像转换Bitmap图像格式和Mat图像重要核心代码本地文件图像转换Bitmap图像格式和Mat图像重要核心代码Mat图像导入YoloV8模型重要核心代码代码实现
- C# 读取文件内容的全面指南:从基础到高级技术
梦幻南瓜
c#c#开发语言
目录引言1.基础文件读取方法1.1File.ReadAllText-最简单的一次性读取1.2File.ReadAllLines-按行读取为数组1.3File.ReadAllBytes-二进制文件读取2.流式读取方法2.1StreamReader基础用法2.2指定编码方式2.3二进制流读取3.高级文件读取技术3.1异步文件读取3.2内存映射文件(Memory-MappedFiles)3.3管道(Pi
- Baumer工业相机堡盟工业相机如何通过YoloV8深度学习模型实现人脸识别检测(C#代码,UI界面版)
格林威
机器视觉工业相机数码相机YOLO深度学习人工智能视觉检测c#
Baumer工业相机堡盟工业相机如何通过YoloV8深度学习模型实现人脸识别检测(C#代码,UI界面版)工业相机使用YoloV8模型实现人脸的检测工业相机通过YoloV8模型实现人脸识别检测的技术背景在相机SDK中获取图像转换图像的代码分析工业相机图像转换Bitmap图像格式和Mat图像重要核心代码本地文件图像转换Bitmap图像格式和Mat图像重要核心代码Mat图像导入YoloV8模型重要核心代
- 对于规范和实现,你会混淆吗?
yangshangchuan
HotSpot
昨晚和朋友聊天,喝了点咖啡,由于我经常喝茶,很长时间没喝咖啡了,所以失眠了,于是起床读JVM规范,读完后在朋友圈发了一条信息:
JVM Run-Time Data Areas:The Java Virtual Machine defines various run-time data areas that are used during execution of a program. So
- android 网络
百合不是茶
网络
android的网络编程和java的一样没什么好分析的都是一些死的照着写就可以了,所以记录下来 方便查找 , 服务器使用的是TomCat
服务器代码; servlet的使用需要在xml中注册
package servlet;
import java.io.IOException;
import java.util.Arr
- [读书笔记]读法拉第传
comsci
读书笔记
1831年的时候,一年可以赚到1000英镑的人..应该很少的...
要成为一个科学家,没有足够的资金支持,很多实验都无法完成
但是当钱赚够了以后....就不能够一直在商业和市场中徘徊......
- 随机数的产生
沐刃青蛟
随机数
c++中阐述随机数的方法有两种:
一是产生假随机数(不管操作多少次,所产生的数都不会改变)
这类随机数是使用了默认的种子值产生的,所以每次都是一样的。
//默认种子
for (int i = 0; i < 5; i++)
{
cout<<
- PHP检测函数所在的文件名
IT独行者
PHP函数
很简单的功能,用到PHP中的反射机制,具体使用的是ReflectionFunction类,可以获取指定函数所在PHP脚本中的具体位置。 创建引用脚本。
代码:
[php]
view plain
copy
// Filename: functions.php
<?php&nbs
- 银行各系统功能简介
文强chu
金融
银行各系统功能简介 业务系统 核心业务系统 业务功能包括:总账管理、卡系统管理、客户信息管理、额度控管、存款、贷款、资金业务、国际结算、支付结算、对外接口等 清分清算系统 以清算日期为准,将账务类交易、非账务类交易的手续费、代理费、网络服务费等相关费用,按费用类型计算应收、应付金额,经过清算人员确认后上送核心系统完成结算的过程 国际结算系
- Python学习1(pip django 安装以及第一个project)
小桔子
pythondjangopip
最近开始学习python,要安装个pip的工具。听说这个工具很强大,安装了它,在安装第三方工具的话so easy!然后也下载了,按照别人给的教程开始安装,奶奶的怎么也安装不上!
第一步:官方下载pip-1.5.6.tar.gz, https://pypi.python.org/pypi/pip easy!
第二部:解压这个压缩文件,会看到一个setup.p
- php 数组
aichenglong
PHP排序数组循环多维数组
1 php中的创建数组
$product = array('tires','oil','spark');//array()实际上是语言结构而不 是函数
2 如果需要创建一个升序的排列的数字保存在一个数组中,可以使用range()函数来自动创建数组
$numbers=range(1,10)//1 2 3 4 5 6 7 8 9 10
$numbers=range(1,10,
- 安装python2.7
AILIKES
python
安装python2.7
1、下载可从 http://www.python.org/进行下载#wget https://www.python.org/ftp/python/2.7.10/Python-2.7.10.tgz
2、复制解压
#mkdir -p /opt/usr/python
#cp /opt/soft/Python-2
- java异常的处理探讨
百合不是茶
JAVA异常
//java异常
/*
1,了解java 中的异常处理机制,有三种操作
a,声明异常
b,抛出异常
c,捕获异常
2,学会使用try-catch-finally来处理异常
3,学会如何声明异常和抛出异常
4,学会创建自己的异常
*/
//2,学会使用try-catch-finally来处理异常
- getElementsByName实例
bijian1013
element
实例1:
<!DOCTYPE html PUBLIC "-//W3C//DTD XHTML 1.0 Transitional//EN" "http://www.w3.org/TR/xhtml1/DTD/xhtml1-transitional.dtd">
<html xmlns="http://www.w3.org/1999/x
- 探索JUnit4扩展:Runner
bijian1013
java单元测试JUnit
参加敏捷培训时,教练提到Junit4的Runner和Rule,于是特上网查一下,发现很多都讲的太理论,或者是举的例子实在是太牵强。多搜索了几下,搜索到两篇我觉得写的非常好的文章。
文章地址:http://www.blogjava.net/jiangshachina/archive/20
- [MongoDB学习笔记二]MongoDB副本集
bit1129
mongodb
1. 副本集的特性
1)一台主服务器(Primary),多台从服务器(Secondary)
2)Primary挂了之后,从服务器自动完成从它们之中选举一台服务器作为主服务器,继续工作,这就解决了单点故障,因此,在这种情况下,MongoDB集群能够继续工作
3)挂了的主服务器恢复到集群中只能以Secondary服务器的角色加入进来
2
- 【Spark八十一】Hive in the spark assembly
bit1129
assembly
Spark SQL supports most commonly used features of HiveQL. However, different HiveQL statements are executed in different manners:
1. DDL statements (e.g. CREATE TABLE, DROP TABLE, etc.)
- Nginx问题定位之监控进程异常退出
ronin47
nginx在运行过程中是否稳定,是否有异常退出过?这里总结几项平时会用到的小技巧。
1. 在error.log中查看是否有signal项,如果有,看看signal是多少。
比如,这是一个异常退出的情况:
$grep signal error.log
2012/12/24 16:39:56 [alert] 13661#0: worker process 13666 exited on s
- No grammar constraints (DTD or XML schema).....两种解决方法
byalias
xml
方法一:常用方法 关闭XML验证
工具栏:windows => preferences => xml => xml files => validation => Indicate when no grammar is specified:选择Ignore即可。
方法二:(个人推荐)
添加 内容如下
<?xml version=
- Netty源码学习-DefaultChannelPipeline
bylijinnan
netty
package com.ljn.channel;
/**
* ChannelPipeline采用的是Intercepting Filter 模式
* 但由于用到两个双向链表和内部类,这个模式看起来不是那么明显,需要仔细查看调用过程才发现
*
* 下面对ChannelPipeline作一个模拟,只模拟关键代码:
*/
public class Pipeline {
- MYSQL数据库常用备份及恢复语句
chicony
mysql
备份MySQL数据库的命令,可以加选不同的参数选项来实现不同格式的要求。
mysqldump -h主机 -u用户名 -p密码 数据库名 > 文件
备份MySQL数据库为带删除表的格式,能够让该备份覆盖已有数据库而不需要手动删除原有数据库。
mysqldump -–add-drop-table -uusername -ppassword databasename > ba
- 小白谈谈云计算--基于Google三大论文
CrazyMizzz
Google云计算GFS
之前在没有接触到云计算之前,只是对云计算有一点点模糊的概念,觉得这是一个很高大上的东西,似乎离我们大一的还很远。后来有机会上了一节云计算的普及课程吧,并且在之前的一周里拜读了谷歌三大论文。不敢说理解,至少囫囵吞枣啃下了一大堆看不明白的理论。现在就简单聊聊我对于云计算的了解。
我先说说GFS
&n
- hadoop 平衡空间设置方法
daizj
hadoopbalancer
在hdfs-site.xml中增加设置balance的带宽,默认只有1M:
<property>
<name>dfs.balance.bandwidthPerSec</name>
<value>10485760</value>
<description&g
- Eclipse程序员要掌握的常用快捷键
dcj3sjt126com
编程
判断一个人的编程水平,就看他用键盘多,还是鼠标多。用键盘一是为了输入代码(当然了,也包括注释),再有就是熟练使用快捷键。 曾有人在豆瓣评
《卓有成效的程序员》:“人有多大懒,才有多大闲”。之前我整理了一个
程序员图书列表,目的也就是通过读书,让程序员变懒。 程序员作为特殊的群体,有的人可以这么懒,懒到事情都交给机器去做,而有的人又可以那么勤奋,每天都孜孜不倦得
- Android学习之路
dcj3sjt126com
Android学习
转自:http://blog.csdn.net/ryantang03/article/details/6901459
以前有J2EE基础,接触JAVA也有两三年的时间了,上手Android并不困难,思维上稍微转变一下就可以很快适应。以前做的都是WEB项目,现今体验移动终端项目,让我越来越觉得移动互联网应用是未来的主宰。
下面说说我学习Android的感受,我学Android首先是看MARS的视
- java 遍历Map的四种方法
eksliang
javaHashMapjava 遍历Map的四种方法
转载请出自出处:
http://eksliang.iteye.com/blog/2059996
package com.ickes;
import java.util.HashMap;
import java.util.Iterator;
import java.util.Map;
import java.util.Map.Entry;
/**
* 遍历Map的四种方式
- 【精典】数据库相关相关
gengzg
数据库
package C3P0;
import java.sql.Connection;
import java.sql.SQLException;
import java.beans.PropertyVetoException;
import com.mchange.v2.c3p0.ComboPooledDataSource;
public class DBPool{
- 自动补全
huyana_town
自动补全
<!DOCTYPE html PUBLIC "-//W3C//DTD XHTML 1.0 Transitional//EN" "http://www.w3.org/TR/xhtml1/DTD/xhtml1-transitional.dtd"><html xmlns="http://www.w3.org/1999/xhtml&quo
- jquery在线预览PDF文件,打开PDF文件
天梯梦
jquery
最主要的是使用到了一个jquery的插件jquery.media.js,使用这个插件就很容易实现了。
核心代码
<!DOCTYPE html PUBLIC "-//W3C//DTD XHTML 1.0 Transitional//EN" "http://www.w3.org/TR/xhtml1/DTD/xhtml1-transitional.
- ViewPager刷新单个页面的方法
lovelease
androidviewpagertag刷新
使用ViewPager做滑动切换图片的效果时,如果图片是从网络下载的,那么再子线程中下载完图片时我们会使用handler通知UI线程,然后UI线程就可以调用mViewPager.getAdapter().notifyDataSetChanged()进行页面的刷新,但是viewpager不同于listview,你会发现单纯的调用notifyDataSetChanged()并不能刷新页面
- 利用按位取反(~)从复合枚举值里清除枚举值
草料场
enum
以 C# 中的 System.Drawing.FontStyle 为例。
如果需要同时有多种效果,
如:“粗体”和“下划线”的效果,可以用按位或(|)
FontStyle style = FontStyle.Bold | FontStyle.Underline;
如果需要去除 style 里的某一种效果,
- Linux系统新手学习的11点建议
刘星宇
编程工作linux脚本
随着Linux应用的扩展许多朋友开始接触Linux,根据学习Windwos的经验往往有一些茫然的感觉:不知从何处开始学起。这里介绍学习Linux的一些建议。
一、从基础开始:常常有些朋友在Linux论坛问一些问题,不过,其中大多数的问题都是很基础的。例如:为什么我使用一个命令的时候,系统告诉我找不到该目录,我要如何限制使用者的权限等问题,这些问题其实都不是很难的,只要了解了 Linu
- hibernate dao层应用之HibernateDaoSupport二次封装
wangzhezichuan
DAOHibernate
/**
* <p>方法描述:sql语句查询 返回List<Class> </p>
* <p>方法备注: Class 只能是自定义类 </p>
* @param calzz
* @param sql
* @return
* <p>创建人:王川</p>
* <p>创建时间:Jul