【android应用程序开发】——参考I
文章目录
- 一、JSON
- 1.1 JSON格式
- 1.2 JSON结构
- 格式要求
- 二、 Win系统提交Android代码到Github
- 三、数据库操作——LitePal
- 3.1 LitePal配置
- 3.1.1 添加依赖
- 3.1.2 配置litepal.xml文件
- 3.1.3 配置LitePalApplication
- 3.2 使用LitePal
- 3.2.1 概念
- 3.2.3 配置映射列表
- 3.2.3 创建表
- 3.2.4 CRUD操作
- 3.2.4.1 CRUD操作之——添加(C)
- 四、 网络连接——使用OkHttp(okhttp3)库
- 4.1 OkHttp库的配置
- 4.2 OkHttp库的使用
- 4.2.1从服务器获取数据(同步Get)
- 4.2.2 从服务器获取数据(异步Get)
- 4.2.3 向服务器发送数据
- 五、JSON数据解析
- 5.1 JSONObject数据解析
- 5.2使用GSON解析(Gson类型)
- 5.2.1GSON配置
- 6.Android开发之——Service
- 6.1Android多线程
- 6.2Android异步消息处理机制
- 6.3AsyncTask
- 6.4 Service
- 6.4.1借助Intent启动和停止服务
- 6.4.2 服务与活动的通信
- 6.4.3 服务的高级技巧
- 6.4.3.1前台服务
- 6.4.3.2IntentService类
- 七、Android应用之——通知
- 7.1 通知的常规用法
- 7.2 通知的高级用法
- 八、android开发之——广播
- 8.1创建广播接收器——动态注册
- 8.2静态注册广播
- 8.2标准广播和有序广播
- 8.3本地广播
- 九、Android——内容提供器
- 9.1运行时权限
- 9.2使用现有的内容提供器
- 9.2.1ContentResolver访问内容提供器数据
一、JSON
JSON 是 JS 对象的字符串表示法,它使用文本表示一个 JS 对象的信息,本质是一个字符串。
JavaScript Object Notation:JavaScript 对象简谱
采用完全独立于编程语言的文本格式来存储和表示数据。
1.1 JSON格式
JSON 数据的书写格式是:键(名称)/值对。
JSON 键值对是用来保存 JS 对象的一种方式,键/值对包括字段名称(在双引号中),后面跟一个冒号,然后是值。
JSON 值可以是:字符串(在双引号中)、数组(在中括号中)、数字(整数或浮点数)、逻辑值(true 或 false)、对象(在大括号中)、 null。
1.2 JSON结构
JSON结构有两种结构,对象和数组结构。
① {“name”: “李三”} 是一个包含name为李三的对象,
② [“李三”,“赵四”] 是一个包含两个元素的数组
③ [{“name”: “李三”} ,{“name”: “赵四”} ] 就表示包含两个对象的数组。
④ {“name”:[“Shanxi”,“Shandong”]}
格式要求
花括弧,方括弧,冒号和逗号
①花括弧表示一个“容器”
②方括号装载数组
③数组之间的元素通过逗号隔开
④键和值用冒号隔开
二、 Win系统提交Android代码到Github
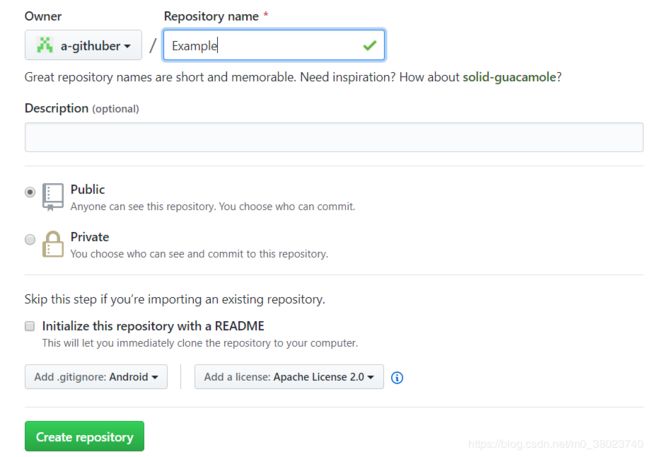
1. 创建新的Repository
2. 添加Android类型的.gitignore文件,选择开源协议
.gitignore这个文件的作用就是告诉Git哪些文件不需要添加到版本管理中。
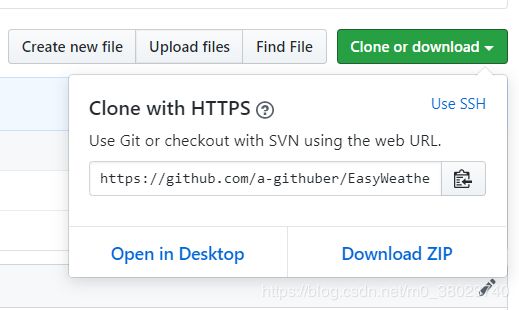
3. 获取远程版本库的Git地址
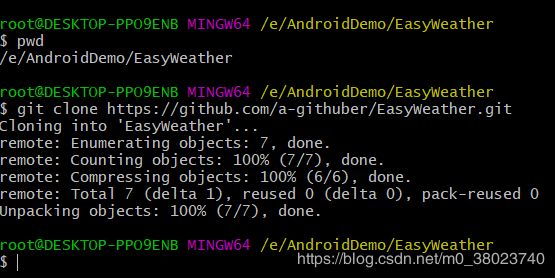
4. Git Bash进入安卓工程目录

6. 将github上的文件复制并覆盖本地文件
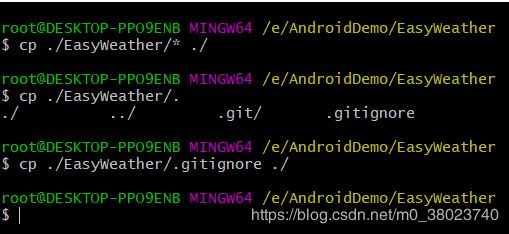
7. 项目提交到github
配置Git 身份
git config --global user.name “GCC”
git config --global user.email “[email protected]”
git add . ——添加版本控制
git commit -m “first commit.” ——本地执行提交操作
git push origin master ——将提交的内容同步到远程版本库
三、数据库操作——LitePal
3.1 LitePal配置
【开源网址】:
https://github.com/LitePalFramework/LitePal
3.1.1 添加依赖
对于jcenter上面的开源项目,只需要在app/build.gradle配置文件中声明该开源库的引用。
If you program with Java:
dependencies {
    implementation 'org.litepal.android:java:3.0.0'
}
3.1.2 配置litepal.xml文件
<litepal>

    <dbname value="demo" />


    <version value="1" />


    <list>
    list>
litepal>
3.1.3 配置LitePalApplication
由于操作数据库时需要用到Context,而我们显然不希望在每个接口中都去传一遍这个参数,那样操作数据库就显得太繁琐了。因此,LitePal使用了一个方法来简化掉Context这个参数,只需在AndroidManifest.xml中配置LitePalApplication,所有的数据库操作都不用再传Context了。
在AndroidManifest.xml里面:
<manifest>
    <application
        android:name="org.litepal.LitePalApplication"
        ...
    >
        ...
    application>
manifest>
3.2 使用LitePal
3.2.1 概念
根据对象关系映射模式的理念,每一张表都应该对应一个模型(Model),也就是说,如果我们想要建一张news表,就应该有一个对应的News模型类。新建一个User类,表中的每一列其实就是对应了模型类中的一个字段,比如表中有id、name、age 类中就也应该有这几个字段。id作为主键。
3.2.3 配置映射列表
add these models into the mapping list in litepal.xml:
需要添加完整的类名,包含包的路径
<list>
    <mapping class="org.litepal.litepalsample.model.Album" />
    <mapping class="org.litepal.litepalsample.model.Song" />
list>
LitePal的所有映射都是自动完成的。根据LitePal的数据类型支持,可以进行对象关系映射的数据类型一共有8种,int、short、long、float、double、boolean、String和Date。只要是声明成这8种数据类型的字段都会被自动映射到数据库表中,并不需要进行任何额外的配置。
3.2.3 创建表
现在只要对数据库有任何操作,数据库,就会自动被创建
gets the SQLiteDatabase with following codes:
SQLiteDatabase db = LitePal.getDatabase();
3.2.4 CRUD操作
- 导入LitePalSupport类
import org.litepal.crud.LitePalSupport;
- 模型类继承自LitePalSupport类
public class Province extends LitePalSupport {
}
3.2.4.1 CRUD操作之——添加(C)
Province province=new Province();
province.setxxx(xxx);
......
province.save();
四、 网络连接——使用OkHttp(okhttp3)库
4.1 OkHttp库的配置
【开源网址】
http://square.github.io/okhttp/
在app/build.gradle配置文件中声明该开源库引用
implementation("com.squareup.okhttp3:okhttp:4.1.1")
4.2 OkHttp库的使用
4.2.1从服务器获取数据(同步Get)
1.创建OkHttpClient的实例
OkHttpClient client = new OkHttpClient();
2.创建Request对象,发起Http请求
Request request = new Request.Builder()
      .url("http://www.baidu.com")
      .build();
3.调用OkHttpClient的newCall方法创建一个Call对象,同时调用execute方法,返回服务器的数据,即Response对象
Response response = client.newCall(request).execute()
4.获取Response返回的数据
response.body().string();
4.2.2 从服务器获取数据(异步Get)
okhttp3.Callback callback;
OkHttpClient okHttpClient=new OkHttpClient();
Request request=new Request.Builder().url(urlAdress).build();
okHttpClient.newCall(request).enqueue(callback);
callback为传入的回调函数地址,使用实现匿名接口的形式new new Callback(){
}.......
异步发起的请求会被加入到 Dispatcher 中的 runningAsyncCalls双端队列中通过线程池来执行。
4.2.3 向服务器发送数据
五、JSON数据解析
5.1 JSONObject数据解析
1.获取Response数据
..........
String string=response.body().string();
2.定义JSONArray数组
JSONArray jsonArrayP=new JSONArray(response);
3.获取JSONObject对象
JSONObject jsonObject=jsonArrayP.getJSONObject(i);
4.取出相应数据
jsonObject.getString("name");
jsonObject.getxxxx(xxxx);
5.2使用GSON解析(Gson类型)
【开源网址】
https://github.com/google/gson
5.2.1GSON配置
dependencies {
  implementation 'com.google.code.gson:gson:2.8.5'
}
6.Android开发之——Service
6.1Android多线程
class MyThread extends Thread{
    @Override
    public void run() {
        super.run();
    }
}
void test(){
    MyThread myThread=new MyThread();
    myThread.start();
}
class MyThread implements Runnable{
    @Override
    public void run() {
    }
}
void test(){
    MyThread myThread=new MyThread();
    new Thread(myThread).start();
    //new Thread构造函数需要一个Runnable接口
new Thread(new Runnable() {
    @Override
    public void run() {

	}
}).start();
//不用专门去定义一个类来实现Runnable接口
6.2Android异步消息处理机制
- Message
Message message=new Message();
message.arg1=1;
message.arg2=2;
message.what=3;
message.obj=null;//携带Object对象
- Handler
用于发送和处理消息,发送使用**sendMessage()方法;发出的消息经过一系列的辗转处理,会传递到handleMessage()**方法中
Message message=new Message();
message.arg1=1;
message.arg2=2;
message.what=3;
message.obj=null;//携带Object对象
Handler handler=null;//测试
handler.sendMessage(message);
- MessageQueue
存放通过Handler发送的消息,一个线程只有唯一的MessageQueue对象 - Looper
从MessageQueue中取出消息,送往Handler的handleMessage()中,内部是通过dispatchMessage()方法完成的。一个线程只有唯一的Looper对象
Handler handler= new Handler(){
     @Override
     public void handleMessage(@NonNull Message msg) {
         super.handleMessage(msg);
     }
 };
6.3AsyncTask
AsyncTask是一个抽象类
-定义
public abstract class AsyncTask<Params, Progress, Result> {
 ...
}

// 类中参数为3种泛型类型
// 整体作用:控制AsyncTask子类执行线程任务时各个阶段的返回类型
// 具体说明:
    // a. Params:开始异步任务执行时传入的参数类型,对应excute()中传递的参数
    // b. Progress:异步任务执行过程中,返回下载进度值的类型
    // c. Result:异步任务执行完成后,返回的结果类型,与doInBackground()的返回值类型保持一致
// 注:
    // a. 使用时并不是所有类型都被使用
    // b. 若无被使用,可用java.lang.Void类型代替
    // c. 若有不同业务,需额外再写1个AsyncTask的子类
}
class DownLoad extends AsyncTask<Void,Integer,Boolean>{
   protected void onPreExecute() {
    super.onPreExecute();
}//后台任务执行之前调用

@Override
protected Boolean doInBackground(Void... voids) {
    int download=0;
    publishProgress(download);//向主线程反馈数据,很快调用onProgressUpdate()
    return null;
}//所有代码都在子线程里进行,不能进行UI更新操作

@Override
protected void onProgressUpdate(Integer... values) {
    super.onProgressUpdate(values);
}//可以操作UI

@Override
protected void onPostExecute(Boolean aBoolean) {
    super.onPostExecute(aBoolean);
}//doInBackground后台任务执行完毕,aBoolean作为后台任务的返回值
}
//无需向后台任务传参数//整型作为进度显示//使用Boolean来反馈执行结果
- onPreExecute()
- doInBackground()
- publishProgress()
- onProgressUpdate()
- onPostExecute()
new DownLoad().execute();//启动任务
6.4 Service
class MyService extends Service{
    @Nullable
    @Override
    public IBinder onBind(Intent intent) {
        return null;
    }

    @Override
    public void onCreate() {
        super.onCreate();
    }//创建服务调用.

    @Override
    public int onStartCommand(Intent intent, int flags, int startId) {
        return super.onStartCommand(intent, flags, startId);
    }//每次服务启动调用

    @Override
    public void onDestroy() {
        super.onDestroy();
    }//服务销毁的时候调用
}
服务必须注册
6.4.1借助Intent启动和停止服务
- 启动服务
void test001(){
    Intent intent=new Intent(this,MyService.class);
    startService(intent);
}
- 停止服务
void test001(){
    Intent intent=new Intent(this,MyService.class);
    stopService(intent);
}
只需要在MyService的任何一个位置调用stopSelf()即可停止服务
6.4.2 服务与活动的通信
借助onBind()方法
- 创建一个Binder对象
class MyService extends Service{
	//使用Binder类来管理后台任务
    /**********************************/
    class TestBinder extends Binder{
    .........具体方法
    }//继承自Binder类,Binder类实现了IBinder接口
    /***********************************/
    TestBinder testBinder=new TestBinder();
    @Nullable
    @Override
    public IBinder onBind(Intent intent) {
        //return null;
        return testBinder;
    }
    ........................................
    }
- 在活动里面绑定服务
第一阶段:
....................................................
public MyService.TestBinder testBinder=null;

private ServiceConnection serviceConnection=new ServiceConnection() {
    @Override
    public void onServiceConnected(ComponentName componentName, IBinder iBinder) {
        testBinder=(MyService.TestBinder)iBinder;
        //调用testBinder的各种方法
    }
        //参数里面的iBinder即为onBind()返回的对象
    @Override
    public void onServiceDisconnected(ComponentName componentName) {

    }
};//ServiceConnection是接口
第二阶段:
................................
void test001(){
    Intent intent=new Intent(this,MyService.class);
    bindService(intent,serviceConnection,BIND_AUTO_CREATE);
    //startService(intent);
    //解除调用
    unbindService(serviceConnection);
}
..................................
- 函数
- startService(intent)与stopService(intent);
- bindService(intent,serviceConnection,BIND_AUTO_CREATE);与unbindService(serviceConnection);
- onCreate()与onDestory();
- onStartCommand();
- onBind();
- onCreate()必须先于onBind()运行
6.4.3 服务的高级技巧
6.4.3.1前台服务
6.4.3.2IntentService类
创建一个异步的、会自动停止的服务
class  MyIntentService extends IntentService{

    public MyIntentService(){
        super("MyIntentService");
    }//必须这样,因为抽象父类里面没有默认的构造函数
    @Override
    protected void onHandleIntent(@Nullable Intent intent) {
        //处理具体的逻辑
        startService(intent);
    }

    @Override
    public void onDestroy() {
        super.onDestroy();
    }
}
七、Android应用之——通知
通知可以在【活动】,【广播】,【服务】中创建。
7.1 通知的常规用法
- Android的通知消息通过NotificationManger来进行管理
NotificationManager notificationManager=(NotificationManager)getSystemService(Context.NOTIFICATION_SERVICE);
- 构造Notification对象
Notification notification=new NotificationCompat.Builder(this)
        .setContentTitle("")
        .setContentText("")
        .setWhen(System.currentTimeMillis())
        //通知被创建的时间,以毫秒为单位,System.currentTimeMillis()产生一个当前的毫秒,这个毫秒其实就是自1970年1月1日0时起的毫秒数
        .setSmallIcon(R.drawable.ic_launcher_background)
        //getResources()获取要加载的资源文件对象
        .setLargeIcon(BitmapFactory.decodeResource(getResources(),R.drawable.ic_launcher_background))
        .setContentIntent(pi)
                        //设置当点击通知后的跳转
        .setAutoCancel(true)
                        //设置点击了通知后,通知自动消失
.build();
注:java的连缀用法
在创建对象时,同时调用属性的设值函数,为属性赋值
 Apple apple = new Apple()
                .setColor("Green")
                .setWeight(12.3f);
                //但是函数必须返回this
- 使用NotificationManger管理Notification对象
notificationManager.notify(1,notification);
- 点击通知
Intent intent=new Intent(this,WeatherActivity.class);
PendingIntent pendingIntent=PendingIntent.getActivity(this,0,intent,0);
............
.setContentIntent(pendingIntent)
- 关闭通知
................
.setAutoCancel(true)
...................
notificationManager.cancel(1);
7.2 通知的高级用法
.setSound(Uri.fromFile(new File("1233")))//加入声音
.setVibrate(new long[]{0,1000,1000,1000})//振动,毫秒单位,主要申请权限
.setLights(Color.BLUE,1000,1000)
- 富文本构建
......
.setStyle(new NotificationCompat.BigTextStyle().bigText("........"));
............
- 图片嵌入
.setStyle(new NotificationCompat.BigPictureStyle().
        bigPicture(BitmapFactory.decodeResource(getResources(),R.drawable.png01)))
- 通知重要性
.setPriority(NotificationCompat.PRIORITY_MAX)
八、android开发之——广播
跨进程通信
8.1创建广播接收器——动态注册
- 创建广播接收器
class MyBroadCast extends BroadcastReceiver{
    @Override
    public void onReceive(Context context, Intent intent) {
      //不允许开线程
    }
}
- 注册广播接收器
.........................
IntentFilter intentFilter=new IntentFilter();
MyBroadCast myBroadCast=new MyBroadCast();
.....................
intentFilter.addCategory("android.net.conn.CONNECTIVITY_CHANGE");//网络状态发生变化
registerReceiver(myBroadCast,intentFilter);
...........................
- 取消注册
unregisterReceiver(myBroadCast);
【拓展】
......................................................
ConnectivityManager connectivityManager=(ConnectivityManager)getSystemService(Context.CONNECTIVITY_SERVICE);
//ConnectivityManager管理网络连接
NetworkInfo networkInfo=connectivityManager.getActiveNetworkInfo();//注意申请权限
//获取网络信息
if(networkInfo!=null&&networkInfo.isAvailable()){//是否有网络
   // ..........................;
}
..........................................................
8.2静态注册广播
8.2标准广播和有序广播
- 静态标准广播
<intent-filter>
    <action android:name="com.example.action.MAIN" />
intent-filter>
Intent intent=new intent(com.example.action.MAIN);
sendBroadCast(intent);
- 发送有序广播
Intent intent=new intent(com.example.action.MAIN);
sendOrderedBroadCast(intent);
注册的时候设置有序广播接收器的接受顺序
<intent-filter android:priority="100">
有序广播截断
class MyBroadCast extends BroadcastReceiver{
    @Override
    public void onReceive(Context context, Intent intent) {
      //不允许开线程
      abortBroadcast();
    }
}
8.3本地广播
使用LocalBroadcastManage
①注册
intentFilter.addCategory("android.net.conn.CONNECTIVITY_CHANGE");

MyBroadCast myBroadCast=new MyBroadCast();
LocalBroadcastManager localBroadcastManager=LocalBroadcastManager.getInstance(getApplicationContext());
localBroadcastManager.registerReceiver(myBroadCast,intentFilter);
②发送
Intent intent=new intent(com.example.action.MAIN);
localBroadcastManager.sendBroadCast(intent);
③注销
localBroadcastManager.unregisterReceiver(myBroadCast);
九、Android——内容提供器
不同的应用程序之间共享数据
9.1运行时权限
if(ContextCompat.checkSelfPermission(MainActivity.this,Manifest.permission.CALL_PHONE)!=
                   PackageManager.PERMISSION_GRANTED){
               ActivityCompat.requestPermissions(MainActivity.this,new String[]{Manifest.permission.CALL_PHONE}
               ,1);//请求码是唯一值
           }
           .................
调用回调函数
onRequestPermissionsResult(requestcode,String[]permission,int[]grantResults){
                   .......
                   grantResults[0]==PackageManager.PERMISSION_GRANTED;
               };
9.2使用现有的内容提供器
9.2.1ContentResolver访问内容提供器数据
ContentResolver contentResolver=MainActivity.this.getContentResolver();
CRUD操作
			contentResolver.insert();
            contentResolver.update();
            contentResolver.delete();
            contentResolver.query();
//接受参数
内容URI:authority:com.example.provider和path:/table1
格式
content://com.example.provider/table1
解析成Uri对象
String string="content://com.example.provider/table1";
Uri uri=Uri.parse(string);
- CRUD——R
  Cursor cursor=contentResolver.query();
               if(cursor!=null)
               while(cursor.moveToNext())

               { ........................................................
                 String string=  cursor.getString(cursor.getColumnIndex("example"));
                  int i=cursor.getInt(cursor.getColumnIndex(int));
               ......................................................}
- CRUD——C
               ContentValues contentValues=new ContentValues();
               contentValues.put("column1","text");
               contentValues.put("column2",2);
               contentResolver.insert(Uri,contentValues);
- CRUD——U
               ContentValues contentValues=new ContentValues();
               contentValues.put("column1","text");
               contentValues.put("column1",2);//changed
               contentResolver.insert(Uri,contentValues,"column1=? and ....",new String[]{string...});
- CRUD——D
 ContentValues contentValues=new ContentValues();
               contentValues.put("column1","text");
               contentValues.put("column1",2);//changed
               contentResolver.delete(Uri"column1=? and ....",new String[]{string...});
