容器化进阶Kubernetes核心技术
文章目录
- 前言
- Pod详解
- Pod的定义
- Pod的基本用法
- Pod的分类
- Pod生命周期和重启策略
- Pod资源配置
- Label详解
- Replication Controller详解
- Replica Set详解
- Deployment详解
- Horizontal Pod Autoscaler
- Volume详解
- Namespace详解
- Service 详解
- Service的定义
- Service的基本用法
- 多端口service
- 外部的service
前言
上篇学习了搭建k8s集群,本篇博客进阶学习k8s。
Pod详解
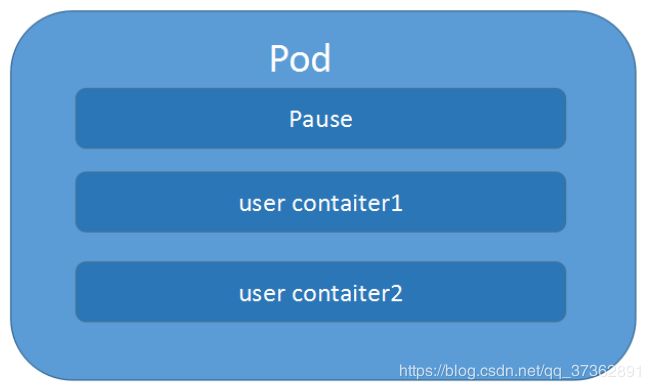
Pod是Kubernetes的最重要概念,每一个Pod都有一个特殊的被称为”根容器“的Pause容器。Pause容器对应的镜像属于Kubernetes平台的一部分,除了Pause容器,每个Pod还包含一个或多个紧密相关的用户业务容器。


Podvs 应用
每个Pod都是应用的一个实例,有专用的IPPodvs 容器
一个Pod可以有多个容器,彼此间共享网络和存储资源,每个Pod中有一个Pause容器保存所有的容器状态,通过管理pause容器,达到管理pod中所有容器的效果。Podvs 节点
同一个Pod中的容器总会被调度到相同Node节点,不同节点间Pod的通信基于虚拟二层网络技术实现PodvsPod
普通的Pod和静态Pod
Pod的定义
下面是yaml文件定义的Pod的完整内容
apiVersion: v1 #指定api版本,此值必须在kubectl apiversion中
kind: Pod #指定创建资源的角色/类型
metadata: #资源的元数据/属性
name: web04-pod #资源的名字,在同一个namespace中必须唯一
labels: #设定资源的标签,详情请见http://blog.csdn.net/liyingke112/article/details/77482384
k8s-app: apache
version: v1
kubernetes.io/cluster-service: "true"
annotations: #自定义注解列表
- name: String #自定义注解名字
spec:#specification of the resource content 指定该资源的内容
replicas: 3
########deploy专用##############
# minReadySeconds: 60 #滚动升级时60s后认为该pod就绪
strategy:
rollingUpdate: ##由于replicas为3,则整个升级,pod个数在2-4个之间
maxSurge: 1 #滚动升级时会先启动1个pod
maxUnavailable: 1 #滚动升级时允许的最大Unavailable的pod个数
restartPolicy: Always #表明该容器一直运行,默认k8s的策略,在此容器退出后,会立即创建一个相同的容器
nodeSelector: #节点选择,先给主机打标签kubectl label nodes kube-node1 zone=node1
zone: node1
containers:
- name: web04-pod #容器的名字
image: web:apache #容器使用的镜像地址
imagePullPolicy: Never #三个选择Always、Never、IfNotPresent,每次启动时检查和更新(从registery)images的策略,
# Always,每次都检查
# Never,每次都不检查(不管本地是否有)
# IfNotPresent,如果本地有就不检查,如果没有就拉取
command: ['sh'] #启动容器的运行命令,将覆盖容器中的Entrypoint,对应Dockefile中的ENTRYPOINT
args: ["$(str)"] #启动容器的命令参数,对应Dockerfile中CMD参数
env: #指定容器中的环境变量
- name: str #变量的名字
value: "/etc/run.sh" #变量的值
resources: #资源管理,请求请见http://blog.csdn.net/liyingke112/article/details/77452630
requests: #容器运行时,最低资源需求,也就是说最少需要多少资源容器才能正常运行
cpu: 0.1 #CPU资源(核数),两种方式,浮点数或者是整数+m,0.1=100m,最少值为0.001核(1m)
memory: 32Mi #内存使用量
limits: #资源限制,超过阈值会挂。
cpu: 0.5
memory: 32Mi
ports:
- containerPort: 80 #容器开发对外的端口
name: httpd #名称
protocol: TCP
livenessProbe: #pod内容器健康检查的设置,详情请见http://blog.csdn.net/liyingke112/article/details/77531584
httpGet: #通过httpget检查健康,返回200-399之间,则认为容器正常
path: / #URI地址
port: 80
#host: 127.0.0.1 #主机地址
scheme: HTTP
initialDelaySeconds: 180 #表明第一次检测在容器启动后多长时间后开始
timeoutSeconds: 5 #检测的超时时间
periodSeconds: 15 #检查间隔时间
#successThreshold: 1 #检测成功阈值 可不添
#failureThreshold: 5 #检测故障阈值 可不添
#也可以用这种方法
#exec: 执行命令的方法进行监测,如果其退出码不为0,则认为容器正常
# command:
# - cat
# - /tmp/health
#也可以用这种方法
#tcpSocket: //通过tcpSocket检查健康
# port: number
lifecycle: #生命周期管理
postStart: #容器运行之前运行的任务
exec:
command:
- 'sh'
- 'yum upgrade -y'
##############修改时区if判断 ###################
lifecycle:
postStart:
exec:
command:
- bash
- "-c"
- |
set -ex
if [[ `cat /etc/redhat-release|awk '{print $1}'` == "CentOS" ]]; then
ln -sf /usr/share/zoneinfo/Asia/Shanghai /etc/localtime;
elif [[ `cat /etc/issue|grep -o "Debian"` == "Debian" ]]; then
ln -snf /usr/share/zoneinfo/Asia/Shanghai /etc/localtime && echo Asia/Shanghai > /etc/timezone
fi
##############################################
preStop:#容器关闭之前运行的任务
exec:
command: ['service httpd stop']
volumeMounts: #详情请见http://blog.csdn.net/liyingke112/article/details/76577520
- name: volume #挂载设备的名字,与volumes[*].name 需要对应
mountPath: /data #挂载到容器的某个路径下
readOnly: True
volumes: #定义一组挂载设备
- name: volume #定义一个挂载设备的名字
#meptyDir: {}
hostPath:
path: /opt #挂载设备类型为hostPath,路径为宿主机下的/opt,这里设备类型支持很多种
Pod的基本用法
在kubernetes中对运行容器的要求为:容器的主程序需要一直在前台运行,而不是后台运行。应用需要改造成前台运行的方式。如果我们创建的Docker镜像的启动命令是后台执行程序,则在kubelet创建包含这个容器的pod之后运行完该命令,即认为Pod已经结束,将立刻销毁该Pod。如果为该Pod定义了RC,则创建、销毁会陷入一个无限循环的过程中。
Pod可以由1个或多个容器组合而成。
# 一个容器组成的Pod
apiVersion: v1
kind: Pod
metadata:
  name: mytomcat
  labels:
    name: mytomcat
spec:
  containers:
  - name: mytomcat
    image: tomcat
    ports:
    - containerPort: 8080
- 由两个为紧耦合的容器组成的
Pod示例
#两个紧密耦合的容器
apiVersion: v1
kind: Pod
metadata:
  name: myweb
  labels:
    name: tomcat-redis
spec:
  containers:
  - name: tomcat
    image: tomcat
    ports:
    - containerPort: 8080
  - name: redis
    image: redis
    ports:
    - containerPort: 6379
- 创建
kubectl create -f xxx.yaml
- 查看
kubectl get pod/po <Pod_name>
kubectl get pod/po <Pod_name> -o wide
kubectl describe pod/po <Pod_name>
- 删除
kubectl delete -f pod pod_name.yaml
kubectl delete pod --all/[pod_name]
Pod的分类
Pod有两种类型
-
普通
Pod
普通Pod一旦被创建,就会被放入到etcd中存储,随后会被Kubernetes Master调度到某个具体的Node上并进行绑定,随后该Pod对应的Node上的kubelet进程实例化成一组相关的Docker容器并启动起来。在默认情况下,当Pod里某个容器停止时,Kubernetes会自动检测到这个问题并且重新启动这个Pod里某所有容器,如果Pod所在的Node宕机,则会将这个Node上的所有Pod重新调度到其它节点上。 -
静态
Pod
静态Pod是由kubelet进行管理的仅存在于特定Node上的Pod,它们不能通过API Server进行管理,无法与ReplicationController、Deployment或DaemonSet进行关联,并且kubelet也无法对它们进行健康检查。
Pod生命周期和重启策略
- Pod的状态
| 状态值 | 说明 |
|---|---|
| Pending | API Server已经创建了该Pod,但Pod中的一个或多个容器的镜像还没有创建,包括镜像下载过程 |
| Running | Pod内所有容器已创建,且至少一个容器处于运行状态、正在启动状态或正在重启状态 |
| Completed | Pod内所有容器均成功执行退出,且不会再重启 |
| Failed | Pod内所有容器均已退出,但至少一个容器退出失败 |
| Unknown | 由于某种原因无法获取Pod状态,例如网络通信不畅 |
- Pod重启策略
Pod的重启策略包括Always、OnFailure和Never,默认值是Always
| 重启策略 | 说明 |
|---|---|
| Always | 当容器失效时,由kubelet自动重启该容器 |
| OnFailure | 当容器终止运行且退出码不为0时,由kubelet自动重启该容器 |
| Never | 不论容器运行状态如何,kubelet都不会重启该容器 |
- 常见转换状态
| Pod包含的容器 | Pod当前的状态 | 发生事件 | Pod的结果状态 | ||
|---|---|---|---|---|---|
| RestartPolicy=Always | RestartPolicy=OnFailure | RestartPolicy=Never | |||
| 包含一个容器 | Running | 容器成功退出 | Running | Succeeded | Succeeded |
| 包含一个容器 | Running | 容器失败退出 | Running | Running | Failure |
| 包含两个容器 | Running | 1个容器失败退出 | Running | Running | Running |
| 包含两个容器 | Running | 容器被OOM杀掉 | Running | Running | Failure |
Pod资源配置
每个Pod都可以对其能使用的服务器上的计算资源设置限额,Kubernetes中可以设置限额的计算资源有CPU与Memory两种,其中CPU的资源单位为CPU数量,是一个绝对值而非相对值。Memory配额也是一个绝对值,它的单位是内存字节数。
Kubernetes里,一个计算资源进行配额限定需要设定以下两个参数:
Requests该资源最小申请数量,系统必须满足要求Limits该资源最大允许使用的量,不能突破,当容器试图使用超过这个量的资源时,可能会被Kubernetes Kill并重启
sepc
  containers:
  - name: db
    image: mysql
    resources:
      requests:
        memory: "64Mi"
        cpu: "250m"
      limits:
        memory: "128Mi"
        cpu: "500m"
上述代码表明MySQL容器申请最少0.25个CPU以及64MiB内存,在运行过程中容器所能使用的资源配额为0.5个CPU以及128MiB内存。
Label详解
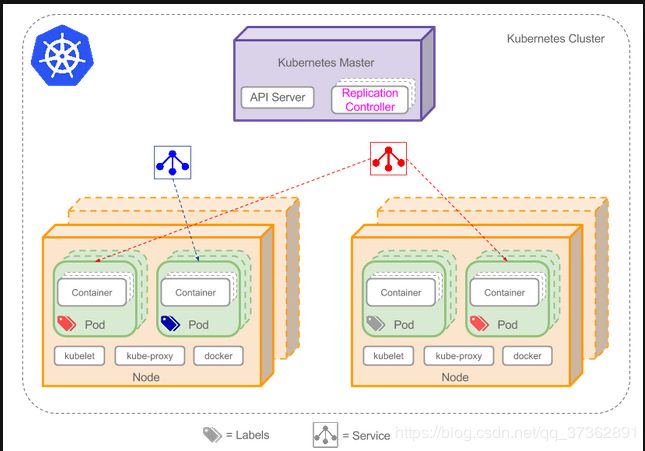
Label是Kubernetes系统中另一个核心概念。一个Label是一个key=value的键值对,其中key与value由用户自己指定。Label可以附加到各种资源对象上,如Node、Pod、Service、RC,一个资源对象可以定义任意数量的Label,同一个Label也可以被添加到任意数量的资源对象上,Label通常在资源对象定义时确定,也可以在对象创建后动态添加或删除。
Label的最常见的用法是使用metadata.labels字段,来为对象添加Label,通过spec.selector来引用对象
apiVersion: v1
kind: ReplicationController
metadata:
  name: nginx
spec:
  replicas: 3
  selector:
    app: nginx
  template:
    metadata:
      labels:
        app: nginx
    spec:
      containers:
      - name: nginx
        image: nginx
        ports:
        - containerPort: 80
-------------------------------------
apiVersion: v1
kind: Service
metadata:
  name: nginx
spec:
  type: NodePort
ports:
  - port: 80
    nodePort: 3333
selector:
  app: nginx
Label附加到Kubernetes集群中的各种资源对象上,目的就是对这些资源对象进行分组管理,而分组管理的核心就是Label Selector。Label与Label Selector都是不能单独定义,必须附加在一些资源对象的定义文件上,一般附加在RC和Service的资源定义文件中。
Replication Controller详解
Replication Controller(RC)是Kubernetes系统中核心概念之一,当我们定义了一个RC并提交到Kubernetes集群中以后,Master节点上的Controller Manager组件就得到通知,定期检查系统中存活的Pod,并确保目标Pod实例的数量刚好等于RC的预期值,如果有过多或过少的Pod运行,系统就会停掉或创建一些Pod.此外我们也可以通过修改RC的副本数量,来实现Pod的动态缩放功能。
kubectl scale rc nginx --replicas=5
由于Replication Controller与Kubernetes代码中的模块Replication Controller同名,所以在Kubernetes v1.2时,它就升级成了另外一个新的概念Replica Sets,官方解释为下一代的RC,它与RC区别是Replica Sets支援基于集合的Label selector,而RC只支持基于等式的Label Selector。我们很少单独使用Replica Set,它主要被Deployment这个更高层面的资源对象所使用,从而形成一整套Pod创建、删除、更新的编排机制。最好不要越过RC直接创建Pod,因为Replication Controller会通过RC管理Pod副本,实现自动创建、补足、替换、删除Pod副本,这样就能提高应用的容灾能力,减少由于节点崩溃等意外状况造成的损失。即使应用程序只有一个Pod副本,也强烈建议使用RC来定义Pod。
Replica Set详解
ReplicaSet 跟 ReplicationController 没有本质的不同,只是名字不一样,并且ReplicaSet 支持集合式的 selector(ReplicationController 仅支持等式)。Kubernetes官方强烈建议避免直接使用ReplicaSet,而应该通过Deployment来创建RS和Pod。由于ReplicaSet是ReplicationController的代替物,因此用法基本相同,唯一的区别在于ReplicaSet支持集合式的selector。
Deployment详解
Deployment是Kubenetes v1.2引入的新概念,引入的目的是为了更好的解决Pod的编排问题,Deployment内部使用了Replica Set来实现。Deployment的定义与Replica Set的定义很类似,除了API声明与Kind类型有所区别:
apiVersion: extensions/v1beta1
kind: Deployment
metadata:
  name: frontend
spec:
  replicas: 1
  selector:
    matchLabels:
      tier: frontend
    matchExpressions:
      - {key: tier, operator: In, values: [frontend]}
  template:
    metadata:
      labels:
        app: app-demo
        tier: frontend
    spec:
      containers:
      - name: tomcat-demo
        image: tomcat
        ports:
        - containerPort: 8080
Horizontal Pod Autoscaler
Horizontal Pod Autoscal(Pod横向扩容 简称HPA)与RC、Deployment一样,也属于一种Kubernetes资源对象。通过追踪分析RC控制的所有目标Pod的负载变化情况,来确定是否需要针对性地调整目标Pod的副本数,这是HPA的实现原理。
Kubernetes对Pod扩容与缩容提供了手动和自动两种模式,手动模式通过kubectl scale命令对一个Deployment/RC进行Pod副本数量的设置。自动模式则需要用户根据某个性能指标或者自定义业务指标,并指定Pod副本数量的范围,系统将自动在这个范围内根据性能指标的变化进行调整。
- 手动扩容和缩容
kubectl scale deployment frontend --replicas 1
- 自动扩容和缩容
HPA控制器基本Master的kube-controller-manager服务启动参数--horizontal-pod-autoscaler-sync-period定义的时长(默认值为30s),周期性地监测Pod的CPU使用率,并在满足条件时对RC或Deployment中的Pod副本数量进行调整,以符合用户定义的平均Pod CPU使用率。
apiVersion: apps/v1beta1
kind: Deployment
metadata:
  name: nginx-deployment
spec:
  replicas: 1
  template:
    metadata:
      name: nginx
      labels:
        app: nginx
    spec:
      containers:
      - name: nginx
        image: nginx
        resources:
          requests:
            cpu: 50m
        ports:
        - containerPort: 80
-------------------------------
apiVersion: v1
kind: Service
metadata:
  name: nginx-svc
spec:
  ports:
  - port: 80
  selector:
    app: nginx
-----------------------------------
apiVersion: autoscaling/v1
kind: HorizontalPodAutoscaler
metadata:
  name: nginx-hpa
spec:
  scaleTargetRef:
    apiVersion: app/v1beta1
    kind: Deployment
    name: nginx-deployment
  minReplicas: 1
  maxReplicas: 10
  targetCPUUtilizationPercentage: 50
Volume详解
Volume是Pod中能够被多个容器访问的共享目录。Kubernetes的Volume定义在Pod上,它被一个Pod中的多个容器挂载到具体的文件目录下。Volume与Pod的生命周期相同,但与容器的生命周期不相关,当容器终止或重启时,Volume中的数据也不会丢失。要使用volume,pod需要指定volume的类型和内容( spec.volumes字段),和映射到容器的位置(spec.containers.volumeMounts 字段)。Kubernetes支持多种类型的Volume,包括:emptyDir、hostPath、gcePersistentDisk、awsElasticBlockStore、nfs、iscsi、flocker、glusterfs、rbd、cephfs、gitRepo、secret、persistentVolumeClaim、downwardAPI、azureFileVolume、azureDisk、vsphereVolume、Quobyte、PortworxVolume、ScaleIO。
- emptyDir
EmptyDir类型的volume创建于pod被调度到某个宿主机上的时候,而同一个pod内的容器都能读写EmptyDir中的同一个文件。一旦这个pod离开了这个宿主机,EmptyDir中的数据就会被永久删除。所以目前EmptyDir类型的volume主要用作临时空间,比如Web服务器写日志或者tmp文件需要的临时目录。yaml示例如下:
apiVersion: v1
kind: Pod
metadata:
  name: test-pd
spec:
  containers:
  - image: docker.io/nazarpc/webserver
    name: test-container
    volumeMounts:
    - mountPath: /cache
      name: cache-volume
  volumes:
  - name: cache-volume
    emptyDir: {}
- hostPath
HostPath属性的volume使得对应的容器能够访问当前宿主机上的指定目录。例如,需要运行一个访问Docker系统目录的容器,那么就使用/var/lib/docker目录作为一个HostDir类型的volume;或者要在一个容器内部运行CAdvisor,那么就使用/dev/cgroups目录作为一个HostDir类型的volume。一旦这个pod离开了这个宿主机,HostDir中的数据虽然不会被永久删除,但数据也不会随pod迁移到其他宿主机上。因此,需要注意的是,由于各个宿主机上的文件系统结构和内容并不一定完全相同,所以相同pod的HostDir可能会在不同的宿主机上表现出不同的行为。yaml示例如下:
apiVersion: v1
kind: Pod
metadata:
  name: test-pd
spec:
  containers:
  - image: docker.io/nazarpc/webserver
    name: test-container
    # 指定在容器中挂接路径
    volumeMounts:
    - mountPath: /test-pd
      name: test-volume
    # 指定所提供的存储卷
  volumes:
  - name: test-volume
    # 宿主机上的目录
    hostPath:
    # directory location on host
      path: /data
- nfs
NFS类型的volume。允许一块现有的网络硬盘在同一个pod内的容器间共享。yaml示例如下:
apiVersion: apps/v1 # for versions before 1.9.0 use apps/v1beta2
kind: Deployment
metadata:
  name: redis
spec:
  selector:
    matchLabels:
       app: redis
  revisionHistoryLimit: 2
  template:
     metadata:
       labels:
         app: redis
     spec:
       containers:
       # 应用的镜像
       - image: redis
         name: redis
         imagePullPolicy: IfNotPresent
       # 应用的内部端口
         ports:
         - containerPort: 6379
           name: redis6379
         env:
         - name: ALLOW_EMPTY_PASSWORD
           value: "yes"
         - name: REDIS_PASSWORD
           value: "redis"
       # 持久化挂接位置,在docker中
        volumeMounts:
        - name: redis-persistent-storage
          mountPath: /data
      volumes:
      # 宿主机上的目录
      - name: redis-persistent-storage
        nfs:
          path: /k8s-nfs/redis/data
          server: 192.168.126.112
Namespace详解
Namespace在很多情况下用于实现多用户的资源隔离,通过将集群内部的资源对象分配到不同的Namespace中,形成逻辑上的分组,便于不同的分组在共享使用整个集群的资源同时还能被分别管理。Kubernetes集群在启动后,会创建一个名为"default"的Namespace,如果不特别指Namespace,则用户创建的Pod,RC,Service都将被系统创建到这个默认的名为default的Namespace中。
- Namespace创建
apiVersion: v1
kind: Namespace
metadata:
  name: development
---------------------
apiVersion: v1
kind: Pod
metadata:
  name: busybox
  namespace: development
spec:
  containers:
  - image: busybox
    command:
     - sleep
     - "3600"
    name: busybox
- Namespace查看
kubectl get pods --namespace=development
Service 详解
Service是Kubernetes最核心概念,通过创建Service,可以为一组具有相同功能的容器应用提供一个统一的入口地址,并且将请求负载分发到后端的各个容器应用上。
Service的定义
yaml格式的Service定义文件
apiVersion: v1
kind: Service
matadata:
  name: string
  namespace: string
  labels:
  - name: string
  annotations:
  - name: string
spec:
  selector: []
  type: string
  clusterIP: string
  sessionAffinity: string
  ports:
  - name: string
    protocol: string
    port: int
    targetPort: int
    nodePort: int
  status:
    loadBalancer:
      ingress:
        ip: string
        hostname: string
| 属性名称 | 取值类型 | 是否可选 | 取值说明 |
|---|---|---|---|
| version | string | Required | v1 |
| kind | string | Required | Service |
| metadata | object | Required | 元数据 |
| metadata.name | string | Required | Service名称 |
| metadata.namespace | string | Required | 命名空间,默认为default |
| metadata.labels[] | list | 自定义标签属性列表 | |
| metadata.annotation[] | list | 自定义注解属性列表 | |
| spec | object | Required | 详细描述 |
| spec.selector[] | list | Required | Label Selector配置,将选择具有指定Label标签的Pod作为管理范围 |
| spec.type | string | Required | Service的类型,指定Service的访问方式,默认值为ClusterIP。取值范围如下:ClusterIP: 虚拟服务的IP,用于k8s集群内部的pod访问,在Node上kubeproxy通过设置的Iptables规则进行转发。NodePort:使用宿主机的端口,使用能够访问各Node的外部客户端通过Node的IP地址和端口就能访问服务。LoadBalancer: 使用外接负载均衡器完成到服务的负载分发,需要在spec.status.loadBalancer字段指定外部负载均衡器的IP地址,并同时定义nodePort和clusterIP,用于公有云环境。 |
| spec.clusterIP | string | 虚拟服务的IP地址,当type=clusterIP时,如果不指定,则系统进行自动分配。也可以手工指定。当type=LoadBalancer时,则需要指定。 | |
| spec.sessionAffinity | string | 是否支持Session,可选值为ClientIP,表示将同一个源IP地址的客户端访问请求都转发到同一个后端Pod。默认值为空。 | |
| spec.ports[] | list | Service需要暴露的端口列表 | |
| spec.ports[].name | string | 端口名称 | |
| spec.ports[].protocol | string | 端口协议,支持TCP和UDP,默认值为TCP | |
| spec.ports[].port | int | 服务监听的端口号 | |
| spec.ports[].targetPort | int | 需要转发到后端Pod的端口号 | |
| spec.ports[].nodePort | int | 当spec.type=NodePort时,指定映射到物理机的端口号status object当spec.type=LoadBalancer时,设置外部负载均衡器的地址,用于公有云环境 | |
| status.loadBalancer | object | 外部负载均衡器 | |
| status.loadBalancer.ingress | object | 外部负载均衡器 | |
| status.loadBalancer.ingress.ip | string | 外部负载均衡器的IP地址 | |
| status.loadBalancer.ingress.hostname | string | 外部负载均衡器的主机名 |
Service的基本用法
一般来说,对外提供服务的应用程序需要通过某种机制来实现,对于容器应用最简便的方式就是通过TCP/IP机制及监听IP和端口号来实现。创建一个基本功能的Service:
apiVersion: v1
kind: ReplicationController
metadata:
  name: mywebapp
spec:
  replicas: 1
  template:
    metadata:
      name: mywebapp
      labels:
        app: mywebapp
    spec:
      containers:
      - name: mywebapp
        image: tomcat
        ports:
        - containerPort: 8080
查看pod运行情况
在Node 192.168.56.121上查看tomcat运行情况

我们可以通过kubectl get pods -l app=mywebapp -o yaml | grep podIP来获取Pod的IP地址和端口号来访问Tomcat服务,但是直接通过Pod的IP地址和端口访问应用服务是不可靠的,因为当Pod所在的Node发生故障时,Pod将被kubernetes重新调度到另一台Node,Pod的地址会发生改变。我们可以通过配置文件来定义Service,再通过kubectl create来创建,这样可以通过Service地址来访问后端的Pod。
apiVersion: v1
kind: Service
metadata:
  name: mywebapp-svc
spec:
  ports:
  - port: 8081
    targetPort: 8080
  selector:
    app: mywebapp
多端口service
有时一个容器应用也可能需要提供多个端口的服务,那么在Service的定义中也可以相应地设置为将多个端口对应到多个应用服务。
apiVersion: v1
kind: Service
metadata:
  name: mywebAppService
spec:
  ports:
  - port: 8080
    targetPort: 8080
    name: web
  - port: 8005
    targetPort: 8005
    name: management
  selector:
    app: mywebapp
外部的service
在某些特殊环境中,应用系统需要将一个外部数据库作为后端服务进行连接,或将另一个集群或Namespace中的服务作为服务的后端,这时可以通过创建一个无Label Selector的Service来实现。
apiVersion: v1
kind: Service
metadata:
  name: my-service
spec:
  ports:
  - protocol: TCP
    port: 80
    targetPort: 80
--------------------------
apiVersion: v1
kind: Endpoints
metadata:
  name: my-service
subsets:
- addresses:
  - ip: 10.254.74.3
  ports:
  - port: 8080

