SpringMvc 之MockMvc的使用方法
出现的问题:
在我们后台开发接口时,经常做的一件事就是编码、启动后台服务、使用PostMan 或者其他的接口调用工具进行测试、发现接口问题、修改代码,继续重启后台服务,继续走着这样的流程,个人感觉启动服务是一个非常麻烦的事情,当我需要看看我写的接口是否正确时,每次都要重新启动,输入参数,访问服务,然后在本地的时候代码跑着一点问题都没有,部署到对应环境时,打包没问题,接口却不通了,这种接口不通的问题如果暴露在编译打包时,是不是就省去了很多时间,最近看了一下springboot中自带的MockMVC,应该属于SpringMVC的测试框架.
解决问题:
看到springboot官方文档中,默认情况下,@springbootTest注解不会启动服务器,如果想要针对此模拟环境测试web端点,则可以另外配置MockMvc:
这里使用的是用maven 构建的springboot项目,构建成功时在src/test/..下对应有一个自动生成的测试类
@RunWith(SpringRunner.class)
@SpringBootTest
@AutoConfigureMockMvc //该注解将会自动配置mockMvc的单元测试
public class LogdemoApplicationTests {

 @Autowired
    private MockMvc mvc; //自动注入mockMvc的对象
}
简单的接口示例,使用Get请求方式:
 @GetMapping("/testGet")
    public Map testGet(@RequestParam("name") String name, @RequestParam("age")Integer age){
        Map map = new HashMap<>();
        map.put("name",name);
        map.put("age",age);
        map.put("status",200);

        return map;
    }
对应的单元测试:
import static org.springframework.test.web.servlet.request.MockMvcRequestBuilders.get;
 @Test
    public void testGet() throws Exception{
        System.out.println("=======开始测试testGet=======");
          //此处应该注意 get()静态方法时web.servlet包下的,不要导错了
        MvcResult mvcResult = this.mvc
                .perform(get("/testGet") //get请求方式
                        .param("name", "张三")//拼接参数
                        .param("age", "14"))
                .andExpect(status().isOk())//http返回状态码
                .andReturn();
        System.out.println(mvcResult.getResponse().getContentAsString());//打印响应结果
        System.out.println("=========测试testGet结束========");
    }
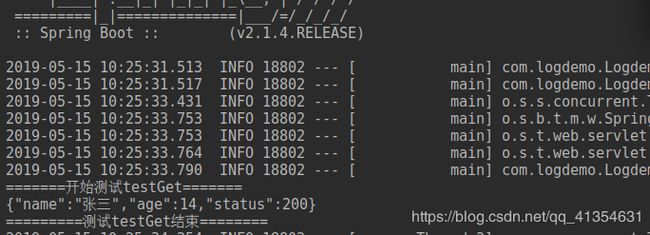
控制台输出:
修改一下代码,如果测试中出现错误的话:
    @Test
    public void testGet() throws Exception{
        System.out.println("=======开始测试testGet=======");

        this.mvc
                .perform(get("/testGet")
                        .param("name", "张三")
                        .param("age", "14"))
                .andExpect(status().isOk())
                .andExpect(content().string("result")); //判断结果是否和预期想吻合,如果不一样的话是会报错的
//        System.out.println(mvcResult.getResponse().getContentAsString());
        System.out.println("=========测试testGet结束========");
    }
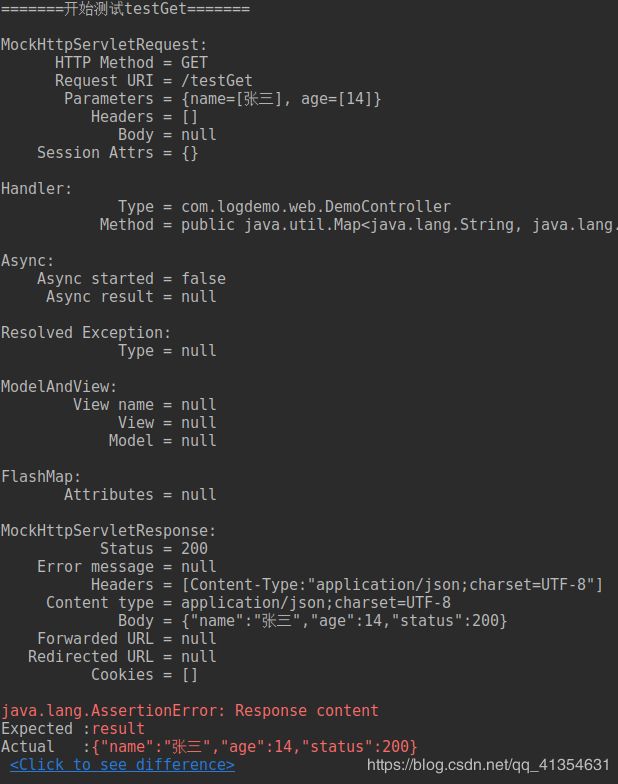
出现错误的提示:
请求和响应的信息会被打印到控制台,也方便我们找错误,这里的错误是因为接口的返回值和预期的不一样,andExpect(content().string("result")); 这个表示我们的预期结果值是result,但是返回值是一个json,所以会报错,利用这种方法测试要慎用,因为很多时候一个接口返回的数据并不是一样的,格式是一样的,但是值可以发生变化,所以可以用Http响应的状态来判断,也可以使用自己定义的接口状态来判断。
其他的接口请求方式略有不同,但是大致的API都还是一样的。
GET请求传JSON示例:
//接口
@GetMapping("/testGetJson")
    public Map testGetJson(@RequestBody User user ){
        Map map = new HashMap<>();
        map.put("user",JSONObject.toJSONString(user));
        map.put("status",200);
        return map;
    }

//单元测试
 @Test
    public void testGetJson() throws Exception {
        System.out.println("=======开始测试testGetJSON=======");
        String result = this.mvc.perform(
                get("/testGetJson")
                        .content("{\"id\":1,\"name\":\"张三\",\"sex\":\"男\"}")
                        .contentType(MediaType.APPLICATION_JSON_UTF8_VALUE))
                .andExpect(status().isOk())
                .andReturn().getResponse().getContentAsString();
        System.out.println("result"+result);
        System.out.println("=======开始测试testGetJSON=======");

    }
使用POST方式的 @PathVariable注解传参
//示例接口
@PostMapping("/testPost/{id}")
    public String testPost(@PathVariable ("id")Integer id){

        return "this testPost return " +id;
    }
//测试用例
    @Test
    public void testPost() throws Exception {
        System.out.println("=============开始测试testPost============");

        int id = 1;
        this.mvc
                .perform(post("/testPost/"+id))
                .andExpect(status().isOk())
                .andExpect(content().string("this testPost return " +id));
        System.out.println("==============测试testPost结束==============");
    }
使用POST方式传输JSON格式的数据与GET基本一致,这里无需重复演示
使用POST方式接受表单数据
//接口
    @PostMapping("/testPostForm")
    public Map testPostForm(User user){

        Map map = new HashMap<>();
        map.put("user",JSONObject.toJSONString(user));
        map.put("status",200);
        return map;
    }
// 单元测试
    @Test
    public void testPostForm() throws Exception {
        System.out.println("===========开始测试testPostForm===============");
        String result =
                this.mvc.perform(
                post("/testPostForm")
                        .param("id", "1")
                        .param("name", "张三")
                        .param("sex", "男")
                        .contentType(MediaType.APPLICATION_FORM_URLENCODED))
                .andExpect(status().isOk())
                .andReturn().getResponse().getContentAsString();
        System.out.println("result :" + result);
        System.out.println("===============测试testPostForm结束=================");
    }
param中的values是可变参数,可以传数组,对于Json的传参,最好直接用fastJson转换成字符串,用变量传输.
header中的传参一般都是必不可少的,在上边的接口加以改造即可:
// 接口
 @PostMapping("/testPostForm")
    public Map testPostForm(User user,@RequestHeader ("token") String token){

        Map map = new HashMap<>();
        map.put("user",JSONObject.toJSONString(user));
        map.put("token",token);
        map.put("status",200);
        return map;
    }

// 单元测试
 @Test
    public void testPostForm() throws Exception {
        System.out.println("===========开始测试testPostForm===============");
        String result =
                this.mvc.perform(
                post("/testPostForm")
                        .param("id", "1")
                        .param("name", "张三")
                        .param("sex", "男")
                        .header("token","this is a token")
                        .contentType(MediaType.APPLICATION_FORM_URLENCODED))
                .andExpect(status().isOk())
                .andReturn().getResponse().getContentAsString();
        System.out.println("result :" + result);
        System.out.println("===============测试testPostForm结束=================");
    }
当然,这种测试框架不止一个,在官方文档中还有 WebTestClient 等等,大家有兴趣的可以自己看看
在打包的时候可以执行测试,查看接口返回值是否有问题:
测试输出内容可以自定义,可以打印更多的信息
附录:
MockMvc的官方文档地址:
https://docs.spring.io/spring-boot/docs/2.1.4.RELEASE/reference/htmlsingle/#boot-features-testing-spring-boot-applications-testing-with-mock-environment


