⑥mpvue 很基础的小程序页面搭建(vuex管理状态、实现收藏和分享功能)
mpVue
- 主页面部分的搭建
- 主页面静态页面部分的搭建
- 主页面交互功能的完成
- 跳转页面功能
- 其他静态页面搭建
- vuex管理状态,动态渲染页面
- 详情页静态页面搭建
- 收藏和本地缓存功能的实现
- 背景音乐播放暂停的功能实现
- 分享功能的实现
本人是个新手,写下博客用于自我复习、自我总结。
如有错误之处,请各位大佬指出。
学习资料来源于:尚硅谷
当我们初始化项目后,要编写我们自己代码就要把 src里的文件 清空。
(因为配置的原因,项目的构建就会去找src里的文件。当然如果不觉得麻烦,也可以去build里的webpack.base.conf中修改源文件路径)
主页面部分的搭建
在src中,先建好app.vue和main.js。
app.vue
<script>
  export default {

  }
script>

<style>
/*公共的样式*/
style>
main.js
import Vue from 'vue'
import App from './app.vue'

// 设置vue的提示功能关闭
Vue.config.productionTip = false;

// 声明当前组件的类型为应用
App.mpType = 'app'

// 生成应用的实例
const app = new Vue(App)

// 挂载整个应用
app.$mount()
然后去创建pages文件夹,里面存放我们的页面。
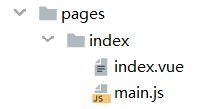
再次说明,虽然index.vue才是用来实现页面的,但是main.js一定要有,且main.js格式比较固定,如下:
import Vue from 'vue'
import Index from './index.vue'

const index = new Vue(Index)

// 挂载当前的页面
index.$mount()
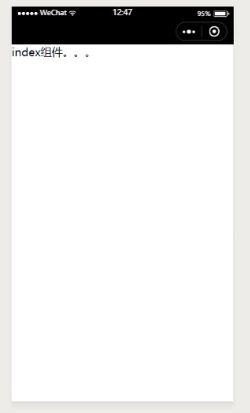
然后在index.vue里先随便写点什么。
<template>
	<div>
       <p>index组件。。。p>
    div>
template>
<script>
  export default {
    data() {
      return {}
    }
  }
script>
<style>

style>
如果想要看到效果,就需要有个app.json,用来指定页面的路径。
{
  "pages": [
    "pages/index/main"
  ]
}
然后就可以去微信开发者工具中看到效果了,这就是最基本的项目结构。
除此以外需要说明的是,在WebStorm / IDEA 等编程工具中,每次修改代码,想要看到效果,都要重新npm run dev。
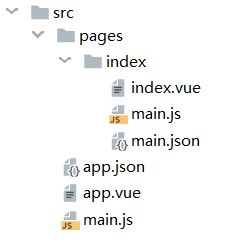
最基本的项目结构:
(如果页面需要json文件,命名一定是main.json,原因在前文说到过。)
如果我们想修改这个页面在小程序中顶部的 颜色、标题 就需要在main.json里面改,而不是在index.vue里的style部分。
{
  "navigationBarBackgroundColor": "#8ed145",
  "navigationBarTitleText": "周刊"
}
同理,如果想要修改全局信息就可以在app.json中改。(比如让所有页面顶部的颜色为xxx,所有页面顶部标题为xxx。但显然一般情况下,我们不需要在全局设置。)
主页面静态页面部分的搭建
如果要加入一些图片,可以把图片放在任何地方,但实际上最好是放在static文件夹下,它就是专门用来存放静态资源的。

我们可以发现static文件夹下,有个文件叫做gitkeep,而且它里面什么都没有。它的作用是为git服务的,因为git有一个特点:如果这个文件夹里面什么都没有,它会自动把这个文件夹忽略,但我们不希望static文件夹被忽略。因此只要在文件夹下放一个文件名叫作gitkeep的空文件就可以了。
(图片在这里就不为大家提供了,大家可以自己找几张图片试试效果)
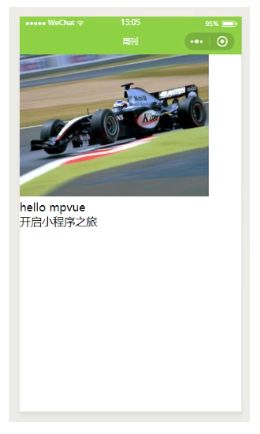
放置好图片之后,就可以去index.vue中配置了。
<template>
  <div>
    <img src="/static/images/index/cart.jpg" alt="">
    <p>hello mpvuep>
    <div>
      <p>开启小程序之旅p>
    div>
  div>
template>
<script>
  export default {
    data() {
      return {}
    }
  }
script>
<style>

style>
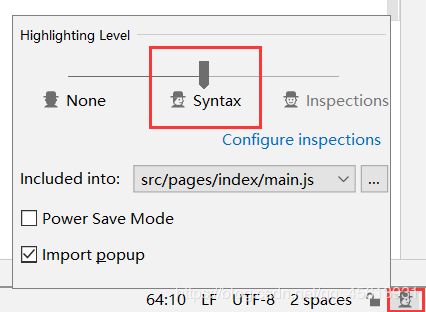
需要说明的是,相关编程工具可能不认识rpx,会报错。但并不是意味着不能使用。如果不想看到红波浪线,在IDEA / WebStorm中可以通过如下方式关闭。
(其他工具没试过)
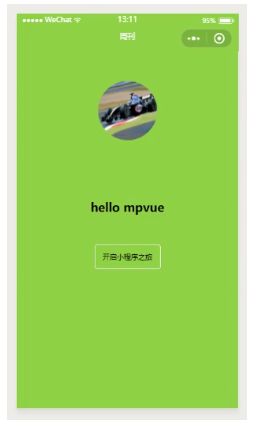
<template>
  <div class="indexContainer">
    <img class="index_img" src="/static/images/index/cart.jpg" alt="">
    <p class="userName">hello mpvuep>
    <div class="goStudy">
      <p>开启小程序之旅p>
    div>
  div>
template>
<script>
  export default {
    data() {
      return {}
    }
  }
script>
<style>

  .indexContainer {
    /* 小程序推荐flex布局 */
    display: flex;
    flex-direction: column;
    /* 居中 */
    align-items: center;
  }

  .index_img {
    /* WebStorm不认识rpx,会报错。但并不是不能使用。 */
    width: 200rpx;
    height: 200rpx;
    border-radius: 100rpx;
    margin: 100rpx 0;
  }

  .userName {
    font-size: 40rpx;
    font-weight: bold;
    margin: 100rpx 0;
  }

  .goStudy {
    width: 220rpx;
    height: 80rpx;
    border: 1rpx solid #eee;
    font-size: 24rpx;
    line-height: 80rpx;
    text-align: center;
    border-radius: 10rpx;
  }
style>
如果我们想修改页面背景色,可以通过如下方式修改。
  /* 修改页面背景色 */
  page {
    background: #8ed145;
  }

  /*....其他样式.....*/
主页面交互功能的完成
首先先来看一下生命周期的问题。
之前提到过,我们可以使用vue的生命周期也可以使用原生小程序的生命周期,但是原生小程序这部分生命周期钩子来源于微信小程序的 Page, 除特殊情况外,不建议使用小程序的生命周期钩子。
回顾一下生命周期:(vue)
- beforeCreate 实例初始化之后,数据观测(data observer) 和 event/watcher 事件配置之前被调用。
- created 实例已经创建完成之后被调用。在这一步,实例已完成以下的配置:数据观测(data observer),属性和方法的运算, watch/event 事件回调。然而,挂载阶段还没开始,$el 属性目前不可见。
- beforeMount 在挂载开始之前被调用:相关的 render 函数首次被调用。
- mounted el 被新创建的 vm.$el 替换,并挂载到实例上去之后调用该钩子。
- beforeUpdate 数据更新时调用,发生在虚拟 DOM 重新渲染和打补丁之前。 你可以在这个钩子中进一步地更改状态,这不会触发附加的重渲染过程。
- updated 由于数据更改导致的虚拟 DOM 重新渲染和打补丁,在这之后会调用该钩子。
- beforeDestroy 实例销毁之前调用。在这一步,实例仍然完全可用。
- destroyed Vue 实例销毁后调用。调用后,Vue 实例指示的所有东西都会解绑定,所有的事件监听器会被移除,所有的子实例也会被销毁。 该钩子在服务器端渲染期间不被调用。
小程序页面Page实例生命周期:
- onLoad 监听页面加载
- onShow: 页面显示
- onReady: 监听页面初始化渲染完成
- onHide: 监听页面隐藏,注意当前页面实例依然存活
- onUnload: 监听页面卸载
- onPullDownRefresh: 监听用户下载动作
- onReachBottom: 监听用户上拉触底操作
- onShareAppMessage: 用户点击右上角分享功能
- onPageScroll: 页面滚动
- onTabItemTap: 当前是 tab 页时,点击 tab 时触发
小程序应用App实例声明周期:
- onLaunch: 小程序应用初始化
- onShow: 小程序启动获取后台进入前台
- onHide: 小程序应用从前台进入后台
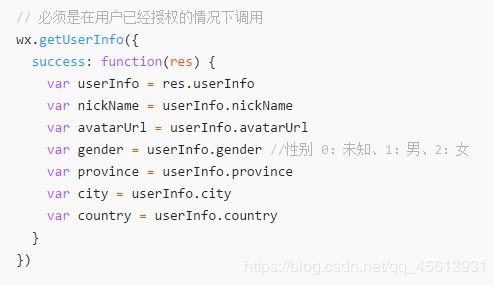
现在我们想获取微信用户信息,我们可以使用wx.getUserInfo(Object object)
详情请参照官方文档:getUserInfo的使用
但是如果我们能直接获得到用户信息,那显然不合理。所以也会有授权的这个动作。
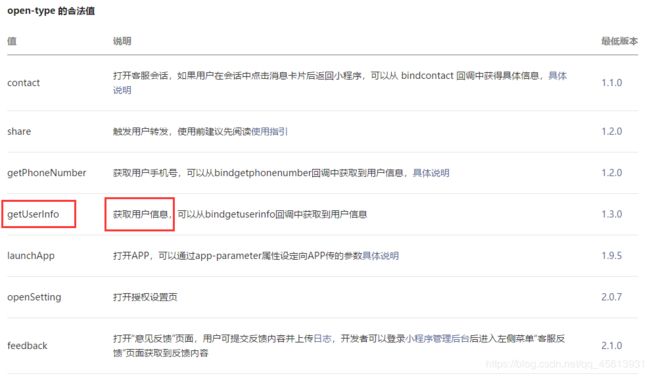
在这里使用到了:Button的使用
Button中有个open-type属性,open-type中也有个getUserInfo,用来获取信息。
(注意上面的getUserInfo和Button里的getUserInfo不是同一个)

在开始做前,先带大家看一下之后如何获取用户信息,判断是否授权的:
<template>
  <div class="indexContainer">
    <img class="index_img" src="/static/images/index/cart.jpg" alt="">
    <Button open-type="getUserInfo" @getuserinfo="getUserInfo">点击获取用户信息Button>
    <p class="userName">hello mpvuep>
    <div class="goStudy">
      <p>开启小程序之旅p>
    div>
  div>
template>
<script>
  export default {
    data() {
      return {}
    },
    methods: {
      getUserInfo(data){
        console.log(data);
      }
    }
  }
script>
<style>
	/*忽略*/
style>
需要说明的是:mpvue中绑定小程序原生事件不能使用bind + 事件名,需要使用@事件名且一定要定义在methods中,否则不生效
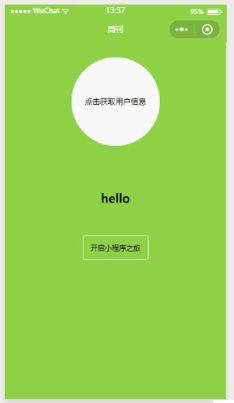
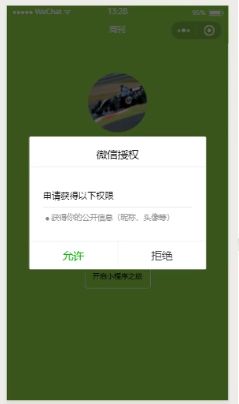
然后我们点击按钮,就会弹出是否授权
我们通过这个输出结果分析一下:
如果你拒绝授权,就会传进来一个错误信息

当你同意授权后,detail就是如下图所示的结果

我们就用这个rawData来判定用户是否提供授权
      getUserInfo(data){
        // 判断用户是否授权
        if(data.mp.detail.rawData){
          // 用户授权
          ...
        }
      }
而在detail里还有个信息就是userInfo(用户表),我们可以从这里获取到用户的相关信息。(所以之前的方法名才叫做getUserInfo)
userInfo里会有如下信息:nickName姓名、avatarUrl头像、gender性别、province省份、city城市、country国家。
最后再明确一下现在需要做的事:用户进入小程序,点击按钮才会跳出授权选项,否则不能直接获取用户信息。我们获取到用户信息,在页面上显示用户名称和头像。获取到授权后,这个按钮也就不需要出现了。
综上所述,代码部分可修改如下:
<template>
  <div class="indexContainer">
    <img v-if="isShow" class="index_img" :src="userInfo.avatarUrl" alt="">
    <Button class="btn" v-else open-type="getUserInfo" @getuserinfo="getUserInfo">点击获取用户信息Button>
    <p class="userName">hello {{userInfo.nickName}}p>
    <div class="goStudy">
      <p>开启小程序之旅p>
    div>
  div>
template>
<script>
  export default {
    data() {
      return {
        userInfo: {},
        isShow: false // 用户没有授权
      }
    },
    beforeMount(){
      console.log('---beforeMount---');
      //获取用户登录信息
      this.handleGetUserInfo()
    },
    methods: {
      // 获取用户登录信息
      handleGetUserInfo(){
        wx.getUserInfo({
          success: (data) => {
            console.log(data);
            // 更新data中的数据
            this.userInfo = data.userInfo
            this.isShow = true;
          },
          fail: () => {
            console.log('获取失败');
          }
        })
      },
      getUserInfo(data){
        // 判断用户是否授权
        if(data.mp.detail.rawData){
          // 用户授权
          this.handleGetUserInfo()
        }
      }
    }
  }
script>
<style>
  page {
    background: #8ed145;
  }
  .indexContainer {
    /* 小程序推荐flex布局 */
    display: flex;
    flex-direction: column;
    /* 居中 */
    align-items: center;
  }

  .index_img {
    /* WebStorm不认识rpx,会报错。并不是不能使用。 */
    width: 200rpx;
    height: 200rpx;
    border-radius: 100rpx;
    margin: 100rpx 0;
  }

  .userName {
    font-size: 40rpx;
    font-weight: bold;
    margin: 100rpx 0;
  }

  .goStudy {
    width: 220rpx;
    height: 80rpx;
    border: 1rpx solid #eee;
    font-size: 24rpx;
    line-height: 80rpx;
    text-align: center;
    border-radius: 10rpx;
  }

  .btn {
    width: 300rpx;
    height: 300rpx;
    border-radius: 150rpx;
    margin:50rpx 0;
    line-height: 300rpx;
    text-align: center;
    font-size: 26rpx;
  }

style>
跳转页面功能
首先需要说明,在pc端之前一直使用click事件,但是在移动端建议使用tap事件。
click事件是pc端的单击事件,但是当这个事件在移动端实现的时候,会出现延300ms的现象,所以移动端一般用tap来代替click。tap可以减少click在移动端的延迟,提高了性能。
再通过代码简单看看冒泡现象,即点击子元素后,父元素也相当于被点击。
<template>
  <div class="indexContainer">
    <img v-if="isShow" class="index_img" :src="userInfo.avatarUrl" alt="">
    <Button class="btn" v-else open-type="getUserInfo" @getuserinfo="getUserInfo">点击获取用户信息Button>
    <p class="userName">hello {{userInfo.nickName}}p>
    <div @tap="toDetail" class="goStudy">
      <p @tap="handleChild">开启小程序之旅p>
    div>
  div>
template>
<script>
  export default {
    //其他内容。。。
    methods: {
      // 其他内容。。。

      toDetail(){
        console.log('toDetail');
      },
      handleChild(){
        console.log('child');
      }
    }
  }
script>
<style>
/*其他内容。。。*/
style>
这种情况 vue里阻止冒泡,这样做即可:
<div @tap="toDetail" class="goStudy">
      <p @tap.stop="handleChild">开启小程序之旅p>
div>
然后我们这部分要完成的功能就是,点击这个div部分,我们就能跳转页面。
涉及到页面跳转,需要wx.navigateTo:navigateTo使用方法
除此以外,页面跳转的相关方法:

知道这些用法后,代码其实很简单。首先建立一个新页面的文件夹。

它的main.js还是和以往一样的格式。
import Vue from 'vue'
import List from './list.vue'

const list = new Vue(List)

list.$mount()
list.vue:
<template>
	<div>
       <p>list组件。。。p>
    div>
template>
<script>
  export default {
    data() {
      return {}
    }
  }
script>
<style>

style>
当然如果要修改list页面的导航条颜色和标题,就可以仿照之前的建立一个main.json。
然后index.vue中设置跳转即可:
<template>
  <div class="indexContainer">
    <img v-if="isShow" class="index_img" :src="userInfo.avatarUrl" alt="">
    <Button class="btn" v-else open-type="getUserInfo" @getuserinfo="getUserInfo">点击获取用户信息Button>
    <p class="userName">hello {{userInfo.nickName}}p>
    <div @tap="toDetail" class="goStudy">
      <p>开启小程序之旅p>
    div>
  div>
template>
<script>
  export default {
    data() {
      return {
        userInfo: {},
        isShow: false // 用户没有授权
      }
    },
    beforeMount(){
      console.log('---beforeMount---');
      //获取用户登录信息
      this.handleGetUserInfo()
    },
    methods: {
      // 获取用户登录信息
      handleGetUserInfo(){
        wx.getUserInfo({
          success: (data) => {
            console.log(data);
            // 更新data中的数据
            this.userInfo = data.userInfo
            this.isShow = true;
          },
          fail: () => {
            console.log('获取失败');
          }
        })
      },
      getUserInfo(data){
        // 判断用户是否授权
        if(data.mp.detail.rawData){
          // 用户授权
          this.handleGetUserInfo()
        }
      },
      toDetail(){
        wx.navigateTo({
          url: '/pages/list/main'
        })
      }
    }
  }
script>
<style>
  page {
    background: #8ed145;
  }
  .indexContainer {
    /* 小程序推荐flex布局 */
    display: flex;
    flex-direction: column;
    /* 居中 */
    align-items: center;
  }

  .index_img {
    /* WebStorm不认识rpx,会报错。并不是不能使用。 */
    width: 200rpx;
    height: 200rpx;
    border-radius: 100rpx;
    margin: 100rpx 0;
  }

  .userName {
    font-size: 40rpx;
    font-weight: bold;
    margin: 100rpx 0;
  }

  .goStudy {
    width: 220rpx;
    height: 80rpx;
    border: 1rpx solid #eee;
    font-size: 24rpx;
    line-height: 80rpx;
    text-align: center;
    border-radius: 10rpx;
  }

  .btn {
    width: 300rpx;
    height: 300rpx;
    border-radius: 150rpx;
    margin:50rpx 0;
    line-height: 300rpx;
    text-align: center;
    font-size: 26rpx;
  }

style>
同时,不要忘记去app.json中,将新页面路径添加到其中。然后重新打包运行npm run dev
{
  "pages": [
    "pages/index/main",
    "pages/list/main"
  ]
}
除此以外还要说明的是,这个排列顺序和页面的出现顺序也是相关的。如果在这里index在上,那么就会先展示index页面。如果list页面在上,就会先展示list页面。
其他静态页面搭建
首先我先修改一些json信息:
app.json
{
  "pages": [
    "pages/list/main",
    "pages/index/main"
  ],
  "window": {
    "navigationBarBackgroundColor": "#489B81"
  }
}
index中的main.json
{
  "navigationBarBackgroundColor": "#8ed145",
  "navigationBarTitleText": "主页"
}
list中的main.json
{
  "navigationBarTitleText": "周刊"
}
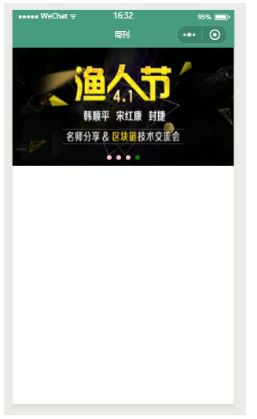
对于list.vue这里先实现一个轮播图。
涉及到的内容swiper:swiper的使用
swiper滑块视图容器。其中只可放置swiper-item组件,否则会导致未定义的行为
在这里就展示几个常用的样式:
(其他的都可以去参考官方文档)
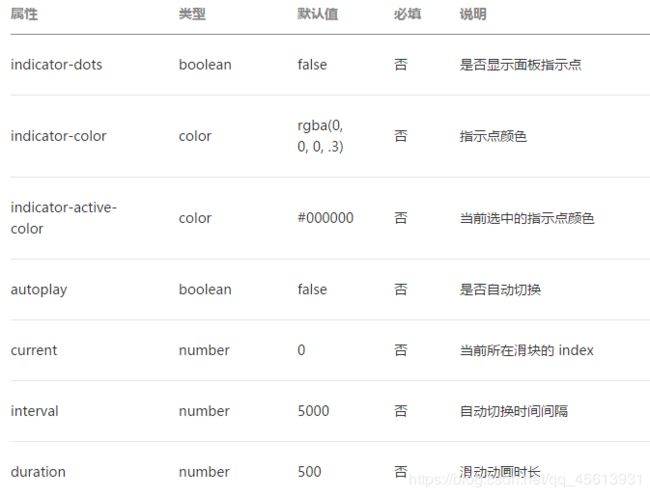
(轮播图的图片就不提供了)
<template>
  <div class="listContainer">
    <swiper indicator-dots indicator-color="pink" indicator-active-color="green">
      <swiper-item>
        <img src="/static/images/detail/carousel/01.jpg" alt="">
      swiper-item>
      <swiper-item>
        <img src="/static/images/detail/carousel/02.jpg" alt="">
      swiper-item>
      <swiper-item>
        <img src="/static/images/detail/carousel/03.jpg" alt="">
      swiper-item>
      <swiper-item>
        <img src="/static/images/detail/carousel/04.jpg" alt="">
      swiper-item>
    swiper>
  div>
template>

<script>
  export default {

  }
script>

<style>
  .listContainer swiper {
    width: 100%;
    height: 400rpx;
  }

  .listContainer swiper img {
    width: 100%;
    height: 100%;
  }
style>
如果说我们把这部分内容放在list.vue里实现,对于内容少且不会再添加新内容的情况下,当然是可行的。因为如果要展示这些内容,它们总归会要有相同的展示格式,这是很常见的,比如各大影视下的评论区,每条评论的第一行是评论人网名,评论人头像,第二行是评论日期,第三行是评论内容。。。(或者其他的格式)
正是因为有这样的需求,如果都写在list.vue里,那么代码重复率肯定很高,而且增加新文章内容很麻烦,总不能每一次都手动增加新内容吧。因此我们可以选择建立一个“通用模板”(组件)。那么每次增加新内容或者展示已有的内容,我们只要用一些办法,反复调用这个通用模板(组件),再把我们需要展示的内容贴上,就方便很多了。
因此,我们首先建立list_template文件夹

在这里需要说明的是,既然list_template是个模板,相当于是个组件,它显然不是个独立的页面,那么是不是就不需要main.js了?
测试就可以发现,实际上并不行。也就是说只要pages里建了文件夹,如果想要使用这个文件夹下的某些内容,虽然它并不需要main.js中设置内容,但是main.js一定要有。因此在这里的main.js中内容为空。
如果要使用那首先肯定要注册组件了:
list.vue
<template>
  <div class="listContainer">
    <swiper indicator-dots indicator-color="pink" indicator-active-color="green">
      <swiper-item>
        <img src="/static/images/detail/carousel/01.jpg" alt="">
      swiper-item>
      <swiper-item>
        <img src="/static/images/detail/carousel/02.jpg" alt="">
      swiper-item>
      <swiper-item>
        <img src="/static/images/detail/carousel/03.jpg" alt="">
      swiper-item>
      <swiper-item>
        <img src="/static/images/detail/carousel/04.jpg" alt="">
      swiper-item>
    swiper>
    <div>
      <ListTmp />
    div>
  div>
template>

<script>
  import ListTmp from '../list_template/list_template.vue'
  export default {
    components:  {ListTmp}
  }
script>

<style>
  .listContainer swiper {
    width: 100%;
    height: 400rpx;
  }

  .listContainer swiper img {
    width: 100%;
    height: 100%;
  }
style>
list_template.vue
(图片未提供)
<template>
  <div class="tmpContainer">
    <div class="avatar_date">
      <img src="/static/images/avatar/0.png" alt="">
      <span>2018span>
    div>
    <p class="company">xxxp>
    <img class="detail_img" src="/static/images/index/cart.jpg" alt="">
    <p class="content">xxxp>
    <div class="view_star_container">
      <img src="/static/images/icon/star.png" alt="">
      <span>xxspan>
      <img src="/static/images/icon/view.png" alt="">
      <span>xxspan>
    div>
  div>
template>

<script>
  export default {

  }
script>

<style>
  .tmpContainer {
    display: flex;
    flex-direction: column;
    border-bottom: 1rpx solid #eee;
  }
  .avatar_date{
    padding:10rpx;
  }
  .avatar_date img {
    width: 60rpx;
    height: 60rpx;
    vertical-align: middle;
    margin-right: 10rpx;
  }

  .avatar_date span {
    font-size: 28rpx;
    color: #333;
  }

  .company {
    font-size: 40rpx;
    font-weight: bold;
    padding: 10rpx;
  }
  .detail_img {
    width: 100%;
    height: 460rpx;
  }

  .content {
    font-size: 32rpx;
    text-indent: 32rpx;
    line-height: 50rpx;
    letter-spacing: 3rpx;
  }

  .view_star_container img {
    width: 32rpx;
    height: 32rpx;
    vertical-align: middle;
    margin-left: 10rpx;
  }

  .view_star_container span{
    font-size: 28rpx;
    color: #333;
    margin-left: 10rpx;
  }
style>
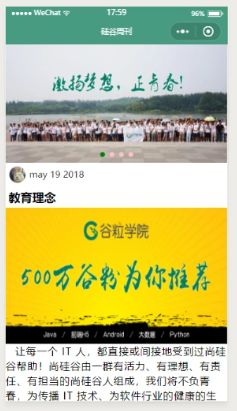
效果图:

现在我们只是能让它显示,接下来考虑怎么去拿到list中,我们想要展示的内容。
vuex管理状态,动态渲染页面
首先先把数据准备好,在src中建一个文件夹datas。

在list-data里就存放着,我们想要在页面中展示的内容。
这个数组中存放着很多对象,每一个对象都对应着每一个板块的内容。
当然每一个对象中存放着什么信息随便你设置,这里只是举个例子。
let list_data = [
  {
    date: 'may 19 2018',
    title: 'xxx',
    detail_img: '/static/images/detail/carousel/02.jpg',
    avatar: '/static/images/avatar/4.png',
    detail_content: 'xxx',
    headImgSrc: '/static/images/detail/carousel/02.jpg',
    author: 'xxx',
    dataTime: '24time',
    detail_love_image1: '/static/images/icon/chat.png',
    detail_love_image2: '/static/images/icon/view.png',
    love_count: 88,
    attention_count: 66,
    detail: 'xxx',
    music: {
      dataUrl: 'http://up.mcyt.net/down/46100.mp3', // 音乐链接
      title: 'IF-Ken Arai',   // 音乐标题
      coverImgUrl: 'http://y.gtimg.cn/music/photo_new/T002R300x300M000003rsKF44GyaSk.jpg?max_age=2592000',
    },
    postId: 0
  },
  {
    date: 'may 19 2018',
    title: 'xxx',
    detail_img: '/static/images/detail/carousel/01.jpg',
    avatar: '/static/images/avatar/4.png',
    detail_content: 'xxx',
    headImgSrc: '/static/images/detail/carousel/01.jpg',
    author: 'xxx',
    dataTime: '24time',
    detail_love_image1: '/static/images/icon/chat.png',
    detail_love_image2: '/static/images/icon/view.png',
    love_count: 88,
    attention_count: 66,
    detail: 'xxx',
    music: {
      dataUrl: 'http://www.ytmp3.cn/down/50395.mp3', // 音乐链接
      title: '一路向北',   // 音乐标题
      coverImgUrl: 'http://y.gtimg.cn/music/photo_new/T002R300x300M000003rsKF44GyaSk.jpg?max_age=2592000',
    },
    postId: 1
  },
  //其他信息
];

export default {list_data};
那么现在我们要做的就是拿到这些信息,并在list.vue中遍历调用,就完成了这部分功能。这里,我们采用vuex的方式。
(如果没有下载过vuex:npm install vuex ;如果不了解vuex可以参考我以前的文章)

首先在src下建文件夹:
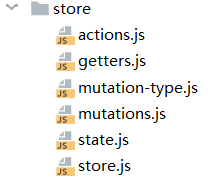
store.js
import Vue from 'vue'
import Vuex from 'vuex'
import state from './state'
import actions from './actions'
import mutations from './mutations'
import getters from './getters'

// 声明使用vuex
Vue.use(Vuex)

// 暴露vuex核心store对象,其中管理四个部分:state actions getters mutations
export default new Vuex.Store({
  state,
  actions,
  getters,
  mutations
})
虽然其他js中内容还没写,但是一定还要记住,要去src下的main.js中,将store对象放置Vue的原型上,为的是每个实例都可以使用
src下的main.js:
import Vue from 'vue'
import store from './store/store'
import App from './app.vue'

// 设置vue的提示功能关闭
Vue.config.productionTip = false;

// 声明当前组件的类型为应用
App.mpType = 'app'

// 将store对象放置Vue的原型上,为的是每个实例都可以使用
Vue.prototype.$store = store

// 生成应用的实例
const app = new Vue(App)

// 挂载整个应用
app.$mount()
state.js 管理的状态对象
export default {
  listTmp: []
}
mutation-type用来保证actions内容和mutations内容的一致性(虽然看起来有些多此一举)
export const RECEIVE_LIST = 'RECEIVE_LIST'
actions.js 包含多个事件回调函数的对象
通过执行: commit()来触发 mutation 的调用, 间接更新 state
(在actions中获取到内容信息list-data)
import {RECEIVE_LIST} from './mutation-type'
import listData from '../datas/list-data'
export default {
  getList({commit}){
    // 触发对应的mutation
    commit(RECEIVE_LIST, listData)
  }
}
mutations.js 包含多个直接更新 state 的方法(回调函数)的对象
这里需要注意,在actions中我这里获取到的相当于是list-data.js,在之前list-data中我们暴露的是数组list_data,所以这里接收到的参数应该是list_data
import {RECEIVE_LIST} from './mutation-type'

export default {
  [RECEIVE_LIST](state, {list_data}){
    state.listTmp = list_data
    console.log(state);
  }
}
getters目前没用到,所以也就不去写内容了。
这样一来vuex就拿到了我们想要的list_data数据了。接下来要去到页面中调用。
首先去list.vue中想办法获取到vuex获取到的数据,然后传递数据进入list_template。
<template>
  <div class="listContainer">
    <swiper indicator-dots indicator-color="pink" indicator-active-color="green">
      <swiper-item>
        <img src="/static/images/detail/carousel/01.jpg" alt="">
      swiper-item>
      <swiper-item>
        <img src="/static/images/detail/carousel/02.jpg" alt="">
      swiper-item>
      <swiper-item>
        <img src="/static/images/detail/carousel/03.jpg" alt="">
      swiper-item>
      <swiper-item>
        <img src="/static/images/detail/carousel/04.jpg" alt="">
      swiper-item>
    swiper>
    <div>
      <ListTmp v-for="(item,index) in listTmp" :key="index" :item="item" :index="index"/>
    div>
  div>
template>

<script>
  import {mapState} from 'vuex'
  import ListTmp from '../list_template/list_template.vue'
  export default {
    components:  {ListTmp},
    beforeMount(){
      // 分发action修改状态
      this.$store.dispatch('getList')
    },
    computed: {
      // 映射状态到本组件
      ...mapState(['listTmp'])
    }
  }
script>

<style>
  .listContainer swiper {
    width: 100%;
    height: 400rpx;
  }

  .listContainer swiper img {
    width: 100%;
    height: 100%;
  }
style>
list_template 用 props 接收传过来的数据,然后 根据list_data中每个对象的内容,获取到相关信息就可以了。
<template>
  <div class="tmpContainer">
    <div class="avatar_date">
      <img :src="item.avatar" alt="">
      <span>{{item.date}}span>
    div>
    <p class="company">{{item.title}}p>
    <img class="detail_img" :src="item.detail_img" alt="">
    <p class="content">{{item.detail_content}}p>
    <div class="view_star_container">
      <img src="/static/images/icon/star.png" alt="">
      <span>{{item.love_count}}span>
      <img src="/static/images/icon/view.png" alt="">
      <span>{{item.attention_count}}span>
    div>
  div>
template>

<script>
  export default {
    props: [
      'item', 'index'
    ]
  }
script>

<style>
/*忽略样式*/
style>
详情页静态页面搭建
这一部分继续根据上一部分来做,就是点击上面的每一个模块,就可以进入到这个模块的详情页,并实现收藏、转发、分享功能。
首先建立详情页部分:pages文件夹下建一个detail
其中的内容仍然是“三件套”,main.js ,main.json 和 vue

main.js依然是:
import Vue from 'vue'
import Detail from './detail.vue'

const detail = new Vue(Detail)

detail.$mount()
main.json设置导航条标题:
{
  "navigationBarTitleText": "详情页"
}
切记,不要忘记在app.json中加入页面路径:
{
  "pages": [
    "pages/list/main",
    "pages/detail/main",
    "pages/index/main"
  ],
  "window": {
    "navigationBarBackgroundColor": "#489B81"
  }
}
点击模块跳转页面就很简单了:(@tap)
需要说明的是,这里还需要在点击时传递一个参数,就是之前传进来的index,我们得知道点击的是哪个模块,才能显示相应的内容。
list_template.vue
<template>
  <div @tap="toDetail" class="tmpContainer">
    <div class="avatar_date">
      <img :src="item.avatar" alt="">
      <span>{{item.date}}span>
    div>
    <p class="company">{{item.title}}p>
    <img class="detail_img" :src="item.detail_img" alt="">
    <p class="content">{{item.detail_content}}p>
    <div class="view_star_container">
      <img src="/static/images/icon/star.png" alt="">
      <span>{{item.love_count}}span>
      <img src="/static/images/icon/view.png" alt="">
      <span>{{item.attention_count}}span>
    div>
  div>
template>

<script>
  export default {
    props: [
      'item', 'index'
    ],
    methods: {
      toDetail(){
        // 跳转到详情页 + 传参过去index
        wx.navigateTo({
          url: '/pages/detail/main?index=' + this.index
        })
      }
    }
  }
script>

<style>
/*忽略样式*/
style>
在详情页部分,首先涉及到如何接收这个index,解决方法:$mp.query.index
为什么使用它,看下图就知道了。这个index就是之前我们传递的index。
(当然也有其他办法,这里暂且就这么调用)

拿到下标之后,我们就想办法去vuex中拿到这个下标的内容即可。
detail.vue:
<template>
  <div class="detailContainer">
    <img class="detail_img" :src="detailObj.detail_img" alt="">
    <div class="avatar_date">
      <img :src="detailObj.avatar" alt="">
      <span>{{detailObj.author}}span>
      <span>发布于span>
      <span>{{detailObj.date}}span>
    div>
    <p class="company">{{detailObj.title}}p>
    <div class="collection_share_container">
      <div class="collection_share">
        <img src="/static/images/icon/collection-anti.png" alt="">
        <img src="/static/images/icon/share-anti.png" alt="">
      div>
      <div class="line">div>
    div>
    <Button>转发此文章Button>
    <p class="content">{{detailObj.detail_content}}p>
  div>
template>

<script>
  import {mapState} from 'vuex'
  export default {
    data(){
      return {
        detailObj: {}
      }
    },
    mounted(){
      // 更新数据。使用this.$mp.query.index
      this.detailObj = this.listTmp[this.$mp.query.index]
    },
    computed: {
      ...mapState(['listTmp'])
    }
  }
script>

<style>
  .detailContainer {
    display: flex;
    flex-direction: column;
  }

  .detail_img {
    width: 100%;
    height: 460rpx;
  }
  .avatar_date{
    padding:10rpx;
  }
  .avatar_date img {
    width: 64rpx;
    height: 64rpx;
    vertical-align: middle;
  }

  .avatar_date span {
    font-weight: 28rpx;
    margin-left: 6rpx;
  }

  .company {
    font-size: 32rpx;
    font-weight: bold;
    padding:10rpx;
  }

  .collection_share_container {
    position: relative;
  }

  .collection_share {
    float: right;
    margin-right: 30rpx;
  }

  .collection_share img {
    width: 90rpx;
    height: 90rpx;
    margin-right: 20rpx;
  }

  .line {
    position: absolute;
    top: 45rpx;
    left: 5%;
    width: 90%;
    height:1rpx;
    background: #eee;
    z-index: -1;
  }

  .content {
    font-size: 32rpx;
    text-indent: 32rpx;
    letter-spacing: 3rpx;
    line-height: 50rpx;
  }
style>
收藏和本地缓存功能的实现
在上一步中,我们做到了根据点击模块的不同,去展示不同的页面内容,也设置好了样式。
接下来去实现每个页面中的收藏功能,即刚进入页面是未收藏,点击后变成收藏,退出页面再点进这个页面,它仍然是收藏。
涉及到如下用法:
getStorageSync的使用、setStorageSync的使用
它们就可以将数据存储在本地缓存中,这样就可以做到退出页面也还会记录相应数据的功能。
showToast的使用
它用来显示消息提示框,比较常用的是如下几个属性。

而这个icon除了成功图标外,还有这么几个图标可以选择:

需要说明的是,在使用getStorageSync一定要小心,因为你如果第一次进入页面,页面肯定是没有缓存的,如果这时直接使用getStorageSync获取缓存,就会报错(虽然第二次进入页面以后就正常了)。因此,在获取缓存之前,需要一个预处理的工作,可以写在beforeMount()里。即:只要是第一次进入页面(没有缓存),那我们就给它先set一个“空缓存”(这个缓存里的数据为空),这样就不会报错了。
<template>
  <div class="detailContainer">
    <img class="detail_img" :src="detailObj.detail_img" alt="">
    <div class="avatar_date">
      <img :src="detailObj.avatar" alt="">
      <span>{{detailObj.author}}span>
      <span>发布于span>
      <span>{{detailObj.date}}span>
    div>
    <p class="company">{{detailObj.title}}p>
    <div class="collection_share_container">
      <div class="collection_share">
        <img @tap="handleCollection" :src="isCollected?'/static/images/icon/collection.png':'/static/images/icon/collection-anti.png'" alt="">
        <img src="/static/images/icon/share-anti.png" alt="">
      div>
      <div class="line">div>
    div>
    <Button>转发此文章Button>
    <p class="content">{{detailObj.detail_content}}p>
  div>
template>

<script>
  import {mapState} from 'vuex'
  export default {
    data(){
      return {
        detailObj: {},
        isCollected: false, // 标识文章是否被收藏
      }
    },
    beforeMount(){
      this.index = this.$mp.query.index

      // 预处理工作: 本地是否收藏的缓存
      let oldStorage = wx.getStorageSync('isCollected')
      if(!oldStorage){ // 为空
        wx.setStorage({
          key: 'isCollected',
          data: {}
        })
      }else {
        // 用户缓存过
        this.isCollected = (oldStorage[this.index]?true: false)
      }
    },
    mounted(){
      // 更新state中的数据
      this.detailObj = this.listTmp[this.$mp.query.index]
    },
    computed: {
      ...mapState(['listTmp'])
    },
    methods: {
      handleCollection(){
        // 修改状态
        let isCollected = !this.isCollected
        this.isCollected = isCollected
        let title = isCollected?'收藏成功': '取消收藏'
        wx.showToast({
          title,
          icon: 'success'
        })

        // 读取之前本地缓存的状态查看是否收藏
        let oldStorage = wx.getStorageSync('isCollected')
        oldStorage[this.index] = isCollected
        // 将本次设置的结果再缓存到本地
        wx.setStorage({
          key: 'isCollected',
          data: oldStorage
        })
      }
    }
  }
script>

<style>
 /*忽略样式*/
style>
背景音乐播放暂停的功能实现
接下来要做的是,在详情页中加一个背景音乐播放暂停的功能。
涉及到:
playBackgroundAudio的使用、pauseBackgroundAudio的使用、
onBackgroundAudioPlay的使用、onBackgroundAudioPause的使用
前两个是使用后台播放器播放音乐。
后两个是用来监听音乐播放暂停事件的。
虽然这几个接口已经停止维护,而且可能会出现机型兼容问题,但是比较简单好用,暂时先用它们。
这里需要考虑一个问题,当我们播放音乐后,也需要像实现收藏时一样,有一个数据来记录音乐是否播放。那再使用本地缓存是否合理?从功能上来看,我们肯定是想在同一时间里只有一首音乐播放。那如果本地缓存的话,你去到一个页面点击播放,再去另一个页面点击播放,那第一个页面会因为缓存,还会提示正在播放,这显然不合理。那么这个变量需要存储些什么?存储在哪里比较合理?
首先在当前页面肯定有一个数据用来记录音乐是否播放,从而改变 播放 / 暂停 的图片 和音乐,暂时叫它isMusicPlay。为了能够让我们在当前页面点击播放,退出后再进入该页面显示它正在播放,和 退出后进入其他页面 点击播放后,上一个页面的正在播放消失 , 我们可以这么做:
在最开始进入页面时,即页面初始化时,isMusicPlay为false,无论页面之前是否播放。然后我们在beforeMount()中,判断上一个正在播放的页面的下标 和 当前页面的下标是否相同(如果没有上一个播放的页面自然也就跳过这一步了),如果 相同,那我们就修改isMusicPlay为true,这样一来反复进出相同页面,是否播放的正确性就保证了。如果 不同,那isMusicPlay继续为false即可。 当你在新的页面点击播放后,就会记录新页面的下标。这样就完成了这部分功能。
那么现在需要考虑这个记录下标的数据存储在哪里合适?显然不可能存储在各个页面中,因此可以考虑存储在vuex中,也可以我们自己再建一个文件。
这里选择使用再建一个文件,在datas文件夹下再建一个isPlay,用来记录上一个播放页面的下标。

需要说明的是,上面不是说isMusicPlay这个判断当前页面是否播放音乐的数据记录在当前页面了吗,为什么还需要在isPlay里再加一个数据去标识index标志的页面是否播放?把几种情况想明白就知道了。
①之前没有页面播放音乐,即index记录为null,那么就设置当前页面的isMusicPlay为false。
②之前没有页面播放音乐,但是点击过播放音乐,这个时候index一定不是null,因为在之后监听事件的时候,我们还要把播放音乐页面的下标传回到isPlay.js文件。我们又无法判断用户是否在之后会把音乐暂停,所以也无法再把index设为null。所以这个isPlay数据的设置就十分有必要了。这样之后,只要isPlay记录为false,那么就设置当前页面的isMusicPlay为false。
③只要isPlay为true,且index和当前页面的下标相同,那就证明还在同一个页面,那么就设置当前页面的isMusicPlay为true。
④否则:isPlay为true,且index和当前页面的下标不同,那就证明已经不在同一个页面,虽然isPlay为true,那么也要设置当前页面的isMusicPlay为false。
export default {
  pageIndex: null,  // 标识页面的下标
  isPlay: false     // 标识页面音乐是否在播放
}
然后去detail.vue中引入即可,还需要添加监听事件,这样点击播放的时候就会把当前页面的下标记录在isPlay中。
<template>
  <div class="detailContainer">
    <img class="detail_img" :src="isMusicPlay?detailObj.music.coverImgUrl:detailObj.detail_img" alt="">
    <img @tap="handleMusicPlay" class="music_img" :src="isMusicPlay?'/static/images/music/music-start.png':'/static/images/music/music-stop.png'" alt="">
    <div class="avatar_date">
      <img :src="detailObj.avatar" alt="">
      <span>{{detailObj.author}}span>
      <span>发布于span>
      <span>{{detailObj.date}}span>
    div>
    <p class="company">{{detailObj.title}}p>
    <div class="collection_share_container">
      <div class="collection_share">
        <img @tap="handleCollection" :src="isCollected?'/static/images/icon/collection.png':'/static/images/icon/collection-anti.png'" alt="">
        <img src="/static/images/icon/share-anti.png" alt="">
      div>
      <div class="line">div>
    div>
    <Button>转发此文章Button>
    <p class="content">{{detailObj.detail_content}}p>
  div>
template>

<script>
  import {mapState} from 'vuex'
  import isPlayObj from '../../datas/isPlay'
  export default {
    data(){
      return {
        detailObj: {},
        isCollected: false, // 标识文章是否被收藏
        isMusicPlay: false  // 标识音乐是否播放
      }
    },
    beforeMount(){
      // 使用this.$mp.query.index取代 onLoad中的options
      this.index = this.$mp.query.index

      // 预处理工作: 本地是否收藏的缓存
      let oldStorage = wx.getStorageSync('isCollected')
      if(!oldStorage){ // 为空
        wx.setStorage({
          key: 'isCollected',
          data: {}
        })
      }else {
        // 用户缓存过
        this.isCollected = (oldStorage[this.index]?true: false)
      }

      // 判断当前页面加载的时候音乐是否在播放
      isPlayObj.pageIndex === this.index && isPlayObj.isPlay?this.isMusicPlay = true:this.isMusicPlay = false

      // 监听音乐的播放和暂停
      wx.onBackgroundAudioPlay(() => {
        // 修改状态
        this.isMusicPlay = true
        isPlayObj.pageIndex = this.index
        isPlayObj.isPlay = true
      })
      wx.onBackgroundAudioPause(() => {
        this.isMusicPlay = false
        isPlayObj.isPlay = false
      })
    },
    mounted(){
      console.log(this);
      // 更新state中的数据
      this.detailObj = this.listTmp[this.$mp.query.index]
    },
    computed: {
      ...mapState(['listTmp'])
    },
    methods: {
      handleCollection(){
        // 修改状态
        let isCollected = !this.isCollected
        this.isCollected = isCollected
        let title = isCollected?'收藏成功': '取消收藏'
        wx.showToast({
          title,
          icon: 'success'
        })

        // 读取之前本地缓存的状态查看是否收藏
        let oldStorage = wx.getStorageSync('isCollected')
        oldStorage[this.index] = isCollected
        // 将本次设置的结果再缓存到本地
        wx.setStorage({
          key: 'isCollected',
          data: oldStorage
        })
      },
      handleMusicPlay(){
        // 处理音乐播放
        let isMusicPlay = !this.isMusicPlay
        this.isMusicPlay = isMusicPlay
        let {dataUrl,title} = this.detailObj.music
        if(isMusicPlay){
          wx.playBackgroundAudio({
            dataUrl,
            title
          })
        }else {
          wx.pauseBackgroundAudio()
        }
      }
    }
  }
script>

<style>
/*忽略其他样式*/
  .music_img {
    width: 60rpx;
    height: 60rpx;
    position: absolute;
    top: 200rpx;
    left: 50%;
    margin-left: -30rpx;
  }
style>
分享功能的实现
这部分要实现的功能就是点击分享按钮,可以实现 将当前页面分享到 什么地方的 功能。
这部分涉及到:
showActionSheet的使用、
button里open-type里的一个功能
![]()
这两个的效果是不同的。
showActionSheet的效果是这样的:
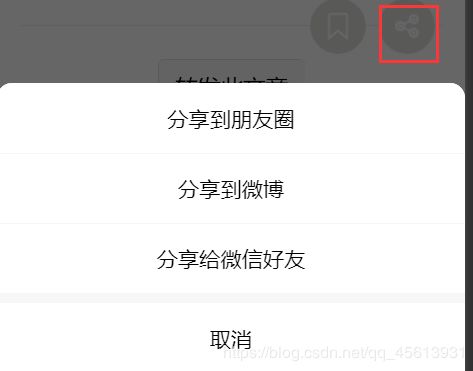
而button的效果是这样的:
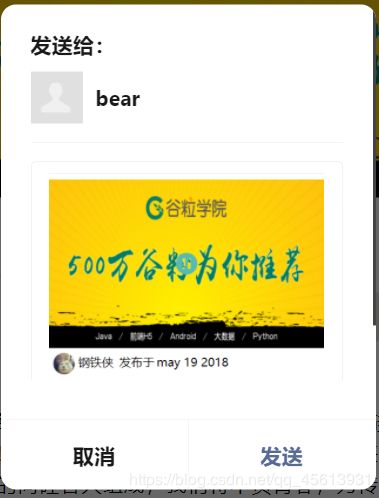
在这里需要说明的是,showActionSheet的这个分享并没有真的实现分享功能,原因是 个人学习的话都是个人帐号,权限不够。
但是button的那个分享,如果用微信开发者工具到真机上预览的话,是可以分享的。
(毕竟不是我们自己实现,这是官方提供的)
下面是detail.vue的完整代码:
<template>
  <div class="detailContainer">
    <img class="detail_img" :src="isMusicPlay?detailObj.music.coverImgUrl:detailObj.detail_img" alt="">
    <img @tap="handleMusicPlay" class="music_img" :src="isMusicPlay?'/static/images/music/music-start.png':'/static/images/music/music-stop.png'" alt="">
    <div class="avatar_date">
      <img :src="detailObj.avatar" alt="">
      <span>{{detailObj.author}}span>
      <span>发布于span>
      <span>{{detailObj.date}}span>
    div>
    <p class="company">{{detailObj.title}}p>
    <div class="collection_share_container">
      <div class="collection_share">
        <img @tap="handleCollection" :src="isCollected?'/static/images/icon/collection.png':'/static/images/icon/collection-anti.png'" alt="">
        <img @tap="handleShare" src="/static/images/icon/share-anti.png" alt="">
      div>
      <div class="line">div>
    div>
    <Button open-type="share">转发此文章Button>
    <p class="content">{{detailObj.detail_content}}p>
  div>
template>

<script>
  import {mapState} from 'vuex'
  import isPlayObj from '../../datas/isPlay'
  export default {
    data(){
      return {
        detailObj: {},
        isCollected: false, // 标识文章是否被收藏
        isMusicPlay: false  // 标识音乐是否播放
      }
    },
    beforeMount(){
      console.log(this)
      // 使用this.$mp.query.index取代 onLoad中的options
      this.index = this.$mp.query.index

      // 预处理工作: 本地是否收藏的缓存
      let oldStorage = wx.getStorageSync('isCollected')
      if(!oldStorage){ // 为空
        wx.setStorage({
          key: 'isCollected',
          data: {}
        })
      }else {
        // 用户缓存过
        this.isCollected = (oldStorage[this.index]?true: false)
      }

      // 判断当前页面加载的时候音乐是否在播放
      isPlayObj.pageIndex === this.index && isPlayObj.isPlay?this.isMusicPlay = true:this.isMusicPlay = false

      // 监听音乐的播放和暂停
      wx.onBackgroundAudioPlay(() => {
        console.log('音乐播放');
        // 修改状态
        this.isMusicPlay = true
        isPlayObj.pageIndex = this.index
        isPlayObj.isPlay = true
      })
      wx.onBackgroundAudioPause(() => {
        console.log('音乐暂停');
        this.isMusicPlay = false
        isPlayObj.isPlay = false
      })
    },
    mounted(){
      console.log(this);
      // 更新state中的数据
      this.detailObj = this.listTmp[this.$mp.query.index]
    },
    computed: {
      ...mapState(['listTmp'])
    },
    methods: {
      handleCollection(){
        // 修改状态
        let isCollected = !this.isCollected
        this.isCollected = isCollected
        let title = isCollected?'收藏成功': '取消收藏'
        wx.showToast({
          title,
          icon: 'success'
        })

        // 读取之前本地缓存的状态查看是否收藏
        let oldStorage = wx.getStorageSync('isCollected')
        oldStorage[this.index] = isCollected
        // 将本次设置的结果再缓存到本地
        wx.setStorage({
          key: 'isCollected',
          data: oldStorage
        })
      },
      handleMusicPlay(){
        // 处理音乐播放
        let isMusicPlay = !this.isMusicPlay
        this.isMusicPlay = isMusicPlay
        let {dataUrl,title} = this.detailObj.music
        if(isMusicPlay){
          wx.playBackgroundAudio({
            dataUrl,
            title
          })
        }else {
          wx.pauseBackgroundAudio()
        }
      },
      handleShare(){
        wx.showActionSheet({
          itemList: [
            '分享到朋友圈', '分享到微博', '分享给微信好友'
          ]
        })
      }
    }
  }
script>

<style>

  .detailContainer {
    display: flex;
    flex-direction: column;
  }

  .detail_img {
    width: 100%;
    height: 460rpx;
  }
  .avatar_date{
    padding:10rpx;
  }
  .avatar_date img {
    width: 64rpx;
    height: 64rpx;
    vertical-align: middle;
  }

  .avatar_date span {
    font-weight: 28rpx;
    margin-left: 6rpx;
  }

  .company {
    font-size: 32rpx;
    font-weight: bold;
    padding:10rpx;
  }

  .collection_share_container {
    position: relative;
  }

  .collection_share {
    float: right;
    margin-right: 30rpx;
  }

  .collection_share img {
    width: 90rpx;
    height: 90rpx;
    margin-right: 20rpx;
  }

  .line {
    position: absolute;
    top: 45rpx;
    left: 5%;
    width: 90%;
    height:1rpx;
    background: #eee;
    z-index: -1;
  }

  .content {
    font-size: 32rpx;
    text-indent: 32rpx;
    letter-spacing: 3rpx;
    line-height: 50rpx;
  }

  .music_img {
    width: 60rpx;
    height: 60rpx;
    position: absolute;
    top: 200rpx;
    left: 50%;
    margin-left: -30rpx;
  }

style>
