kaggle经典比赛总结(二)CNN入门-数字识别
Introduction to CNN Keras — Acc 0.997
数字识别-CNN介绍
Kaggle链接:https://www.kaggle.com/yassineghouzam/introduction-to-cnn-keras-0-997-top-6/comments
数字识别是kaggle上关于深度学习的入门比赛,等同与深度学习的hello world程序。
1. 介绍
2. 数据处理
3. CNN模型
4. 模型评价
5. 预测和提交
1.介绍
本文打算在数字识别数据集上训练5层卷积神经网络,并且使用以Tensorflow为后端的Keras API实现。并且在单CPU的情况下训练CNN模型2个半小时达到了99.671%的准确率。由于计算能力的原因,这里设置迭代的次数为2,如果想达到更多的准确率99%+可以将迭代次数设置为30或者更高。
本文主要分为三个部分:
(1)数据处理
(2)CNN模型和评价
(3)预测结果
实现CNN,需要安装如下python包,有关keras包,可以直接在pycharm中安装或者通过pip手动安装(python的环境建议直接安装anaconda3):
import pandas as pd
import numpy as np
import matplotlib.pyplot as plt
import matplotlib.image as img
import seaborn as sns
import itertools

from sklearn.model_selection import train_test_split
from sklearn.metrics import confusion_matrix

from keras.utils.np_utils import to_categorical
from keras.models import Sequential
from keras.layers import Dense, Dropout, Flatten, Conv2D, MaxPool2D
from keras.optimizers import RMSprop
from keras.preprocessing.image import ImageDataGenerator
from keras.callbacks import ReduceLROnPlateau
2.数据处理
2.1 加载数据集
# 2.1 加载数据集 28 * 28 = 784
train = pd.read_csv('/Users/xudong/kaggleData/digit-recognizer/train.csv')
test = pd.read_csv('/Users/xudong/kaggleData/digit-recognizer/test.csv')
print(train.head(5))

# 标签列
Y_train = train['label']

# 丢弃label列
X_train = train.drop(labels=['label'], axis=1)

# 删除train,释放空间
del train

# 画出数据的统计图
sns.set(style='white', context='notebook', palette='deep')
snss = sns.countplot(Y_train)
plt.show()
print(Y_train.value_counts())
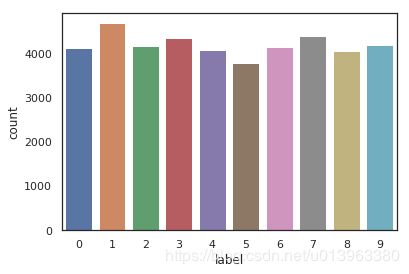
可以画图显示当前所有类别数字的数量统计(0~9):
2.2 数据预处理
这个部分主要是对数据进行处理,包括检查缺失数据、数据标准化、数据转化、类别标签的编码和划分数据集。
# 1 检查所有的null或者缺失数据
print(X_train.isnull().any().describe())
# print(test.isnull().any().describe())

# 2 数据标准化 本来就是0-255
# CNN在0-1上收敛要更快
X_train = X_train / 255.0
test = test / 255.0

print(X_train.head(5))

# 3 转换图片数据为三个纬度(长=28px宽=28px,通道=1)
# 将一维784的向量转化成28*28*1的张量
# keras会要求通道数的输入,mnist图片只有灰色的因此只有一个通道,对于RGB图片来说,会有三个通道。
X_train = X_train.values.reshape(-1, 28, 28, 1)
test = test.values.reshape(-1, 28, 28, 1)

# 4 标签编码
# encoding labels to one hot vectors(ex:2 -》 [0, 0, 1, 0, 0, 0, 0, 0, 0, 0])
Y_train = to_categorical(Y_train, num_classes=10)

# 5 划分数据集
# 将数据集划分喂两个部分,10%作为验证集,90%作为训练集
random_seed = 2
X_train, X_val, Y_train, Y_val = train_test_split(X_train, Y_train, test_size=0.1, random_state=2, stratify=Y_train)

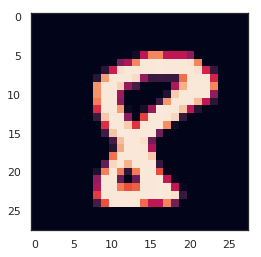
# Some examples 画图显示单条数据的样式
g = plt.imshow(X_train[1][:, :, 0])
3.CNN模型
3.1 模型的定义
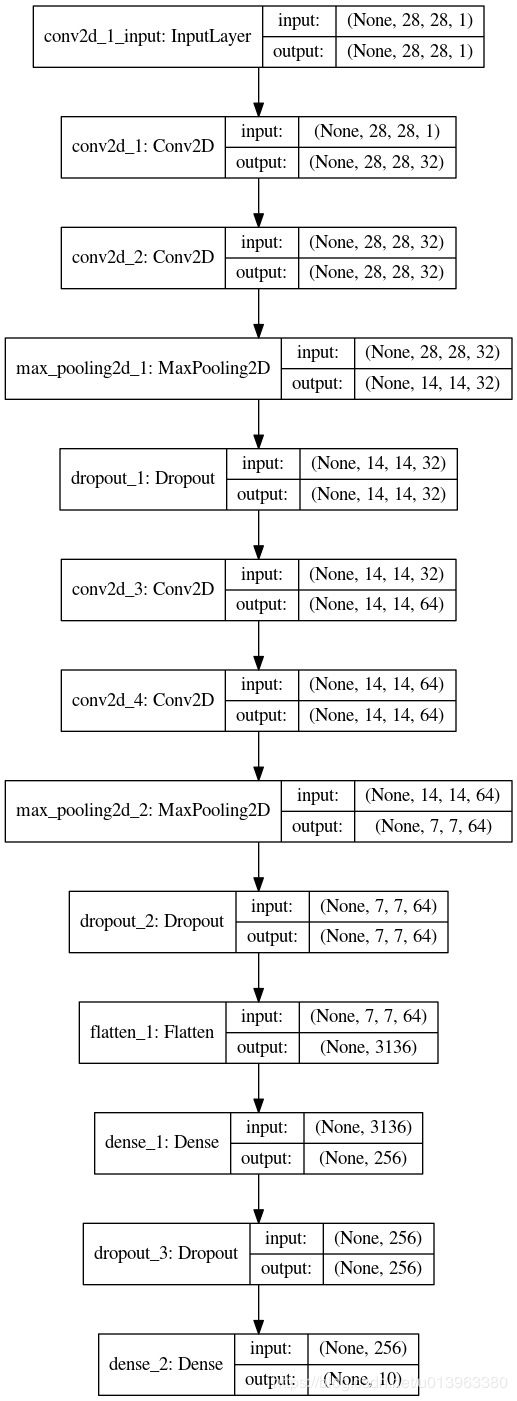
这里使用Keras创建CNN模型(相关知识可以参考CNN入门算法LeNet)。本文的CNN模型主要结构如下:
(1)输入层:28 * 28的灰度图像,也就是一个通道,那么一个图像就是一个2维的矩阵,没有RGB三个通道。
(2)Layer1:32个大小为5 * 5的卷积核,设置padding为same,使用relu激活函数。这一层的输出为32 * 28 * 28。
(3)Layer2:32个大小为5 * 5的卷积核,设置padding为same,使用relu激活函数。这一层的输出为32 * 28 * 28。
(4)Layer3:2 * 2大小的池化层,使用最大池化层(默认步长2)。输出32 * 14 * 14。
(5)Layer4:Dropout层,设置概率为0.25。
(6)Layer5:64个大小为3 * 3的卷积核,设置padding为same,使用relu激活函数。输出64 * 14 * 14。
(7)Layer6:64个大小为3 * 3的卷积核,设置padding为same,使用relu激活函数。输出64 * 14 * 14。
(8)Layer7:2 * 2大小的池化层,步长为2。输出64 * 7 * 7。
(9)Layer8:Dropout层,设置概率为0.25。
(10)Layer9:Flatten层,输出为3136。
(11)Layer10:256的Dense层,激活函数是relu,输出256。
(12)Layer11:Dropout层,设置概率为0.5。
(13)输出层:10的Dense层,输出10。
# 3 CNN
# 3.1 Define the model
model = Sequential()
model.add(Conv2D(filters=32, kernel_size=(5, 5), padding='Same', activation='relu', input_shape=(28, 28, 1)))
model.add(Conv2D(filters=32, kernel_size=(5, 5), padding='Same', activation='relu'))
model.add(MaxPool2D(pool_size=(2, 2)))
model.add(Dropout(0.25))

model.add(Conv2D(filters=64, kernel_size=(3, 3), padding='Same', activation='relu'))
model.add(Conv2D(filters=64, kernel_size=(3, 3), padding='Same', activation='relu'))
model.add(MaxPool2D(pool_size=(2, 2), strides=(2, 2)))
model.add(Dropout(0.25))

model.add(Flatten())
model.add(Dense(256, activation='relu'))
model.add(Dropout(0.5))
model.add(Dense(10, activation='softmax'))
通过keras的网络结构可视化包来可视化上述的CNN模型结构。
from keras.utils.vis_utils import plot_model

plot_model(model, to_file='model.png', show_shapes=True, show_layer_names=True)
3.2 设置优化算法和退火算法
选择RMSProp优化算法(优化算法从梯度下降到Adam),评价指标选择分类准确率accuracy,使用学习率下降退火。
# 3.2 设置优化器
# 优化算法
optimizer = RMSprop(lr=0.001, rho=0.9, epsilon=1e-08, decay=0.0)
# compile the model 评价指标设置为accuracy
model.compile(optimizer=optimizer, loss='categorical_crossentropy', metrics=["accuracy"])

# set a learning rate annealer
# 学习率优化
learning_rate_reduction = ReduceLROnPlateau(monitor='val_acc',
                                            patience=3,
                                            verbose=1,
                                            factor=0.5,
                                            min_lr=0.00001)
3.3 数据增强
数据增强主要用来防止过拟合,用于dataset较小的时候。随着神经网络的加深,需要学习的参数也会随之增加,这样就会更容易导致过拟合,当数据集较小的时候,过多的参数会拟合数据集的所有特点,而非数据之间的共性。因此在这种情况下,为了防止过拟合现象,数据增强应运而生。当然除了数据增强,还有正则项/dropout等方式可以防止过拟合。
常见的数据增强方法:
(1)随机旋转,随机旋转一般情况下是对输入图像随机旋转[0,360)。
(2)随机裁剪,随机裁剪是对输入图像随机切割掉一部分。
(3)色彩抖动,色彩抖动指的是在颜色空间如RGB中,每个通道随机抖动一定的程度。在实际的使用中,该方法不常用。
(4)高斯噪声,指在图像中随机加入少量的噪声。该方法对防止过拟合比较有效,这会让神经网络不能拟合输入图像的所有特征。
(5)水平翻转。
(6)竖直翻转。
# 3.3 数据增强

epochs = 2
batch_size = 86

# without data augmentation
# history = model.fit(X_train, Y_train, batch_size=batch_size,
#                     epochs=epochs, validation_data=(X_val, Y_val), verbose=2)


# with data augmentation to prevent overfitting
datagen = ImageDataGenerator(
    featurewise_center=False, # set input mean to 0 over the dataset
    samplewise_center=False, # set each sample mean to 0
    featurewise_std_normalization=False,
    samplewise_std_normalization=False,
    zca_whitening=False,
    rotation_range=10, # 随机旋转图片10度
    zoom_range=0.1, # 随机裁剪10%的图片
    width_shift_range=0.1,  # 水平移动10%
    height_shift_range=0.1,  # 垂直移动10%
    horizontal_flip=False,
    vertical_flip=False
)

datagen.fit(X_train)
history = model.fit_generator(datagen.flow(X_train, Y_train, batch_size=batch_size),
                              epochs=epochs, validation_data=(X_val, Y_val),
                              verbose=2, steps_per_epoch=X_train.shape[0] // batch_size,
                              callbacks=[learning_rate_reduction])
4.模型评价
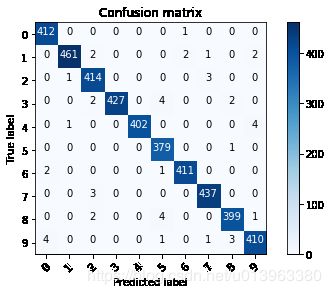
4.1 混淆矩阵
# 4.1 confusion matrix
def plot_confusion_matrix(cm, classes, normalize=False, cmap=plt.cm.Blues):
    """
    This function prints and plots the confusion matrix.
    Normalization can be applied by setting `normalize=True`.
    """
    plt.imshow(cm, interpolation='nearest', cmap=cmap)
    plt.title('Confusion matrix')
    plt.colorbar()
    tick_marks = np.arange(len(classes))
    plt.xticks(tick_marks, classes, rotation=45)
    plt.yticks(tick_marks, classes)

    if normalize:
        cm = cm.astype('float') / cm.sum(axis=1)[:, np.newaxis]

    thresh = cm.max() / 2.0
    for i, j in itertools.product(range(cm.shape[0]), range(cm.shape[1])):
        plt.text(j, i, cm[i, j], horizontalalignment='center', color='white' if cm[i, j] > thresh else 'black')

    plt.tight_layout()
    plt.ylabel('True label')
    plt.xlabel('Predicted label')
    plt.show()  # notebook不需要写show


# predict the values from the validation dataset
y_pred = model.predict(X_val)
# convert predictions classes to one hot vectors
y_pred_classes = np.argmax(y_pred, axis=1)
# convert validation observations to one hot vectors
y_true = np.argmax(Y_val, axis=1)
# compute the confusion matrix
confusion_mtx = confusion_matrix(y_true, y_pred_classes)
# plot the confusion matrix
plot_confusion_matrix(confusion_mtx, classes=range(10))
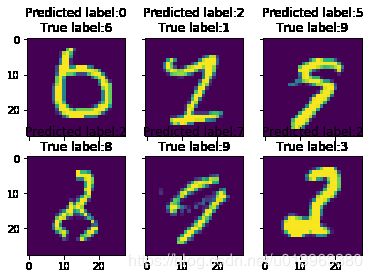
4.2 打印分类错误的结果
# display some error results
errors = (y_pred_classes - y_true != 0)  # index
y_pred_classes_errors = y_pred_classes[errors]  # 错误的类别
y_pred_errors = y_pred[errors]  # 预测错误的类别 [0,1,0....]的概率
y_true_errors = y_true[errors]  # z正确的类别
x_val_errors = X_val[errors]  # pix的特征


# 画出top6的错误预测数字
def display_errors(errors_index, img_errors, pred_errors, obs_errors):
    n = 0
    nrows = 2
    ncols = 3
    fig, ax = plt.subplots(nrows, ncols, sharex=True, sharey=True)
    for row in range(nrows):
        for col in range(ncols):
            error = errors_index[n]
            ax[row, col].imshow((img_errors[error]).reshape((28, 28)))
            ax[row, col].set_title('Predicted label:{}\nTrue label:{}'.format(pred_errors[error],obs_errors[error]))
            n += 1

#  probablities of the wrong predicted numbers
y_pred_errors_prob = np.max(y_pred_errors, axis=1)

# predicted probabilities of the true values in the error set
true_prob_errors = np.diagonal(np.take(y_pred_errors, y_true_errors, axis=1))

# difference between the probability of the predicted label and the true label
delta_pred_true_errors = y_pred_errors_prob - true_prob_errors

# sorted list of the delta prob errors
sorted_delta_errors = np.argsort(delta_pred_true_errors)

# top 6 errors
most_important_errors = sorted_delta_errors[-6:]

# show the top 6 errors
display_errors(most_important_errors, x_val_errors, y_pred_classes_errors, y_true_errors)
4.3 预测结果并提交
# predict the test result
results = model.predict(test)

# select the indix with the maximum probability
results = np.argmax(results,axis = 1)

results = pd.Series(results,name="Label")
submission = pd.concat([pd.Series(range(1,28001),name = "ImageId"),results],axis = 1)

submission.to_csv("cnn_mnist_datagen.csv",index=False)
在Kaggle免费的Gpu上使用epochs=30,跑出来的最终结果是0.98728。
