ActiveMQ快速入门
什么是ActiveMQ:
官方解释如下:
Apache ActiveMQ™是最流行的开源,多协议,基于Java的消息传递服务器。它支持行业标准协议,因此用户可以通过广泛的语言和平台从客户选择中受益。可以使用C,C ++,Python,.Net等进行连接。使用无处不在的AMQP协议集成您的多平台应用程序。在Websocket上使用STOMP在Web应用程序之间交换消息。使用MQTT管理您的IoT设备。支持您现有的JMS基础结构及其他。ActiveMQ提供了强大的功能和灵活性来支持任何消息传递用例。
ActiveMQ能干什么?
它是一种面向消息的中间件,利用高效可靠的消息传递机制进行与平台无关的数据交流,并基于数据通信来进行分布式系统的集成。通过提供消息传递和消息排队模型在分布式系统下提供应用解耦,流量削峰,异步通信,数据同步等功能
大致过程如下:
发送者把消息发送给消息服务器,消息服务器将消息存放在若干队列/主题中,在合适的时候,消息服务器会把消息转发给接受者。在这个过程中,发送和接受都是异步的。
ActiveMQ通讯方式:
1、点对点(queue)
类似QQ私聊,一对一,一个发送者,一个接受者(当然关联QQ的情况比较特殊哈,比如发送者发了一条消息:“今晚他加班,老地方见”,两个人都能收到,不太贴切了哈)
2、一对多(topic)
类似于群聊,微信公众号更贴切一些,只要关注了微信公众号的接受者,都能收到发送者的消息推送
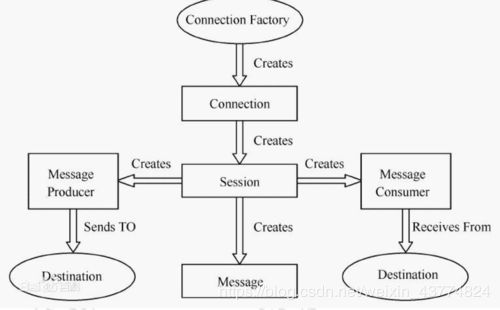
废话不多说,按照JMS编码总体架构进行编码:

建Maven项目,在pom.xml中引入ActiveMQ依赖
  org.apache.activemq
  activemq-all
   5.15.9
队列生产者测试代码如下:
public class JmsProduce {
    public static final String  defaultURL = "tcp://192.168.23.128:61616";
    public static final String  QUEUE_NAME="queue";
    public static void main(String[] args) throws JMSException {
        //创建连接工厂   defaultURL = "tcp://" + DEFAULT_BROKER_HOST + ":" + DEFAULT_BROKER_PORT;制定ip+端口
        ActiveMQConnectionFactory activeMQConnectionFactory = new ActiveMQConnectionFactory(defaultURL);
        //通过连接工厂,获得连接并启动
        Connection connection =  activeMQConnectionFactory.createConnection();
        connection.start();
        //创建会话session 第一个参数事务,第二个参数签收
        Session session = connection.createSession(false, Session.AUTO_ACKNOWLEDGE);
        //创建目的地(队列或主题)
        Queue queue = session.createQueue(QUEUE_NAME);
        //创建消息生产者
        MessageProducer producer = session.createProducer(queue);
        //生产五条消息,发送到MQ队列中
        for (int i =1; i <=5 ; i++) {
            TextMessage textMessage = session.createTextMessage("msg----" + i);
            producer.send(textMessage);
        }
        producer.close();
        session.close();
        connection.close();
        System.out.println("---------------消息发布到MQ完成---------------------");
    }
}
队列消费者测试代码如下:
public class JmsConsumer {
    public static final String  defaultURL = "tcp://192.168.23.128:61616";
    public static final String  QUEUE_NAME="queue";
    public static void main(String[] args) throws JMSException {
        //创建连接工厂   defaultURL = "tcp://" + DEFAULT_BROKER_HOST + ":" + DEFAULT_BROKER_PORT;制定ip+端口
        ActiveMQConnectionFactory activeMQConnectionFactory = new ActiveMQConnectionFactory(defaultURL);
        //通过连接工厂,获得连接并启动
        Connection connection =  activeMQConnectionFactory.createConnection();
        connection.start();
        //创建会话session 第一个参数事务,第二个参数签收
        Session session = connection.createSession(false, Session.AUTO_ACKNOWLEDGE);
        //创建目的地(队列或主题)
        Queue queue = session.createQueue(QUEUE_NAME);
        //创建消费者
        MessageConsumer consumer = session.createConsumer(queue);
        while(true){
            //receive() 可以设置一个时间参数
            TextMessage textMessage = (TextMessage) consumer.receive();
            if (textMessage!=null){
                System.out.println("消费者接收到消息----"+textMessage.getText());
            }else {
                break;
            }
        }
        consumer.close();
        session.close();
        connection.close();
    }
}
执行效果:

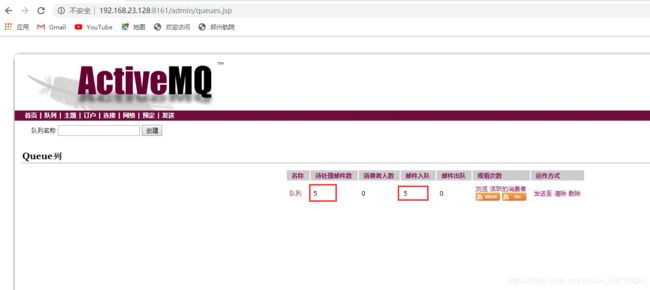
执行完成后看前台:

我们可以看到用receive()同步阻塞阻塞方式,receive方法在能够接收到消息之前或超时之前(设置超时时间)将一直阻塞。
用监听的方式:
public class JmsConsumer {
    public static final String  defaultURL = "tcp://192.168.23.128:61616";
    public static final String  QUEUE_NAME="queue";
    public static void main(String[] args) throws JMSException, IOException {
        //创建连接工厂   defaultURL = "tcp://" + DEFAULT_BROKER_HOST + ":" + DEFAULT_BROKER_PORT;制定ip+端口
        ActiveMQConnectionFactory activeMQConnectionFactory = new ActiveMQConnectionFactory(defaultURL);
        //通过连接工厂,获得连接并启动
        Connection connection =  activeMQConnectionFactory.createConnection();
        connection.start();
        //创建会话session 第一个参数事务,第二个参数签收
        Session session = connection.createSession(false, Session.AUTO_ACKNOWLEDGE);
        //创建目的地(队列或主题)
        Queue queue = session.createQueue(QUEUE_NAME);
        //创建消费者
        MessageConsumer consumer = session.createConsumer(queue);
      //通过监听的方式来消费消息
        consumer.setMessageListener((message) -> {
            if(message!=null && message instanceof TextMessage){
                TextMessage textMessage = (TextMessage) message;
                try{
                    System.out.println("消费者接收到消息----"+textMessage.getText());
                }catch (JMSException e){
                    e.printStackTrace();
                }
            }
        });
        System.in.read();
        consumer.close();
        session.close();
        connection.close();
    }
}
我们启动两个消费者,生产者发送消息,消费者消费消息默认采用轮询策略

主题消费者测试代码如下:
public class JmsConsumer_Topic {
    public static final String  defaultURL = "tcp://192.168.23.128:61616";
    public static final String  TOPIC_NAME="topic-test";
    public static void main(String[] args) throws JMSException, IOException {
        System.out.println("我是二号消费者");
        //创建连接工厂   defaultURL = "tcp://" + DEFAULT_BROKER_HOST + ":" + DEFAULT_BROKER_PORT;制定ip+端口
        ActiveMQConnectionFactory activeMQConnectionFactory = new ActiveMQConnectionFactory(defaultURL);
        //通过连接工厂,获得连接并启动
        Connection connection =  activeMQConnectionFactory.createConnection();
        connection.start();
        //创建会话session 第一个参数事务,第二个参数签收
        Session session = connection.createSession(false, Session.AUTO_ACKNOWLEDGE);
        //创建目的地(队列或主题)
        Topic topic = session.createTopic(TOPIC_NAME);
        //创建消费者
        MessageConsumer consumer = session.createConsumer(topic);
        //通过监听的方式来消费消息
        consumer.setMessageListener((message) -> {
            if(message!=null && message instanceof TextMessage){
                TextMessage textMessage = (TextMessage) message;
                try{
                    System.out.println("消费者接收到消息----"+textMessage.getText());
                }catch (JMSException e){
                    e.printStackTrace();
                }
            }
        });
        System.in.read();
        consumer.close();
        session.close();
        connection.close();
    }
}
主题生产者测试代码如下:
public class JmsProduce_Topic {
    public static final String  defaultURL = "tcp://192.168.23.128:61616";
    public static final String  TOPIC_NAME="topic-test";
    public static void main(String[] args) throws JMSException {
        //创建连接工厂   defaultURL = "tcp://" + DEFAULT_BROKER_HOST + ":" + DEFAULT_BROKER_PORT;制定ip+端口
        ActiveMQConnectionFactory activeMQConnectionFactory = new ActiveMQConnectionFactory(defaultURL);
        //通过连接工厂,获得连接并启动
        Connection connection =  activeMQConnectionFactory.createConnection();
        connection.start();
        //创建会话session 第一个参数事务,第二个参数签收
        Session session = connection.createSession(false, Session.AUTO_ACKNOWLEDGE);
        //创建目的地(队列或主题)
        Topic topic = session.createTopic(TOPIC_NAME);
        //创建消息生产者
        MessageProducer producer = session.createProducer(topic);
        //生产五条消息,发送到MQ队列中
        for (int i =1; i <=6 ; i++) {
            TextMessage textMessage = session.createTextMessage("msg----" + i);
            producer.send(textMessage);
        }
        producer.close();
        session.close();
        connection.close();
        System.out.println("---------------消息发布到MQ完成---------------------");
    }
}
首先要有订阅,微信公众号推送消息才能收到所以先启动两个消费者,然后生产者生产消息推送
 idea中启动多个main实例,如下图所示:

需要多次启动main 打上勾

现在看到前台显示是这样的

ActiveMQ整合spring
pom.xml中的部分核心依赖
  org.springframework
  spring-jms
  4.3.23.RELEASE


  org.apache.activemq
  activemq-pool
  5.15.9


      org.springframework
      spring-core
      4.3.23.RELEASE
applicationContext.xml如下:
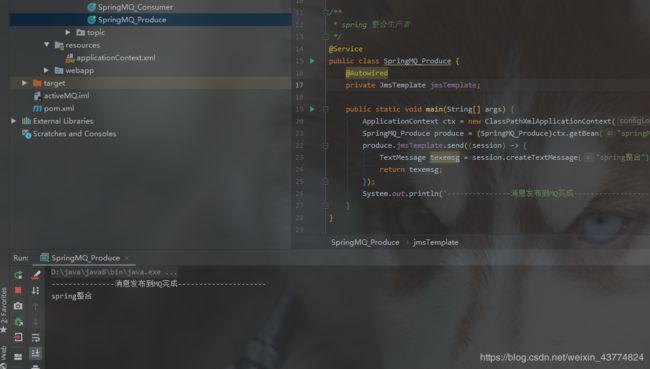
队列生产者测试类
@Service
public class SpringMQ_Produce {
    @Autowired
    private JmsTemplate jmsTemplate;

    public static void main(String[] args) {
        ApplicationContext ctx = new ClassPathXmlApplicationContext("applicationContext.xml");
        SpringMQ_Produce produce = (SpringMQ_Produce)ctx.getBean("springMQ_Produce");
        produce.jmsTemplate.send((session) -> {
            TextMessage texemsg = session.createTextMessage("spring整合");
            return texemsg;
        });
        System.out.println("---------------消息发布到MQ完成---------------------");
    }
}
前台显示没有问题:
![]()
队列消费者测试类:
@Service
public class SpringMQ_Consumer {
    @Autowired
    private JmsTemplate jmsTemplate;

    public static void main(String[] args) {
        ApplicationContext ctx = new ClassPathXmlApplicationContext("applicationContext.xml");
        SpringMQ_Consumer consumer = (SpringMQ_Consumer)ctx.getBean("springMQ_Consumer");
        String  value = (String) consumer.jmsTemplate.receiveAndConvert();
        System.out.println("---------------收到的消息---------------------"+value);
    }
}
运行结果:

前台也没有问题
![]()
topic的话要把applicationContext.xml中目的地改为topic即可,代码不变 即:
也可以使用监听的方式,applicationContext.xml中的监听配置
首先需要一个配置类:
@Component
public class MymessageListener implements MessageListener {
    @Override
    public void onMessage(Message message) {
        if(message!=null && message instanceof TextMessage){
            TextMessage textMessage = (TextMessage) message;
            try {
                System.out.println(textMessage.getText());
            } catch (JMSException e) {
                e.printStackTrace();
            }
        }
    }
}
这时只需启动生产者即可

SpringBoot整合ActiveMQ
pom.xml添加主要依赖
  org.springframework.boot
  spring-boot-starter-parent
  2.1.5.RELEASE


  org.springframework.boot
  spring-boot-starter-activemq
  2.1.5.RELEASE
application.yml
server:
  port: 8888

spring:
  activemq:
    broker-url: tcp://192.168.23.128:61616
    user: admin
    password: admin
  jms:
    pub-sub-domain: false    #false=Queue  true=Topic  默认false

myqueue: boot-active-queue
配置类:
@Component
@EnableJms
public class ConfigBean {
    @Value("${myqueue}")
    private String myQueue;

    public ActiveMQQueue queue(){
        return new ActiveMQQueue(myQueue);
    }
}
队列生产者测试类:
@Component
public class Queue_Produce {
    @Autowired
    private JmsMessagingTemplate jmsMessagingTemplate;
    @Autowired
    private Queue queue;

    public void produceMsg(){
        jmsMessagingTemplate.convertAndSend(queue,"*******"+ UUID.randomUUID().toString().substring(0,3));
    }
}
队列消费者测试
@Component
public class Queue_Consumer {
    @JmsListener(destination = "${myqueue}")
    public void receive(TextMessage textMessage) throws JMSException {
        System.out.println("消费者受到消息"+textMessage.getText());
    }
}
主题生产者消费者的代码差不太多,这里就不一一贴出来了
注意, pub-sub-domain改为true
ActiveMQ持久化
activemq默认持久化方式为kahadb,今天介绍jdbc持久化方式
将jdbc驱动包放在activemq安装目录lib文件夹下

进入conf文件夹编辑activemq.xml,替换默认持久化方式
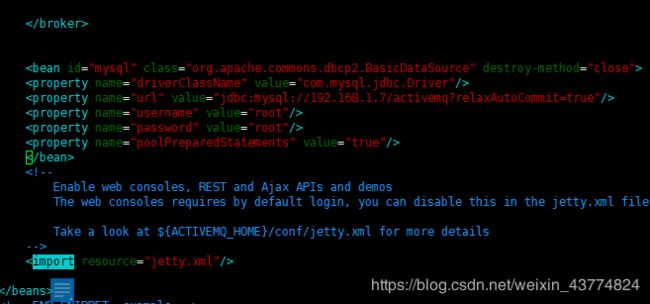
将默认的
替换为:
注意,现在使用的数据库连接池是默认的,如果改为c3p0等,需要提供相应的Jar包,这段配置写在broker闭合标签和import标签之间
重启activemq之后,会在activemq数据库里新建三张表
activemq_msgs用于存储消息,Queue和Topic都存储在这个表中
activemq_acks用于存储订阅关系
表activemq_lock在集群环境中才有用,只有一个Broker可以获得消息,称为Master Broker
这里注意,不开启持久化,生产消息不会存储到activemq_msgs表中


