SpringBoot2.X之旅,JPA+Durid+Mysql实践Druid Monitor笔记demo(Web Project)
一、开发环境
本文的开发环境是跟之前的一篇文章一样的SpringBoot2.X之旅,开篇 hello world(Web Project)
二、搭建项目基础:
1、Idea新建web项目,需要引入的包如图:
2、在pom.xml中加入druid的包,可以参照druid的文档
https://github.com/alibaba/druid/tree/master/druid-spring-boot-starter
最终pom.xml文件如下:
    4.0.0

        org.springframework.boot
        spring-boot-starter-parent
        2.1.3.RELEASE


    com.cobra
    jpademo
    0.0.1-SNAPSHOT
    jpademo
    Demo project for Spring Boot


        1.8


            org.springframework.boot
            spring-boot-starter-data-jpa


            org.springframework.boot
            spring-boot-starter-web


            mysql
            mysql-connector-java
            runtime


            com.alibaba
            druid-spring-boot-starter
            1.1.10


            org.projectlombok
            lombok
            true


            org.springframework.boot
            spring-boot-starter-test
            test


                org.springframework.boot
                spring-boot-maven-plugin
3、根据durid文档,配置连接需要的参数,这里我只做了最简单的配置,同时加入了WebStatFilter配置、StatViewServlet(监控页面)、AOP监控配置、同时设置sql语句控制台输出,这里给Druid Monitor设置的用户名/密码为:admin/admin:
spring:
  datasource:
    username: root
    password: 123456
    url: jdbc:mysql://127.0.0.1:3306/demo?serverTimezone=UTC&characterEncoding=utf-8&useSSL=false

    # 一、WebStatFilter配置,说明请参考Druid Wiki,配置_配置WebStatFilter
    druid:
      web-stat-filter:
        #是否启用StatFilter默认值false
        enabled: true
        url-pattern: "/*"
        exclusions: "*.js,*.gif,*.jpg,*.png,*.css,*.ico,/druid/*"
        session-stat-enable: "true"
#        session-stat-max-count:
#        principal-session-name:
#        principal-cookie-name:
#        profile-enable:
      #二、是否启用StatViewServlet(监控页面)默认值为false(考虑到安全问题默认并未启动,如需启用建议设置密码或白名单以保障安全)
      stat-view-servlet:
        # Spring监控配置,说明请参考Druid Github Wiki,配置_Druid和Spring关联监控配置
        enabled: true
        url-pattern: "/druid/*"
        reset-enable: "true"
        login-username: "admin"
        login-password: "admin"
        allow: "192.168.0.100,127.0.0.1"
        deny: "192.168.0.101"
      #三、Spring监控AOP切入点,如x.y.z.service.*,配置多个英文逗号分隔
      aop-patterns: "com.cobra.jpademo.service.impl.OrderServiceImpl.*"
  #控制台输出sql
  jpa:
    show-sql: true
    open-in-view: false
4、本人使用的mysql5.7版本,如果版本不一样,表很简单,可以自行建表,数据库表和数据
/*
 Navicat Premium Data Transfer

 Source Server         : localhost
 Source Server Type    : MySQL
 Source Server Version : 50724
 Source Host           : localhost:3306
 Source Schema         : demo

 Target Server Type    : MySQL
 Target Server Version : 50724
 File Encoding         : 65001

 Date: 09/03/2019 19:20:22
*/

SET NAMES utf8mb4;
SET FOREIGN_KEY_CHECKS = 0;

-- ----------------------------
-- Table structure for order_info
-- ----------------------------
DROP TABLE IF EXISTS `order_info`;
CREATE TABLE `order_info`  (
  `order_id` int(255) NOT NULL AUTO_INCREMENT,
  `order_desc` varchar(255) CHARACTER SET utf8 COLLATE utf8_general_ci NOT NULL,
  `order_fee` decimal(65, 0) NOT NULL,
  `user_id` int(255) NOT NULL,
  PRIMARY KEY (`order_id`) USING BTREE
) ENGINE = InnoDB AUTO_INCREMENT = 4 CHARACTER SET = utf8 COLLATE = utf8_general_ci ROW_FORMAT = Dynamic;

-- ----------------------------
-- Records of order_info
-- ----------------------------
INSERT INTO `order_info` VALUES (1, '第一个订单', 12, 1);
INSERT INTO `order_info` VALUES (2, '第二个订单', 120, 2);
INSERT INTO `order_info` VALUES (3, '第三个订单', 60, 2);

-- ----------------------------
-- Table structure for user_info
-- ----------------------------
DROP TABLE IF EXISTS `user_info`;
CREATE TABLE `user_info`  (
  `user_id` int(11) NOT NULL AUTO_INCREMENT,
  `username` varchar(255) CHARACTER SET utf8 COLLATE utf8_general_ci NOT NULL,
  `password` varchar(255) CHARACTER SET utf8 COLLATE utf8_general_ci NOT NULL,
  `email` varchar(255) CHARACTER SET utf8 COLLATE utf8_general_ci NOT NULL,
  PRIMARY KEY (`user_id`) USING BTREE
) ENGINE = InnoDB AUTO_INCREMENT = 3 CHARACTER SET = utf8 COLLATE = utf8_general_ci ROW_FORMAT = Dynamic;

-- ----------------------------
-- Records of user_info
-- ----------------------------
INSERT INTO `user_info` VALUES (1, '周伯通', '123abc', '[email protected]');
INSERT INTO `user_info` VALUES (2, '黄药师', '456def', '[email protected]');

SET FOREIGN_KEY_CHECKS = 1;
三、基本配置完成,开始coding:
1、数据实体类dataobject:
UserInfo:
package com.cobra.jpademo.dataobject;

import lombok.Data;

import javax.persistence.Entity;
import javax.persistence.Id;

/**
 * @Author: Baron
 * @Description: 用户dataobject
 * @Date: Created in 2019/3/8 18:29
 */
@Entity
@Data
public class UserInfo {

    @Id
    private Integer userId;

    private String username;

    private String password;

    private String email;

}
OrderInfo:
package com.cobra.jpademo.dataobject;

        import lombok.Data;

        import javax.persistence.Entity;
        import javax.persistence.Id;
        import java.math.BigDecimal;

/**
 * @Author: Baron
 * @Description: 订单dataobject
 * @Date: Created in 2019/3/8 18:20
 */
@Data
@Entity
public class OrderInfo {

    @Id
    private Integer orderId;

    private String orderDesc;

    private BigDecimal orderFee;

    private Integer userId;

}
2、基础的目录结构如下,本文为了演示方便,只有dataobject,真实项目中是需要VO、DTO等传递数据,否则直接暴露数据库结构给前端,是绝对不允许的行为:
1、repository层,也就是我们所说的dao,新建UserInfoRepository、OrderInfoRepository接口,继承JpaRepository指定实体类和主键类型:
1)UserInfoRepository
package com.cobra.jpademo.repository;

import com.cobra.jpademo.dataobject.UserInfo;
import org.springframework.data.jpa.repository.JpaRepository;

/**
 * @Author: Baron
 * @Description: 用户Repository
 * @Date: Created in 2019/3/8 18:36
 */
public interface UserInfoRepository extends JpaRepository {
}
2)OrderInfoRepository,这里新建一个特殊的根据userId查询订单的方法findByUserId(Integer userId),注意方法名是有一定规律的,可以根据idea的提示自动补全:
package com.cobra.jpademo.repository;

import com.cobra.jpademo.dataobject.OrderInfo;
import com.cobra.jpademo.dataobject.UserInfo;
import org.springframework.data.jpa.repository.JpaRepository;

import java.util.List;

/**
 * @Author: Baron
 * @Description: 订单Repository
 * @Date: Created in 2019/3/8 18:36
 */
public interface OrderInfoRepository extends JpaRepository {

    /**
     * 根据UserId查询订单
     * @param userId
     * @return
     */
    List findByUserId(Integer userId);

}
3、service层:
1)新建对应的接口,并分别定义方法:
UserService,查询所有用户(为了演示,分页就不做了):
package com.cobra.jpademo.service;

import com.cobra.jpademo.dataobject.UserInfo;

import java.util.List;

/**
 * @Author: Baron
 * @Description: 用户Service接口
 * @Date: Created in 2019/3/8 23:46
 */
public interface UserService {

    /**
     * 查询所有用户
     * @return
     */
    List findAllUser();

}
OrderService,根据userId查询订单
package com.cobra.jpademo.service;

import com.cobra.jpademo.dataobject.OrderInfo;

import java.util.List;

/**
 * @Author: Baron
 * @Description: 订单服务接口
 * @Date: Created in 2019/3/8 23:48
 */
public interface OrderService {

    /**
     *  根据userId查找订单
     * @param userId
     * @return
     */
    List findOrdersByUserId(Integer userId);

}
2)service接口实现
UserServiceImpl:
package com.cobra.jpademo.service.impl;

import com.cobra.jpademo.dataobject.UserInfo;
import com.cobra.jpademo.repository.UserInfoRepository;
import com.cobra.jpademo.service.UserService;
import org.springframework.beans.factory.annotation.Autowired;
import org.springframework.stereotype.Service;

import java.util.List;

/**
 * @Author: Baron
 * @Description: 用户Service接口
 * @Date: Created in 2019/3/8 23:51
 */
@Service
public class UserServiceImpl implements UserService {

    @Autowired
    private UserInfoRepository repository;

    /**
     * 查询所有用户
     * @return
     */
    @Override
    public List findAllUser() {
        return repository.findAll();
    }

}
OrderServiceIml:
package com.cobra.jpademo.service.impl;

import com.cobra.jpademo.dataobject.OrderInfo;
import com.cobra.jpademo.repository.OrderInfoRepository;
import com.cobra.jpademo.service.OrderService;
import org.springframework.beans.factory.annotation.Autowired;
import org.springframework.stereotype.Service;

import java.util.List;

/**
 * @Author: Baron
 * @Description: 订单Service实现
 * @Date: Created in 2019/3/8 23:49
 */
@Service
public class OrderServiceImpl implements OrderService {

    @Autowired
    private OrderInfoRepository repository;

    /**
     *  根据userId查找订单
     * @param userId
     * @return
     */
    @Override
    public List findOrdersByUserId(Integer userId) {
        return repository.findByUserId(userId);
    }

}
4、controller层,这里以json格式返回数据,直接使用@RestController注解
UserController:
package com.cobra.jpademo.controller;

import com.cobra.jpademo.dataobject.UserInfo;
import com.cobra.jpademo.service.UserService;
import org.springframework.beans.factory.annotation.Autowired;
import org.springframework.web.bind.annotation.GetMapping;
import org.springframework.web.bind.annotation.RequestMapping;
import org.springframework.web.bind.annotation.RestController;

import java.util.List;

/**
 * @Author: Baron
 * @Description: 用户controller
 * @Date: Created in 2019/3/8 23:41
 */
@RestController
@RequestMapping("/user")
public class UserController {

    @Autowired
    private UserService userService;

    /**
     * 获取所有的用户
     * @return
     */
    @GetMapping("/all")
    public List findAllUsers() {

        return userService.findAllUser();

    }

}
OrderController:
package com.cobra.jpademo.controller;

import com.cobra.jpademo.dataobject.OrderInfo;
import com.cobra.jpademo.service.OrderService;
import org.springframework.beans.factory.annotation.Autowired;
import org.springframework.web.bind.annotation.*;

import java.util.List;

/**
 * @Author: Baron
 * @Description: 订单controller
 * @Date: Created in 2019/3/8 23:41
 */
@RestController
@RequestMapping("/order")
public class OrderController {

    @Autowired
    private OrderService orderService;

    /**
     * 根据userId获取订单
     * @param userId
     * @return
     */
    @GetMapping("/user/{userId}")
    public List getOrdersByUserId(@PathVariable("userId") Integer userId) {

        return orderService.findOrdersByUserId(userId);

    }

}
四、启动项目,测试:
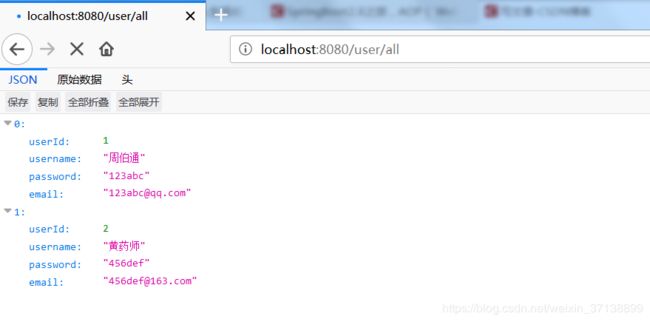
1、接口1:浏览器输入:http://localhost:8080/user/all
2、接口2:浏览器输入:http://localhost:8080/order/user/2
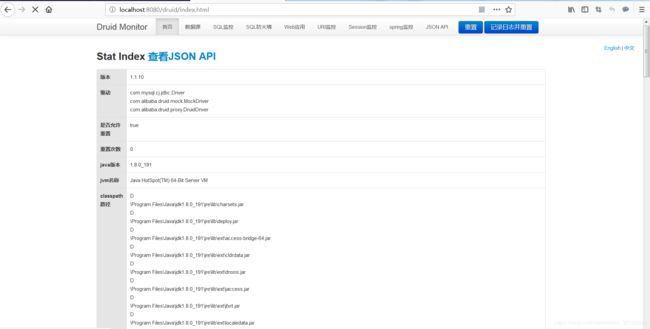
3、打开Druid Monitor,浏览器输入:http://localhost:8080/druid/login.html
填写用户名/密码:admin/admin,登录:
就可以查看你需要监控的数据了:
sql:
接口:
aop:


