欢迎关注我的专栏( つ•̀ω•́)つ【人工智能通识】
【汇总】2019年4月专题
如何规划一个React和Aframe结合的3D效果站点?
相关文章:软件技术-Web-React-MD-Aframe项目快速搭建
SPA和MPA
目前主流的网站开发模式可以简单的分为SPA和MPA两种。
SPA,Single-Page Application,单页面应用。就是整个网站只有一个index.html页面。
MPA,Multiple-Page Application,多页面应用。整个网站有很多页面,既有index.html也有news.html、about.html等等。
你可能要问,一个网站怎么可以能只有一个页面?一个页面不代表只有一种外貌,我们玩的很多软件和游戏也都只有一个页面,比如Photoshop不就是只有一个页面吗?从来不需要切换到另外一个地址或文件。
一个页面只是说只有一个画面框架,只要改变框架内的内容就可以实现多页面效果。
SPA单页面网站有什么优势?在我看来,SPA最大的优势在于内容切换时候不会闪白屏,所以用户体验好。因为在浏览器内点击链接,只要是切换页面地址都会导致屏幕内变成一片白色,然后才可以打开新内容,——而在任何优秀的游戏或软件中都不会有这个情况。
SPA缺点是什么?单页面网站的几乎所有缺点现在都是可以克服和解决的,所以SPA的缺点就是有很多缺点需要克服和解决。比如说单页面把所有页面的内容都压缩到一个index.html内,就会导致加载时间变长,当然这可以用动态加载技术解决;再比如说多页面网站页面之间的前进后退直接用浏览器的按钮就很好,而单页面就需要做很多特别的处理才行。
Aframe和React
Aframe是基于Three.js开发的,性能是略低于Three.js,但Aframe更好用,可以像写html一样快速创建3D元素。
而React也是基于对html元素进行管理的架构。这里面就会产生Aframe和React都对html元素进行监视和管理,很可能导致管理的混乱,也会因为重复监管导致性能下降。这是我们随时要关注的事情。
目前我的策略让React只负责元素的生成和必要的增删处理,尽可能多的把控制权交个Aframe,以此达到较好的性能。
文件结构
我在这里使用了多页面结构,但同时考虑了以后改为单页面结构的可能,算是一种折中。
-
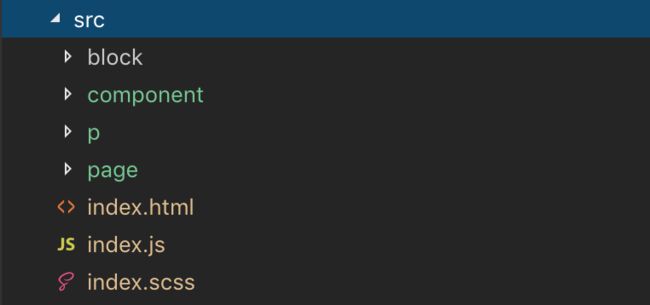
src 代码文件夹,放置所有的js和html代码文件,包含Aframe的页面元素
page文件夹、大的板块元素的block文件夹、普通元素的component文件夹,以及放置各个html页面的p文件夹,当然还有index首页页面相关文件。
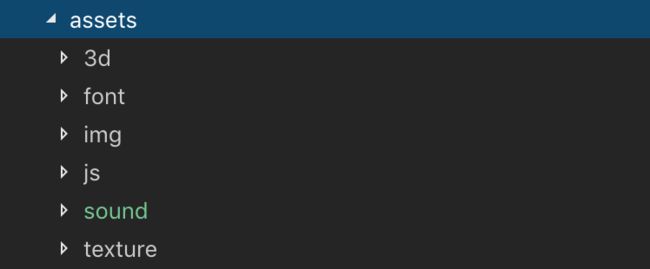
assets 素材文件夹,放置所有素材资源,包含3d模型(
3d)、模型贴图(texture)、字体(font)、图片素材(img)、声音素材(sound)、第三方脚本(js)等文件夹。
- dist 最终文件发布目标文件夹,我们通过webpack命令
npm run build生成的文件都放在这里,既包含index.html和main.js,也包含素材asset文件夹和p文件夹。
默认情况,webpack是不会把
asset和p拷贝过来的,我们需要安装npm install --save-dev copy-webpack-plugin插件,并且配置webpack.config.js文件内添加新的插件设置:
const CopyPlugin = require('copy-webpack-plugin');
...
    plugins: [
        new HtmlWebpackPlugin({
            template: path.join(__dirname, 'src', 'index.html')
        }),
        new CopyPlugin([{
                from: 'assets',
                to: 'assets'
            },{
                from: 'src/p',
                to: 'p'
            }
        ]),
    ]
- node_modules 由npm安装的第三方模块文件夹,你应该在
.gitignore文件夹中忽略它。
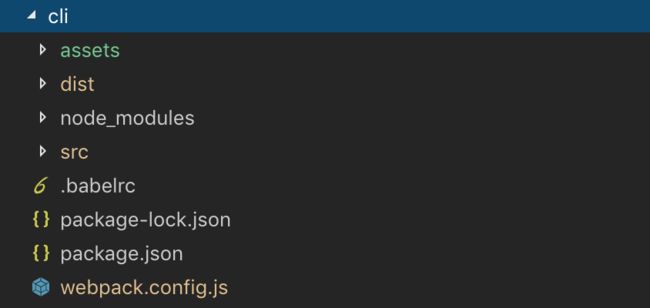
整体上看起来是这个样子:
下面我们来以welcome页面来介绍一下主要代码。
index.html
它的完整代码是:
HourOfCode
注意这里我们并没有导入任何第三方的js工具,甚至连main.js都没导入。这是由于我们使用了html-webpack-plugin插件,并配置了webpack.config.js让它自动进行添加。更多内容请参考:软件技术-Web-React-MD-Aframe项目快速搭建
index.js
我们将把index.html首页和p文件夹每个页面都只当做外框,而实质内容则是使用对应的xxx.js文件。
所以index.js只是初始化React,它的完整代码是:
import React from "react";
import ReactDOM from "react-dom";
import h from "react-hyperscript"

import "index.scss";
import welcome from "page/welcome"

ReactDOM.render(
  h(welcome),
  document.getElementById("root")
);
在这里我们注意它导入了page/welcome页面元素,并把填充到了root里面。
src/page/welcome.js
这个文件用来生成整个欢迎页面的3D内容。完整代码是:
//演示台图标
import React from "react";
import ReactDOM from "react-dom";
import h from "react-hyperscript"
import 'aframe';
import 'aframe-text-geometry-component';
import 'aframe-html-shader';

import assets from "../component/welcome/assets"
import lights from "../component/welcome/lights"
import env from "../component/welcome/env"
import cam from "../component/welcome/cam"

import linkBox from "../component/linkBox"

let size = 3;

let dom = h('a-scene', {
    background: 'color:#CCC'
}, [
    h(assets),
    h(env),
    h(lights),
    h(cam),
    h(linkBox, {
        position: '5 0 -7',
        size: size,
        text: 'show',
        color: '#AFA',
        href: 'p/show.html'
    }),
    h(linkBox, {
        position: '0 0 -7',
        size: size,
        text: 'train',
        color: '#AAF',
        href: 'p/train.html'
    }),
    h(linkBox, {
        position: '-5 0 -7',
        size: size,
        text: 'learn',
        color: '#FAF',
        href: 'p/learn.html'
    }),
])

export default class myComponent extends React.Component {
    render() {
        return dom
    }
}
注意这里导入了很多东西。第一组是React和Aframe各种库;第二组是这个页面专用的素材assets、灯光lights、环境模型env和相机cam,第三组是一个通用型的componet/linkBox带链接的方盒元素。
你可能需要使用
npm install --save-dev ...命令安装缺少的第三方库。
这个welcome是个React元素,它在渲染render的时候返回一个dom,包含了assets、env、lights、cam以及3个不同位置的linBox按钮。
实际上它看起来这样。
点击每个方盒可以跳转到不同的p页面。
component/linkBox.js
这是每个方盒的创建方法,完整代码是:
//演示台图标
import React from "react";
import ReactDOM from "react-dom";
import h from "react-hyperscript"
import 'aframe';

let gen = (position, size, clr, txt,href) => {
    return h('a-entity', {
        position,
        scale: '' + size + ' ' + size + ' ' + size,
        href,
    }, [
        h('a-box', {
            material: "side:double;color:" + clr + ";\
            blending:additive;\
            opacity:0.2,\
            metalness:0.8",
        }),
        h('a-box', {
            id: 'tar',
            class: 'clickable',
            material: "side:double;color:" + clr + ";\
            blending:additive;\
            opacity:0.2,\
            metalness:0.8",
            scale: '1.2 1.2 1.2'
        }),
        h('a-entity', {
            material: 'metalness: 0.85;color:#AAA' + clr,
            position: "-0.4 -0.08 0",
            'text-geometry': "value:" + txt.toUpperCase() + "; \
            font: #optimerBoldFont;\
            height:0.1;\
            size:0.2;\
            curveSegments:1"
        })
    ])
}

export default class myComponent extends React.Component {
    constructor(props) {
        super(props);
    }
    componentDidMount() {
        var dom = ReactDOM.findDOMNode(this);
        var tarEl = dom.querySelector('#tar');
        tarEl.addEventListener('click', function () {
            location=dom.getAttribute('href')
        });
    }
    render() {
        return gen(this.props.position,
            this.props.size,
            this.props.color,
            this.props.text,
            this.props.href)
    }
}
注意底部的代码,我们传递了this.props.position,size,color,text,href到生成元素的函数gen里面,要使用这些props,需要在constructor(props)内添加super(props);。
另外注意componentDidMount方法,就是当元素被添加到页面的时候要执行这个代码,为元素添加可以点击的事件。——要知道,画布内的3D元素默认是不能点击的,要让它可以被点击就需要:
- 场景的摄像机
a-camera元素内要添加一个a-entity并设置属性cursor:"rayOrigin: mouse;",raycaster:"objects: .clickable;"这里的.clickable是指针对class='clickable'的对象生效。具体代码可以参考cam.js。 - 使用
ReactDOM.findDOMNode(this);方法获取到当前React元素对应的html元素,并给它添加click事件控制。
其他几个文件就比较简单了。
page/welcome/assets.js
//全部素材文件都放在这里
import React from "react";
import ReactDOM from "react-dom";
import h from "react-hyperscript"
import 'aframe';

let dom = h('a-assets', {}, [
    h('a-asset-item', {
        id: 'optimerBoldFont',
        src: '/assets/font/optimer_bold.typeface.json'
    }),
    h('a-asset-item', {
        id: 'engine',
        src: '/assets/3d/engine.glb'
    }),
])

export default class myComponent extends React.Component {
    render() {
        return dom
    }
}
这里载入了两个素材,一个字体文件和一个glb三维模型。
page/welcome/env.js
//背景模型
import React from "react";
import ReactDOM from "react-dom";
import h from "react-hyperscript"
import 'aframe';

let dom = h('a-entity', {
    position: "0 0 -3"
}, [
    h('a-gltf-model', {
        src: "#engine",
        rotation: "90 0 0",
        scale: "18 18 18"
    })
])

export default class myComponent extends React.Component {
    render() {
        return dom
    }
}
注意这里调用模型的方法src的写法,#engine对应assets中的id:'engine'。
page/welcome/cam.js
//相机元素
import React from "react";
import ReactDOM from "react-dom";
import h from "react-hyperscript"
import 'aframe';

let dom = h('a-entity', {}, [
    h('a-camera', {
        near: "0.1",
        position: "0 0 0",
        'wasd-controls-enabled':"false"
    },[
        h('a-entity',{
            cursor:"rayOrigin: mouse;",
            raycaster:"objects: .clickable;"
        })
    ])
])

export default class myComponent extends React.Component {
    render() {
        return dom
    }
}
注意这里针对鼠标点击做了特别的处理。
page/welcome/lights.js
//所有灯光
import React from "react";
import ReactDOM from "react-dom";
import h from "react-hyperscript"
import 'aframe';

//生成一个灯光
let lit = (type, position, intensity, color, distance, decay) => {
    return h('a-light', {
        type,
        position,
        intensity,
        color,
        distance,
        decay
    })
}

let dom = h('a-entity', {}, [
    lit('point', '0 0 -10', '8', '#AAF', '20', '1'),
    lit('point', '6 0 -12', '35', '#FF0', '20', '3'),
    lit('point', '-6 0 -12', '35', '#F0A', '20', '3'),
    lit('point', '0 5 -5', '25', '#0F0', '20', '3'),
    lit('point', '0 -5 -5', '25', '#F00', '20', '3'),
])

export default class myComponent extends React.Component {
    render() {
        return dom
    }
}
这里注意各个灯光的位置position、强度intensity、颜色color、范围距离distance和衰减decay的数值。
关于p文件夹
我们可以参照index.html,index.js的模式分别为每个页面搭建纯框架,比如创建show.html,show.js,然后在show.js中填充单独的page/show.js页面元素。
整个项目的Github地址在这里,你可以直接在线参考或者下载到本地测试。项目不断改进中,请继续关注后续文章的变化。
欢迎关注我的专栏( つ•̀ω•́)つ【人工智能通识】
每个人的智能新时代
如果您发现文章错误,请不吝留言指正;
如果您觉得有用,请点喜欢;
如果您觉得很有用,欢迎转载~
END


