记录Tensorflow Object Detection API训练,测试
使用Tensorflow Object DetectionAPI进行目标检测
目标检测架构:SSD
深度学习框架:TensorFlow
深度神经网络:MobileNet
目标检测步骤总结如下:
1. 收集500+张包含有待检测目标的图片,最少100张;
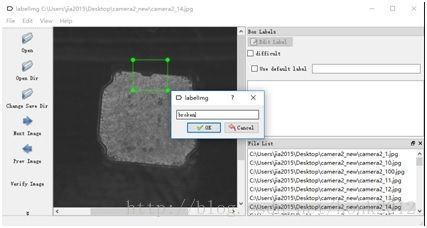
2. 使用软件LabelImg对图片进行标注;所谓标注即是在图片上画框定位目标,LabelImg会创建xml文件描述目标的相关信息;
3. 将数据集分成训练数据集,测试数据集;
4. 将上面的数据集分别生成TFRecords文件;
5. 配置训练用.config文件;
6. 训练;
7. 导出训练后的graph;
8. 测试
软件环境:Windows10, Python 3.6
No.1收集数据
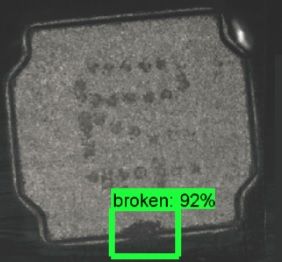
待检测目标:外观不良中的缺损
it's better using 200+ different picture to training without rotation, flip,translation
No.2图片标注
标注软件:LabelImg
下载链接:https://tzutalin.github.io/labelImg/
使用方法介绍:https://blog.gtwang.org/useful-tools/labelimg-graphical-image-annotation-tool-tutorial/
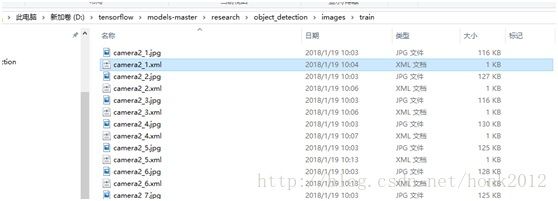
标注后的图片都会对应生成.xml文件
No.3将数据集分成训练数据集,测试数据集;
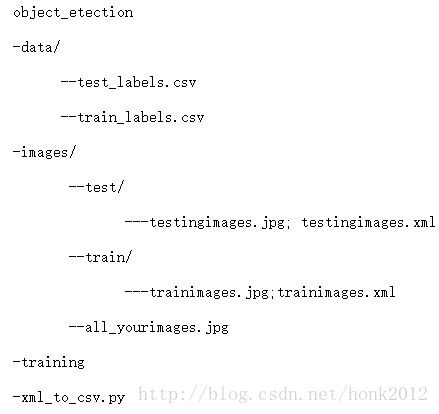
文件目录树结构如下:
object_detection/images
-train(90张图片(.jpg文件),对应的xml文件)
-test(10张图片(.jpg文件),对应的xml文件)
No.4生成TFRecords文件
用脚本 xml_to_csv.py将xml文件转换成.csv文件;按照下图修改脚本中的xml文件路径以及输出的csv文件的路径;
使用脚本 generate_tfrecord.py,将csv文件,以及图片信息生成TensorFlow训练需要的TFRecord 文件;
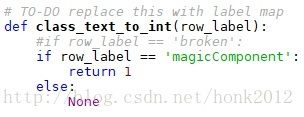
需要在脚本里设定目标检测的类别
(2018.03.02) Add prepare inputs from object_detection/g3doc/using_your_own_dataset
# object_detection/g3doc/using_your_own_dataset
# Preparing Inputs
To use your own dataset in Tensorflow Object Detection API, you must convert it
into the [TFRecord file format](https://www.tensorflow.org/api_guides/python/python_io#tfrecords_format_details).
This document outlines how to write a script to generate the TFRecord file.
## Label Maps
Each dataset is required to have a label map associated with it. This label map
defines a mapping from string class names to integer class Ids. The label map
should be a `StringIntLabelMap` text protobuf. Sample label maps can be found in
object_detection/data. Label maps should always start from id 1.
## Dataset Requirements
For every example in your dataset, you should have the following information:
1. An RGB image for the dataset encoded as jpeg or png.
2. A list of bounding boxes for the image. Each bounding box should contain:
1. A bounding box coordinates (with origin in top left corner) defined by 4
floating point numbers [ymin, xmin, ymax, xmax]. Note that we store the
_normalized_ coordinates (x / width, y / height) in the TFRecord dataset.
2. The class of the object in the bounding box.
# Example Image
Consider the following image:

with the following label map:
```
item {
id: 1
name: 'Cat'
}
item {
id: 2
name: 'Dog'
}
```
We can generate a tf.Example proto for this image using the following code:
```python
def create_cat_tf_example(encoded_cat_image_data):
"""Creates a tf.Example proto from sample cat image.
Args:
encoded_cat_image_data: The jpg encoded data of the cat image.
Returns:
example: The created tf.Example.
"""
height = 1032.0
width = 1200.0
filename = 'example_cat.jpg'
image_format = b'jpg'
xmins = [322.0 / 1200.0]
xmaxs = [1062.0 / 1200.0]
ymins = [174.0 / 1032.0]
ymaxs = [761.0 / 1032.0]
classes_text = ['Cat']
classes = [1]
....
Note: You may notice additional fields in some other datasets. They are
currently unused by the API and are optional.
下载TensorFlow的models文件:https://github.com/tensorflow/models
下载protoc-3.4.0-win32.zip;网址:https://github.com/google/protobuf/releases/tag/v3.4.0;安装后将“D:\software\protoc-3.4.0-win32\bin”加入系统环境变量;
在控制台输入命令,将*.proto文件编译成*_pb2.py文件;注意编译的路径需要在research下,因为有文件导入的模块从object_detection/开始
![]()
在research目录下面安装object_detection库;
python setup.py install
设置PYTHONPATH的系统环境变量
D:\tensorflow\models-master\research
D:\tensorflow\models-master\research\slim
在控制台object_detection目录下执行下面的命令生成TFRecord文件
python generate_tfrecord.py--csv_input=data/train_labels.csv --output_path=data/train.record
python generate_tfrecord.py--csv_input=data/test_labels.csv --output_path=data/test.record
注:如果图片放到 imges/train; images/test;则执行脚本的时候 path的路径需要修改,train为 os.getcwd()+'images/train'; test也需要修改。。。
No.5配置训练用.config文件
在models-master\research\object_detection\samples\configs路径下拷贝ssd_mobilenet_v1_pets.config文件到models-master\research\object_detection\training路径下;
下载预先训练好的模型:http://download.tensorflow.org/models/object_detection/ssd_mobilenet_v1_coco_11_06_2017.tar.gz;解压缩到路径models-master\research\object_detection;
在配置文件ssd_mobilenet_v1_pets.config里设置相关参数;含有字符串“PATH_TO_BE_CONFIGURED”的地方都需要设定;
num_classes: 1
fine_tune_checkpoint:"ssd_mobilenet_v1_coco_11_06_2017/model.ckpt"
train_input_reader:{
tf_record_input_reader {
input_path: "data/train.record"
}
label_map_path:"data/object_detection.pbtxt"}
eval_config: {
num_examples: 96 # 需要测试的图片数量
# Note: The below line limits the evaluation process to 10 evaluations.
# Remove the below line to evaluate indefinitely.
max_evals: 1000 # 测试多少轮
num_visualizations: 96 # 在导入的文件夹路径下可以看多少张测试图片
visualization_export_dir:"Faster_RCNN_inception_resnet_v2_atrous/test_imgs" # 导入测试图片结果的路径
}
eval_input_reader: {
tf_record_input_reader {
input_path: "data/test.record"
}
label_map_path:"training/object_detection.pbtxt"
shuffle: false
num_readers:1}
batch_size:5;(每一次迭代处理的图片数量为5,与GPU,CPU,内存性能有关)
learning_rate:0.004;(初始的学习速率)
No.6 训练
在控制台object_detection路径下输入下面的命令:
python train.py--logtostderr --train_dir=training/ --pipeline_config_path=training/ssd_mobilenet_v1_pets.config
训练目标:loss降到1以下;中途可以中断,重新运行命令会在之前的基础上继续训练;
训练完成后,可以在object_detection路径下执行下面的命令查看训练情况
tensorboard --logdir='training'
在浏览器中输入:http://jia2015-PC:6006 (内容根据个人电脑有差异 )就可以看到训练的图标展示;
No.7导出训练后的graph;
在控制台object_detection路径下运行下面的命令:
python export_inference_graph.py \
--input_type image_tensor \
--pipeline_config_path training/ssd_mobilenet_v1_pets.config \
--trained_checkpoint_prefix training/model.ckpt-10856 \
--output_directoryoutput_model
生成的系列文件如下图所示:
说明:
model.ckpt-10856 是训练结果文件,需要根据训练结果修改
output_model 是输出路径,需要设定
脚本运行时可能报错(ValueError:Protocol message RewriterConfig has no "layout_optimizer" field),可参考下面的方法修改
注释掉object_detection下exporter.py文件的下面这行:#layout_optimizer=rewriter_config_pb2.RewriterConfig.ON)
增加下面这行:
optimize_tensor_layout=True)
No.8 测试
在控制台object_detection路径下运行命令:jupyter notebook
选中object_detection_tutorial.ipynb
修改下面的内容:
MODEL_NAME = 'output_model'
注释掉下面的下载模型代码
#opener =urllib.request.URLopener()
#opener.retrieve(DOWNLOAD_BASE+ MODEL_FILE, MODEL_FILE)
#MODEL_FILE='D:/tensorflow/models-master/research/object_detection/ssd_mobilenet_v1_coco_2017_11_17.tar.gz'
#tar_file =tarfile.open(MODEL_FILE)
#for file intar_file.getmembers():
# file_name = os.path.basename(file.name)
# if 'frozen_inference_graph.pb' in file_name:
# tar_file.extract(file, os.getcwd())
将要测试的图片放到下面的路径,并设定好序号
PATH_TO_TEST_IMAGES_DIR = 'test_images'
TEST_IMAGE_PATHS = [os.path.join(PATH_TO_TEST_IMAGES_DIR, 'image{}.jpg'.format(i)) for i inrange(1, 13) ]
运行Cell/Run All
部分测试结果如下图所示:
附录:上述方法依据的教程:https://pythonprogramming.net/introduction-use-tensorflow-object-detection-api-tutorial/
测试的比较直接的方法是:训练生成checkpoint文件后就可以运行 eval.py
python eval.py \
--logtostderr \
--checkpoint_dir=object_detection/training \
--eval_dir=object_detection/eval \
--pipeline_config_path=object_detection/training/faster_rcnn_inception_resnet_v2_atrous_coco.config
在测试结果的文件夹下可以直观的看到有框的图片显示。。。
Add : change check points saved frequency
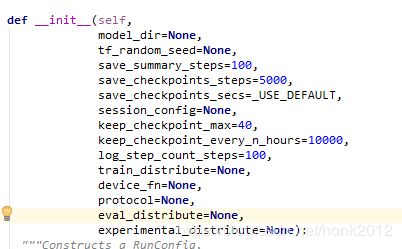
update(2019.01.16: ../Lib/site-packages/tensorflow/python/estimator/run_config.py
old version:
trainer.py(note: this working file may not locate under object_detection directory)
    keep_checkpoint_every_n_hours = train_config.keep_checkpoint_every_n_hours
    saver = tf.train.Saver(
        #keep_checkpoint_every_n_hours=keep_checkpoint_every_n_hours
         max_to_keep=100)   # max_to_keep keep the number of checkpoints
learning.py
location:/home/tom/anaconda3/envs/tensorflow/lib/python3.6/site-packages/tensorflow/contrib/slim/python/slim/learning.py" # directory may be different for local machine
def train(train_op,
          logdir,
          train_step_fn=train_step,
          train_step_kwargs=_USE_DEFAULT,
          log_every_n_steps=1,
          graph=None,
          master='',
          is_chief=True,
          global_step=None,
          number_of_steps=None,
          init_op=_USE_DEFAULT,
          init_feed_dict=None,
          local_init_op=_USE_DEFAULT,
          init_fn=None,
          ready_op=_USE_DEFAULT,
          summary_op=_USE_DEFAULT,
          save_summaries_secs=600,
          summary_writer=_USE_DEFAULT,
          startup_delay_steps=0,
          saver=None,
          save_interval_secs=600,                  # define the checkpoints saved interval time 600s
          sync_optimizer=None,
          session_config=None,
          session_wrapper=None,
          trace_every_n_steps=None,
          ignore_live_threads=False):
  """Runs a training loop using a TensorFlow supervisor.
报错: AttributeError:module 'tensorflow.contrib.data' has no attribute 'parallel_interleave'
solution:
if tf.__version__ < = =1.4:
# models/research/object_detection/utils/dataset_util.py
records_dataset = filename_dataset.apply(
      tf.contrib.data.parallel_interleave(
          file_read_func, cycle_length=config.num_readers,
block_length=config.read_block_length, sloppy=True))models/research/object_detection/utils/dataset_util.py
records_dataset = filename_dataset.apply(
      tf.contrib.data.parallel_interleave(
          file_read_func, cycle_length=config.num_readers,
block_length=config.read_block_length, sloppy=True))
修改为(参考,好像不行,需要验证。。。):
if hasattr(tf.contrib.data,"parallel_interleave"):
      records_dataset = filename_dataset.apply(
      tf.contrib.data.parallel_interleave(
          file_read_func, cycle_length=config.num_readers,
      block_length=config.read_block_length, sloppy=True))
else:
      records_dataset = filename_dataset.apply(
      tf.data.Dataset.interleave(
          file_read_func, cycle_length=config.num_readers,
          block_length=config.read_block_length))
另一个方法:升级tensorflow版本到1.5以上,当然cuda,cudnn可能需要对应升级
