前言
使用系统的转场动画,不能控制动画整个动画过程,没法针对系统导航栏进行颜色过渡效果,故此篇文章采取自定义转场动画的方式,把控整个动画过程,实现导航栏颜色平滑的过渡效果,实际效果如下所示。
正文
接下来开始进入正题,本篇文章主要涉及到自定义转场动画的实现和通过runtime给分类添加属性。
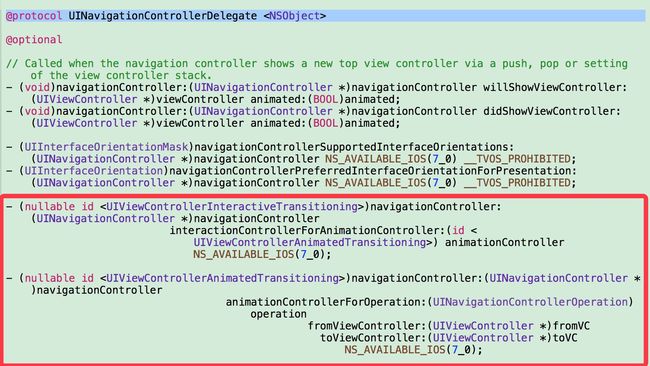
首先我们要自己实现push和pop时候的转场动画,实现转场动画主要是实现UINavigationController的代理方法
主要实现红色框中的两个代理方法,其中下面的代理方面是定义push和pop时的动画效果(没有手势交互),上面哪一个代理方法是左划屏幕pop时的动画交互(push不存在手势滑动,故push不需要)。
下面的代理方法返回了一个遵循UIViewControllerAnimatedTransitioning协议的对象,新建一个类KJPushAnimator并遵循该协议,该协议中有两个required方法
1、 - (NSTimeInterval)transitionDuration:(nullable id
2、 - (void)animateTransition:(id
第一个方法表示动画的持续时间,第二方法就是实现我们转场时候的动画了。
代码如下:
- (NSTimeInterval)transitionDuration:(id)transitionContext {
    return 0.25;
}
动画时间定义为0.25秒,然后另一个协议方法的实现如下
- (void)animateTransition:(id)transitionContext {

    UIViewController *fromVC = [transitionContext viewControllerForKey:UITransitionContextFromViewControllerKey];
    UIViewController *toVC = [transitionContext viewControllerForKey:UITransitionContextToViewControllerKey];


    UIView *containerView = [transitionContext containerView];
    UIView *fromView = [transitionContext viewForKey:UITransitionContextFromViewKey];
    UIView *toView = [transitionContext viewForKey:UITransitionContextToViewKey];
    toView.kj_x = [UIScreen mainScreen].bounds.size.width;

    [containerView addSubview:fromView];
    [containerView addSubview:toView];

    UINavigationBar *navigationBar = toVC.navigationController.navigationBar;

    [navigationBar kj_setBackgroundColor:fromVC.kj_navigationBarTintColor];
    [navigationBar kj_setNavigationBarAlpha:fromVC.kj_navigationBarAlpha];
    [navigationBar kj_setNavigationTitleColor:fromVC.kj_navigationTitleColor];

    [UIView animateWithDuration:kTransitionDuration delay:0 options:UIViewAnimationOptionCurveLinear animations:^{

        fromView.kj_x = -100;
        toView.kj_x = 0;

        [navigationBar kj_setBackgroundColor:toVC.kj_navigationBarTintColor];
        [navigationBar kj_setNavigationBarAlpha:toVC.kj_navigationBarAlpha];
        [navigationBar kj_setNavigationTitleColor:toVC.kj_navigationTitleColor];

    } completion:^(BOOL finished) {
        [transitionContext completeTransition:![transitionContext transitionWasCancelled]];
        [navigationBar kj_setBackgroundColor:toVC.kj_navigationBarTintColor];
        [navigationBar kj_setNavigationBarAlpha:toVC.kj_navigationBarAlpha];
        [navigationBar kj_setNavigationTitleColor:toVC.kj_navigationTitleColor];
    }];
}
首先拿到两个转场相关的两个viewController(fromVC和toVC)以及它们的view(fromView和toView),这里containerView是用来承载fromView和toView的容器父视图,然后将fromView和toView add到containerView上,注意添加的顺序,注意到系统的push动画是从右往左出现要push的vc,所以toView初始的x坐标是屏幕宽度。然后是动画开始前设置navigationBar的相关属性,因为是从fromVC push 到toVC,故navigationBar的设置先跟fromVC关联,然后简单的使用UIView动画模仿系统的push动画,并设置navigationBar的颜色和透明度等。
实现完push转场,在来看pop转场实现:
新建一个类KJPopAnimator遵循UIViewControllerAnimatedTransitioning
- (NSTimeInterval)transitionDuration:(id
return 0.25;
}
同样动画时间定义为0.25秒,另一个协议方法如下:
-
(void)animateTransition:(id
)transitionContext { UIViewController *fromVC = [transitionContext viewControllerForKey:UITransitionContextFromViewControllerKey]; UIViewController *toVC = [transitionContext viewControllerForKey:UITransitionContextToViewControllerKey]; UIView *containerView = [transitionContext containerView]; UIView *toView = [transitionContext viewForKey:UITransitionContextToViewKey]; toView.kj_x = -100; UIView *fromView = [transitionContext viewForKey:UITransitionContextFromViewKey]; fromView.layer.shadowRadius = 8; fromView.layer.shadowColor = [UIColor blackColor].CGColor; fromView.layer.shadowOpacity = 0.5; UIView *maskView = [[UIView alloc] initWithFrame:[UIScreen mainScreen].bounds]; maskView.backgroundColor = [[UIColor blackColor] colorWithAlphaComponent:0.15]; [containerView addSubview:toView]; [containerView addSubview:maskView]; [containerView addSubview:fromView]; CABasicAnimation *animation = [CABasicAnimation animationWithKeyPath:@"shadowOpacity"]; animation.duration = kTransitionDuration; animation.removedOnCompletion = YES; animation.toValue = @0; animation.delegate = self; [fromView.layer addAnimation:animation forKey:nil]; UINavigationBar *navigationBar = toVC.navigationController.navigationBar; [navigationBar kj_setBackgroundColor:fromVC.kj_navigationBarTintColor]; [navigationBar kj_setNavigationBarAlpha:fromVC.kj_navigationBarAlpha]; [navigationBar kj_setNavigationTitleColor:fromVC.kj_navigationTitleColor]; [UIView animateWithDuration:kTransitionDuration delay:0 options:UIViewAnimationOptionCurveLinear animations:^{ toView.kj_x = 0; fromView.kj_x = [UIScreen mainScreen].bounds.size.width; maskView.backgroundColor = [[UIColor blackColor] colorWithAlphaComponent:0]; [navigationBar kj_setBackgroundColor:toVC.kj_navigationBarTintColor]; [navigationBar kj_setNavigationBarAlpha:toVC.kj_navigationBarAlpha]; [navigationBar kj_setNavigationTitleColor:toVC.kj_navigationTitleColor]; } completion:^(BOOL finished) { [maskView removeFromSuperview]; fromView.layer.shadowOpacity = 0; [transitionContext completeTransition:![transitionContext transitionWasCancelled]]; }];}
实现上大致和push差不多,这里为了和系统的pop动画保持一致,还加了pop时的视图阴影以及一个黑色透明的遮罩层(读者可以自己打开一个app观察系统的pop动画,建议手势左划观察),另外需要注意的一点是,pop是从fromVC到toVC的过程,所以这里视图添加的顺序和push不一样,containerView先add toView然后在add fromView,确保fromView在最上面。
实现完push和pop动画后就要运用到开始说的UINavigationController的代理方法了,创建一个继承自UINavigationController的子类KJNavigationController,在viewDidLoad方法中设置self.delegate = self;然后实现代理方法
- (nullable id )navigationController:(UINavigationController *)navigationController
                                            animationControllerForOperation:(UINavigationControllerOperation)operation
                                                         fromViewController:(UIViewController *)fromVC
                                                           toViewController:(UIViewController *)toVC {
    if (operation == UINavigationControllerOperationPush) {

        return [KJPushAnimator new];
    } else if (operation == UINavigationControllerOperationPop) {
        return [KJPopAnimatior new];
    }

    return nil;
}
通过operation判断是push行为还是pop,传入对应的动画驱动,此时我们就自己模仿了系统的转场动画,但是系统默认还有手势左划pop回上一个页面,这就需要实现UINavigationController的里一个代理方法- (nullable id
该代理返回的是一个实现了UIViewControllerInteractiveTransitioning的对象,系统有一个已经实现好的类UIPercentDrivenInteractiveTransition,直接使用就
然后就是滑动手势的实现,使用UIScreenEdgePanGestureRecognizer,顾名思义,手势的触发是从屏幕的边缘(上下左右四个边缘)
- (void)setupGesture {
    UIScreenEdgePanGestureRecognizer *edgePan = [[UIScreenEdgePanGestureRecognizer alloc] initWithTarget:self action:@selector(edgePanGesture:)];
    edgePan.edges = UIRectEdgeLeft;
[self.view addGestureRecognizer:edgePan];
}
设置从屏幕左边缘触发,然后看edpePanGesuture方法
- (void)edgePanGesture:(UIScreenEdgePanGestureRecognizer *)sender {
    UIGestureRecognizerState state = sender.state;

    CGFloat offsetX = MAX(0, [sender translationInView:sender.view].x);
    CGFloat width = [UIScreen mainScreen].bounds.size.width;
    CGFloat percent = offsetX / width;
    switch (state) {
        case UIGestureRecognizerStateBegan:
        {
            self.interactive  = [[UIPercentDrivenInteractiveTransition alloc] init];
            self.interactive.completionCurve = UIViewAnimationCurveLinear;
            [self popViewControllerAnimated:YES];
        }
            break;
        case UIGestureRecognizerStateChanged:
        {

            [self.interactive updateInteractiveTransition:percent];

        }
            break;
        case UIGestureRecognizerStateEnded:
        {
            if (percent > 0.5) {
                [self.interactive finishInteractiveTransition];
            } else {
                [self.interactive cancelInteractiveTransition];
            }

            self.interactive = nil;
        }
            break;
        default:
        {
            [self.interactive cancelInteractiveTransition];
            self.interactive = nil;
        }
            break;
    }
}
首先拿到手指滑动的偏移量offsetX,计算手指滑动距离与屏幕尺寸的百分比,然后判断手势的状态,在手势began时,调用popViewControllerAnimated方法(这一步很重要),在changed时,告诉UIPercentDrivenInteractiveTransition对象pop完成的百分比,在手势end时,判断手指滑动是否超过屏幕一般,超过一般则pop完成,调用finishInteractiveTransition,没有则表示取消这次pop,调用cancelInteractiveTransition,并且注意将self.interactive置为nil。
以上实现这些都是为了能够得到push和pop时的转场进行的百分比(进度),接来下就是对navigationBar的一些配置。
给navigationBar创建一个分类,设置navigationBar的颜色、透明度以及标题颜色
这里不是直接对navigationBar进行这些颜色设置,而是在navigationBar上插入一个子视图,通过设置这个子视图的颜色来显示navigationBar的颜色
- (UIView *)backgroundView {
    UIView *backgroundView = objc_getAssociatedObject(self, _cmd);
    if (!backgroundView) {
        [self setBackgroundImage:[UIImage new] forBarMetrics:UIBarMetricsDefault];
        backgroundView = [[UIView alloc] initWithFrame:CGRectMake(0, 0, CGRectGetWidth([UIScreen mainScreen].bounds), CGRectGetHeight(self.bounds) + 20)];
        backgroundView.userInteractionEnabled = NO;
        backgroundView.autoresizingMask = UIViewAutoresizingFlexibleLeftMargin | UIViewAutoresizingFlexibleRightMargin|UIViewAutoresizingFlexibleTopMargin|UIViewAutoresizingFlexibleBottomMargin;
        [self.subviews.firstObject insertSubview:backgroundView atIndex:0];
        [self setBackgroundView:backgroundView];
    }
    self.backgroundColor = [UIColor clearColor];
    return backgroundView;
}
- (void)setBackgroundView:(UIView *)maskLayer {
    objc_setAssociatedObject(self, @selector(backgroundView), maskLayer, OBJC_ASSOCIATION_RETAIN_NONATOMIC);
}
上图中将_UIBarBackground的color设置为clearColor,后面的navigationBar的颜色实际上就是插入的backgroundView的颜色
最后再给UIViewController添加一个分类,方便直接设置navigationBar的相关属性
就是一些setter和getter方法,主要是用户没有手动设置时给定一个默认置,代码比较简单就不做详细解释了,读者此时可以回到KJPushAnimator和KJPopAnimator中看看navigationBar的相关设置,注意动画前后navigationBar的设置。
然后实际项目中的设置navigationBar的颜色,和标题颜色就非常简单了,#improt "UIViewController+KJNavigationBar.h"然后在viewDidLoad中
- (void)viewDidLoad {
    [super viewDidLoad];

    self.kj_navigationBarTintColor = [UIColor cyanColor];
    self.kj_navigationTitleColor = [UIColor whiteColor];
}
实际效果就如同文章开始的gif一样
