docker、consul集群、ocelot网关部署2
上篇主要介绍了下docker和consul集群的部署
https://blog.csdn.net/qazlj/article/details/86742532
下面接着介绍下业务系统接入到Consul服务发现,以及结合Ocelot API网关进行接口访问
通过netcore分别创建一个webapi应用,这里通过应用内写代码注册到我们部署好的Consul集群中,
Nuget安装Consul包
创建一个健康检查控制器,供Consul服务调用,(这里不是必须的,只要是个能正常响应的接口地址就行)
[Produces("application/json")]
[Route("api/Health")]
public class HealthController : Controller
{
    // 状态码是200设置此服务是健康的状态,否则是故障状态。
    [HttpGet]
    public IActionResult Get() => Ok("ok");
}
appsettings.json添加配置
"Service": {
"Name": "webapp1",  //服务名
"IP": "172.172.0.10", //这个应用可访问的ip
"Port": "80" //访问应用的端口
},
"Consul": {
"IP": "172.172.0.5",//注册到Consul服务
"Port": "8500"
}
根据配置文件创建两个实体类
public class ConsulService
{
    public string IP { get; set; }
    public int Port { get; set; }
}
public class HealthService
{
    public string Name { get; set; }
    public string IP { get; set; }
    public int Port { get; set; }
}
创建一个Consul注册服务
public static class ConsulBuilderExtensions
{
    // Consul服务注册
    public static IApplicationBuilder RegisterConsul(this IApplicationBuilder app, IApplicationLifetime lifetime, HealthService healthService, ConsulService consulService)
    {
        var consulClient = new ConsulClient(x => x.Address = new Uri($"http://{consulService.IP}:{consulService.Port}"));//请求注册的 Consul 地址
        var httpCheck = new AgentServiceCheck()
        {
            DeregisterCriticalServiceAfter = TimeSpan.FromSeconds(5),//服务启动多久后注册
            Interval = TimeSpan.FromSeconds(10),//健康检查时间间隔,或者称为心跳间隔
            HTTP = $"http://{healthService.IP}:{healthService.Port}/api/health",//健康检查地址
            Timeout = TimeSpan.FromSeconds(5)
        };
        // Register service with consul
        var registration = new AgentServiceRegistration()
        {
            Checks = new[] { httpCheck },
            ID = healthService.Name + "_" + healthService.Port,
            Name = healthService.Name,
            Address = healthService.IP,
            Port = healthService.Port,
            Tags = new[] { $"urlprefix-/{healthService.Name}" }
        };
        consulClient.Agent.ServiceRegister(registration).Wait();
        lifetime.ApplicationStopping.Register(() =>
        {
            consulClient.Agent.ServiceDeregister(registration.ID).Wait();//服务停止时取消注册
        });
        return app;
    }
在Startup中注册服务
    public void Configure(IApplicationBuilder app, IHostingEnvironment env, IApplicationLifetime appLifeTime)
    {
        #region register this service
        app.RegisterConsul(appLifeTime, new HealthService()
        {
            IP = Configuration["Service:IP"],
            Port = Convert.ToInt32(Configuration["Service:Port"]),
            Name = Configuration["Service:Name"],
        }, new ConsulService()
        {
            IP = Configuration["Consul:IP"],
            Port = Convert.ToInt32(Configuration["Consul:Port"])
        });
		#endregion
		if (env.IsDevelopment())
        {
            app.UseDeveloperExceptionPage();
        }
        else
        {
            app.UseHsts();
        }
        app.UseHttpsRedirection();
        app.UseMvc();
    }
将应用打包发布到容器中,这里先按上篇文章介绍的步骤创建一个容器,然后部署netcore运行环境
netcore安装(ubuntu16.04)
https://dotnet.microsoft.com/download/linux-package-manager/ubuntu16-04/runtime-current
使用nginx托管
https://docs.microsoft.com/zh-cn/aspnet/core/host-and-deploy/linux-nginx?view=aspnetcore-2.2
nginx安装
https://www.nginx.com/resources/wiki/start/topics/tutorials/install/#official-debian-ubuntu-packages
apt-get install nginx -y
配置/etc/nginx/sites-available/default
server {
listen        80;
server_name   172.172.0.11;
location / {
    proxy_pass         http://localhost:5000;
    proxy_http_version 1.1;
    proxy_set_header   Upgrade $http_upgrade;
    proxy_set_header   Connection keep-alive;
    proxy_set_header   Host $host;
    proxy_cache_bypass $http_upgrade;
    proxy_set_header   X-Forwarded-For $proxy_add_x_forwarded_for;
    proxy_set_header   X-Forwarded-Proto $scheme;
}
}
nginx -t 验证配置文件 查看/nginx.conf文件路径
nginx -c /etc/nginx/nginx.conf
nginx -s reload
将程序发布后拷贝到容器中去,进入程序目录运行
dotnet WebApp1.dll 启动应用
同样再创建一个WebApp2的应用并部署到容器
查看Consul,注册成功
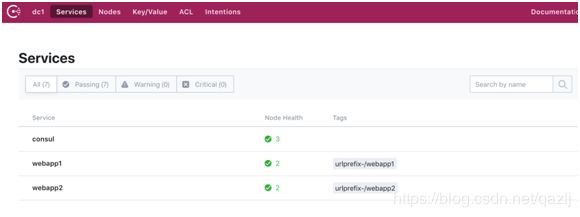

以上就完成了业务系统接入到Consul中。
下面接着介绍Ocelot网关的配置
文档参考
https://ocelot.readthedocs.io/en/latest/features/servicediscovery.html#consul
新建netcore项目,Nuget引入Ocelot包和Ocelot.Provider.Consul包
创建OcelotConfig.json配置文件
这里配置为使用当前已经搭建好的Consul集群
{
"ReRoutes": [
	{
            "DownstreamPathTemplate": "/api/{url}",
            "DownstreamScheme": "http",
            "UpstreamPathTemplate": "/webapp2/{url}",
            "UpstreamHttpMethod": [ "Get","POST","Put" ],
            "ServiceName": "webapp2",
            "UseServiceDiscovery": true,
            "LoadBalancerOptions": {
                    "Type": "LeastConnection"
            }
    },
	{
            "DownstreamPathTemplate": "/api/{url}",
            "DownstreamScheme": "http",
            "UpstreamPathTemplate": "/webapp1/{url}",
            "UpstreamHttpMethod": [ "Get","POST","Put" ],
            "ServiceName": "webapp1",
            "UseServiceDiscovery": true,
            "LoadBalancerOptions": {
                    "Type": "LeastConnection"
            }
    }
],
 "GlobalConfiguration": {
 "ServiceDiscoveryProvider": {
  "Host": "172.172.0.9",
  "Port": 8500,
  "Type": "Consul"
}
}
}
修改Program类,应用启动时先加载配置文件
public static IWebHostBuilder CreateWebHostBuilder(string[] args) =>
        WebHost.CreateDefaultBuilder(args)
        .ConfigureAppConfiguration((hostingContext, builder) =>
        {
            builder
            .SetBasePath(hostingContext.HostingEnvironment.ContentRootPath)
            .AddJsonFile("OcelotConfig.json");
        }).UseStartup().UseStartup().UseKestrel(o => {
                o.Listen(IPAddress.Loopback, 6000);
            });
Startup类加入Ocelot服务
public void ConfigureServices(IServiceCollection services)
    {
        services.AddOcelot(Configuration)
            .AddConsul();

        services.AddMvc().SetCompatibilityVersion(CompatibilityVersion.Version_2_1);
    }

public void Configure(IApplicationBuilder app, IHostingEnvironment env)
    {
        if (env.IsDevelopment())
        {
            app.UseDeveloperExceptionPage();
        }
        else
        {
            app.UseHsts();
        }
        app.UseOcelot().Wait();
        app.UseHttpsRedirection();
        app.UseMvc();
    }
创建一个容器,映射端口到8005
docker run -itd -p 8005:5000 --net docker-br0 --ip 172.172.0.4 --name ocelot02 ubuntu:16.04 /bin/bash
按上面的介绍部署netcore运行环境和nginx到容器
以上Ocelot就部署完了。
宿主机上访问http://localhost:8005/webapp2/values 调用webapp2的接口
返回内容:[“webapp2”,“业务站点2”,“1”],请求通过!
访问http://localhost:8005/webapp1/values 调用webapp1的接口
返回内容:[“webapp1”,“业务站点1”,“1”],请求通过!
这里Ocelot配置的Consul地址是集群中的一个具体节点的地址,如果此节点挂掉整个应用就会无法访问,所以生产环境中需要配置为集群代理地址。