Webpack介绍
WebPack是前端资源模块工具,主要分析你的项目结构,找到JavaScript模块以及其它的一些浏览器不能直接运行的拓展语言(Scss,TypeScript等),并将其转换和打包为合适的格式供浏览器使用。
WebPack的优点:
模块化,可以组织管理很多细化为小的资源文件,将它们合并打包。
ES6规范支持,类似TypeScript是在JavaScript基础上拓展的开发语言:使我们能够实现目前版本的JavaScript不能直接使用的特性,并且之后还能转换为JavaScript文件使浏览器可以识别。
Scss,less等CSS预处理器。
安装NodeJS
参考:
https://blog.csdn.net/qixiang_chen/article/details/84704218
安装Webpack环境
首先在本地计算机安装NodeJS
//全局安装Webpack
(推荐使用全局安装,所有下载的NodeJS模块都在统一的位置)
npm install -g webpack
//在具体某一个目录安装Webpack
新建webpack_demo目录,将命令行程序当前目录转移到webpack_demo目录下执行如下命令
npm install --save-dev webpack
初始化Webpack环境
在目录webpack_demo下执行
npm init
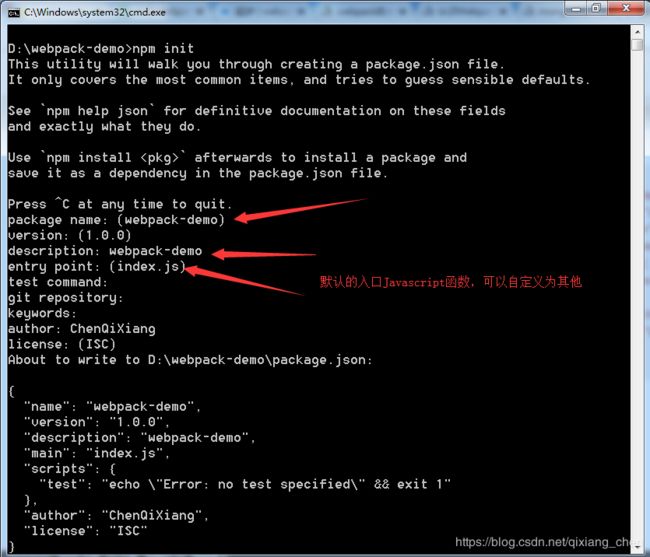
在D:/webpack_demo目录下生成一个package.json文件
package.json
{
  "name": "webpack-demo",
  "version": "1.0.0",
  "description": "webpack-demo",
  "main": "index.js",
  "scripts": {
    "test": "echo \"Error: no test specified\" && exit 1"
  },
  "author": "ChenQiXiang",
  "license": "ISC"
}
在webpack_demo目录下定义JS与页面
在webpack_demo目录下新建app目录,存放Javascript文件;新建static目录存放静态页面。
在子目录static下新建index.html静态文件
index.html
Webpack例程
在子目录app下新建hello.js,在其中定义页面输出的内容,依据CommonJS规范导出这个函数为一个模块
hello.js
module.exports = function() {
  var str = document.createElement('hellodiv'); //获取index.html页面上DIV控件
  str.textContent = "Hello World I'm Webpack tool";
  return str;
};
我们设置的Webpack打包入口Javascript是index.js文件,所以我们需要新建这个index.js
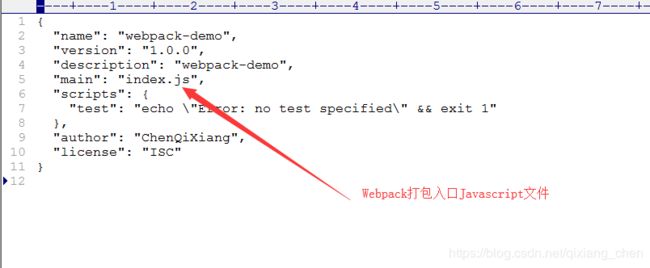
在子目录app下新建index.js入口Javascript文件
index.js文件
const hellomodule = require('./hello.js');
document.querySelector("#hellodiv").appendChild(hellomodule());
在d:/webpack_demo目录下新建webpack.config.js配置文件,指导Webpack如何打包Javascript
webpack.config.js
module.exports = {
  entry:  __dirname + "/app/index.js",
  output: {
    path: __dirname + "/static",
    filename: "build.js"
  }
}
其中
entry键定义webpack打包的入口Javascipt文件,webpack分析此文件将所有依赖的js,css等静态文件打包成一个单独的文件build.js
__dirname变量代表当前目录
output键定义webpack打包后文件名与目录。
开启命令行,使用Webpack命令打包
webpack命令是使用npm install -g webpack安装的。
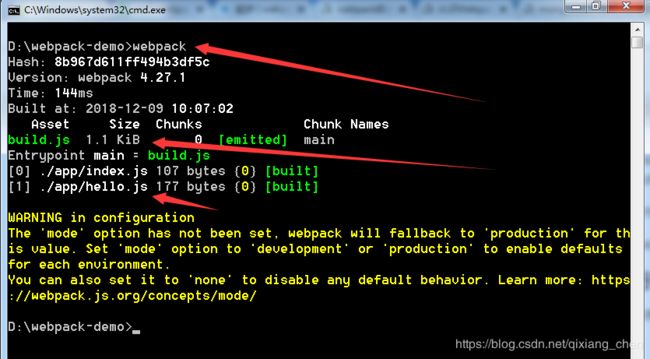
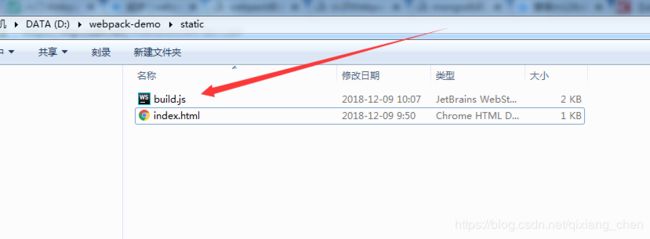
打开子目录static,发现新打包的JS文件build.js
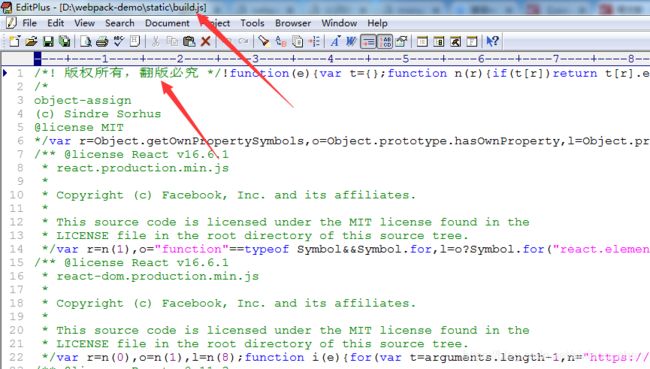
使用编辑工具打开build.js文件,发现被Webpack压缩处理过
!function(e){var t={};function n(r){if(t[r])return t[r].exports;var o=t[r]={i:r,l:!1,exports:{}};return e[r].call(o.exports,o,o.exports,n),o.l=!0,o.exports}n.m=e,n.c=t,n.d=function(e,t,r){n.o(e,t)||Object.defineProperty(e,t,{enumerable:!0,get:r})},n.r=function(e){"undefined"!=typeof Symbol&&Symbol.toStringTag&&Object.defineProperty(e,Symbol.toStringTag,{value:"Module"}),Object.defineProperty(e,"__esModule",{value:!0})},n.t=function(e,t){if(1&t&&(e=n(e)),8&t)return e;if(4&t&&"object"==typeof e&&e&&e.__esModule)return e;var r=Object.create(null);if(n.r(r),Object.defineProperty(r,"default",{enumerable:!0,value:e}),2&t&&"string"!=typeof e)for(var o in e)n.d(r,o,function(t){return e[t]}.bind(null,o));return r},n.n=function(e){var t=e&&e.__esModule?function(){return e.default}:function(){return e};return n.d(t,"a",t),t},n.o=function(e,t){return Object.prototype.hasOwnProperty.call(e,t)},n.p="",n(n.s=0)}([function(e,t,n){const r=n(1);document.querySelector("#hellodiv").appendChild(r())},function(e,t){e.exports=function(){var e=document.createElement("hellodiv");return e.textContent="Hello World I'm Webpack tool",e}}]);
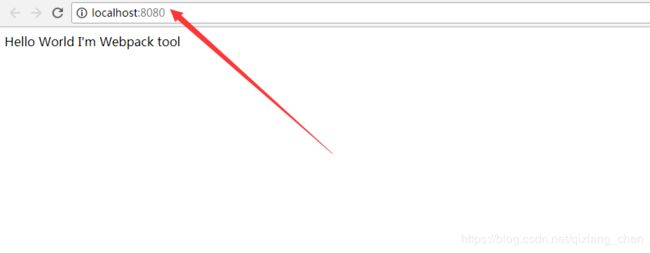
使用浏览器打开静态网页index.html
自定义脚本
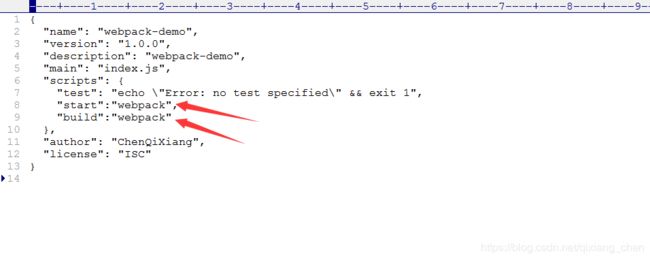
在package.json中自定义执行基本,定义形式如下
scriptName:“命令”
脚本名test与start比较特殊,定义后可以直接使用npm test;npm start启动
其他的脚本名必须使用npm run <脚本名>的形式运行,比如npm run build

前端调试支持
Webpack对前端脚本打包压缩后调试非常麻烦,Webpack打包时对调试进行支持,生成Source Maps信息方法调试定位代码。
在webpack.config.js配置调试选项
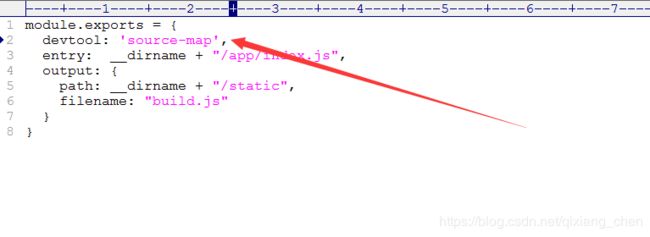
生成网页后可以跟踪JS原代码
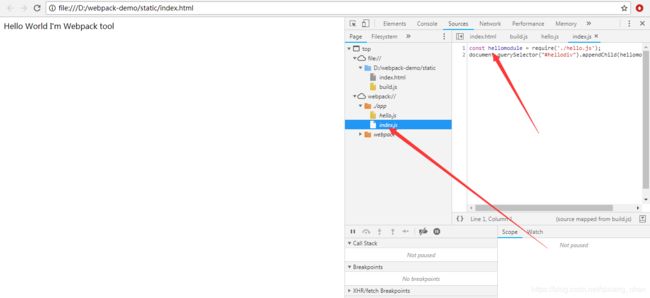
如果不添加调试选项,生成静态网页无法跟踪JS源码

Webpack调试选项
source-map
在一个单独的文件中产生一个完整且功能完全的文件。这个文件具有最好的source map,但是它会减慢打包速度;
cheap-module-source-map
在一个单独的文件中生成一个不带列映射的map,不带列映射提高了打包速度,但是也使得浏览器开发者工具只能对应到具体的行,不能对应到具体的列(符号),会对调试造成不便;
eval-source-map
使用eval打包源文件模块,在同一个文件中生成干净的完整的source map。这个选项可以在不影响构建速度的前提下生成完整的sourcemap,但是对打包后输出的JS文件的执行具有性能和安全的隐患。在开发阶段这是一个非常好的选项,在生产阶段则一定不要启用这个选项;
cheap-module-eval-source-map
这是在打包文件时最快的生成source map的方法,生成的Source Map 会和打包后的JavaScript文件同行显示,没有列映射,和eval-source-map选项具有相似的缺点;
Webpack搭建静态资源Http服务器
前台页面设计,测试效果需要使用Http服务器,使用NodeJS可以方便搭建Http服务器。
npm install -g webpack-dev-server
webpack-dev-server服务器配置参数
contentBase:静态资源网页目录
port:服务端口
inline:修改静态资源文件是否自动刷新页面
historyApiFallback:是否可以跳转历史网页,开发单网页应用中设置为true,统一跳转到首页面index.html
在webpack.config.js配置文件添加如下配置
module.exports = {
  entry:  __dirname + "/app/index.js",
  output: {
    path: __dirname + "/static",
    filename: "build.js"
  },

  devServer: {
    contentBase: "./static",
    historyApiFallback: true,
    inline: true
  }
}
在package.json文件中添加脚本
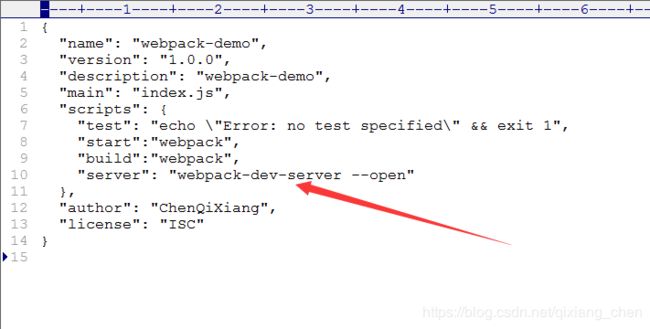
运行本地Http服务
npm run server
Webpack 加载器Loader
Loader可以使Webpack调用外部的工具与命令,为Webpack打包提供服务。比如将scss转换为css文件;将ES6,ES7规范的Javascript转换为现在浏览器可以识别的Javascript语法;使用React开发JSX脚本可以转化为JS脚本等。Loader需要单独安装模板,并且在webpack.config.js配置文件中module部分相应配置。配置的键值包括:
test:一个用以匹配loaders所处理文件的拓展名的正则表达式(必须)
loader:loader的名称(必须)
include/exclude:手动添加必须处理的文件(文件夹)或屏蔽不需要处理的文件(文件夹)(可选);
query:为loaders提供额外的设置选项(可选)
Babel是Javascript编译工具,它可以将ES6,ES7规范的Javascript脚本编译为ES规范的,也就是当前浏览器都支持的Javascript规范;它还可以将React扩展Javascript语言JSX编译为普通JS。
Babel核心包包括:核心功能位于称为babel-core的npm包中,解析ES6的babel-env-preset包和解析JSX的babel-preset-react包。
安装Babel
npm install -g babel-core babel-loader babel-preset-env babel-preset-react
在Webpack中配置Babel
修改webpack.config.js配置文件
module.exports = {
	entry:  __dirname + "/app/index.js",
	output: {
		path: __dirname + "/static",
		filename: "build.js"
	},

	devServer: {
		contentBase: "./static",
		historyApiFallback: true,
		inline: true
	},
	module: {
		rules: [
			{
				test: /(\.jsx|\.js)$/,
				use: {
					loader: "babel-loader",
					options: {
						presets: [
							"env", "react"
						]
					}
				},
				exclude: /node_modules/
			}
		]
	}
}
现在我们的Webpack_demo项目支持ES6和React脚本了。使用React组件还需要安装React
npm install -g react react-dom
1、修改Hello.js文件,使用ES6语法和React组件,将数据分类到一个data.json文件中
data.json
{
  "welcome": "Hello World I'm Webpack tool"
}
修改hello.js文件
import React, {Component} from 'react'
import data from './data.json';

class Welcome extends Component{
  render() {
    return (

        {data.welcome}

    );
  }
}

export default Welcome
修改Index.js
import React from 'react';
import {render} from 'react-dom';
import Welcome from './hello';
render(运行Http服务器
npm run server
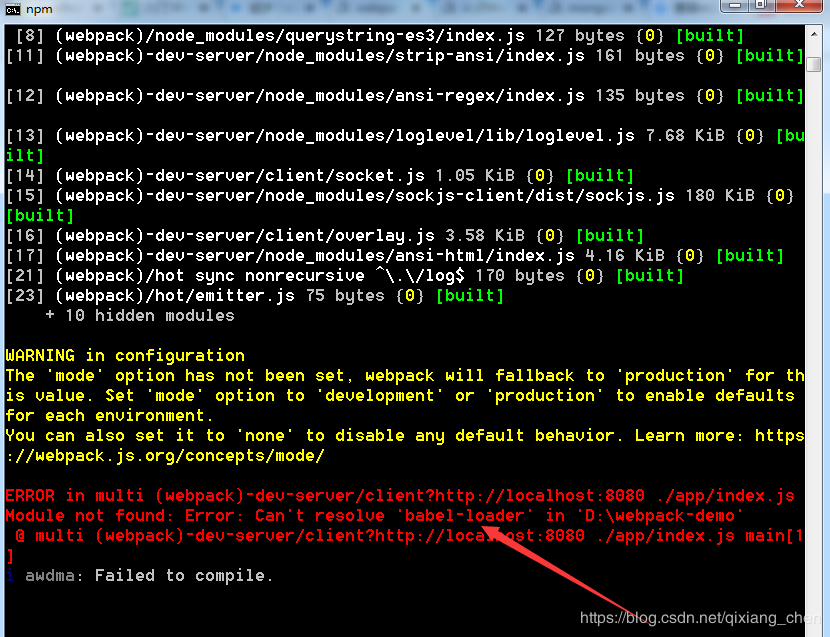
后台报找不到babel-loader错误,babel-loader相关模块都安装到全局目录,在此启动Http服务器失败,尝试在本地目录d:/webpack_demo安装babel-loader
npm install babel-core babel-loader babel-preset-env babel-preset-react
npm install -g react react-dom
安装组件后再次运行本地Http服务
npm run server
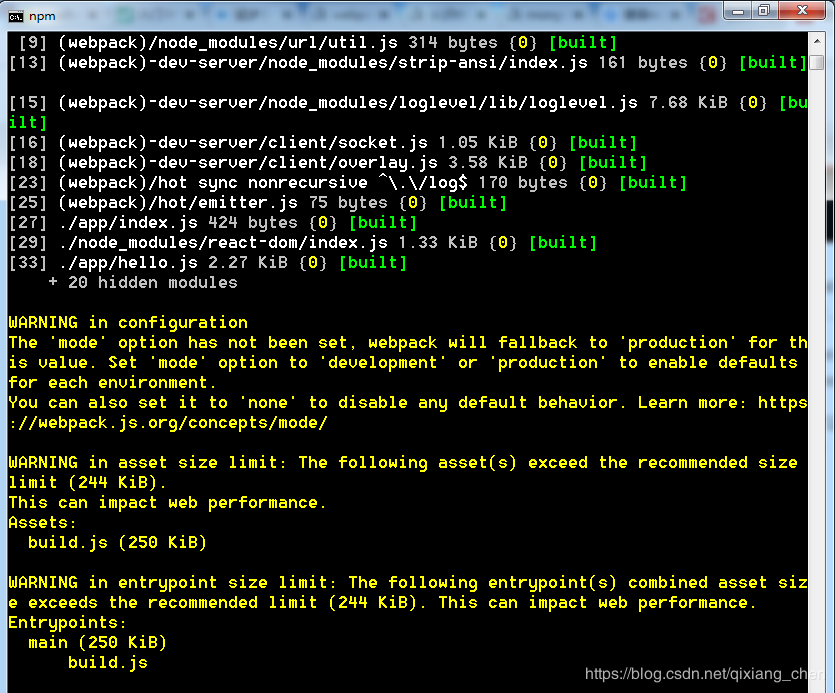
浏览器中可以访问到data.json中的内容

CSS Loader
Webpack提供两两个CSS处理插件,css_loader和style_loader,css-loader使用@import 和 url(…)的方法实现 require()的功能,style-loader将所有的计算后的样式加入页面中,二者组合在一起把样式表嵌入webpack打包后的JS文件中
安装CSS Loader
npm install style-loader css-loader
修改webpack.config.js文件
module.exports = {
	entry:  __dirname + "/app/index.js",
	output: {
		path: __dirname + "/static",
		filename: "build.js"
	},

	devServer: {
		contentBase: "./static",
		historyApiFallback: true,
		inline: true
	},
	module: {
		rules: [
			{
				test: /(\.jsx|\.js)$/,
				use: {
					loader: "babel-loader",
					options: {
						presets: [
							"env", "react"
						]
					}
				},
				exclude: /node_modules/
			},
            {
                test: /\.css$/,
                use: [
                    {
                        loader: "style-loader"
                    }, {
                        loader: "css-loader"
                    }
                ]
            }
		]
	}
}
在app子目录下添加统一样式common.css
common.css
html {
  box-sizing: border-box;
}
body {
  margin: 0;
  font-family: '宋体';
}

div {
  background:pink;
}
修改index.js,引入common.css
import React from 'react';
import {render} from 'react-dom';
import Welcome from './hello';
import './common.css';
render(重新运行Http服务器,测试效果
为了避免CSS全局类名对具体页面影响,引入CSS Module概念,CSS可以单独定义为模块,页面可以引入具体的CSS模块,不再受全局CSS类名的影响。
修改webpack.config.js文件
module.exports = {
	entry:  __dirname + "/app/index.js",
	output: {
		path: __dirname + "/static",
		filename: "build.js"
	},

	devServer: {
		contentBase: "./static",
		historyApiFallback: true,
		inline: true
	},
	module: {
		rules: [
			{
				test: /(\.jsx|\.js)$/,
				use: {
					loader: "babel-loader",
					options: {
						presets: [
							"env", "react"
						]
					}
				},
				exclude: /node_modules/
			},
            {
                test: /\.css$/,
                use: [
                    {
                        loader: "style-loader"
                    }, {
                        loader: "css-loader",
                        options: {
                            modules: true,
                            localIdentName: '[name]__[local]--[hash:base64:5]'
                        }
                    }
                ]
            }
		]
	}
}
添加hello.css
.mydiv {
  background:green;
}
修改hello.js
import React, {Component} from 'react'
import data from './data.json';
import styles from './hello.css';

class Welcome extends Component{
  render() {
    return (

        {data.welcome}

    );
  }
}

export default Welcome
Webpack插件
插件(Plugins)是用来拓展Webpack功能的,在整个构建过程中生效,执行相关的任务。
在webpack.config.js添加插件配置
const webpack = require('webpack');

module.exports = {
	entry:  __dirname + "/app/index.js",
	output: {
		path: __dirname + "/static",
		filename: "build.js"
	},

	devServer: {
		contentBase: "./static",
		historyApiFallback: true,
		inline: true
	},
	module: {
		rules: [
			{
				test: /(\.jsx|\.js)$/,
				use: {
					loader: "babel-loader",
					options: {
						presets: [
							"env", "react"
						]
					}
				},
				exclude: /node_modules/
			},
            {
                test: /\.css$/,
                use: [
                    {
                        loader: "style-loader"
                    }, {
                        loader: "css-loader",
                        options: {
                            modules: true,
                            localIdentName: '[name]__[local]--[hash:base64:5]'
                        }
                    }
                ]
            }
		]
	},
    plugins: [
        new webpack.BannerPlugin('版权所有,翻版必究')
    ]
}
注意需要引入
const webpack = require(‘webpack’);
必须在本地目录安装webpack,webpack-cli
npm install webpack webpack-cli
使用webpack打包
npm run build 或 npm start
生成的build.js添加版本信息,如果生成文件存在乱码,请确认webpack.config.js,index.js,hello.js都是UTF-8编码格式。
使用Html模板插件
安装HTML模板插件
npm install html-webpack-plugin
删除原来的index.html静态文件,在app目录下新建index.template.html模板文件,
app/index.template.html
Webpack例程
修改webpack.config.js配置文件
const webpack = require('webpack');
const HtmlWebpackPlugin = require('html-webpack-plugin');

module.exports = {
	entry:  __dirname + "/app/index.js",
	output: {
		path: __dirname + "/static",
		filename: "build.js"
	},

	devServer: {
		contentBase: "./static",
		historyApiFallback: true,
		inline: true
	},
	module: {
		rules: [
			{
				test: /(\.jsx|\.js)$/,
				use: {
					loader: "babel-loader",
					options: {
						presets: [
							"env", "react"
						]
					}
				},
				exclude: /node_modules/
			},
            {
                test: /\.css$/,
                use: [
                    {
                        loader: "style-loader"
                    }, {
                        loader: "css-loader",
                        options: {
                            modules: true,
                            localIdentName: '[name]__[local]--[hash:base64:5]'
                        }
                    }
                ]
            }
		]
	},
    plugins: [
        new webpack.BannerPlugin('版权所有,翻版必究'),
		new HtmlWebpackPlugin({
            template: __dirname + "/app/index.template.html"
        })
    ]
}
注意需要引入
const webpack = require(‘webpack’);
const HtmlWebpackPlugin = require(‘html-webpack-plugin’);
Webpack Http服务器热部署插件
热部署插件是Webpack的内置插件,只要引入webpack模块即可。
1、引入new webpack.HotModuleReplacementPlugin()插件
2、修改
devServer: {
contentBase: “./static”,
historyApiFallback: true,
inline: true,
hot:true
}
中hot=true
webpack.config.js
const webpack = require('webpack');
const HtmlWebpackPlugin = require('html-webpack-plugin');

module.exports = {
	entry:  __dirname + "/app/index.js",
	output: {
		path: __dirname + "/static",
		filename: "build.js"
	},

	devServer: {
		contentBase: "./static",
		historyApiFallback: true,
		inline: true,
		hot:true
	},
	module: {
		rules: [
			{
				test: /(\.jsx|\.js)$/,
				use: {
					loader: "babel-loader",
					options: {
						presets: [
							"env", "react"
						]
					}
				},
				exclude: /node_modules/
			},
            {
                test: /\.css$/,
                use: [
                    {
                        loader: "style-loader"
                    }, {
                        loader: "css-loader",
                        options: {
                            modules: true,
                            localIdentName: '[name]__[local]--[hash:base64:5]'
                        }
                    }
                ]
            }
		]
	},
    plugins: [
        new webpack.BannerPlugin('版权所有,翻版必究'),
		new HtmlWebpackPlugin({
            template: __dirname + "/app/index.template.html"
        }),
		new webpack.HotModuleReplacementPlugin()
    ]
}
其他插件
OccurenceOrderPlugin :为组件分配ID,通过这个插件webpack可以分析和优先考虑使用最多的模块,并为它们分配最小的ID
UglifyJsPlugin:压缩JS代码;
ExtractTextPlugin:分离CSS和JS文件

