PhoneAccount流程解析(SIM卡管理器)拨号过程中解析PhoneAccount
刚开始看拨号流程是 总是出现PhoneAccount和PhoneAccountHandler,一直不知道是干嘛使的。所以今天写一篇文章来记录一下免得忘了。
在网上找了挺多资料,然后对照代码看了一遍。
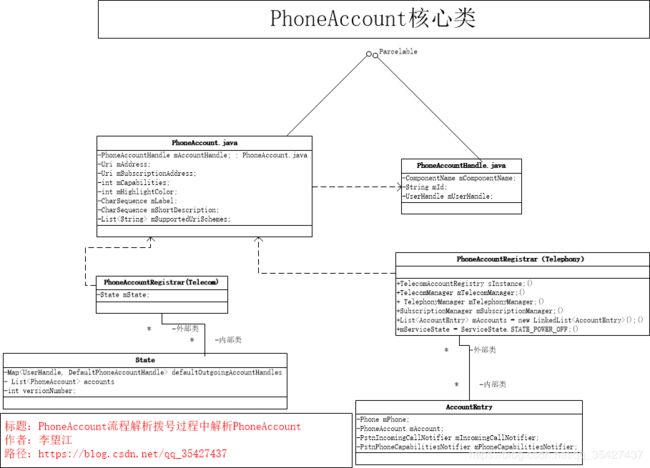
PhoneAccount的作用 : PhoneAccount就是在拨打电话和来电过程中使用哪一张SIM卡,哪一个SIP账号,从代码里面可以看出来他本身是实现了Parcelable,所以支持跨进程传输。
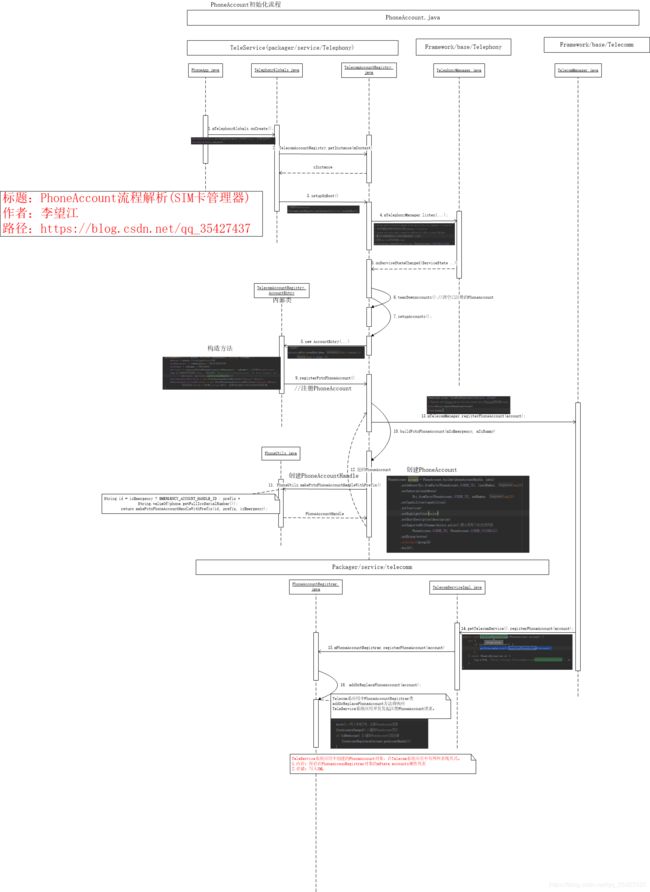
首先看一下流程图,我们的入口在TeleService进程中的PhoneApp类中开始进行初始化。
流程图:
直接来看代码
PhoneApp.java
 @Override
    public void onCreate() {
        if (UserHandle.myUserId() == 0) {//除系统调用,其他情况下不加载
            // We are running as the primary user, so should bring up the
            // global phone state.  系统用户运行PhoneApp,将启动和加载全局的电话属性和状态
            mPhoneGlobals = new PhoneGlobals(this);//primary用户
            mPhoneGlobals.onCreate();

            mTelephonyGlobals = new TelephonyGlobals(this);//处理PSTN呼叫
            mTelephonyGlobals.onCreate();
        }
    }
PhoneApp本身是一个Application,而这个进程开机启动,所以开机就会调用PhoneApp类。我们这里主要看TelephonyGlobals类中的onCreate。
TelephonyGlobals.java
public void onCreate() {
        // Make this work with Multi-SIM devices 支持多SIM卡设备
        Phone[] phones = PhoneFactory.getPhones();
        for (Phone phone : phones) {//初始化TTY     Text Telephone(TTY)即聋哑人电话,在手机插入专用设备后支持收发文本,但是需要网络支持
            mTtyManagers.add(new TtyManager(mContext, phone));
        }
        //加载PhoneAccount
        TelecomAccountRegistry.getInstance(mContext).setupOnBoot();
    }
这里通过单例获取TelecomAccountRegistry对象,而TelecomAccountRegistry对象就是初始化PhoneAccount对象的核心入口,进入PhoneAccountRegistry类中查看setupOnBoot。
TelepcomAccountRegistry.java
    /**
     * setupOnBoot方法注册了两个Listener回调和一个广播接收器,使用了三个内部类匿名对象 mOnSubscriptionsChangedListener,mPhoneStateListener,mReceiver
     * 作为监听回调的响应。
     */
    void setupOnBoot() {
        //注册Subscription变化的回调Listener
        SubscriptionManager.from(mContext).addOnSubscriptionsChangedListener(
                mOnSubscriptionsChangedListener);


        // 我们还需要监听服务状态的变化(例如:emergency -> in service)

        // 因为这可能意味着在单个SIM手机中删除或添加一个SIM卡。
        //注册Phone State变化的回调Listener
        mTelephonyManager.listen(mPhoneStateListener, PhoneStateListener.LISTEN_SERVICE_STATE);

        IntentFilter filter = new IntentFilter();
        filter.addAction(Intent.ACTION_USER_SWITCHED);
        filter.addAction(CarrierConfigManager.ACTION_CARRIER_CONFIG_CHANGED);
        //注册用户切换广播
        mContext.registerReceiver(mReceiver, filter);

        ContentObserver rttUiSettingObserver = new ContentObserver(
                new Handler(Looper.getMainLooper())) {
            @Override
            public void onChange(boolean selfChange) {
                synchronized (mAccountsLock) {
                    for (AccountEntry account : mAccounts) {
                        account.updateRttCapability();
                    }
                }
            }
        };

        Uri rttSettingUri = Settings.Secure.getUriFor(Settings.Secure.RTT_CALLING_MODE);
        //注册用户广播
        mContext.getContentResolver().registerContentObserver(
                rttSettingUri, false, rttUiSettingObserver);
    }
setupOnBoot方法注册了两个Listener回调和一个广播接收器,使用三个内部匿名对象:mOnSubscriptionsChangedListener,mPhoneStateListener和mUserSwitchedReceiver作为监听回调的响应。总结三个对象的响应逻辑,他全部发起了tearDownAccounts和setupAccounts的方法调用,重点需要查看PhoneStateListener的回调响应逻辑。
 private final PhoneStateListener mPhoneStateListener = new PhoneStateListener() {
        @Override
        public void onServiceStateChanged(ServiceState serviceState) {
            int newState = serviceState.getState();//获取当前最新状态
            if (newState == ServiceState.STATE_IN_SERVICE && mServiceState != newState) {
                tearDownAccounts();//清空已注册的PhoneAccount
                setupAccounts();
            }
            mServiceState = newState;
        }
    };
当前服务状态保存在STATE_IN_SERVICE中,当ServiceState已发生变化时,调用trarDownAccounts();方法清空已注册的PhoneAccount,接着调用setupAccounts重新设置并注册新的PhoneAccount,逻辑如下:
private void setupAccounts() {//重新设置并注册新的PhoneAccount
        Phone[] phones = PhoneFactory.getPhones();//获取Phone对象  获取每张卡

        final boolean phoneAccountsEnabled = mContext.getResources().getBoolean(
                R.bool.config_pstn_phone_accounts_enabled);
        int activeCount = 0;
        int activeSubscriptionId = SubscriptionManager.INVALID_SUBSCRIPTION_ID;
        boolean isAnyProvisionInfoPending = false;

        synchronized (mAccountsLock) {//同步锁
            if (phoneAccountsEnabled) {
                // states we are interested in from what
                // IExtTelephony.getCurrentUiccCardProvisioningStatus()can return
                final int PROVISIONED = 1;
                final int INVALID_STATE = -1;
                final int CARD_NOT_PRESENT = -2;
                boolean isInEcm = false;

                for (Phone phone : phones) {
                    int provisionStatus = PROVISIONED;
                    int subscriptionId = phone.getSubId();
                    int slotId = phone.getPhoneId();
                    ......
                    if (subscriptionId >= 0  && (provisionStatus == PROVISIONED)
                            && (mSubscriptionManager.isActiveSubId(subscriptionId))) {
                        activeCount++;
                        activeSubscriptionId = subscriptionId;
                        //添加用户
                        mAccounts.add(new AccountEntry(phone, false /* emergency */,
                                false /* isDummy */));
                        isAccountAdded = true;
                    }

            ....
        }
    }
通过PhoneFactory对象获取Phone对象数组后,在通过Phone对象创建TelecomAccountRegistry类的内部类AccountEntry对象。
AccountEntry(Phone phone, boolean isEmergency, boolean isDummy) {
            mPhone = phone;//GsmCdmaPhone对象
            mIsEmergency = isEmergency;//是否紧急呼救
            mIsDummy = isDummy;//是否虚拟
            mAccount = registerPstnPhoneAccount(isEmergency, isDummy);//注册PhoneAccount
            Log.i(this, "Registered phoneAccount: %s with handle: %s",
                    mAccount, mAccount.getAccountHandle());
            mIncomingCallNotifier = new PstnIncomingCallNotifier((Phone) mPhone);
            mPhoneCapabilitiesNotifier = new PstnPhoneCapabilitiesNotifier((Phone) mPhone,
                    this);//回调Listener接口,视屏电话能力变化后的消息回调。
        }
AoccuntEntry类实现了PstnPhoneCapabilitiesNotifier.Listener接口,他只有一个方法定义onVideoCapabilitiesChanged,在视频电话功能变化后将进行消息回调;
我们在来看registerPstnPhoneAccount()注册入口
 private PhoneAccount registerPstnPhoneAccount(boolean isEmergency, boolean isDummyAccount) {
            PhoneAccount account = buildPstnPhoneAccount(mIsEmergency, mIsDummy);
            // Register with Telecom and put into the account entry.向Telecom应用注册Account
            mTelecomManager.registerPhoneAccount(account);
            return account;
        }
这里一共有两个操作一个是创建PhoneAccount对象,吧PhoneAccount信息写入本地文件中
首先查看buildPstnPhoneAccount方法
  /**
         * Registers the specified account with Telecom as a PhoneAccountHandle.
         */
        private PhoneAccount buildPstnPhoneAccount(boolean isEmergency, boolean isDummyAccount) {
            String dummyPrefix = isDummyAccount ? "Dummy " : "";

            // 创建PhonoAccountHandler对象
            PhoneAccountHandle phoneAccountHandle =
                    PhoneUtils.makePstnPhoneAccountHandleWithPrefix(
                            mPhone, dummyPrefix, isEmergency);

            // 通过Phone获取一些基础信息
            int subId = mPhone.getSubId();
            String subscriberId = mPhone.getSubscriberId();
            int color = PhoneAccount.NO_HIGHLIGHT_COLOR;
            int slotId = SubscriptionManager.INVALID_SIM_SLOT_INDEX;
            String line1Number = mTelephonyManager.getLine1Number(subId);
            if (line1Number == null) {
                line1Number = "";
            }
            String subNumber = mPhone.getLine1Number();
            if (subNumber == null) {
                subNumber = "";
            }

            String label;
            String description;
            Icon icon = null;
            SubscriptionInfo record =
                    mSubscriptionManager.getActiveSubscriptionInfo(subId);

            if (isEmergency) {
                label = mContext.getResources().getString(R.string.sim_label_emergency_calls);
                description =
                        mContext.getResources().getString(R.string.sim_description_emergency_calls);
            } else if (mTelephonyManager.getPhoneCount() == 1) {

                description = label = mTelephonyManager.getNetworkOperatorName();
            } else {
                CharSequence subDisplayName = null;

                if (record != null) {
                    subDisplayName = record.getDisplayName();
                    slotId = record.getSimSlotIndex();
                    color = record.getIconTint();
                    icon = Icon.createWithBitmap(record.createIconBitmap(mContext));
                }

                String slotIdString;
                if (SubscriptionManager.isValidSlotIndex(slotId)) {
                    slotIdString = Integer.toString(slotId);
                } else {
                    slotIdString = mContext.getResources().getString(R.string.unknown);
                }

                if (TextUtils.isEmpty(subDisplayName)) {
                    // Either the sub record is not there or it has an empty display name.
                    Log.w(this, "Could not get a display name for subid: %d", subId);
                    subDisplayName = mContext.getResources().getString(
                            R.string.sim_description_default, slotIdString);
                }

                label = dummyPrefix + subDisplayName;
                description = dummyPrefix + mContext.getResources().getString(
                                R.string.sim_description_default, slotIdString);
            }

            //  默认所有SIM电话账户都能拨打紧急电话
            int capabilities = PhoneAccount.CAPABILITY_SIM_SUBSCRIPTION |
                    PhoneAccount.CAPABILITY_CALL_PROVIDER |
                    PhoneAccount.CAPABILITY_MULTI_USER;
            //当前Phone对象具备的通讯能力处理了逻辑
            if (mContext.getResources().getBoolean(R.bool.config_pstnCanPlaceEmergencyCalls)) {
                capabilities |= PhoneAccount.CAPABILITY_PLACE_EMERGENCY_CALLS;
            }

            mIsVideoCapable = mPhone.isVideoEnabled();
            boolean isVideoEnabledByPlatform = ImsManager.getInstance(mPhone.getContext(),
                    mPhone.getPhoneId()).isVtEnabledByPlatform();

            if (!mIsPrimaryUser) {
                Log.i(this, "Disabling video calling for secondary user.");
                mIsVideoCapable = false;
                isVideoEnabledByPlatform = false;
            }

            if (mIsVideoCapable) {
                capabilities |= PhoneAccount.CAPABILITY_VIDEO_CALLING;
            }

            if (isVideoEnabledByPlatform) {
                capabilities |= PhoneAccount.CAPABILITY_SUPPORTS_VIDEO_CALLING;
            }

            mIsVideoPresenceSupported = isCarrierVideoPresenceSupported();
            if (mIsVideoCapable && mIsVideoPresenceSupported) {
                capabilities |= PhoneAccount.CAPABILITY_VIDEO_CALLING_RELIES_ON_PRESENCE;
            }

            if (mIsVideoCapable && isCarrierEmergencyVideoCallsAllowed()) {
                capabilities |= PhoneAccount.CAPABILITY_EMERGENCY_VIDEO_CALLING;
            }

            mIsVideoPauseSupported = isCarrierVideoPauseSupported();
            Bundle extras = new Bundle();
            if (isCarrierInstantLetteringSupported()) {
                capabilities |= PhoneAccount.CAPABILITY_CALL_SUBJECT;
                extras.putAll(getPhoneAccountExtras());
            }

            final boolean isHandoverFromSupported = mContext.getResources().getBoolean(
                    R.bool.config_support_handover_from);
            if (isHandoverFromSupported && !isEmergency) {
                extras.putBoolean(PhoneAccount.EXTRA_SUPPORTS_HANDOVER_FROM,
                        isHandoverFromSupported);
            }

            final boolean isTelephonyAudioDeviceSupported = mContext.getResources().getBoolean(
                    R.bool.config_support_telephony_audio_device);
            if (isTelephonyAudioDeviceSupported && !isEmergency
                    && isCarrierUseCallRecordingTone()) {
                extras.putBoolean(PhoneAccount.EXTRA_PLAY_CALL_RECORDING_TONE, true);
            }

            if (PhoneGlobals.getInstance().phoneMgr.isRttEnabled()) {
                capabilities |= PhoneAccount.CAPABILITY_RTT;
            }

            extras.putBoolean(PhoneAccount.EXTRA_SUPPORTS_VIDEO_CALLING_FALLBACK,
                    mContext.getResources()
                            .getBoolean(R.bool.config_support_video_calling_fallback));

            if (slotId != SubscriptionManager.INVALID_SIM_SLOT_INDEX) {
                extras.putString(PhoneAccount.EXTRA_SORT_ORDER,
                    String.valueOf(slotId));
            }

            mIsMergeCallSupported = isCarrierMergeCallSupported();
            mIsMergeImsCallSupported = isCarrierMergeImsCallSupported();
            mIsVideoConferencingSupported = isCarrierVideoConferencingSupported();
            mIsMergeOfWifiCallsAllowedWhenVoWifiOff =
                    isCarrierMergeOfWifiCallsAllowedWhenVoWifiOff();
            mIsManageImsConferenceCallSupported = isCarrierManageImsConferenceCallSupported();
            mIsShowPreciseFailedCause = isCarrierShowPreciseFailedCause();

            if (isEmergency && mContext.getResources().getBoolean(
                    R.bool.config_emergency_account_emergency_calls_only)) {
                capabilities |= PhoneAccount.CAPABILITY_EMERGENCY_CALLS_ONLY;
            }

            if (icon == null) {
                Resources res = mContext.getResources();
                Drawable drawable = res.getDrawable(DEFAULT_SIM_ICON, null);
                drawable.setTint(res.getColor(R.color.default_sim_icon_tint_color, null));
                drawable.setTintMode(PorterDuff.Mode.SRC_ATOP);

                int width = drawable.getIntrinsicWidth();
                int height = drawable.getIntrinsicHeight();
                Bitmap bitmap = Bitmap.createBitmap(width, height, Bitmap.Config.ARGB_8888);
                Canvas canvas = new Canvas(bitmap);
                drawable.setBounds(0, 0, canvas.getWidth(), canvas.getHeight());
                drawable.draw(canvas);

                icon = Icon.createWithBitmap(bitmap);
            }

            // Check to see if the newly registered account should replace the old account.
            String groupId = "";
            String[] mergedImsis = mTelephonyManager.getMergedSubscriberIds();
            boolean isMergedSim = false;
            if (mergedImsis != null && subscriberId != null && !isEmergency) {
                for (String imsi : mergedImsis) {
                    if (imsi.equals(subscriberId)) {
                        isMergedSim = true;
                        break;
                    }
                }
            }
            if(isMergedSim) {
                groupId = GROUP_PREFIX + line1Number;
                Log.i(this, "Adding Merged Account with group: " + Log.pii(groupId));
            }

            PhoneAccount account = PhoneAccount.builder(phoneAccountHandle, label)
                    .setAddress(Uri.fromParts(PhoneAccount.SCHEME_TEL, line1Number, null))
                    .setSubscriptionAddress(
                            Uri.fromParts(PhoneAccount.SCHEME_TEL, subNumber, null))
                    .setCapabilities(capabilities)
                    .setIcon(icon)
                    .setHighlightColor(color)
                    .setShortDescription(description)
                    .setSupportedUriSchemes(Arrays.asList(//默认有两个URI支持列表
                            PhoneAccount.SCHEME_TEL, PhoneAccount.SCHEME_VOICEMAIL))
                    .setExtras(extras)
                    .setGroupId(groupId)
                    .build();

            return account;
        }
上面代码的核心逻辑可以总结几个点:
1,创建PhoneAccountHandle对象
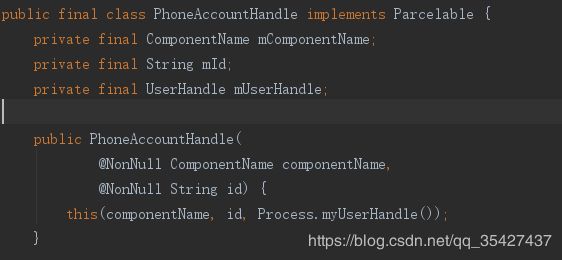
PhoneAccountHandle对象的Id通过phone.getFullccSerialNumber获取,当前SIM卡的ICCID;ComponentName对象的构造方法为:new ComponentName("com.android.phone","com.android.services.telephony.TelephonyConnectionService"),这就是TeleService系统应用中的IConnectionService服务,PhoneAccountHandle对象的构造方法this(componentName, id, Process.myUserHandle());用来回去com.android.phone进程的UserHandle为其SYSTEM类型
2.通过GsmCdmaPhone对象获取一些基础数据类型,如Subid,Slotid,SubscriptionInfo等信息。
3.通过取值capabitites配置信息计算能力。
4.根据前方获取的信息创建PhoneAccount对象
5.使用TelecomManager调用registerPhoneAccount接口注册PhoneAccount.
创建完成小结
PhoneAccount对象在TeleService系统应用中创建,它是Parcelable类型,支持序列化和反序列化操作,可跨进程传递该对象
PhoneAccount对象的mAccountHnadle属性为PhoneAccountHandle类型,mId取值是GsmCdmaPhone对象读取SIM卡的ICCID,与GsmCdmaPhone对象建立了对应关系
创建完成PhoneAccount对象后回到调用buildPstnPhoneAccount返回PhoneAccount下一步处理。
 private PhoneAccount registerPstnPhoneAccount(boolean isEmergency, boolean isDummyAccount) {
            PhoneAccount account = buildPstnPhoneAccount(mIsEmergency, mIsDummy);
            // .向Telecom应用注册Account
            mTelecomManager.registerPhoneAccount(account);
            return account;
        }
TelecomManage.java
public void registerPhoneAccount(PhoneAccount account) {
        try {
            if (isServiceConnected()) {
                getTelecomService().registerPhoneAccount(account);
            }
        } catch (RemoteException e) {
            Log.e(TAG, "Error calling ITelecomService#registerPhoneAccount", e);
        }
    }
这里获取的服务是Telecom中的TelecomService服务,这个服务返回的Binde在TelecomSerivceImpl
TelecomServiceImpl.java
@Override
        public void registerPhoneAccount(PhoneAccount account) {
            try {
                synchronized (mLock) {

                    try {
                        if (account.hasCapabilities(PhoneAccount.CAPABILITY_SIM_SUBSCRIPTION)) {
                            enforceRegisterSimSubscriptionPermission();
                        }
                        if (account.hasCapabilities(PhoneAccount.CAPABILITY_MULTI_USER)) {
                            enforceRegisterMultiUser();
                        }
                        enforceUserHandleMatchesCaller(account.getAccountHandle());
                        final long token = Binder.clearCallingIdentity();
                        try {
                            mPhoneAccountRegistrar.registerPhoneAccount(account);//注册PhoneAccount入口
                        } finally {
                            Binder.restoreCallingIdentity(token);
                        }
                    } catch (Exception e) {
                        Log.e(this, e, "registerPhoneAccount %s", account);
                        throw e;
                    }
                }
            } finally {
                Log.endSession();
            }
        }
这里忽略了很多代码,只需要查看 mPhoneAccountRegistrar.registerPhoneAccount(account);
PhoneAccountRegistrar.java
 public void registerPhoneAccount(PhoneAccount account) {
        .....
        addOrReplacePhoneAccount(account);
    }


  private void addOrReplacePhoneAccount(PhoneAccount account) {
        Log.d(this, "addOrReplacePhoneAccount(%s -> %s)",
                account.getAccountHandle(), account);

        boolean isEnabled = false;
        boolean isNewAccount;

        PhoneAccount oldAccount = getPhoneAccountUnchecked(account.getAccountHandle());
        if (oldAccount != null) {
            mState.accounts.remove(oldAccount);
            isEnabled = oldAccount.isEnabled();
            Log.i(this, "Modify account: %s", getAccountDiffString(account, oldAccount));
            isNewAccount = false;
        } else {
            Log.i(this, "New phone account registered: " + account);
            isNewAccount = true;
        }


        if (account.hasCapabilities(PhoneAccount.CAPABILITY_SELF_MANAGED)) {
            int newCapabilities = account.getCapabilities() &
                    ~(PhoneAccount.CAPABILITY_CALL_PROVIDER |
                        PhoneAccount.CAPABILITY_CONNECTION_MANAGER |
                        PhoneAccount.CAPABILITY_SIM_SUBSCRIPTION);

            // Ensure name is correct.
            CharSequence newLabel = mAppLabelProxy.getAppLabel(
                    account.getAccountHandle().getComponentName().getPackageName());

            account = account.toBuilder()
                    .setLabel(newLabel)
                    .setCapabilities(newCapabilities)
                    .build();
        }

        mState.accounts.add(account);//更新List accounts 列表  就是跟新Phone
        // Set defaults and replace based on the group Id.
        maybeReplaceOldAccount(account);

        account.setIsEnabled(
                isEnabled || account.hasCapabilities(PhoneAccount.CAPABILITY_SIM_SUBSCRIPTION)
                || account.hasCapabilities(PhoneAccount.CAPABILITY_SELF_MANAGED));

        write();//写入本地文件,记录PhoneAccount信息
        fireAccountsChanged();//通知PhoneAccount变化
        if (isNewAccount) {//通知PhoneAccount已经注册
            fireAccountRegistered(account.getAccountHandle());
        }
    }
TeleService系统应用中创建PhoneAccount对象,在Telecom系统应用中有两种表现形式:
1.内存 ,保存在PhoneAccountRegistrar对象的mState.accounts属性列表
2.存储 ,写入XML文件
我们可以找一下XML的位置,在 data/user_de/0/com.android.service.telecom/files/phone-account-registrar-state.xml 可以直接push出来
当前导出了三种状态,第一种是无卡状态,第二种单卡状态,第三种是双卡状态
//无卡的情况下
com.android.phone/com.android.services.telephony.TelephonyConnectionService
E
0
tel:
tel:
182
AAAAAQGJUE5HDQoaCgAAAA1JSERSAAAAJgAAADAIBgAAAH2yCCgAAAAEc0JJVAgICAh8CGSIAAAC
KElEQVRYhe2YsW4TQRCGv9mzFIwISIcQKSjokNyCBEgIRUADFBTxnv0GdLwC2/AKRFQRcoNsFKGk
oPUbpDZS6nS8AL4ZivMJk5yTnGL7rrjvAWa/m/t3tLtCCbz30Wg0SpMkSczsK7BhZoiIlKlzGhFR
Vf0VRdEXVf08HA7/XLpgCKEVQph2u913wEBEbuR1ryJVILl3fHz8/lJFQwguhKDe+7fAd+CamdlV
OzXPrF4KtJxzHy4svL293RqPx9MkSd6o6jcR2QQUcMuSmkNFBDObnFvcex+Nx+Npr9d7raojEdk0
M1uRFIAzMyciDxYuEEJozYL+atap62RftNRMFWFmrnCRfPf1+/2XaZruAzeXnamLOLNQninv/Qtg
H7gFpEC0Lik4lZU8U977Z8BoJqXrlvpPbC5Tz83sBxCTdWpVQT8XgX+Z8t4/NbNDEbnN6kbC5cTy
TPV6vSeqegDcoYJMnRED6Pf7j9I0PQS21r37FhHt7Ow8Bg6ALSAVkcp+3zzOOTckk6pk9y3CAXep
OOhFOGBKzaQgE6o86EW47LBQP1wNJkMhTcfKUuuObVQtUYSjRtN+ntoN1pxGrCyNWFkasbI0YmVp
xMrSiJWlEStLI1aWWotp1RIFqAMmIqLUQDD3EJGJM7NdM8s7V+VdzsxMAaequ1G73T6K4/ge8JBq
H1iE7J67F8dxiE5OTqzT6fw0s98icp/stXrdggpMzOyTiHwcDAbTv4Eb4Qp/IvOFAAAAAElFTkSu
QmCC
0
只能拨打紧急呼救电话
tel
voicemail
true
true
15
单卡
//一张卡
//版本号9
//对应卡的节点
对应PhoneAccountHandler对象
com.android.phone/com.android.services.telephony.TelephonyConnectionService //服务信息
89860318747559832419 //SIM卡的ICCID
0 // 0 UserHandler,即系统用户
tel: //手机号码
tel:
54 //GsmCdmaPhone对象通话能力取值
AAAAAQGJUE5HDQoaCgAAAA1JSERSAAAAMAAAADAIBgAAAFcC+YcAAAAEc0JJVAgICAh8CGSIAAAC
X0lEQVRoge2aPWsUQRjHf88mp2guFz2DUcRK/QAWFrGy8CuYT6CNJtp4hgRD1gRSaApBrK0lNkI6
m0BEguDLBxC0EhsVIWe4C3tjcXvLqTu7s283F9gfTDM3+8z/P8/sLHvPwgFHco+oVPaYIioHJQlR
SnIRD+C6Dq7rmAzNZ8J+4Q/nq+ztpY87dtijsd4M4sZkI7sBpYSNDYeZGY/F2RUU86B+A0YrGKKo
jeINUllm7fFHPxsd/fAs9ItfuLUK3AdUxrjd60V+MCJXWX3yIcpEulUCnXjPF5ClAdJGqTqeWoiT
kW6l9OKd1DH/mcGP8436kfM01pu6+yF5BooX389Rmq2RqAHJDAxWvBHmBoZQPJgaGFLxYGJgiMUD
jEb+mlJ8xXG4MHmSc/VJzk4c53RtglPVGlPVce5svuDzz+8DMgAkFf/l3gpnascYdcKTu/RqM51S
Dfot1Dt3E26bqeq4VnwRhGegJ96dq9Hq3PZ7jfb8s3c7VJy/j+7rly5n1aklfgsFj3czbr58/l9f
kQZMcm39pIlicJu1IEoDtikN2KY0YJvSgG1KA7YpDdimNGCb0oBtTF4pMyOLs4XFPvAZKA3YJsbA
iQ7QGoiSMIS2r0FLuAERhVKC6+4ivPY798lePjJssu8r2cZ1d6Oqlfrqh4jD1pbiyvQnOuoaUA3W
pdgG3dPxF47cYPvt10BLmEytASCoDi7NXcTrPACmURyKvCYr3TLrDsIya0/fZy+z9qfv0d2xuJpV
ZhIWuuMfZCIqKPs33GYOEuPpzScSeQND0v898/oWIg4rH3tY4g8EbRKgctJcvAAAAABJRU5ErkJg
gg==
-16746133
SIM 卡,插槽:0
// 固定的URI
tel
voicemail
true
0
true
15
双卡
//两张卡
com.android.phone/com.android.services.telephony.TelephonyConnectionService
89860318747559832419
0
tel:
tel:
54
AAAAAQGJUE5HDQoaCgAAAA1JSERSAAAAMAAAADAIBgAAAFcC+YcAAAAEc0JJVAgICAh8CGSIAAAC
X0lEQVRoge2aPWsUQRjHf88mp2guFz2DUcRK/QAWFrGy8CuYT6CNJtp4hgRD1gRSaApBrK0lNkI6
m0BEguDLBxC0EhsVIWe4C3tjcXvLqTu7s283F9gfTDM3+8z/P8/sLHvPwgFHco+oVPaYIioHJQlR
SnIRD+C6Dq7rmAzNZ8J+4Q/nq+ztpY87dtijsd4M4sZkI7sBpYSNDYeZGY/F2RUU86B+A0YrGKKo
jeINUllm7fFHPxsd/fAs9ItfuLUK3AdUxrjd60V+MCJXWX3yIcpEulUCnXjPF5ClAdJGqTqeWoiT
kW6l9OKd1DH/mcGP8436kfM01pu6+yF5BooX389Rmq2RqAHJDAxWvBHmBoZQPJgaGFLxYGJgiMUD
jEb+mlJ8xXG4MHmSc/VJzk4c53RtglPVGlPVce5svuDzz+8DMgAkFf/l3gpnascYdcKTu/RqM51S
Dfot1Dt3E26bqeq4VnwRhGegJ96dq9Hq3PZ7jfb8s3c7VJy/j+7rly5n1aklfgsFj3czbr58/l9f
kQZMcm39pIlicJu1IEoDtikN2KY0YJvSgG1KA7YpDdimNGCb0oBtTF4pMyOLs4XFPvAZKA3YJsbA
iQ7QGoiSMIS2r0FLuAERhVKC6+4ivPY798lePjJssu8r2cZ1d6Oqlfrqh4jD1pbiyvQnOuoaUA3W
pdgG3dPxF47cYPvt10BLmEytASCoDi7NXcTrPACmURyKvCYr3TLrDsIya0/fZy+z9qfv0d2xuJpV
ZhIWuuMfZCIqKPs33GYOEuPpzScSeQND0v898/oWIg4rH3tY4g8EbRKgctJcvAAAAABJRU5ErkJg
gg==
-16746133
SIM 卡,插槽:0
tel
voicemail
true
0
true
15
com.android.phone/com.android.services.telephony.TelephonyConnectionService
89860318747559832385
0
tel:
tel:
54
AAAAAQGJUE5HDQoaCgAAAA1JSERSAAAAMAAAADAIBgAAAFcC+YcAAAAEc0JJVAgICAh8CGSIAAAE
UUlEQVRoge2aXUxbZRjHf28ppVC+xhwfChsXTgWWmMUNxtTsws9djMRkmYlZNGrc0ESvnHPEbGUG
zeJITIwE0Qs10SzsTncxl01xEhR102HGoktwmBqKc2VAC7S0vF6ctnTCOT3teQvM+E9Octq+53n+
//c57/s8Pc+BmxxCtUEppWWbQgipgktKkFIKFeQB3G5pc7ulzcxYJQ4Tid+3/9f88HRW2naLcgoi
p46WB2J2k0XDsgAppdh1HNvxXSJyT/PgYST7QU4JhKkZXGAPQkLIPmHLPvRDxx0/a9EQc3rjLQlI
JL957+Drc/CaxsGSXQkIAT6EfPDHzrqfjESkNUuwOHkBkSgBKwdASEKJxHYgGY+0ZkqPvNQmRMW6
ikXBW1JQcvupo+UBvfWQcgSWgHwi8saDk1lGA1ISsMTkTcG0gJVIHkwKWKnkwYSAlUwewG70Yzrk
G2pcPHb/KmrWOikpsJOdLZiameOPv4L0Dvg59qUP/4xuXkoZhjMY27rMkLfboGV3BTsaixEGVq+M
hmh538NvnqCha7RtdCLLkV3V/876iZS30VTIAxx86laatmrkpYSBoWk+PePjoy+u0XNhktmw5ru6
zMGRPZXk5aSdQ2/AordQjHzDi5cLI6HZlwCMyG+7O5/t9UXRa6G9e5RjX/luGNNQ46L9hSqc2YKq
Uge7H1pN14mrlgUkX8Tz6V0XibfN1wOTC8gD9F8KcPL78fjn+rvyUuGpi6QChImdZl1ZTvz87AW/
7rjLnpn4eXGB4f5hGkqsnD4/QZFLy/gDQ1O645yO+fnyT0VUuFYj4L3Pzd3LG6pz4+e/e0MqXKdf
TqeKdWUOGuvyAQjPQXfPwnWSDpZMwL7Hy3E6tOV05twEl4ZnklxhDksiYO+ONWypdQHg9c3S3u1V
ZjvjAh6tL+Tp7bcAEApL2j4ZwTepZgFDhgVsujOPA09UYI966TpxlW8vBpT6yJiA9ZU5tD1bicup
ufis7zofnrym3E9GBJQW2zmyp5LVhVpu6P3Fz+GPRzLhSr2AvBwbbzVXsbbUAWhFXcsHf6p2E4dy
AW8+dxt11U4AhkaCvNLpYSqorv7/N5QKOPhkBfdu0JKVdyzMvk4Pf0+EVbpYAGUCmpvW0LS1GIDr
gQivdnkYHlVTLhhBSS20c9sqnonu9QD9gwG21LriyUsPg1em6bO4rSoR8MDGQmwJRfcjmwtNXdfd
M2ZZwJLVQpmCkgg8//awCjNp4aaPwP8Clhv/bQG5kaI5KTB8hJZJSAjlRooM65BFBQghpJRS9HSU
+oHe6NezWG8fmT1mNSJ809NR6jfqVupGoLVVex5kF6IN5BjgiOnL8EHU13iWtL2RyGUxGD60inUH
NzVf3IikVSIaxbyQjEBCCMF3ZHHo3Lu15y23WRPD9/DLXleynpVVpNroTpqJhRAy1vZ3u4XaP7Q6
iPkTQn/mY0ipw6LqXYhkWJaXPZYL/wCB0AHU2iuqMQAAAABJRU5ErkJggg==
-13408298
SIM 卡,插槽:1
tel
voicemail
true
1
true
15
验证了PhoneAccountHandle记录的ICCID,UserHandler和component_name与TeleService中创建的对象是一致的,另外,我们需要重点关注capabilties和supported_uri_schemes,即GsmCdmaPhone对象提供的通话能力和支持的URI。
PhoneAccount在拨号过程中的作用分析
Telecom系统应用中响应的拨号请求逻辑,里面最关键的就是CallManager对象里面的startOutgoingCall和placeOutgoingCall方法,他们分别创建Call对象和发起Connection请求,这两个方法都涉及PhoneAccount对象的使用和传递。
1.startOutgoingCall方法
CallIntentProcessor.processOutgoingCallIntent作为Telecom系统响应拨号请求的处理入口,通过Intent获取PhoneAccountHandler对象,并调用callManager.startOutgoingCall方法创建Call对象,因传入的PhoneAccountHandle对象为Null,联系两次mPhoneAccountRegistrar.getPhoneAccount(phoneAccountHandle, initiatingUser);均返回NULL,从而调用constructPossiblePhoneAccounts方法获取到由PhoneAccountRegistrar保存的已注册PhoneAccount对象 ,调用流程 调用顺序CallManager.startOutgoingCall -->findOutgoingCallPhoneAccount()-->
constructPossiblePhoneAccounts() -->
mPhoneAccountRegistrar.getCallCapablePhoneAccounts() -->
getPhoneAccountHandles() -->
getPhoneAccounts()
 private List getPhoneAccounts(
            int capabilities,
            int excludedCapabilities,
            String uriScheme,
            String packageName,
            boolean includeDisabledAccounts,
            UserHandle userHandle) {
        List accounts = new ArrayList<>(mState.accounts.size());
        for (PhoneAccount m : mState.accounts) {//循环TeleService注册PhoneAccount
            ......一些判断
            PhoneAccountHandle handle = m.getAccountHandle();
             ......
            accounts.add(m);
        }
        return accounts;
    }
startOutgoingCall中的逻辑根据拨号请求匹配到TeleService注册PhoneAccount对象通过call.setTargetPhoneAccount调用,将PhoneAccount与Call产生了关联。
2.placeOutgoingCall
placeOutgoingCall发起的拨号请求的主要调用过程如下: placeOutgoingCall-->call.startCreateConnection-->CreateConnectionProcessor.process-->attemptNextPhoneAccount。
CreateConnectionProcessor.attemptNextPhoneAccount方法中有关PhoneAccount的处理逻辑是mPhoneAccountRegistrar.phoneAccountRequiresBindPermission调用最终通过PackageManager判断Telephony提供的IConnectionService是否可用,代码
CreateConnectionProcessor.java

private void attemptNextPhoneAccount() {
............
            if (!attempt.connectionManagerPhoneAccount.equals(attempt.targetPhoneAccount) &&
                    !mPhoneAccountRegistrar.phoneAccountRequiresBindPermission(   //判断是否可用
                            attempt.targetPhoneAccount)) {
                Log.w(this,
                        "Target PhoneAccount does not have BIND_TELECOM_CONNECTION_SERVICE for "
                                + "attempt: %s", attempt);
                attemptNextPhoneAccount();
                return;
            }
        }
..........
}


PhoneAccountRegistrar.java

 private List resolveComponent(ComponentName componentName,
            UserHandle userHandle) {
        PackageManager pm = mContext.getPackageManager();
        Intent intent = new Intent(ConnectionService.SERVICE_INTERFACE);
        intent.setComponent(componentName);
        try {
            if (userHandle != null) {
                return pm.queryIntentServicesAsUser(intent, 0, userHandle.getIdentifier());
            } else {
                return pm.queryIntentServices(intent, 0);
            }
        } catch (SecurityException e) {
            Log.e(this, e, "%s is not visible for the calling user", componentName);
            return Collections.EMPTY_LIST;
        }
    }
3.createConnection
Telecom首先匹配到已注册的PhoneAccount,然后通过PhoneAccount判断TeleService提供的IConnectionService服务是否可用。在这两给条件都满足的请求下,createConnection继续发起拨号请求,否则调用notiyCallConnectionFailure
我们看一下CreateConnection中的BinderCallback内部类。这里开始创建连接传入一个PhoneAccount。setAccountHandle()和createConnection(call.getConnectionManagerPhoneAccount(),....)
......
  //通过通话相关信息的创建,ConnectionRequest支持系列化和反序列化
                ConnectionRequest connectionRequest = new ConnectionRequest.Builder()
                        .setAccountHandle(call.getTargetPhoneAccount())
...
mServiceInterface.createConnection( // 通过远程接口创建链接     利用远程接口创建一个通话链接   属于第二次宽进程访问
                            call.getConnectionManagerPhoneAccount(),
                            callId,
                            connectionRequest,
                            call.shouldAttachToExistingConnection(),
                            call.isUnknown(),
                            Log.getExternalSession());
........
创建的ConnectionRequest对象包含了PhoneAccount对象,调用IConnectionService服务接口createConnection传递PhoneAccount对象那个和ConnectionRequest对象
4.IConnectionSerivce
PhoneAccount对象转了一圈之后有回到了TeleService系统应用,在IConnectionSerivce的createConnection-->onCreateOutgoingConnectio(进入了TeleService中的TelephonyConnectionService类中)方法中,经过getPhoneForAccount调用最终获取了GsmCdmaPhone对象。
GsmCdmaPhone与PhoneAccountHandle对象是怎么对应起来的呢,我们通过代码可以看到 ,通过PhoneAccountHandle的mId即ICCID与GsmCdmaPhone对象进行的关联,其核心逻辑详情如下:
private Phone getPhoneForAccount(PhoneAccountHandle accountHandle, boolean isEmergency) {
        Phone chosenPhone = null;

        int subId = PhoneUtils.getSubIdForPhoneAccountHandle(accountHandle);
        if(subId == SubscriptionManager.INVALID_SUBSCRIPTION_ID ) {
           ....
        }
        if (subId != SubscriptionManager.INVALID_SUBSCRIPTION_ID) {
            int phoneId = mSubscriptionManagerProxy.getPhoneId(subId);
            chosenPhone = mPhoneFactoryProxy.getPhone(phoneId);
        } else {
            for (Phone phone : mPhoneFactoryProxy.getPhones()) {
                Call call = phone.getRingingCall();
                if (call.getState().isRinging()) {
                    return phone;
                }
            }
         }
        return chosenPhone;
    }
5.扩展来电流程
回到TeleService系统处理来电请求,它使用TelecomManager发起对addNewIncomingCall的调用过程:
PstnincomingCallNotifier.handleNewRingingConnection-->sendIncomingCallIntent,其关键的处理逻辑详情如下。
PstnIncomingCallNotifier-->handleNewRingingConnection() -->sendIncomingCallIntent()
关键代码如下:
 //创建本地PhoneAccountHandler对象
PhoneAccountHandle handle = findCorrectPhoneAccountHandle();
TelecomManager.from(mPhone.getContext()).addNewIncomingCall(handle, extras);//跨进程调用Telecom
findCorrectPhoneAccountHanle方法首先通过GsmCdmaPhone对象ICCID,然后创建“com.android.phone”和"com.android.services.telephony.TelephonyConnectionService"类型的ComponentName对象,最终构造PhoneAcountHandler对象。
这里Telecom系统应用中的TelecomServiceImpl响应TeleService应用跨进程服务接口调用,将检查调用方法是否合法:
 mAppOpsManager.checkPackage(
                                    Binder.getCallingUid(),
                                    phoneAccountHandle.getComponentName().getPackageName());
AppOspManager.checkPackage是Android系统提供的接口用来判断UID与package name是否一致,不一致将抛出SecurityException异常。Binder.getCallingUid()将获取到TeleService系统应用即com.android.phone进程的UID,传入的package name则是"com.android.phone",加上对TelephonyUtil.isPstnComponetName的判断。所以非TeleService系统应用调用TelecomManager的addNewIncomingCall方法时抛出SecurityException异常,增强了服务接口的安全性。
Telecom系统应用接收到来电消息,创建Call对象后向TeleService系统应用发起CreateConnection请求,与拨号流程中PhoneAccount的作用一致。
小结
PhoneAccount是在TeleService系统应用中创建的,通过PhoneAccountHandle的id来标识或关联GsmCdmaPhone对象,ComponentName对象则用来标识IConnectionService服务。Telecom系统应用接收到PhoneAccount注册后,将保存在PhoneAccountRegistrar对象的List
产生通话业务是,Telecom系统应用根据List
PhoneAccount结构图:


