SpringBoot缓存原理介绍和使用
(一)JSR107缓存
1.简介
JCache规范定义了一种对Java对象临时在内存中进行缓存的方法,包括对象的创建、共享访问、假脱机(spooling)、失效、各JVM的一致性等,可被用于缓存JSP内最经常读取的数据,如产品目录和价格列表。利用JCACHE,多数查询的反应时间会因为有缓存的数据而加快(内部测试表明反应时间大约快15倍)。
2.核心接口
-
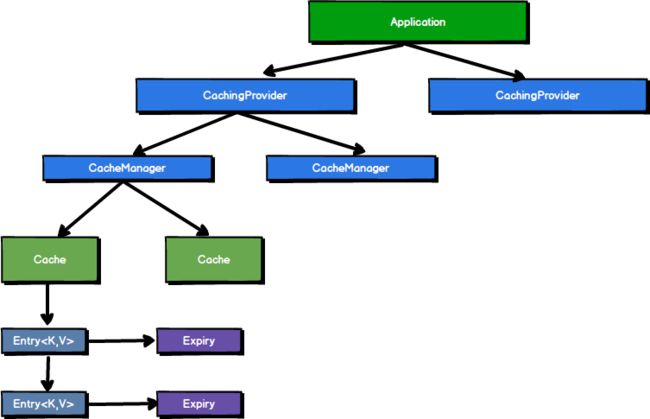
CachingProvider:定义了创建、配置、获取、管理和控制多个CacheManager。一个应用可以在运行期间访问多个CachingProvider
-
CacheManager:定义了创建、配置、获取、管理和控制多个唯一命名的Cache,这些Cache存在于CacheManage的上下文中,一个CacheManage只被一个CachingProvider拥有
-
Cache:类似于Map的数据结构并临时储存以key为索引的值,一个Cache仅仅被一个CacheManage所拥有
-
Entry:存储在Cache中的key-value对
-
Expiry:存储在Cache的条目有一个定义的有效期,一旦超过这个时间,就会设置过期的状态,过期无法被访问,更新,删除。缓存的有效期可以通过ExpiryPolicy设置。
(二)自动配置原理
- 在
CacheAutoConfiguration自动配置类中封装了对缓存的操作。
@Import注解的作用是向容器中加入CacheConfigurationImportSelector(缓存配置选择器),通过这个选择器判断选择了什么缓存配置。
@Import({CacheAutoConfiguration.CacheConfigurationImportSelector.class})
...
static class CacheConfigurationImportSelector implements ImportSelector {
    CacheConfigurationImportSelector() {
    }
    public String[] selectImports(AnnotationMetadata importingClassMetadata) {
        CacheType[] types = CacheType.values();
        String[] imports = new String[types.length];

        for(int i = 0; i < types.length; ++i) {
            imports[i] = CacheConfigurations.getConfigurationClass(types[i]);
        }

        return imports;
    }
}
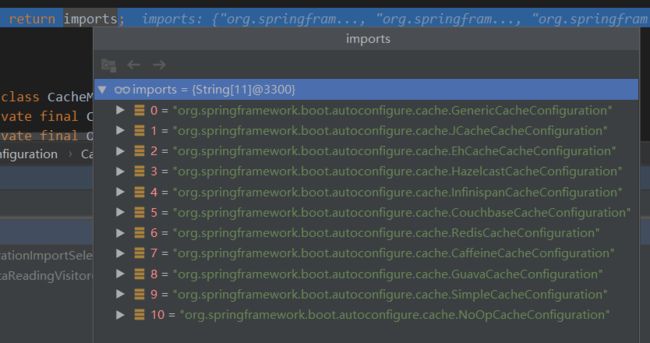
CacheConfigurationImportSelector类的作用是扫描所有的缓存配置并存放在imports数组中进行返回。如下图所示可以看到所有扫描到的自动配置类:
- 以
GenericCacheConfiguration自动配置类为例,@Conditional()注解表示,当容器存在Cache.class组件并且不存在CacheManager.class组件时,这个缓存配置类才会生效。
@Configuration
@ConditionalOnBean({Cache.class})
@ConditionalOnMissingBean({CacheManager.class})
@Conditional({CacheCondition.class})
class GenericCacheConfiguration {
	...
- 在配置文件中添加
debug=true来打印配置报告,在控制台可以看到SimpleCacheConfiguration匹配成功。

- 而
SimpleCacheConfiguration配置类的作用是给容器中添加ConcurrentMapCacheManager缓存管理器。
@Bean
public ConcurrentMapCacheManager cacheManager() {
	...
- 而
ConcurrentMapCacheManager缓存管理器的作用是获取和创建ConcurrentMapCacheManager类型的缓存组件,之后将数据保存在ConcurentMap中。
private final ConcurrentMap<String, Cache> cacheMap = new ConcurrentHashMap<String, Cache>(16);
运行流程
6. 方法运行之前,按照cacheNames指定的名字,先去查询Cache缓存组件。如果没有,则会自动创建。
public Cache getCache(String name) {
	Cache cache = this.cacheMap.get(name);
	if (cache == null && this.dynamic) {	//第一次运行是,cache为null
		synchronized (this.cacheMap) {
			cache = this.cacheMap.get(name);
			if (cache == null) {
				cache = createConcurrentMapCache(name);
				this.cacheMap.put(name, cache);	//创建后存放在cacheMap内
			}
		}
	}
	return cache;
}
- 使用一个key去Cache中查找缓存的内容,默认是方法的参数值。而key是按照某种策略生成的
protected Object lookup(Object key) {
	return this.store.get(key);
}
(三)SpringBoot缓存抽象
1.基本概念
| 功能 | |
|---|---|
| Cache | 缓存接口,定义缓存操作,实现有:RedisCache、EhCacheCache、ConcurrentMapCache等 |
| CacheManager | 缓存管理器,管理各种缓存(Cache)组件 |
| @Cacheable | 针对方法配置,根据方法的请求参数对其结果进行缓存 |
| @CacheEvict | 清空缓存 |
| @CachePut | 保证方法被调用,又希望结果被缓存 update,调用,将信息更新缓存 |
| @EnableCaching | 开启基于注解的缓存 |
| KeyGenerator | 缓存数据时key生成的策略 |
| serialize | 缓存数据时value序列化策略 |
项目整合
- 新建SpringBoot Web项目,加入MySQL,Mybatis,Redis依赖。部分
pom.xml配置文件如下:
 <dependencies>
        <dependency>
            <groupId>org.springframework.bootgroupId>
            <artifactId>spring-boot-starter-data-redisartifactId>
        dependency>
        <dependency>
            <groupId>org.springframework.bootgroupId>
            <artifactId>spring-boot-starter-webartifactId>
        dependency>
        <dependency>
            <groupId>org.mybatis.spring.bootgroupId>
            <artifactId>mybatis-spring-boot-starterartifactId>
            <version>1.3.4version>
        dependency>
        <dependency>
            <groupId>mysqlgroupId>
            <artifactId>mysql-connector-javaartifactId>
            <scope>runtimescope>
        dependency>
        <dependency>
            <groupId>org.springframework.bootgroupId>
            <artifactId>spring-boot-starter-testartifactId>
            <scope>testscope>
        dependency>
    dependencies>
- 编写
application.properties配置文件,加入MySQL连接配置。
spring.datasource.driver-class-name=com.mysql.jdbc.Driver
spring.datasource.url=jdbc:mysql://localhost:3306/spring_cache?useSSL=false&allowPublicKeyRetrieval=true&serverTimezone=GMT%2B8
spring.datasource.username=root
spring.datasource.password=123456
# 开启驼峰命名匹配
mybatis.configuration.map-underscore-to-camel-case=true
# 打印sql
logging.level.com.cuzz.cache.mapper=debug
# 可以打印配置报告
debug=true
- 创建一个名为
Department和Employee的bean实例,并继承Serializable接口,原因是需要将这个实例化对象进行序列化后才能存放在缓存中。
public class Department implements Serializable {
    private Integer id;
    private String deptName;

    public Department(){}
    public Department(Integer id, String deptName) {
        this.id = id;
        this.deptName = deptName;
    }
    //Getter and Setter

public class Employee implements Serializable {
    private Integer id;
    private String lastName;
    private String gender;
    private String email;
    private Integer dId;

	public Employee() {}
    public Employee(Integer id, String lastName, String gender, String email, Integer dId) {
       this.id = id;
       this.lastName = lastName;
       this.gender = gender;
       this.email = email;
       this.dId = dId;
   }
    //Getter and Setter
}
- 创建Mapper接口映射数据库,用于访问数据库中的数据。
@Mapper
public interface EmployeeMapper {
    @Select("SELECT * FROM employee WHERE id = #{id}")
    Employee getEmployeeById(Integer id);

    @Update("UPDATE employee SET last_name=#{lastName},email=#{email},gender=#{gender},d_id=#{dId} WHERE id=#{id}")
    void updateEmp(Employee employee);

    @Delete("DELETE FROM employee WHERE employee.id=#{id}")
    void deleteEmp(Integer id);

    @Select("SELECT * FROM employee WHERE last_name=#{lastName}")
    Employee getEmpByLastName(String lastName);
}
- 在主程序中添加
@MapperScan注解,用于扫描配置的Mapper接口。同时使用@EnableCaching注解开启缓存。
@MapperScan("com.kellen5l.tool.mapper.EmployeeMapper")
@EnableCaching
@SpringBootApplication
public class SpringBootCacheTestApplication {
    public static void main(String[] args) {
        SpringApplication.run(SpringBootCacheTestApplication.class, args);
    }
}
- 编写
EmployeeService类用于调用Mapper中的方法来取得数据库中的数据,并进行缓存。
@Service
public class EmployeeService {
   @Autowired
   EmployeeMapper employeeMapper;

   @Cacheable(cacheNames = "emp")
   public Employee getEmployee(Integer id) {
       System.out.println("----> 查询" + id + "号员工");
       return employeeMapper.getEmployeeById(id);
   }
}
CacheManager中管理多个Cache组件,对缓存的真正CRUD操作在Cache组件中,每个缓存组件都有自己的唯一名字。以Cacheable类位列,在其中可以看到更多的属性。
- cacheNames/value:指定存储缓存组件的名字
- key:缓存数据使用的key,可以使用它来指定。默认是使用方法参数的值,1-方法的返回值。编写Spel表达式:#id 参数id的值, #a0/#p0 #root.args[0]
- keyGenerator:key的生成器,自己可以指定key的生成器的组件id
- cacheManager:指定Cache管理器,或者cacheReslover指定获取解析器
- condition:指定符合条件的情况下,才缓存;
- unless:否定缓存,unless指定的条件为true,方法的返回值就不会被缓存,可以获取到结果进行判断
- sync:是否使用异步模式
public @interface Cacheable {
	@AliasFor("cacheNames")
	String[] value() default {};

	@AliasFor("value")
	String[] cacheNames() default {};

	String key() default "";

	String keyGenerator() default "";

	String cacheManager() default "";

	String cacheResolver() default "";

	String condition() default "";

	String unless() default "";

	boolean sync() default false;
}
- 使用Postman进行接口测试,可以看到只有第一次查询会执行查询数据库操作,之后的查询都会使用缓存中存放的序列化数据。
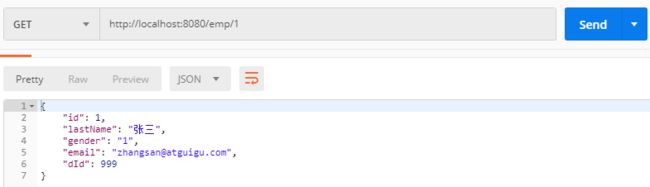
可以看到多次查询但只执行了一次查询方法。
