ES集群的安装与插件的使用
ES集群安装
1)ELK是日志分析平台,不是一款软件,而是一整套解决方案,是三个软件产品的首字母缩写,ELK分别代表:
Elasticsearch:负责日志检索和储存
Logstash:负责日志的收集和分析、处理
Kibana:负责日志的可视化
2) ELK组件在海量日志系统的运维中,可用于解决分布式日志数据集中式查询和管理系统监控等,故障排查,安全信息和事件管理,报表功能
部署Elasticsearch分布式集群安装,Kibana作为可视化平台,实时总结流量和数据的图表,Logstash用来收集处理日志
 1.3 步骤
实现此案例需要按照如下步骤进行。
步骤一:先准备一台虚拟机
1)更改主机名,配置IP,搭建第三方yum源
    [root@se1 ~]# echo se1 > /etc/hostname
    [root@se1 ~]# vim /etc/sysconfig/network-scripts/ifcfg-eth0
    # Generated by dracut initrd
    DEVICE="eth0"
    ONBOOT="yes"
    IPV6INIT="no"
    IPV4_FAILURE_FATAL="no"
    NM_CONTROLLED="no"
    TYPE="Ethernet"
    BOOTPROTO="static"
    IPADDR=192.168.1.51
    PREFIX=24
    GATEWAY=192.168.1.254
    [root@se1 ~]# vim /etc/yum.repos.d/local.repo
    [local_repo]
    name=CentOS-$releasever - Base
    baseurl="ftp://192.168.1.254/system"
    enabled=1
    gpgcheck=1
    [elk]
    name=elk
    baseurl="ftp://192.168.1.254/elk"
    enabled=1
    gpgcheck=0
2)部署elasticsearch第一个节点
    [root@se1 ~]# vim /etc/hosts
    192.168.1.51 es1
    192.168.1.52 es2
    192.168.1.53 es3
    192.168.1.54 es4
    192.168.1.55 es5
    [root@es1 ~]# yum -y install java-1.8.0-openjdk.x86_64
    [root@es1 ~]# java -version
    openjdk version "1.8.0_161"
    OpenJDK Runtime Environment (build 1.8.0_161-b14)
    OpenJDK 64-Bit Server VM (build 25.161-b14, mixed mode)
    [root@es1 ~]# sestatus  //查看selinux状态
    SELinux status:                 disabled
    [root@es1 ~]# yum -y install elasticsearch
    [root@es1 ~]# vim /etc/elasticsearch/elasticsearch.yml
    17 cluster.name: myelk        //配置集群名字
    23 node.name: es1        //当前主机名称
    54 network.host: 0.0.0.0     // 0.0.0.0(监听所有地址)
    68 discovery.zen.ping.unicast.hosts: ["es1", "es2", "es3"]
    //声明集群里的主机成员有谁,不需要全部写进去
    [root@es1 ~]# systemctl restart elasticsearch
    [root@es1 ~]# systemctl enable elasticsearch
    [root@es1 ~]# ss -antup | grep 9200
    [root@es1 ~]# ss -antup | grep 9300
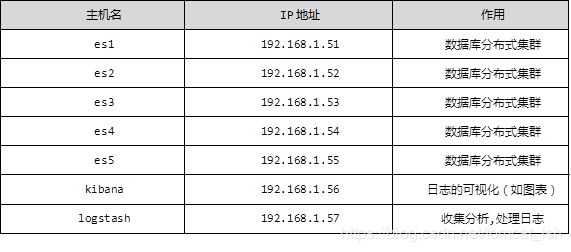
3)访问9200端口查看是否安装成功,如图-1所示:
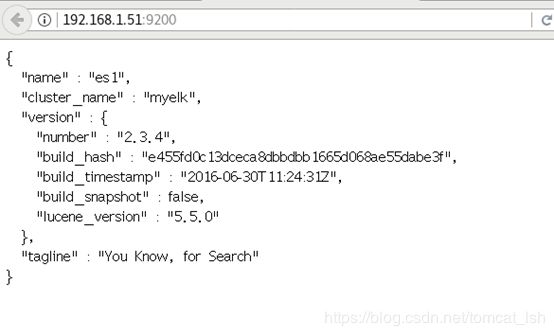
图-1
2 案例2:ES集群安装配置
2.1 问题
本案例要求:
一共安装5台虚拟机
在所有机器中部署ES
启动服务查看验证集群状态
2.2 步骤
实现此案例需要按照如下步骤进行。
步骤一:安装elasticsearch和java-1.8.0-openjdk,同步配置文件
备注:在步骤一已经安装了一台elasticsearch,这里只需再准备四台即可
1)更改对应的主机名、 ip地址以及搭建yum源(以案例1为例子)
2)安装elasticsearch四台主机同样操作(以es2为例子)
[root@es2 ~]# yum -y install java-1.8.0-openjdk.x86_64
[root@es2 ~]# yum -y install elasticsearch
3)同步配置/etc/hosts和/etc/elasticsearch/elasticsearch.yml, 修改node.name字段(以es2为例子)
[root@es1 ~]# for i in {52..55} ; do scp /etc/hosts 192.168.1.$i:/etc/hosts; done
[root@es1 ~]# for i in {52..55} ; do scp  \
/etc/elasticsearch/elasticsearch.yml \
192.168.1.$i:/etc/elasticsearch/elasticsearch.yml; done
[root@es2 ~]# vim /etc/elasticsearch/elasticsearch.yml
node.name: es2    //另外三台修改为对应es3,es4,es5
[root@es2 ~]# systemctl restart elasticsearch
[root@es2 ~]# systemctl enable elasticsearch
4)访问测试,如图-2所示:
可以访问61-65的任意一台主机, 集群的节点都是5台,若先启动的是es4或es5,这两个会自动成为各自的集群,解决办法,先启动集群里的es1或es2或es3其中的一台,或者把es4和es5重启,es4和es5会自动加进去
ES 集群验证:返回字段解析:
”status”: ”green“ 集群状态:绿色为正常、黄色表示有问题但不是很严重、红色表示严重故障
”number_of_nodes”: 5, 表示集群中节点的数量
[student@room9pc01 ~]$ firefox http://192.168.1.51:9200/_cluster/health?pretty
3 案例3:练习插件
3.1 问题
本案例要求:
在其中一台机器上部署插件
使用bigdesk查看集群状态
使用head创建index
使用kopf查看数据
3.2 步骤
实现此案例需要按照如下步骤进行。
步骤一:部署插件
插件装在哪一台机器上,只能在哪台机器上使用(这里安装在es5机器上面)
1)使用远程 uri 路径可以直接安装
[root@es5 ~]# cd /usr/share/elasticsearch/bin
[root@es5 bin]# ./plugin  install  \
ftp://192.168.1.254/elk/elasticsearch-head-master.zip        //安装head插件
[root@es5 bin]# ./plugin  install  \
ftp://192.168.1.254/elk/elasticsearch-kopf-master.zip        //安装kopf插件
[root@es5 bin]# [root@se5 bin]# ./plugin install  \
 ftp://192.168.1.254/elk/bigdesk-master.zip
//安装bigdesk插件
[root@es5 bin]# ./plugin  list        //查看安装的插件
Installed plugins in /usr/share/elasticsearch/plugins:
    - head
    - kopf
    - bigdesk
2)访问head插件,如图-4所示:
[student@room9pc01 ~]$ firefox http://192.168.1.55:9200/_plugin/head
图-4
3)访问kopf插件,如图-5所示:
[student@room9pc01 ~]$ firefox http://192.168.1.55:9200/_plugin/kopf
图-5
4)访问bigdesk插件,如图-6所示:
[student@room9pc01 ~]$ firefox http://192.168.1.55:9200/_plugin/bigdesk
图-6
步骤二:使用head创建index
[root@es5 bin]# curl -X PUT "http://192.168.1.55:9200/index" -d '
> {
>     "settings":{
>     "index":{
>     "number_of_shards":5,        //分片数
>     "number_of_replicas":1        //副本数
>    }
>   }
> }'
{"acknowledged":true}
步骤三:使用kopf查看数据,如图-7所示:
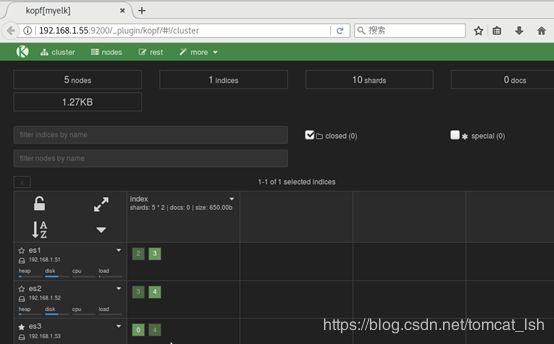
图-7
4 案例4:插入,增加,删除查询数据
4.1 问题
本案例要求:
使用curl命令连接使用ES数据库
使用PUT方法增加数据
使用POST修改数据
使用GET查询数据
使用DELETE删除数据
4.2 步骤
实现此案例需要按照如下步骤进行。
步骤一:增加数据
[root@es5 ~]# curl -X PUT "http://192.168.1.55:9200/tedu/teacher/1" -d '{
"职业":"诗人",
"名字":"李白",
"称号":"诗仙",
"年代":"唐"
}'
{"_index":"tedu","_type":"teacher","_id":"1","_version":1,"_shards":{"total":2,"successful":2,"failed":0},"created":true}
步骤二:修改数据
[root@es5 ~]# curl -X PUT "http://192.168.1.55:9200/tedu/teacher/1" -d '{
 "doc":{
 "年代": "唐代"
 }
 }'
{"_index":"tedu","_type":"teacher","_id":"1","_version":3,"_shards":{"total":2,"successful":2,"failed":0},"created":false}
步骤三:查询数据
[root@es5 ~]#  curl -X GET "http://192.168.1.55:9200/tedu/teacher/3?pretty"
{
  "_index" : "tedu",
  "_type" : "teacher",
  "_id" : "3",
  "found" : false
}
步骤四:删除数据
[root@es5 ~]# curl -X DELETE "http://192.168.1.55:9200/tedu/teacher/3?pretty"
{
  "found" : false,
  "_index" : "tedu",
  "_type" : "teacher",
  "_id" : "3",
  "_version" : 1,
  "_shards" : {
    "total" : 2,
    "successful" : 2,
    "failed" : 0
  }
}
步骤五:删除索引
[root@es5 bin]# curl -X DELETE http://192.168.1.55:9200/tedu/
//删除索引
{"acknowledged":true}
[root@es5 bin]# curl -X DELETE http://192.168.1.65:9200/*      //删除所有索引
{"acknowledged":true}
5 案例5:导入数据
5.1 问题
本案例要求批量导入数据:
使用 curl 命名为集群批量导入数据,并查看
5.2 步骤
实现此案例需要按照如下步骤进行。
步骤一:导入数据
使用POST方式批量导入数据,数据格式为json,url 编码使用data-binary导入含有index配置的json文件
[student@room9pc01 ~]$ scp  /var/ftp/elk/*.gz [email protected]:/root/
[root@kibana ~]# gzip  -d logs.jsonl.gz
[root@kibana ~]# curl -X POST "http://192.168.1.51:9200/_bulk"  \
--data-binary @logs.jsonl
2)使用GET查询结果
[root@kibana ~]# curl -XGET 'http://192.168.1.51:9200/_mget?pretty' -d '{
 "docs":[
     {
        "_index":"shakespeare",
        "_type:":"act",
        "_id":0
},
{
        "_index":"shakespeare",
        "_type:":"line",
        "_id":0
},
{
        "_index":"tedu",
        "_type:":"teacher",
        "_id":25
}
]
}'
{        //查询的结果
  "docs" : [ {
    "_index" : "shakespeare",
    "_type" : "act",
    "_id" : "0",
    "_version" : 1,
    "found" : true,
    "_source" : {
      "line_id" : 1,
      "play_name" : "Henry IV",
      "speech_number" : "",
      "line_number" : "",
      "speaker" : "",
      "text_entry" : "ACT I"
    }
  }, {
    "_index" : "shakespeare",
    "_type" : "act",
    "_id" : "0",
    "_version" : 1,
    "found" : true,
    "_source" : {
      "line_id" : 1,
      "play_name" : "Henry IV",
      "speech_number" : "",
      "line_number" : "",
      "speaker" : "",
      "text_entry" : "ACT I"
    }
  }, {
    "_index" : "xixi",
    "_type" : "haha",
    "_id" : "25",
    "_version" : 1,
    "found" : true,
    "_source" : {
      "account_number" : 25,
      "balance" : 40540,
      "firstname" : "Virginia",
      "lastname" : "Ayala",
      "age" : 39,
      "gender" : "F",
      "address" : "171 Putnam Avenue",
      "employer" : "Filodyne",
      "email" : "[email protected]",
      "city" : "Nicholson",
      "state" : "PA"
    }
  } ]
}