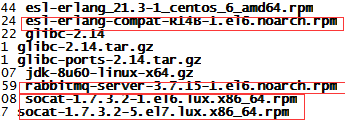
centos 安装rabbitmq
rabbitmq需要依赖Erlang,Erlang,socat需要依赖epel-release,所以需要先安装epel-release
1、安装必要依赖包
yum install build-essential openssl openssl-devel unixODBC unixODBC-devel make gcc gcc-c++ kernel-devel m4 ncurses-devel tk tc xz2、安装erlang
下载地址:https://www.erlang-solutions.com/resources/download.html
[root@liu package]# rpm -ivh esl-erlang_21.3-1_centos_6_amd64.rpm
warning: esl-erlang_21.3-1_centos_6_amd64.rpm: Header V4 RSA/SHA1 Signature, key ID a14f4fca: NOKEY
error: Failed dependencies:
        libwx_baseu-2.8.so.0()(64bit) is needed by esl-erlang-21.3-1.x86_64
        libwx_baseu-2.8.so.0(WXU_2.8)(64bit) is needed by esl-erlang-21.3-1.x86_64
        libwx_baseu_xml-2.8.so.0()(64bit) is needed by esl-erlang-21.3-1.x86_64
        libwx_gtk2u_adv-2.8.so.0()(64bit) is needed by esl-erlang-21.3-1.x86_64
        libwx_gtk2u_adv-2.8.so.0(WXU_2.8)(64bit) is needed by esl-erlang-21.3-1.x86_64
        libwx_gtk2u_aui-2.8.so.0()(64bit) is needed by esl-erlang-21.3-1.x86_64
        libwx_gtk2u_aui-2.8.so.0(WXU_2.8)(64bit) is needed by esl-erlang-21.3-1.x86_64
        libwx_gtk2u_aui-2.8.so.0(WXU_2.8.5)(64bit) is needed by esl-erlang-21.3-1.x86_64
        libwx_gtk2u_core-2.8.so.0()(64bit) is needed by esl-erlang-21.3-1.x86_64
        libwx_gtk2u_core-2.8.so.0(WXU_2.8)(64bit) is needed by esl-erlang-21.3-1.x86_64
        libwx_gtk2u_core-2.8.so.0(WXU_2.8.10)(64bit) is needed by esl-erlang-21.3-1.x86_64
        libwx_gtk2u_gl-2.8.so.0()(64bit) is needed by esl-erlang-21.3-1.x86_64
        libwx_gtk2u_gl-2.8.so.0(WXU_2.8)(64bit) is needed by esl-erlang-21.3-1.x86_64
        libwx_gtk2u_html-2.8.so.0()(64bit) is needed by esl-erlang-21.3-1.x86_64
        libwx_gtk2u_html-2.8.so.0(WXU_2.8)(64bit) is needed by esl-erlang-21.3-1.x86_64
        libwx_gtk2u_stc-2.8.so.0()(64bit) is needed by esl-erlang-21.3-1.x86_64
        libwx_gtk2u_stc-2.8.so.0(WXU_2.8)(64bit) is needed by esl-erlang-21.3-1.x86_64
        libwx_gtk2u_xrc-2.8.so.0()(64bit) is needed by esl-erlang-21.3-1.x86_64
        libwx_gtk2u_xrc-2.8.so.0(WXU_2.8)(64bit) is needed by esl-erlang-21.3-1.x86_64
3、安装缺少的依赖包
[root@liu package]# yum install unixODBC unixODBC-devel wxBase wxGTK SDL wxGTK-gl4、安装erlang兼容包和socat包
[root@liu ~]# wget https://raw.githubusercontent.com/jasonmcintosh/esl-erlang-compat/master/rpmbuild/RPMS/noarch/esl-erlang-compat-R14B-1.el6.noarch.rpm
[root@liu ~]# wget http://repo.iotti.biz/CentOS/7/x86_64/socat-1.7.3.2-5.el7.lux.x86_64.rpm
[root@liu ~]# rpm -ivh esl-erlang-compat-R14B-1.el6.noarch.rpm
[root@liu ~]#  rpm -ivh socat-1.7.3.2-5.el7.lux.x86_64.rpm
5、安装socat包报错
[root@liu package]# rpm -ivh socat-1.7.3.2-5.el7.lux.x86_64.rpm
warning: socat-1.7.3.2-5.el7.lux.x86_64.rpm: Header V4 DSA/SHA1 Signature, key ID 53e4e7a9: NOKEY
error: Failed dependencies:
        libc.so.6(GLIBC_2.14)(64bit) is needed by socat-1.7.3.2-5.el7.lux.x86_64
解决方法:
#查看GLIBC版本
[root@liu package]# strings /lib64/libc.so.6 | grep GLIBC
GLIBC_2.2.5
GLIBC_2.2.6
GLIBC_2.3
GLIBC_2.3.2
GLIBC_2.3.3
GLIBC_2.3.4
GLIBC_2.4
GLIBC_2.5
GLIBC_2.6
GLIBC_2.7
GLIBC_2.8
GLIBC_2.9
GLIBC_2.10
GLIBC_2.11
GLIBC_2.12
#下载
[root@liu package]# wget http://ftp.gnu.org/gnu/glibc/glibc-2.14.tar.gz
#安装
[root@liu package]# tar -zxvf glibc-2.14.tar.gz
[root@liu package]# tar -zxvf glibc-ports-2.14.tar.gz
[root@liu package]# mv glibc-ports-2.14 glibc-2.14/ports
[root@liu package]# mkdir glibc-2.14/build
[root@liu package]# cd glibc-2.14/build
[root@liu build]# ../configure  --prefix=/usr --disable-profile --enable-add-ons --with-headers=/usr/include --with-binutils=/usr/bin
[root@liu build]# make
[root@liu build]# make install
[root@liu build]# strings /lib64/libc.so.6 |grep GLIBC
GLIBC_2.2.5
GLIBC_2.2.6
GLIBC_2.3
GLIBC_2.3.2
GLIBC_2.3.3
GLIBC_2.3.4
GLIBC_2.4
GLIBC_2.5
GLIBC_2.6
GLIBC_2.7
GLIBC_2.8
GLIBC_2.9
GLIBC_2.10
GLIBC_2.11
GLIBC_2.12
GLIBC_2.13
GLIBC_2.14
然后你会发现上面一顿操作没毛用,还是报上面错误,这是很多第一次照别人安装掉进去的坑,注意要使用自己的版本:
注意细节,不用多说
rabbitmq下载地址:https://www.rabbitmq.com/download.html
7、安装rabbitmq
[root@liu package]# rpm -ivh rabbitmq-server-3.7.15-1.el6.noarch.rpm 8、启动mq
[root@liu package]# /sbin/service rabbitmq-server start[root@liu package]# netstat -tunlp |grep 5672
tcp 0 0 0.0.0.0:25672 0.0.0.0:* LISTEN 38515/beam.smp
tcp 0 0 :::5672 :::* LISTEN 38515/beam.smp
9、启动mq管理界面
[root@liu package]# rabbitmq-plugins enable rabbitmq_management
[root@liu package]# netstat -tunlp |grep 5672
tcp        0      0 0.0.0.0:25672               0.0.0.0:*                   LISTEN      38515/beam.smp
tcp        0      0 0.0.0.0:15672               0.0.0.0:*                   LISTEN      38515/beam.smp
tcp        0      0 :::5672                     :::*                        LISTEN      38515/beam.smp
10、添加账户和权限
#添加用户密码
[root@liu package]# rabbitmqctl add_user admin Zaq1xsw
Adding user "admin" ...
#设置用户标签
[root@liu package]# rabbitmqctl set_user_tags admin administrator
Setting tags for user "admin" to [administrator] ...
设置用户权限
[root@liu package]# rabbitmqctl set_permissions -p / admin '.*' '.*' '.*'
Setting permissions for user "admin" in vhost "/" ...
