Mybatis源码解析(一) SqlSessionFactory 初始化
文章目录
- SqlSessionFactory
- 创建一个SqlSessionFactory
- mappers 配置
- Xml映射文件解析
- XML映射文件解析流程
- 解析XML映射文件
- Xml映射文件<->接口绑定
SqlSessionFactory
每个基于 MyBatis 的应用都是以一个 SqlSessionFactory 的实例为核心的。SqlSessionFactory 的实例可以通过 SqlSessionFactoryBuilder 获得。而 SqlSessionFactoryBuilder 则可以从 XML 配置文件或一个预先定制的 Configuration 的实例构建出 SqlSessionFactory 的实例。
创建一个SqlSessionFactory
从 XML 文件中构建 SqlSessionFactory 的实例非常简单,建议使用类路径下的资源文件进行配置。 但是也可以使用任意的输入流(InputStream)实例,包括字符串形式的文件路径或者 file:// 的 URL 形式的文件路径来配置。MyBatis 包含一个名叫 Resources 的工具类,它包含一些实用方法,可使从 classpath 或其他位置加载资源文件更加容易。
SqlSessionFactoryBuilder#build
public SqlSessionFactory build(Configuration config) {
  return new DefaultSqlSessionFactory(config);
}
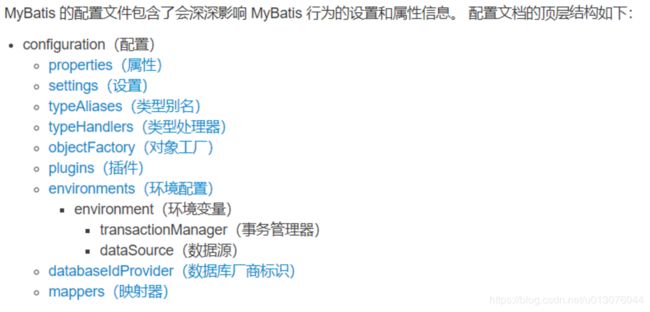
这个configurations 可以自己构造,也可以通过配置mybatis的xml,对应配置介绍如下
http://www.mybatis.org/mybatis-3/zh/configuration.html
mappers 配置
这里重点说一下 mappers 这个元素的配置,因为之前我直接使用这个Configuration自己进行构造,发现xml并没有被解析,后面发现在这里的进行mappers的进行解析的时候,做了一步操作,就是把mapper进行解析
private void mapperElement(XNode parent) throws Exception {
  if (parent != null) {
    for (XNode child : parent.getChildren()) {
      if ("package".equals(child.getName())) {
        String mapperPackage = child.getStringAttribute("name");
        configuration.addMappers(mapperPackage);
      } else {
        String resource = child.getStringAttribute("resource");
        String url = child.getStringAttribute("url");
        String mapperClass = child.getStringAttribute("class");
        if (resource != null && url == null && mapperClass == null) {
          ErrorContext.instance().resource(resource);
          InputStream inputStream = Resources.getResourceAsStream(resource);
          XMLMapperBuilder mapperParser = new XMLMapperBuilder(inputStream, configuration, resource, configuration.getSqlFragments());
          // 15 行
          mapperParser.parse();
        } else if (resource == null && url != null && mapperClass == null) {
          ErrorContext.instance().resource(url);
          InputStream inputStream = Resources.getUrlAsStream(url);
          XMLMapperBuilder mapperParser = new XMLMapperBuilder(inputStream, configuration, url, configuration.getSqlFragments());
          // 20 行
          mapperParser.parse();
        } else if (resource == null && url == null && mapperClass != null) {
          Class mapperInterface = Resources.classForName(mapperClass);
          configuration.addMapper(mapperInterface);
        } else {
          throw new BuilderException("A mapper element may only specify a url, resource or class, but not more than one.");
        }
      }
    }
  }
}
可以发现在 15行 和 20行 ,也就是 配置中的resource 和 url不为空的时候 。调用了一下 parse 的方法
也就是XML文件的解析,也就是下一章节,这里先看一下如何进行xml扫描配置
<mappers>
  <mapper resource="org/mybatis/builder/AuthorMapper.xml"/>
  <mapper resource="org/mybatis/builder/BlogMapper.xml"/>
  <mapper resource="org/mybatis/builder/PostMapper.xml"/>
mappers>

<mappers>
  <mapper url="file:///var/mappers/AuthorMapper.xml"/>
  <mapper url="file:///var/mappers/BlogMapper.xml"/>
  <mapper url="file:///var/mappers/PostMapper.xml"/>
mappers>
Xml映射文件解析
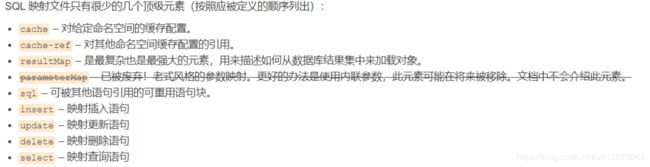
MyBatis 的真正强大在于它的映射语句,这是它的魔力所在。由于它的异常强大,映射器的 XML 文件就显得相对简单。如果拿它跟具有相同功能的 JDBC 代码进行对比,你会立即发现省掉了将近 95% 的代码。MyBatis 为聚焦于 SQL 而构建,以尽可能地为你减少麻烦。
上一章节讲到是XMLMapperBuilder 将XML映射文件进行解析
- 那么是如何解析的呢?
- 这个XMLMapperBuilder主要做了什么呢?
- XML 如何和 MapperInterface 的方法绑定的呢
我们接着上一节看, 把其中的涉及到 XML->MAPPER 一部分给拉下来
InputStream inputStream = Resources.getResourceAsStream(resource);
XMLMapperBuilder mapperParser = new XMLMapperBuilder(inputStream, configuration, resource, configuration.getSqlFragments());
mapperParser.parse();
XML映射文件解析流程
首先看一下parse方法,也就是解析整个XML文件
public void parse() {
  if (!configuration.isResourceLoaded(resource)) {
    // 0. 解析xml
    configurationElement(parser.evalNode("/mapper"));
    // 1. 标记已解析
    configuration.addLoadedResource(resource);
    // 2. 接口绑定
    bindMapperForNamespace();
  }

    parsePendingResultMaps();

   parsePendingCacheRefs();
   parsePendingStatements();
}
- 将mapper标签下的所有字标签进行解析,可以看到
configurationElement方法中包含了 获取命名空间、解析cache标签、cache-ref标签、parameterMap、ResultMap、sql、crud方法 - 绑定
MapperInterfaceClass和NameSpace绑定。 - 处理一些前面未处理完成的映射,因为xml解析的时候是一个文件一个文件解析的,所以当存在xml文件之后存在引用的关系的时候,可能会由于解析的先后顺序,导致的解析不全,示例如下:
CountryMapper.xml
	<select id="selectCountryUser" resultMap="com.wuhulala.springboot.mybatis.mapper.UserMapper.userMap"
	parameterType="long">
		xxxxx
	select>
相应的解决逻辑是:捕获IncompleteElementException异常之后,然后在任意一个xml解析完成之后处理这些没有解析成功的内容。这样即便是存在循环依赖也不会影响。但是这里处理的时候也有一些我认为的瑕疵,就是没有保存相互依赖之间的关系,从而会把所有的未解决的处理一遍,并不是只处理关联的,因为我看来这些都是和namespace相关联的。也许这就是粗暴简单的美吧
如:处理ResultMap
 private void parsePendingResultMaps() {
    Collection<ResultMapResolver> incompleteResultMaps = configuration.getIncompleteResultMaps();
    synchronized (incompleteResultMaps) {
      Iterator<ResultMapResolver> iter = incompleteResultMaps.iterator();
      while (iter.hasNext()) {
        try {
          iter.next().resolve();
          iter.remove();
        } catch (IncompleteElementException e) {
          // ResultMap is still missing a resource...
        }
      }
    }
  }
- xml 解析的所有内容会放在配置它的
configuration对象里面,也就是根据配置文件生成的那个对象。
解析XML映射文件
private void configurationElement(XNode context) {
    try {
      String namespace = context.getStringAttribute("namespace");
      if (namespace == null || namespace.equals("")) {
        throw new BuilderException("Mapper's namespace cannot be empty");
      }
      builderAssistant.setCurrentNamespace(namespace);
      cacheRefElement(context.evalNode("cache-ref"));
      cacheElement(context.evalNode("cache"));
      parameterMapElement(context.evalNodes("/mapper/parameterMap"));
      resultMapElements(context.evalNodes("/mapper/resultMap"));
      sqlElement(context.evalNodes("/mapper/sql"));
      buildStatementFromContext(context.evalNodes("select|insert|update|delete"));
    } catch (Exception e) {
      throw new BuilderException("Error parsing Mapper XML. The XML location is '" + resource + "'. Cause: " + e, e);
    }
  }
这里都是各个标签的处理逻辑,如果对更深入的有兴趣,可以点进去看看,我暂时没啥兴趣。。。
Xml映射文件<->接口绑定
所以我们只看一下bindMapperForNamespace方法,从方法名上看,是把Mapper绑定到NameSpace上
private void bindMapperForNamespace() {
  String namespace = builderAssistant.getCurrentNamespace();
  if (namespace != null) {
    Class<?> boundType = null;
    try {
      boundType = Resources.classForName(namespace);
    } catch (ClassNotFoundException e) {
      //ignore, bound type is not required
    }
    if (boundType != null) {
      if (!configuration.hasMapper(boundType)) {
        // Spring may not know the real resource name so we set a flag
        // to prevent loading again this resource from the mapper interface
        // look at MapperAnnotationBuilder#loadXmlResource
        configuration.addLoadedResource("namespace:" + namespace);
        configuration.addMapper(boundType);
      }
    }
  }
}
- 获取当前的
NameSpace,这里的NameSpace也就是上面的XMLMapperBuilder#configurationElement 去解析的。如下面的namespace就是com.wuhulala.springboot.mybatis.mapper.CountryMapper
- 加载绑定的namespace类,如果不存在,不处理。这样对应的namespace的mapper也不对
- 绑定 mapper接口 和 NameSpace ,并设置一下这个已被解析,其实在我们自己写代码的时候也应该设置一下这样的标志位,从而不对相同的资源进行重复处理。这样我们就会发现这里的Mapper指的就是MapperInterface,NameSpace就是一个命名空间,命名空间是不需要和Mapper绑定的,因为我们也可以直接通过
namespace + id进行调用。
在之前版本的 MyBatis 中,命名空间(Namespaces)的作用并不大,是可选的。 但现在,随着命名空间越发重要,你必须指定命名空间。
命名空间的作用有两个,一个是利用更长的完全限定名来将不同的语句隔离开来,同时也实现了你上面见到的接口绑定。就算你觉得暂时用不到接口绑定,你也应该遵循这里的规定,以防哪天你改变了主意。 长远来看,只要将命名空间置于合适的 Java 包命名空间之中,你的代码会变得更加整洁,也有利于你更方便地使用 MyBatis。