Part 3: The Boot Loader
终于到了boot loader部分了......
Floppy and hard disks for PCs are divided into 512 byte regions called sectors. A sector is the disk's minimum transfer granularity: each read or write operation must be one or more sectors in size and aligned on a sector boundary. If the disk is bootable, the first sector is called the boot sector, since this is where the boot loader code resides. When the BIOS finds a bootable floppy or hard disk, it loads the 512-byte boot sector into memory at physical addresses 0x7c00 through 0x7dff, and then uses a jmp instruction to set the CS:IP to 0000:7c00, passing control to the boot loader. Like the BIOS load address, these addresses are fairly arbitrary - but they are fixed and standardized for PCs.
- First, the boot loader switches the processor from real mode to 32-bit protected mode, because it is only in this mode that software can access all the memory above 1MB in the processor's physical address space. Protected mode is described briefly in sections 1.2.7 and 1.2.8 of PC Assembly Language, and in great detail in the Intel architecture manuals. At this point you only have to understand that translation of segmented addresses (segment:offset pairs) into physical addresses happens differently in protected mode, and that after the transition offsets are 32 bits instead of 16.
- Second, the boot loader reads the kernel from the hard disk by directly accessing the IDE disk device registers via the x86's special I/O instructions. If you would like to understand better what the particular I/O instructions here mean, check out the "IDE hard drive controller" section on the 6.828 reference page.
1.从BIOS跳转到boot loader第一条指令后, boot loader首先把处理器从实模式切换到保护模式, 我们暂时只要知道保护模式下寻址方式不同于段基址*16 + 偏移地址的寻址方式, 并且偏移地址从16位变为32位。
保护模式下最大的特点就是虚拟内存, 通过虚拟内存, 不同进程间地址空间不能相互访问,并且给予进程独享32位地址空间的假象。想深入了解
virtual memory 可看 OSTEP
的12~24章。
2.boot loader 把内核的其余部分从IDE 磁盘 读入到内存中(通过I/O指令读写磁盘的寄存器), 具体细节可看 [OSTEP的36章]
(http://pages.cs.wisc.edu/~remzi/OSTEP/file-devices.pdf)。
这书写的实在是好, 我看完CSAPP再看的OSTEP, 基本把操作系统的原理弄的明明白白, 值得一直安利。
Exercise 3.
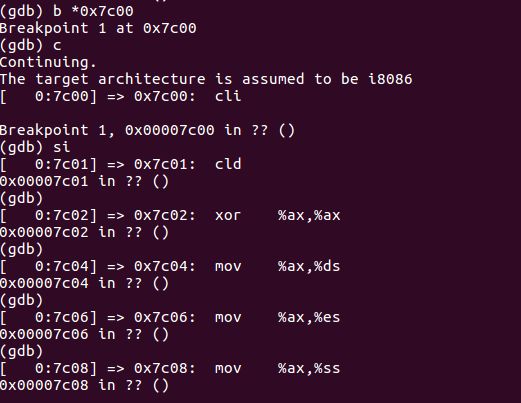
先在boot loader第一条指令0x7c00处打个断点再c运行到这,后面再用si指令一步一步地运行。
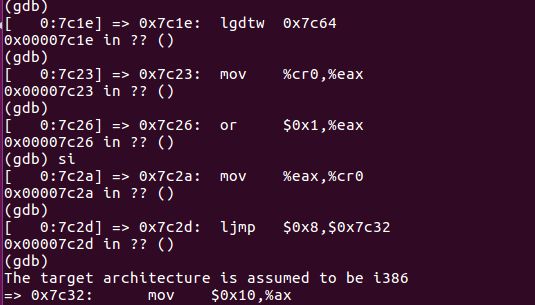
类似于boot loader, 先关闭中断设置串操作方向,清零段寄存器,加载全局描述符, 最后通过ljmp $0x8, $0x7c32, 设置CS:IP从而跳转到下面一条指令并进入保护模式,
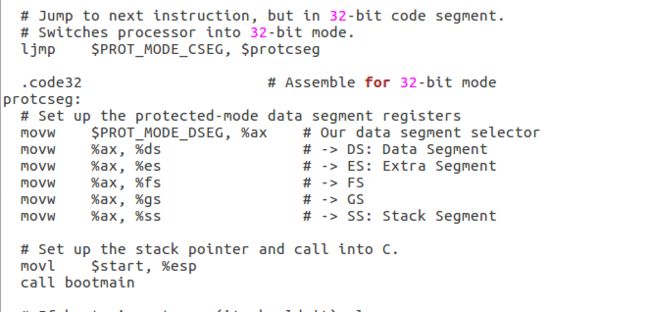
boot/boot.S对应的就是bootloader的代码
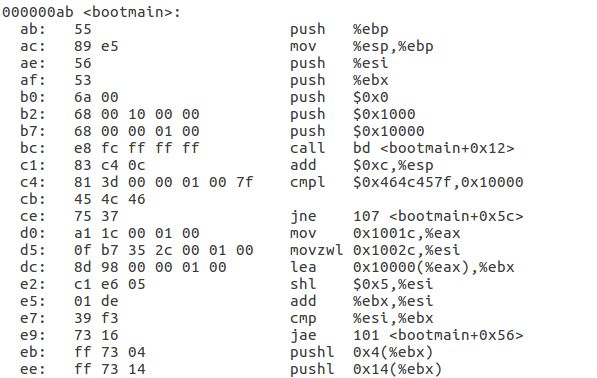
所以movl $start, %esp设置内核的栈值为start,就是boot loader第一条指令 call bootmain跳转到bootmain试着去si把每条汇编指令跟上面的C语言对应起来
回答一些问题:
Be able to answer the following questions:
At what point does the processor start executing 32-bit code? What exactly causes the switch from 16- to 32-bit mode?
What is the last instruction of the boot loader executed, and what is the first instruction of the kernel it just loaded?
Where is the first instruction of the kernel?
How does the boot loader decide how many sectors it must read in order to fetch the entire kernel from disk? Where does it find this information?
从bootmain代码我们可以看出boot loader把kernel作为一个ELF文件读取·
, elf header记录了文件信息。通过检查ELF头文件(第一个sector)的e_magic位检查是否有效的elf文件,通过ELFHDR->e_phnum知道kernel有多少段,通过循环把它们读到内存中load address的地方。
多说一句, elf也是linux的可执行文件的格式。
Exercise 4.
不多说, 需要掌握指针再继续下面的实验。把CSAPP有关部分看完和代码跑跑就大概掌握了。
elf可执行文件的格式:
An ELF binary starts with a fixed-length ELF header, followed by a variable-length program header listing each of the program sections to be loaded. The C definitions for these ELF headers are in inc/elf.h. The program sections we're interested in are:

.text: The program's executable instructions.
.rodata: Read-only data, such as ASCII string constants produced by the C compiler. (We will not bother setting up the hardware to prohibit writing, however.)
.data: The data section holds the program's initialized data, such as global variables declared with initializers like int x = 5;.
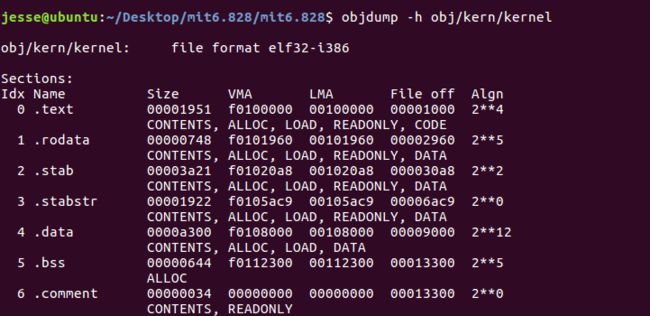
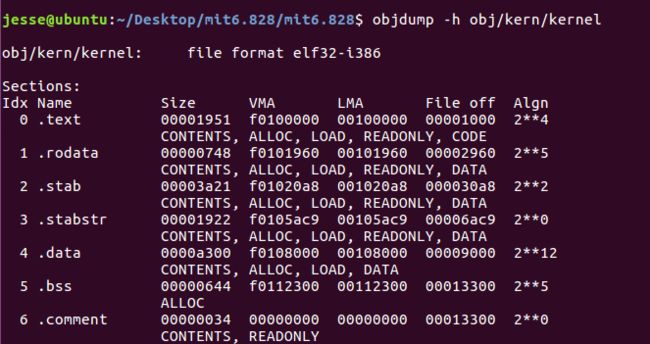
Take particular note of the "VMA" (or link address) and the
 "LMA" (or load address) of the .text section. The load
address of a section is the memory address at which that
section should be loaded into memory.

The link address of a section is the memory address from which the section expects
to execute. The linker encodes the link address in the binary in various ways,
such as when the code needs the address of a global variable, with the result
that a binary usually won't work if it is executing from an address that it is
not linked for. (It is possible to generate position-independent code that
does not contain any such absolute addresses. This is used extensively by
modern shared libraries, but it has performance and complexity costs, so
we won't be using it in 6.828.)
load address v.s. link address:
load adress:一个 section 应该被加载到的内存地址
link address:一个section希望在这里执行的内存地址
Exercise 5. 修改 boot/Makefrag里的 boot loader 的link address 0x7c00,看看有什么事发生
当修改了boot loader的链接地址,这个指令就会出现错误。
不要忘了改回去再继续下面的实验。
跟boot loader不同的是, kernel被加载到低地址段,但是它希望在高地址段执行,可以看到VMA和LMA相差了0xf0000000
Exercise 6.
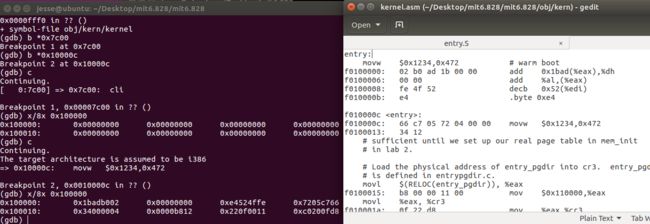
Reset the machine (exit QEMU/GDB and start them again). Examine the 8 words of memory at 0x00100000 at the point the BIOS enters the boot loader, and then again at the point the boot loader enters the kernel. Why are they different? What is there at the second breakpoint? (You do not really need to use QEMU to answer this question. Just think.)
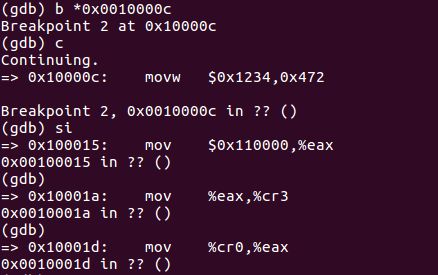
通过对比,我们发现进入boot loader和进入kernel时0x100000处的数据发生了变化, 我们尝试把这些数据看作指令, 发现它们就是kernel entry处开始的指令!
因为bootmain函数在最后会把内核的各个程序段送入到内存地址0x00100000处,所以这里现在存放的就是内核的某一个段的内容,由于程序入口地址是0x0010000C,正好位于这个段中,所以可这里面存放的是指令段也就是.text段的内容。
这里Lab 1的Part 2部分的所有实验就完成了。
