Day2 : zigbee无线传感器网络
Day2 : zigbee无线传感器网络
- TI Z-Stack协议栈安装
- Zigbee应用开发 - 串口通信
- Z-stack 工程目录解析
- 浅析协议栈
- 初始OSAL
- OSAL 多任务分配机制
- OSAL 的运行机制
- OSAL任务启动和初始化
- Z-stack 的 main() 函数在 Zmain.c中,
- OSAL 任务的执行
- OSAL 的事件传递机制
- OSAL 添加新任务
- 事件的捕获
- 设备间的一次对话
- 功能需求
- 实现步骤
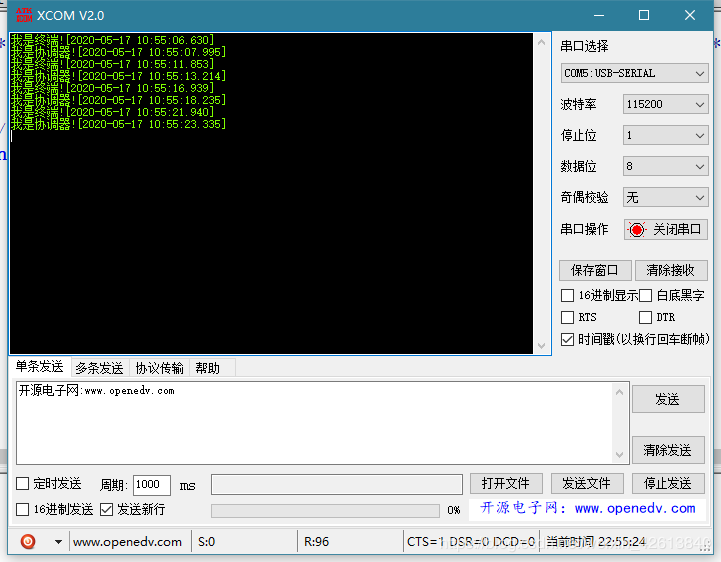
- 实验现象
- 设备间的一次对话刨析
- 簇
- 设备简单描述符
- 设备端口描述符
- APP变量
- afAddrType_t 地址
- afIncomingMSGPacket_t 消息
- AF_DataRequest
2020年5月16日 09:26:20,休息了四天,在正确是时间做正确的事。
参考链接:https://blog.csdn.net/weixin_39148042/article/details/81437042
TI Z-Stack协议栈安装
- 双击即可完成安装
- 协议栈目录
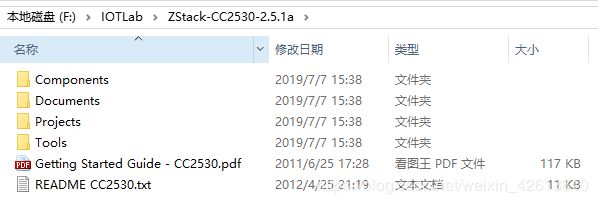
- Components - 存放开源代码,包括硬件接口层,mac层,操作系统层等。
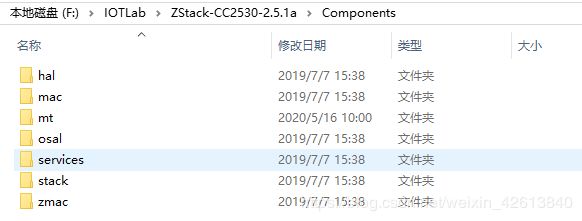
- Documents - TI公司提供的开发文档,针对于协议栈API的讲解。
- Projects - 协议栈的例程模板 (用来复制的)
TI 公司提供了 GenericApp.eww、SampleApp.eww、SimpleApp.eww ,3种例程。- GenericApp 实现了设备互相绑定传输信息(hello world);
- SampleApp 主要实现设备发送和接受 LED 灯信息;
- SimpleApp 主要实现温度和灯的开关,和智能家居结合使用的 have Profile。
- Tools - 开发用的相关工具
- Getting Started Guide - CC2530 - 英文
- Components - 存放开源代码,包括硬件接口层,mac层,操作系统层等。
Zigbee应用开发 - 串口通信
首先借助 TI 提供的协议栈中的例程 SampleApp,接着根据需要完成功能,查看支持 Z-Stack 协议栈的硬件电路,再查阅数据手册(CC2530 的数据手册、Z-stack 协议栈的说明、Z-stack 协议栈 API 函数的使用说明等)文件,然后再进行协议栈的修改。一般只需要修改 APP层即可。
在协议栈例程模板的基础上完成串口通信的实验。
- 复制 ./Projects/zstack/Samples 目录下的 SampleApp.eww,改个名字SampleApp_.eww。注意:放在其他目录需要修改C/C++预处理中,头文件的位置。
- 打开 CC2530DB/Sample.eww
- 工程下的目录
Z-stack 工程目录解析
- 这些文件夹对应着ZigBee协议中不同的层,使用Zibgee协议栈进行应用程序的开发一般只需要修改App目录下的文件即可。
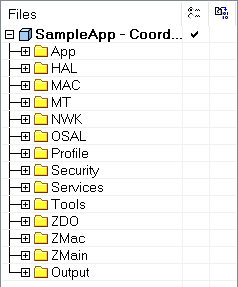
- APP应用接口层(Application Programming Interface ,API)
- 当要创建另外一个新项目时,也只需要主要换掉该目录里的文件。一般我们在App应用层目录下编写自己的应用程序源代码。
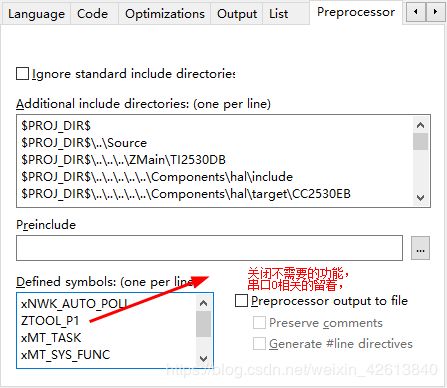
配置原文件不参与编译,即可。
- 硬件层目录(Hardware Abstract Layer,HAL)
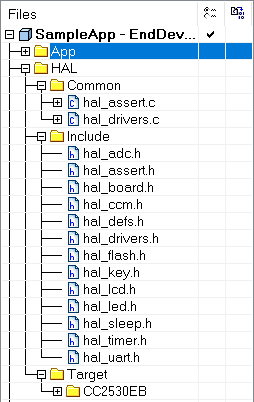
- 下层的Common目录下的文件是公共文件,基本上与硬件无关,其中
- hal_assert.c 是测试文件,用于调试;
- hal_drivers.c 是驱动文件,抽象出与硬件无关的驱动函数,包含有与硬件相关的配置和驱动及操作函数。
- Include 目录下的文件是跟硬件平台相关的。
- Target 下主要包含CC2530具体硬件平台。
- 下层的Common目录下的文件是公共文件,基本上与硬件无关,其中
硬件初始化需要根据 HAL 文件夹中的 hal_board_cfg.h 文件配置寄存器8051的寄存器。TI 官方发布 Z-Stack 的配置针对的是 TI 官方的开发板 CC2530DB 等,如采用其他开发板则需根据原理图设计改变 hal_board_cfg.h 文件的配置。
介质访问控制层(Media Access Control,MAC): 不开源的,不用关心。- 监控调试层目录(MonitorTest,MT)
该目录下的文件主要用于调试目的,即实现通过串口调试各层,与各层进行直接交互。(本节要用到的层) - 网络层目录(Network Layer,NWK)网络层配置参数文件、网络层库的函数接口文件,及APS层库的函数接口。
- 协议栈的操作系统(Operating System Abstraction Layer,OSAL)
该层主要是Z-stack 协议栈的操作系统对硬件的管理和封装。 - 应用框架层目录(Application Farmework,AF)
Profile文件夹下包含AF层处理函数接口文件,例如,开发常用到的数据收、发及终端管理等函数。 - 安全层目录(Security): 包含安全层处理函数接口文件。
- Zigbee和802.15.4设备的地址处理函数目录 : Serices文件包括地址模式的定义及地址处理函数。
工程配置目录(Tools): 包括空间划分及Z-stack相关配置信息。 Zigbee设备对象(Zigbee Device Object,ZDO) 还没遇到~Z-Stack MAC 移植层目录(Z-Stack MAC,ZMAC) 还没遇到- Zigbee 协议主程序(Zigbee main,ZMain)
ZMain.c主要包含了整个项目的入口函数main(),在 OnBoard.c 中包含对硬件开发平台各类外设进行控制的接口函数。 - 输出文件目录
Output 文件是IDE自动生成的。
-
协议栈提供EndDeviceEB(终端设备)、CoordinatorEB(协调器设备)和RouterEB(路由设备)3种设备工作空间。

-
在SampleApp.c 里加入头文件:
#include "mt_uart.h" #include "string.h" -
在SampleApp_Init 里添加如下代码:
MT_UartInit(); // 串口初始化 HalUARTWrite(0, "你好世界!\r\n", strlen("你好世界!\r\n")); // HAL 目录下 hal_uart.h -
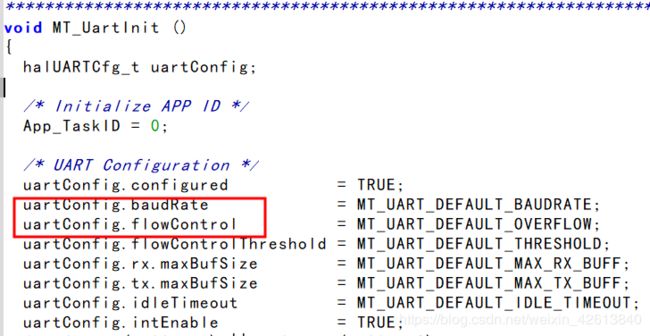
#define MT_UART_DEFAULT_BAUDRATE HAL_UART_BR_115200 // 波特率38400 #define MT_UART_DEFAULT_OVERFLOW FALSE // 关闭流控制 -
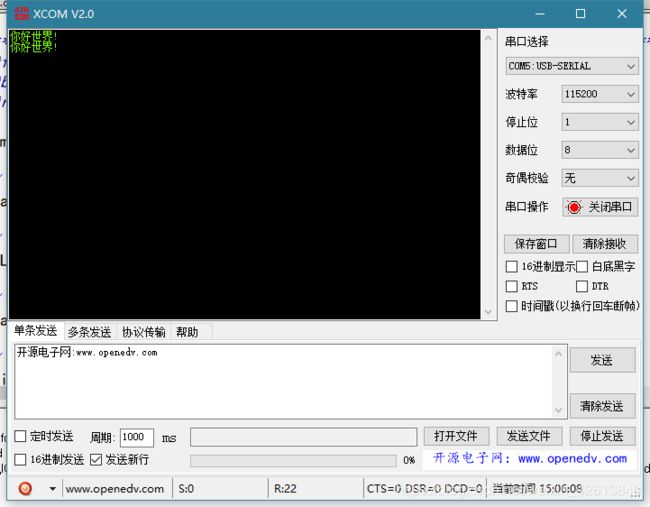
编译工程并下载至开发板,打开串口助手,找到对应的端口,选择波特率为115200,按下复位键可看到如下效果。
浅析协议栈
不需要深入研究复杂的Zigbee协议栈, 协议栈是协议的具体实现。
初始OSAL
- 资源(Resource)
- 共享资源(shared Resource)
- 任务(Task)
- 多任务运行(Muti-task Tunning)
- 内核(Kernel)
- 互斥(Mutual Exclusion)
- 消息队列(Message Queue)
OSAL实现了类似操作系统的某些功能。
OSAL 多任务分配机制
OSAL是一种基于事件驱动的轮循式操作系统,事件驱动是指发生事件后采取相应的事件处理函数,轮训指的是不断地查看是否有事件发生。
Z-stack的采用基于一个轮转查询式操作系统。
一般情况下,用户只需额外添加3个文件就可以完成一个项目:
- 主控文件,存放具体的任务事件处理函数(如SampleApp_ProcessEvent 或 GenericApp_ProcessEvent);
- 主控文件的头文件(如 SampleApp.h)
- 操作系统接口文件(如 OSAL_SampleApp.c),主要存放任务数组 taskArr[],任务数组的具体内容为每个任务的相应的处理函数指针。
无须改动 Z-Stack核心代码。
OSAL 的运行机制
OSAL通过 taskEvents 指针访问事件表的每一项,如果有事件发生,则查找函数表找到事件处理函数进行处理,处理完后,继续访问事件表,查看是否有事件发生,无限循环。
tasksEvents 和 tasksArr[] 里的顺序是一一对应的,tasksArr[]中的第 i 个事件处理函数对应于 tasksEvents 中的第 i 个任务的事件。
在Zigbee协议栈中,3个关键变量其数据结构具体如下。
- tasksCnt。该变量保存了任务数,其声明为 const uint8 tasksCnt。- tasksEvents。该变量是一个指针,指向了事件表的首地址,其声明为uint16* tasksEvents。
- tasksArr。该变量是一个数组,该数组的每一项都是一个函数指针,指向了时间的处理函数。
变量的定义在 OSAL_SampleApp.c 文件中。
OSAL 中最大任务数量为9,最大事件数量为16。
const uint8 tasksCnt = sizeof(tasksArr)/sizeof(tasksArr[0]);
OSAL任务启动和初始化
通过 osalInitTasks() 函数来创建 OSAL任务,其中TaskID 为每个任务的唯一标示号。
任何 OSAL 任务的工作必须分为两步:
- 进行任务的初始化;
- 处理任务事件;
详见下文,OSAL 添加任务
Z-stack 的 main() 函数在 Zmain.c中,
- Osal_int_disable( INTS_ALL ); 关闭所有中断
- HAL_BOARD_INITO; 初始化系统时钟
- Zmain_Vdd_check(); 检查芯片电压是否正常
- Zmain_ram_init(); 初始化堆栈
- InitBoard(OB_COLD); 初始化LED,配置系统定时器
- HalDriverInit(); 初始化芯片各个硬件模块
- Osal_nv_int(); 初始化 FLASH 存储
- Zmain_ext_addr(); 形成 MAC 地址
- ZgInit(); 初始化一些非易失变量
- ZMacInit(); 初始化MAC层
- afInit(); 初始化应用层框架
- Osal’_init_system(); 初始化操作系统
- Osal_init_enable(INI_ALL); 使能全部中断
- Osal_start_system(); 执行操作系统
他主要完成了两项工作,
1. 系统初始化,即由启动代码来初始化硬件系统和软件系统构架需要的各个模块
2. 开始执行操作系统实体。Osal_start_system();
void osal_start_system( void )
{
#if !defined ( ZBIT ) && !defined ( UBIT )
  for(;;)  // Forever Loop 死循环
#endif
  {
    osal_run_system();
  }
}

void osal_run_system( void )
{
  uint8 idx = 0;		// 索引事件表

  osalTimeUpdate();		// 更新系统时钟
  Hal_ProcessPoll();	// 硬件事件,例如,硬件是否按下,是否收到串口数据等

  do {
  	/*
  		轮询事件表的每一项,如果有事件发生,对应项就会产生一个16进制数
      (这个数是所有产生的事件对应16进制的数(事件表中的每一个事件都用
       一个唯一的16进制数标识)按位或 得到的),则跳出循环
   	*/
    if (tasksEvents[idx])  		// 事件表初始化每一项都为0,有事件发生变为十六进制
    {
      break;					// 有事件产生,跳出do...while循环。
    }
  } while (++idx < tasksCnt);	// 继续检查下一项是否有事件发生。

  // 有事件发生后
  if (idx < tasksCnt)			// 索引不超过任务总数,严谨
  {
    uint16 events;				// 临时保存事件
    halIntState_t intState;		// 中断状态

    HAL_ENTER_CRITICAL_SECTION(intState);	// 关闭中断
    events = tasksEvents[idx];	// 临时保存事件
    tasksEvents[idx] = 0;  		// 事件清零
    HAL_EXIT_CRITICAL_SECTION(intState);	// 打开中断

    activeTaskID = idx;			// 当前执行的 TaskId
    /*调用事件处理函数
    (tasksArr[idx]:对应事件处理的函数指针)。该函数
     返回值为0(表示没有其他需要处理的事件)或者为一个
     16进制数(该16进制数是剩下没处理的事件相或得到的
     (事件表中的每一个事件都用一个唯一的16进制数标识。具体
     见下文实例))*/
    events = (tasksArr[idx])( idx, events );	// 调用事件处理函数
    activeTaskID = TASK_NO_TASK;// 当前没有执行任务

    HAL_ENTER_CRITICAL_SECTION(intState);	// 关闭中断
    tasksEvents[idx] |= events;// 把未处理的事件返回给事件表,异或
    HAL_EXIT_CRITICAL_SECTION(intState);	// 打开中断
  }
#if defined( POWER_SAVING )
  else  // Complete pass through all task events with no activity?
  {
    osal_pwrmgr_powerconserve();  // Put the processor/system into sleep
  }
#endif
  /* Yield in case cooperative scheduling is being used. */
#if defined (configUSE_PREEMPTION) && (configUSE_PREEMPTION == 0)
  {
    osal_task_yield();
  }
#endif
}
每个任务都对应一个任务处理函数,每个任务处理函数中可以处理多个事件,
将未处理事件返回给事件表,等待下一次轮训处理。
总之,任务初始化的主要步骤如下。
- 初始化应用服务变量。
const pTackEventHandlerFn tasksArr[] 数组定义系统提供的应用服务和用户服务变量,如 MAC 层服务 macEventLoop、用户服务 SampleApp_ProcessEvent等。 - 分配任务 ID 和分配堆栈内存。
给各个已定义任务指定唯一的标识号。 - 在 AF 层注册应应用对象。
通过在AF层注册应用对象的信息,告知系统 afAddrType_t 地址类型数据包的路由端点,例如用于发送周期信息的 SampleApp_periodic_DstAddr 和 发送 LED 闪烁指令的 SampApp_Flash_DstAddr。 - 注册相应的 OSAL 或者 HAL 系统服务。
-
在协议栈中,Z-stack 提供键盘响应和串口活动响应两种系统服务,但是任何Z-Stack任务均不能自行注册系统服务,两者均需要由用户应用程序注册。
-
值得注意的是,有且仅有 一个OSAL Task 可以注册服务。例如,注册键盘活动响应可调用RegisterForKeys()函数。
-
- 处理任务事件。
处理任务事件通过创建 “ApplicationName” _ProcessEvent() 函数处理。
一个 OSAL 任务可以响应16个事件,除了协议栈默认的强制事件(Mandatory Events)之外还可以再绑定 15 个事件。
OSAL 任务的执行
事件处理函数就是任务本身
SYS_ECENT_MSG(0X8000)是强制事件。改事件主要用来发送全局的系统信息,包括以下信息。
- AF_INCOMING_MSG_CMD : 表示收到了一个新的无线数据。
- KEY_CHANGE : 用来确认按键动作。
- ZDO_NEW_DSTADDR : 用来指示自动匹配请求。
- ZDO_STATE_CHANGE :用来指示网络状态的变化。如协调器建立网络;终端节点加入网络时,终端节点退出网络时等。
- AF_DATA_CONFIRM_CMD 调用AF_DATARequest() 发送数据时,有时需要确认信息,该事件与此相关
tasksEvents 和 tasksArr[] 里的顺序是一一对应的,tasksArr[]中的第 i 个事件处理函数对应于 tasksEvents 中的第 i 个任务的事件。只有这样才能保证每个任务的事件处理函数能够收到正确的 ID (在osalInitTasks函数中分配)。
为了保存 osalInitTasks 函数中所分配的任务 ID ,需要给每一个任务定义一个全局变量。
其中,任务处理函数具体如下:
- macEventLoop,// Mac 层任务处理函数
- nwk_event_loop,// 网络层任务处理函数
- Hal_ProcessEvent, // 硬件抽象层任务处理函数
- MT_ProcessEvent,// 监控任务处理函数可选(通过编译选项 MT_TASK 来决定是否编译该任务处理函数,一般情况下该功能通过串行端口通信来交换实现)
- APS_event_loop,// 应用支持子层任务处理函数,用户不用修改
- APSF_ProcessEvent,应用支持子层消息分割任务处理函数(用户编译选项 ZIGBEE_FRAGMENTATION 来决定是否启动 Zigbee 消息分割功能)
- ZDApp_event_loop,// 设备应用层任务处理函数,用户可以根据需要修改
- ZDNwkMgr_event_loop,// 网络管理层任务处理函数(用户可通过编译选项 ZIGBEE_FREQ_AGILITY 或 ZIGBEE_PANID_CONIFG 来实现该功能)
- SampaleApp_ProcessEvent,// 用户应用层任务处理函数用户自己编写
如果不算调试任务,操作系统一共要处理6项任务,分别为MAC层,网络层,硬件抽象层,应用层,Zibgee 设备应用层以及完全由用户处理的应用层,其优先级由高到低。
MAC 层拥有最高优先级,用户层具有最低优先级。
只需按照自己的需求编写应用层的任务以及事件处理函数即可。
OSAL 的事件传递机制
消息,事件,任务之间到底存在什么样的关系呢?如何实现事件传递机制呢?
事件是驱动任务去执行某些操作的条件,当系统中产生了一个事件OSAL将这个事件传递给相应的任务后,任务才能执行一个相应的操作(调用事件处理函数去处理)。
通常某些事件发生后,又伴随着一些附加信息的产生。 例如,从无线接收到数据后,会产生 AF_INCOMING_MSG_CMD 消息,任务的事件处理函数在处理这个事件的时候,还要得到所接收到的数据。
因此,这就需要将事件和数据封装成一个消息,将消息发送到消息队列,然后再事件处理函数中就可以使用 osal_msg_recive,从消息队列中得到该消息,即:
MSGpkt = (afIncomingMsgPacket_t*)osal_msg_recive(SampleicApp_TaskID);
OSAL 维护了一个消息队列,每一个消息都会被放到这个消息队列中去,当任务接收到事件后,可以从消息队列汇中获取属于自己的消息,然后再调用消息处理函数进行相应的处理。
每个消息包含一个消息头 osal_mag_hdr_t 和用户自定义的消息,osal_msg_hdr_t 结构体的定义如下。
typedef struct
{
	void *next;
	uint16 len;
	uint8 dest_id;
}osal_msg_hdr_t;
进入事件轮询后的第一个事件是网络状态变化事件。
OSAL 添加新任务
上文 OSAL 任务的启动和初始化。
-
新任务的初始化函数
例如,SampleApp_Init(),其目的就是把一些用户自己写的任务中的一些变量、网络模式、网络终端类型等进行初始化,并且自动给每个任务分配一个ID。 -
新任务的事件处理函数
例如,SampleApp_ProcessEvent(),这个函数是首先在 const TaskEvnetHandlerFn taskArr[] 中进行设置,然后在osalInitTaks() 中如果发生事件进行调用绑定的事件处理函数。- 用户自己设计的任务代码在Z-stack中的调用过程
- 首先,执行main()(在ZMain.c文件中)主程序,接着执行osal_init_system()。
- 接着,在 osal_init_system() 中调用 osalInitTask(在 OSAL_SampleApp.c 文件中)。
- 最后,在 osalInitTasks() 中调用 SampleApp_Init()(在 OSAL_SampleApp.c 文件中),完成初始化!
taskID随着任务的增加也随之递增,用户自己实现的任务初始化操作应该在 osalInitTasks() 中添加。。
- 用户自己设计的任务代码在Z-stack中的调用过程
void osalInitTasks( void )
{
  uint8 taskID = 0;

  tasksEvents = (uint16 *)osal_mem_alloc( sizeof( uint16 ) * tasksCnt);
  osal_memset( tasksEvents, 0, (sizeof( uint16 ) * tasksCnt));

  macTaskInit( taskID++ );
  nwk_init( taskID++ );
  Hal_Init( taskID++ );
#if defined( MT_TASK )
  MT_TaskInit( taskID++ );
#endif
  APS_Init( taskID++ );
#if defined ( ZIGBEE_FRAGMENTATION )
  APSF_Init( taskID++ );
#endif
  ZDApp_Init( taskID++ );
#if defined ( ZIGBEE_FREQ_AGILITY ) || defined ( ZIGBEE_PANID_CONFLICT )
  ZDNwkMgr_Init( taskID++ );
#endif
  SampleApp_Init( taskID++ );
  NewApp1_Init( taskID++ ); // 新增加用户任务1的初始化函数
  NewApp2_Init( taskID ); // 新增加用户任务2的初始化函数
}
- 任务处理调用的重要数据结构
在 Z-stack 里,对于同一个任务可能有多种事件发生,那么需要执行不同的事件处理函数,为了方便,对于每个任务的事件处理函数都统一在一个处理函数中实现,
然后根据任务的 ID 号(task_id)和该任务的具体事件(events)调用某个任务的总事件处理函数,进入了该任务的总事件处理函数之后,再根据 events 来判别该任务的哪一种事件发生,进而执行相应的事件处理。
所以这里我们实现了一个任务,还需要把实现的该任务的事件处理函数在这里添加。
const pTaskEventHandlerFn tasksArr[] = {
  macEventLoop,
  nwk_event_loop,
  Hal_ProcessEvent,
#if defined( MT_TASK )
  MT_ProcessEvent,
#endif
  APS_event_loop,
#if defined ( ZIGBEE_FRAGMENTATION )
  APSF_ProcessEvent,
#endif
  ZDApp_event_loop,
#if defined ( ZIGBEE_FREQ_AGILITY ) || defined ( ZIGBEE_PANID_CONFLICT )
  ZDNwkMgr_event_loop,
#endif
  SampleApp_ProcessEvent,
  NewApp1_ProcessEvent,	// 新增第1个任务处理函数
  NewApp2_ProcessEvent,	// 新增第2个任务处理函数
};
tasksEvents 和 tasksArr[] 里的顺序是一一对应的,tasksArr[]中的第 i 个事件处理函数对应于 tasksEvents 中的第 i 个任务的事件。
- 对于不同事件发生后的任务处理函数的调用
任务处理函数,参考 SampleApp_ProcessEvent
注意:需要在 NewProcess_App.h 文件中添加新增函数声明;
extern void NewProcessApp_Init(uint8 task_id);
extern void UINT16 NewProcessApp_ProcessEvent( uint8 task_id , uint16 events );
注意:需要在OSAL_SampleApp.c 文件中添加新增函数声明;
#include "NewApp1.h"
#include "NewApp2.h"
osal_start_timerEx() 常用接口
事件的捕获
OSAL 专门建立了一个任务来对硬件资源进行管理,Hal_ProcessEvent。
OSAL 维护了一个消息队列,每一个消息都会被放到这个消息队列中去,当任务接收到事件后,可以从消息队列汇中获取属于自己的消息,然后再调用消息处理函数进行相应的处理。
所以,无需关心,你要知道最终有函数操作了 tasksEvent[] 就可以了。
{
	tasksEvents[task_id] |= event_flag;
}
设备间的一次对话
功能需求
- 协调器组建 PAN 网络。
- 协调器组网成功后会周期性广播“I am coordinator device! ” (周期为 5s) 。
- 终端设备节点加入该 PAN 网络,加入网络成功后周期性广播字符串“I am endpoint device!” (周期为 5s) 。
(实现点对点的数据传输)
实现步骤
- 拷贝SampleApp
- 配置串口(波特率,流控制)
- SampleApp_Init()任务初始化。
- SampleApp_TaskID:保存 osalInitTasks 函数中所分配的任务 ID
- SampleApp_NwkState:设备网络状态
- SampleApp_TransID:发送数据包的序列号,用于计算丢包率
void SampleApp_Init( uint8 task_id )
{
	SampleApp_TaskID = task_id;		// 全局变量保存任务ID
	SampleApp_NwkState = DEV_INIT;	// 当前设备的网络状态,现在是初始状态
	SampleApp_TransID = 0;			// 发送数据包的序列号,每发送一个数据出去
	// 序列号自动加一,可以计算丢包率

	MT_UartInit();
	HalUARTWrite ( 0, "你好世界!\r\n", strlen("你好世界!\r\n") );
广播模式代码
// 定期消息的目标地址的设置
// 广播模式
SampleApp_Periodic_DstAddr.addrMode = (afAddrMode_t)AddrBroadcast;// 地址的模式
SampleApp_Periodic_DstAddr.endPoint = SAMPLEAPP_ENDPOINT;// 端口
SampleApp_Periodic_DstAddr.addr.shortAddr = 0xFFFF;// 知识点
注释掉组播模式代码
- SampleApp_ProcessEvent()任务事件处理函数
- 事件产生的同时会附加产生消息。通过 osal_msg_receive() 从系统消息队列中接受消息。
命令名称 osal_msg_receive
命令功能 一个任务从消息队列接收属于自己的消息。之后调用 osal_msg_deallocate() 释放消息缓冲区。
函数原型 uint8 *osal_msg_receive( uint8 task_id )

参数说明	int8 task_id:接受任务ID
返回值	*uint8 : 消息 or NULL

示例:
MSGpkt = (afIncomingMSGPacket_t *)osal_msg_receive( SampleApp_TaskID );
- 如果当前zigbee设备网络状态发生了改变( 初始状态为DEV_INIT ),则通过定时器(osal_start_timerEx)功能每隔一段时间(5s)触发SAMPLEAPP_SEND_PERIODIC_MSG_EV 事件.
命令名称 osal_start_timerEx
命令功能 设置一个定时器,定时时间到后,相应的事件被设置。
函数原型 uint8 osal_start_timerEx( uint8 taskID, uint16 event_id, uint16 timeout_value )

参数说明	uint8 taskID - 要为其设置定时器的任务id
		uint16 event_id - 通知事件ID
		UNINT16 timeout_value - 定时时间,以毫秒为单位。
返回值	SUCCESS, or NO_TIMER_AVAIL. - 成功,或者没有可用定时器

示例:
osal_start_timerEx( SampleApp_TaskID,
					SAMPLEAPP_SEND_PERIODIC_MSG_EVT,
					SAMPLEAPP_SEND_PERIODIC_MSG_TIMEOUT );
- SAMPLEAPP_SEND_PERIODIC_MSG_EVT 事件的处理。
// 向外发送一个无线消息 - 这个事件由定时器产生
	// 在 SampleApp_Init() 中设置
	if ( events & SAMPLEAPP_SEND_PERIODIC_MSG_EVT )
	{
		// 发送定期消息
		SampleApp_SendPeriodicMessage();

		// 设置为在正常期间再次发送消息(+有点抖动)
		osal_start_timerEx( SampleApp_TaskID, SAMPLEAPP_SEND_PERIODIC_MSG_EVT,
						   (SAMPLEAPP_SEND_PERIODIC_MSG_TIMEOUT + (osal_rand() & 0x00FF)) );

		// 返回未处理的事件
		return (events ^ SAMPLEAPP_SEND_PERIODIC_MSG_EVT);
	}
- 在SampleApp_SendPeriodicMessage() 里判断当前zigbee设备的逻辑类型,之后调用 AF_DataRequest() 将数据广播出去.
- zgDeviceLogicalType 设备逻辑类型,
void SampleApp_SendPeriodicMessage( void )
{
	uint8* str = NULL;
	if ( zgDeviceLogicalType == ZG_DEVICETYPE_COORDINATOR )
	{
		str = "我是协调器!\r\n";
	}
	else if ( zgDeviceLogicalType == ZG_DEVICETYPE_ENDDEVICE )
	{
		str = "我是终端!\r\n";
	}
	else
	{
		// 设备逻辑错误
	}
	if ( AF_DataRequest( &SampleApp_Periodic_DstAddr, &SampleApp_epDesc,
						SAMPLEAPP_PERIODIC_CLUSTERID,
						strlen( (const char *)str ),
						str,
						&SampleApp_TransID,
						AF_DISCV_ROUTE,
						AF_DEFAULT_RADIUS ) == afStatus_SUCCESS )
	{
	}
	else
	{
		// Error occurred in request to send.
	}
}
- 接收到无线消息时打印到串口,改写SampleApp_MessageMSGCB()函数代码,实现接收到的数据通过串口打印到电脑上:
(*pkt).cmd.Data <=> (pkt->cmd).Data
void SampleApp_MessageMSGCB( afIncomingMSGPacket_t *pkt )
{
	// uint16 flashTime;

	switch ( pkt->clusterId )
	{
		case SAMPLEAPP_PERIODIC_CLUSTERID:
		HalUARTWrite ( 0, (pkt->cmd).Data, (pkt->cmd).DataLength );
		break;

		case SAMPLEAPP_FLASH_CLUSTERID:

		break;
	}
}
实验现象
有趣的是,得到的结果和视频中的不一样,可能是协议栈版本不同吧。
这里终端设备广播之后,它还会收到自己发出去的消息(由协调器转发)。
设备间的一次对话刨析
2020年5月17日 23:01:36
其中协调器的建立网络和终端的加入网络是协议栈帮助完成的,我们不需要考虑
簇
typedef uint16  cId_t;

#define SAMPLEAPP_MAX_CLUSTERS        2
#define SAMPLEAPP_PERIODIC_CLUSTERID  1
#define SAMPLEAPP_FLASH_CLUSTERID     2

// 此列表应填写特定于应用程序的簇ID。
const cId_t SampleApp_ClusterList[SAMPLEAPP_MAX_CLUSTERS] =
{
	SAMPLEAPP_PERIODIC_CLUSTERID,	// 广播簇
	SAMPLEAPP_FLASH_CLUSTERID		// 组播簇
};
- 在同一个Profile中,ClusterID是唯一的。
- 在一个规范下,又提出了簇(cluster)的概念,簇是一个应用领域下的一个特定对象,例如:智能家居中有这个调光器就需要一些命令,如开灯,关灯,变亮,变暗等,实现这些操作需要不同的命令,多个操作命令的集合叫做簇。
- 在设备简单描述符中需要填充输入簇和输出簇。填充时需要注意:
- 消息发送方需把命令放在输出簇里,那么消息接受方需要把同样的命令放在输入簇里,之前的设备间第一次通话,由于输入簇和输出簇是一样的,所以协调器和终端设备间也能正常通信。(对于可以建立绑定关系的两个节点,它们的Cluster的属性必须一个选择“输入”,另一个选择“输出”,而且Cluster值相等,只有这样,他们才能建立绑定。)
- 在直接寻址和间接寻址方式中都会用到这个概念。
- 间接通信是指各个节点通过端点绑定建立通信关系,这种通信方式不需要知道目标节点的地址信息,包括IEEE地址或网络短地址,Z-Stack底层将自动从栈的绑定表中查找目标设备的具体网络地址并将其发送出去。
- 直接通信不需要节点之间建立联系,它使用网络短地址作为参数调用适当的API来实现通信。协调器的短地址固定的0X0000;其他节点由协调器动态分配,可采用通过目标节点的IEEE地址来查询短地址的方法。
设备简单描述符
typedef struct
{
  uint8          EndPoint;				// 端口号
  uint16         AppProfId;				// 规范号
  uint16         AppDeviceId;			// 设备ID
  uint8          AppDevVer:4;			// 应用版本号
  uint8          Reserved:4;             // AF_V1_SUPPORT uses for AppFlags:4.
  uint8          AppNumInClusters;		// 输入簇个数
  cId_t         *pAppInClusterList;		// 输入簇列表
  uint8          AppNumOutClusters;		// 输出簇个数
  cId_t         *pAppOutClusterList;	// 输出簇列表
} SimpleDescriptionFormat_t;

#define SAMPLEAPP_ENDPOINT           20
#define SAMPLEAPP_PROFID             0x0F08
#define SAMPLEAPP_DEVICEID           0x0001
#define SAMPLEAPP_DEVICE_VERSION     0
#define SAMPLEAPP_FLAGS              0
#define SAMPLEAPP_MAX_CLUSTERS       2

const SimpleDescriptionFormat_t SampleApp_SimpleDesc =
{
	SAMPLEAPP_ENDPOINT,              //  int Endpoint;
	SAMPLEAPP_PROFID,                //  uint16 AppProfId[2];
	SAMPLEAPP_DEVICEID,              //  uint16 AppDeviceId[2];
	SAMPLEAPP_DEVICE_VERSION,        //  int   AppDevVer:4;
	SAMPLEAPP_FLAGS,                 //  int   AppFlags:4;
	SAMPLEAPP_MAX_CLUSTERS,          //  uint8  AppNumInClusters;
	(cId_t *)SampleApp_ClusterList,  //  uint8 *pAppInClusterList;
	SAMPLEAPP_MAX_CLUSTERS,          //  uint8  AppNumInClusters;
	(cId_t *)SampleApp_ClusterList   //  uint8 *pAppInClusterList;
};
用于填写端口描述符中的,设备描述。
设备端口描述符
// 端口表 - 这个表是该设备的端口描述
// 或者 应用注册
// There will be one entry in this table for every
// endpoint defined.
typedef struct
{
  uint8 endPoint;							// 端口号
  uint8 *task_id;  							// 指定任务ID
  SimpleDescriptionFormat_t *simpleDesc;	// 设备简单描述符
  afNetworkLatencyReq_t latencyReq;			// 延时请求
} endPointDesc_t;

// 这是设备端口描述符,它虽然在这里定义, 但是
// 却在 SampleApp_Init() 中填写。 另一种方法是在 RAM 中定义它。
endPointDesc_t SampleApp_epDesc;

	// 设备端口描述符
	SampleApp_epDesc.endPoint = SAMPLEAPP_ENDPOINT;
	SampleApp_epDesc.task_id = &SampleApp_TaskID;
	SampleApp_epDesc.simpleDesc
		= (SimpleDescriptionFormat_t *)&SampleApp_SimpleDesc;
	SampleApp_epDesc.latencyReq = noLatencyReqs;

	// 向AF注册端点描述
	afRegister( &SampleApp_epDesc );
- 端点(EndPoint)是一种网络通信中的数据通信,它是无线通信节点的一个通信部件,如果选择“绑定”方式实现节点间的通信,那么可以直接面对端点操作,而不需要知道绑定的两个节点的地址信息。每个Zigbee设备支持240个这样的端点。端点的值和IEEE长地址、16位短地址一样,是唯一确定的网络地址,通常结合绑定功能一起使用。它是Zigbee无线通信的一个重要参数。
类似于TCP/IP 中的端口???- 绑定指的是两个节点在应用层上建立起来的一条逻辑链路。在同一个节点上可以建立多个绑定服务,分别对应不同种类的数据包。此外,绑定也允许有多个目标节点(一对多绑定)。一旦在源节点上建立了绑定,其应用服务即可像目标节点发送数据,而不需要指定目标地址(调用 zb_SendDataRquest(),目标地址可以用一个无效值0xFFFE代替)。
APP变量
应用层主要包括应用支持子层(APS层)和Zigbee设备对象(ZDO)。其中,
APS负责维护和绑定表、在绑定设备之间传递消息;
ZDO定义设备在网络中的角色,发起和响应绑定请求,在网络设备之间建立安全机制。
typedef enum
{
  DEV_HOLD,               # Initialized - not started automatically
  DEV_INIT,               # Initialized - not connected to anything
  DEV_NWK_DISC,           # Discovering PAN's to join
  DEV_NWK_JOINING,        # Joining a PAN
  DEV_NWK_REJOIN,         # ReJoining a PAN, only for end devices
  DEV_END_DEVICE_UNAUTH,  # Joined but not yet authenticated by trust center
  DEV_END_DEVICE,         # Started as device after authentication
  DEV_ROUTER,             # Device joined, authenticated and is a router
  DEV_COORD_STARTING,     # Started as Zigbee Coordinator
  DEV_ZB_COORD,           # Started as Zigbee Coordinator
  DEV_NWK_ORPHAN          # Device has lost information about its parent..
} devStates_t;

uint8 SampleApp_TaskID;			# 内部任务/事件处理的任务ID
								# 当SampleApp_Init()被调用时,该变量赋值
devStates_t SampleApp_NwkState;	# 设备网络状态
uint8 SampleApp_TransID;		# 这是唯一的消息ID(计数器)

SampleApp_TaskID = task_id;		# 全局变量保存任务ID
SampleApp_NwkState = DEV_INIT;	# 当前设备的网络状态,现在是初始状态
SampleApp_TransID = 0;			# 发送数据包的序列号,每发送一个数据出去
								# 序列号自动加一,可以计算丢包率
# Values for ZCD_NV_LOGICAL_TYPE (zgDeviceLogicalType)
#define ZG_DEVICETYPE_COORDINATOR      0x00
#define ZG_DEVICETYPE_ROUTER           0x01
#define ZG_DEVICETYPE_ENDDEVICE        0x02
uint8 zgDeviceLogicalType = DEVICE_LOGICAL_TYPE;	# 设备逻辑类型
afAddrType_t 地址
typedef struct
{
  union
  {
    uint16      shortAddr;	# 网络地址,该地址是设备在加入网络时由协议栈分配的
    ZLongAddr_t extAddr;	# 64位扩展地址,全球唯一
  } addr;
  afAddrMode_t addrMode;	# 地址模式(广播、组播、单播)
  uint8 endPoint;			# 端口号,可供范围(1~240)
  uint16 panId;  			# used for the INTER_PAN feature
} afAddrType_t;

afAddrType_t SampleApp_Periodic_DstAddr;	# 广播地址
afAddrType_t SampleApp_Flash_DstAddr;		# 组播地址

aps_Group_t SampleApp_Group;	# 组

# 定期消息的目标地址设置
# 广播模式
SampleApp_Periodic_DstAddr.addrMode = (afAddrMode_t)AddrBroadcast;	# 地址模式
SampleApp_Periodic_DstAddr.endPoint = SAMPLEAPP_ENDPOINT;			# 端口
SampleApp_Periodic_DstAddr.addr.shortAddr = 0xFFFF;					# 网络地址

# 设置flash命令的目标地址 - 组1
SampleApp_Flash_DstAddr.addrMode = (afAddrMode_t)afAddrGroup;
SampleApp_Flash_DstAddr.endPoint = SAMPLEAPP_ENDPOINT;
SampleApp_Flash_DstAddr.addr.shortAddr = SAMPLEAPP_FLASH_GROUP;

# 默认情况下,所有设备都在组1中启动
SampleApp_Group.ID = 0x0001;
osal_memcpy( SampleApp_Group.name, "Group 1", 7  );
aps_AddGroup( SAMPLEAPP_ENDPOINT, &SampleApp_Group );
这里,除了网络地址(短地址)和端点之外,还需要指定地址模式参数。地址模式参数可以设置为以下几个值。
# 地址结构体中的发送模式结构体:
typedef enum
{
  afAddrNotPresent = AddrNotPresent,	# 当前地址不存在
  afAddr16Bit      = Addr16Bit,			# 用于单播
  afAddr64Bit      = Addr64Bit,			# 用于单播
  afAddrGroup      = AddrGroup,			# 用于组播
  afAddrBroadcast  = AddrBroadcast		# 用于广播
} afAddrMode_t;

# 组播地址
typedef struct
{
  uint16 ID;                       # Unique to this table
  uint8  name[APS_GROUP_NAME_LEN]; # Human readable name of group
} aps_Group_t;
在Zigbee协议栈中,数据包可以单点传送(unicast)、多点传送(multicast)或者广播传送,所以必须有地址模式参数。一个单点传送数据包只发送给一个设备,多点传送数据包则要传送给一组设备,而广播数据包则要发送整个网络中的所有节点。
- 单点传送
单点传送是标准的寻址模式,它将数据包发送给一个已经知道网络地址的网络设备。将afAddrMode设置为 Addr16Bit,并且在数据包中携带目标设备地址。 - 多点传送
当应用程序不知道数据包的目标设备在哪里时,将模式设置为 AddrNotPresent。Z-Stack 底层将自动从栈的绑定表中查找目标设备的具体网络地址,这种特点称为源绑定。如果在绑定表中找到多个设备,则向每个设备都发送一个数据包的复制。 - 广播传送
当应用程序需要将数据包发送给网络的每个设备时,将使用广播模式,此时将模式设置为 AddrBroadcast。目标 shortAddr 可以设置为下面广播地址中的一种。- NWK_BROADCAST_SHORTADDR_DEVALL(0xFFFF):数据包将被传送到网络上的所有设备,包括睡眠中的设备。对于睡眠中的设备,数据包将被保留在其父节点,直到苏醒后主动到父节点查询,或者直到消息超时。
- NWK_BROADCAST_SHORTADDR_DEVRXON(0XFFFD):数据包将被传送到网络上的所有空闲时打开接收的设备(RXONWHENIDELE),即除了睡眠中的设备。
- NWK_BROADCAST_SHORTADDR_DEVZCZR(0XFFFC ):数据发送给所有的路由器(包括协调器,它是一种特殊的路由器)。
- 组寻址
当应用程序需要将数据包发送给网络上的一组设备时,使用该模式。地址模式设置为 afAddrGroup 并且 shortAddr 设置为组ID。在使用这个功能之前,必须在网络中定义组(详见 Z-Stack API 文档中的 aps_AddGroup()函数)。
afIncomingMSGPacket_t 消息
typedef struct
{
  osal_event_hdr_t hdr;     /* OSAL Message header */
  uint16 groupId;           /* Message's group ID - 0 if not set */
  uint16 clusterId;         /* Message's cluster ID */
  afAddrType_t srcAddr;     /* Source Address, if endpoint is STUBAPS_INTER_PAN_EP,
                               it's an InterPAN message */
  uint16 macDestAddr;       /* MAC header destination short address */
  uint8 endPoint;           /* destination endpoint */
  uint8 wasBroadcast;       /* TRUE if network destination was a broadcast address */
  uint8 LinkQuality;        /* The link quality of the received data frame */
  uint8 correlation;        /* The raw correlation value of the received data frame */
  int8  rssi;               /* The received RF power in units dBm */
  uint8 SecurityUse;        /* deprecated */
  uint32 timestamp;         /* receipt timestamp from MAC */
  uint8 nwkSeqNum;          /* network header frame sequence number */
  afMSGCommandFormat_t cmd; /* Application Data */
} afIncomingMSGPacket_t;

# 消息头
typedef struct
{
  uint8  event;				# 消息类型
  uint8  status;			# 网络状态
} osal_event_hdr_t;

# 应用数据
typedef struct
{
  uint8   TransSeqNumber;
  uint16  DataLength;              # 数据长度
  uint8  *Data;					   # 真正的数据
} afMSGCommandFormat_t;
AF_DataRequest
命令名称 AF_DataRequest
命令功能 用户调用该函数即实现数据的无线发送。
函数原型 afStatus_t AF_DataRequest( afAddrType_t *dstAddr, endPointDesc_t *srcEP,
                           uint16 cID, uint16 len, uint8 *buf, uint8 *transID,
                           uint8 options, uint8 radius )

参数说明	afAddrType_t *dstAddr - 发送目的地址 + 端点地址(端口号)和传送模式。目标设备地址。
		endPointDesc_t *srcEP - 源(答复或确认)终端的描述(如操作系统中任务ID等)源EP(endPoint)。
		uint16 cID - 被Profile指定的有效的集群号。命令号,簇。
		uint16 len - 发送数据长度。
		uint8 *buf - 指向存放发送数据的缓冲区指针。
		uint8 *transID - 指向序列号。默认
		uint8 options - 有效位掩码的发送选项。默认 AF_DISCV_ROUTE
		uint8 radius - 发送跳数,通常设置为 AF_DEFAULT_RADIUS,半径

返回值	typedef uint8 Status_t;		// Generic Status return
		typedef Status_t ZStatus_t;
		typedef ZStatus_t afStatus_t;
		#define afStatus_SUCCESS            ZSuccess           /* 0x00 */
		#define afStatus_FAILED             ZFailure           /* 0x01 */
		#define afStatus_INVALID_PARAMETER  ZInvalidParameter  /* 0x02 */
		#define afStatus_MEM_FAIL           ZMemError          /* 0x10 */
		#define afStatus_NO_ROUTE           ZNwkNoRoute        /* 0xCD */

示例1:
	SampleApp_Periodic_DstAddr.addrMode = (afAddrMode_t)AddrBroadcast;
	SampleApp_Periodic_DstAddr.endPoint = SAMPLEAPP_ENDPOINT;
	SampleApp_Periodic_DstAddr.addr.shortAddr = 0xFFFF;

	// Fill out the endpoint description.
	SampleApp_epDesc.endPoint = SAMPLEAPP_ENDPOINT;
	SampleApp_epDesc.task_id = &SampleApp_TaskID;
	SampleApp_epDesc.simpleDesc
		= (SimpleDescriptionFormat_t *)&SampleApp_SimpleDesc;
	SampleApp_epDesc.latencyReq = noLatencyReqs;

	uint8* buf = "hello world!\r\n";

	if ( AF_DataRequest( &SampleApp_Periodic_DstAddr, &SampleApp_epDesc,
						SAMPLEAPP_PERIODIC_CLUSTERID,
						strlen( (char const *)buf ),
						buf,
						&SampleApp_TransID,
						AF_DISCV_ROUTE,
						AF_DEFAULT_RADIUS ) == afStatus_SUCCESS )
	{
	}
	else
	{
		// Error occurred in request to send.
	}

示例2:
	SampleApp_Flash_DstAddr.addrMode = (afAddrMode_t)afAddrGroup;
	SampleApp_Flash_DstAddr.endPoint = SAMPLEAPP_ENDPOINT;
	SampleApp_Flash_DstAddr.addr.shortAddr = SAMPLEAPP_FLASH_GROUP;

	// Fill out the endpoint description.
	SampleApp_epDesc.endPoint = SAMPLEAPP_ENDPOINT;
	SampleApp_epDesc.task_id = &SampleApp_TaskID;
	SampleApp_epDesc.simpleDesc
		= (SimpleDescriptionFormat_t *)&SampleApp_SimpleDesc;
	SampleApp_epDesc.latencyReq = noLatencyReqs;

	uint8 buffer[3];
	buffer[0] = (uint8)(SampleAppFlashCounter++);
	buffer[1] = LO_UINT16( flashTime );
	buffer[2] = HI_UINT16( flashTime );

	if ( AF_DataRequest( &SampleApp_Flash_DstAddr, &SampleApp_epDesc,
						SAMPLEAPP_FLASH_CLUSTERID,
						3,
						buffer,
						&SampleApp_TransID,
						AF_DISCV_ROUTE,
						AF_DEFAULT_RADIUS ) == afStatus_SUCCESS )
	{
	}
	else
	{
		// Error occurred in request to send.
	}
