你要的SpringCloud简略指南来了!(Netflix版本)
Spring Cloud 简略指南(Netflix)
- 一、概述
- 1、基于分布式的微服务架构
- 2、SpringCloud简介
- 1.What is SpringCloud
- 2.集成的相关项目
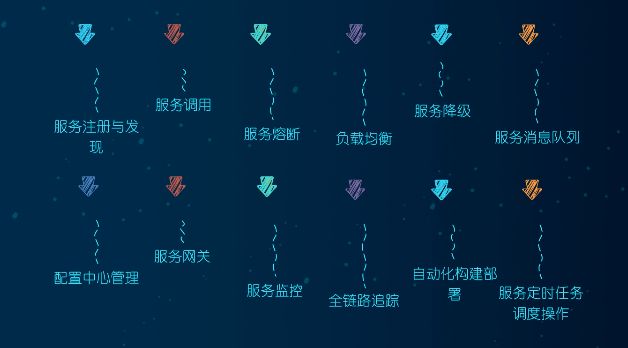
- 3.京东架构
- 4.学习的技术栈
- 5.版本选择
- 6.SpringCloud 版本关系
- 二、创建一个简单的微服务项目(纯http连接)
- 1、创建一个父maven项目(可选)
- 1.idea新建maven项目:
- 1.设置编码(很重要)
- 2.设置文件过滤显示(个性化)
- 3.编写pom文件,修改父maven项目设置
- 2、搭建子maven项目
- a.SpringInitializer搭建SpringBoot项目
- b.maven项目搭建SpringBoot子项目
- c.模仿前一步炮制一个调用接口的项目
- 3、工程重构
- 1、新建模块 api
- 2、将消费者和服者种的entities拷贝至新模块中,
- 三、Eureka服务注册中心
- 1、简介
- 简要介绍
- Eureka的架构位置,
- 2、Eureka服务端安装
- a.创建Eureka服务端服务注册中心
- b.服务注册和发现中心的配置
- 附:使用maven引入依赖:
- d.使用注解开启Eureka服务端服务
- e.运行项目,测试成功
- 3、将其他模块配置为Client模块
- 4、Eureka集群
- a.Eureka集群原理
- b.集群配置
- c.运行测试
- 5、部署业务项目到集群
- 6、使用Eureka负载均衡
- 先增加一个服务提供方
- 如何负载均衡,调用服务?
- a)我们可以将这个地址动态化,将基础地址修改为服务的名称
- b)开启RestTemplate的负载均衡(必要)
- c)测试成功
- 负载均衡用的实际模块?
- 7、修改默认显示的节点名称与地址
- 8、服务发现Discovery
- a.启动类开启服务发现
- b.利用DiscoveryClient获取信息
- c.List\ getServices();
- d.List\ getInstances(String serviceId);
- 9、Eureka自我保护机制
- a)默认情况下
- b)自我保护
- c)自我保护开关
- 1、 注册中心关闭自我保护机制,修改检查失效服务的时间。
- 2、 微服务修改减短服务心跳的时间。
- 终:Eureka 停止更新
- 四、使用Zookeeper代替Eureka
- 1、搭建Zookeeper注册中心
- 2、项目注册入Zookeeper
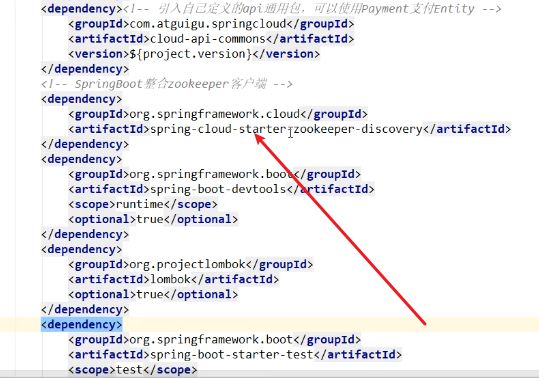
- 1.项目引入Zookeeper的服务发现依赖
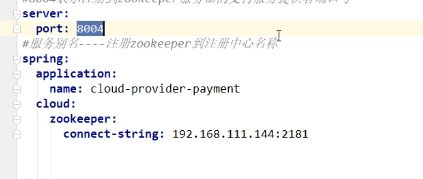
- 2.配置yaml文件,注意connect-string是Zookeeper服务注册中心的 地址
- 3.主启动类
- 4.启动
- 3、Zookeeper与Eureka的区别
- 4、服务消费者入驻
- 5、Zookeeper集群
- 五、Consul服务注册与发现
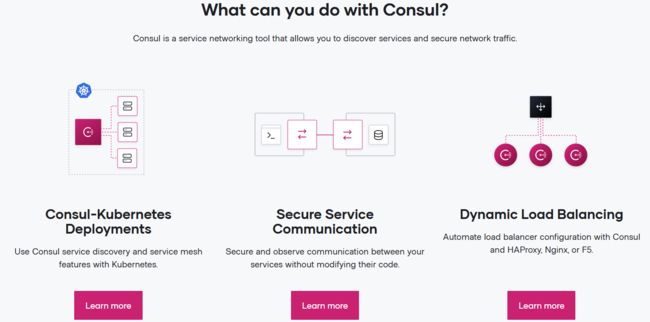
- 1、What is Consul
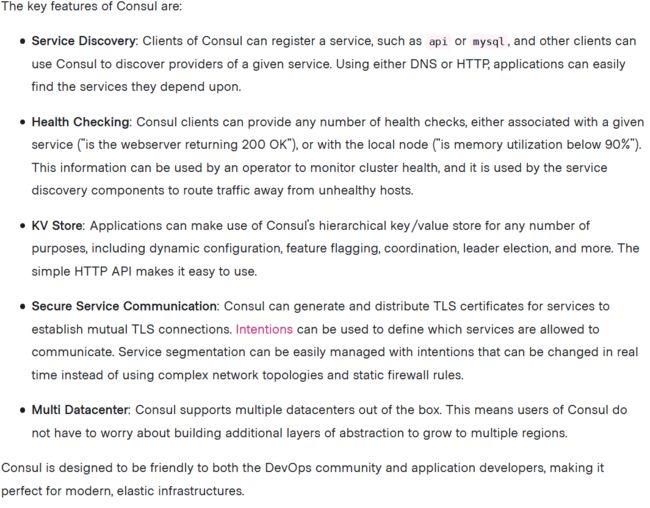
- 服务发现
- 健康检查
- KV存储
- 安全服务通信
- 集群
- 可视化的web界面
- 2、安装启动
- 开发模式启动
- 可视化页面地址
- 3、注册服务到Consul
- 依赖
- 配置文件
- 启动类
- 启动
- 六、三个注册中心的比较
- CAP理论
- 优劣分析
- 更好的集群设计
- 自我保护模式
- ZooKeeper的劣势
- 七、Ribbon负载均衡
- 1、负载均衡
- a.LoadBalance负载均衡
- b.集中式LoadBalance
- c.进程内LoadBalance
- 2、Ribbon特性与项目情况
- a.Ribbon项目已经进入维护,但是仍被大规模使用
- b.Ribbon本地负载均衡客户端VSNginx服务端负载均衡
- c.功能
- 3、Ribbon项目架构
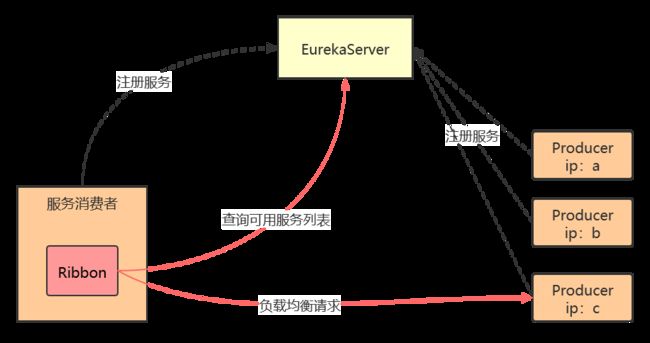
- Ribbon工作分为两步
- 4、整合Ribbon
- a.手动引入依赖(没必要)
- b.RestTemplate的两种请求方式
- c.开启负载均衡
- d.核心组件RibbonIRule
- 定制/替换rule
- 新建包
- 添加@RibbonClient注解
- 5、Ribbon复杂均衡原理
- a.轮询算法
- b.自己写一个负载均衡
- 八、OpenFeign服务接口调用
- 1.Feign简介
- 概述
- 2.使用OpenFeign
- 3.Feign超时时间设置
- 4.OpenFeign日志增强
- 配置Feign日志
- 九、Hystrix断路器
- 1、服务雪崩、熔断、降级
- 服务雪崩
- 服务熔断
- 服务降级
- 2、Hystrix断路器
- Hystrix服务降级fallback
- Hystrix服务熔断break
- Hystrix服务限流flowlimit
- 3、模拟服务雪崩
- a.构建基础项目
- b.模拟项目高压
- i.新建线程组
- ii.设置为2w个请求
- iii.新建Http请求
- iiii.配置http请求
- c.模拟服务雪崩
- 4、Hystrix服务降级
- 升级接口,配置Hystrix服务降级策略
- 配置默认fallback
- 5、通配服务降级FeignFallback
- a.开启feign的Hystrix服务降级
- b.编写降级处理类
- 6、Hystrix服务熔断
- 7、Hystrix工作流程
- 8、可视化服务监控Dashboard
- 引入Dashboard
- 十、Spring Cloud Gateway
- 1、微服务网关API Gateway
- 2、Spring Cloud Gateway概述
- a.What
- b.术语Glossary
- c.How It Works
- 3、Spring Cloud Gateway实战
- a.引入模块
- b.路由配置
- 3、Spring Cloud Gateway Predicate配置
- 4、Spring Cloud Gateway Filter配置
- a.Global Filter
- b.实现自定的Global Filter
- 5、Gateway动态路由
- a.使用注册中心
- 修改默认的断言与过滤器
- b.使用Ribbon负载均衡
- 十一、Spring Cloud Config分布式配置中心
- 1、搭建Config服务配置中心
- a.搭建远程Git仓库
- b.创建Config项目
- 2、Config访问配置的几种方式
- 3、Config客户端配置
- a.客户端依赖
- b.启动类
- c.配置文件
- 4、客户端动态更新
- 配置
- 测试
- 十二、消息总线Bus
- 1、消息总线
- 2、客户端改造
- 1、添加依赖
- 2、服务刷新版本配置文件
- 3、缺陷
- 3、Config刷新版本配置
- 1、添加依赖
- 2、配置文件
- 其它
- 局部刷新
- 跟踪总线事件
- 十三、消息驱动
- 1.Stream消息驱动
- 持久化发布/订阅支持
- 消费者组
- 消费者类型
- 持久性
- 分区支持
- 2.主要概念,编程模型
- Destination Binders
- Bindings
- BindingName
- 声明和绑定通道
- 通过`@EnableBinding`触发绑定
- `@Input` 与 `@Output`
- 访问绑定通道
- 生产和消费消息
- 聚合
- RxJava 支持
- 3.绑定器
- 生产者与消费者
- Binding配置项
- SpringCloudStream的bindings配置
- Consumer properties
- Producer Properties
- 4.搭建一个简单的demo
- Producer
- Consumer
- 5.分组消费升级
- 十四、Spring Cloud Sleuth分布式链路追踪
一、概述
官网简介地址https://spring.io/cloud
1、基于分布式的微服务架构
2、SpringCloud简介
1.What is SpringCloud
SpringCloud=分布式微服务架构的一站式解决方案,是多种微服务架构落地技术的集合体,俗称微服务全家桶
2.集成的相关项目
SpringCloud已经成为国际微服务开发的主流技术栈,国内开发者社区十分火爆,同时Alibaba已经加入SpringCloud Alibaba
3.京东架构
4.学习的技术栈
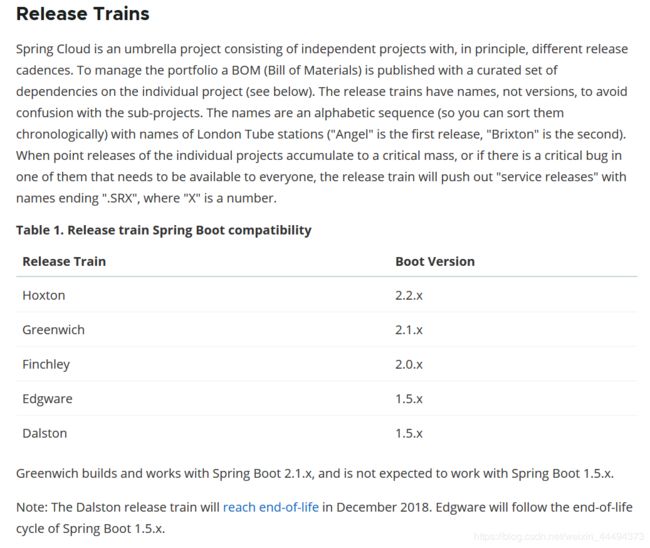
5.版本选择
SpringCloud D版本对应SpringBoot1版本,(过时)
SpringCloud H版本对应SpringBoot2版本
Spring Cloud Alibaba
SpringBoot 1.x版本在2020早已过时
6.SpringCloud 版本关系
采用英国伦敦地铁站来命名,并由地铁站名称字母A-Z依次类推的形式来迭代版本
截止目前2020年5月10日为H版本
二、创建一个简单的微服务项目(纯http连接)
1、创建一个父maven项目(可选)
父项目是用来统一管理依赖版本,在父项目中定义各个依赖的版本,子maven项目只需要声明GroupId+artifactId即可,版本会自动的依赖父maven项目
如果子maven项目拥有自己的版本,就以子项目为主
即默认为父maven项目的版本号
1.idea新建maven项目:
删去src,因为我们只需要一个父maven工程,src没有用
这里也可以选择使用SpringInitializer生成,只要,删去src,修改pom结构为父maven结构即可。
1.设置编码(很重要)
在idea的setting中,找到FileEncodings
有四处需要你修改,尽量都改utf8
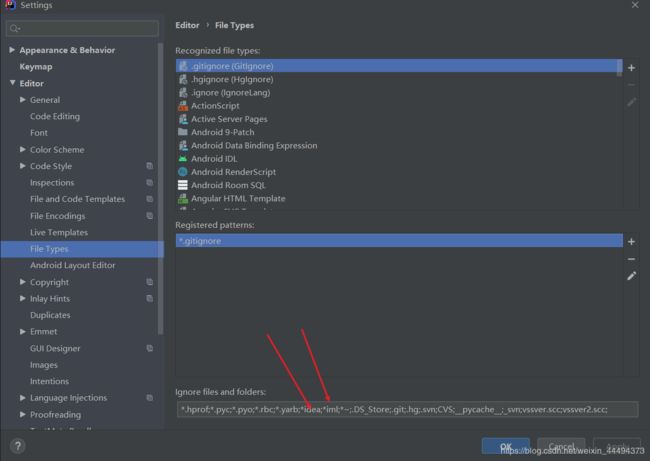
2.设置文件过滤显示(个性化)
解决idea显示了一堆没用的文件,如*.iml文件等等等等
在FileTypes下修改设置
这里修改了两个,如图,注意一定要书写规范,用分号间隔!
3.编写pom文件,修改父maven项目设置
pom.xml如下
pom的坑:因为使用了阿里云的镜像,似乎存在一些版本缺失的问题,调整一下maven依赖的版本,就能解决,
下面是2020年5月11日能使用的版本
  4.0.0

  com.jirath.cloud
  springcloud1
  pom
  1.0-SNAPSHOT


    eureka
    comsumer1
    producer1
    api


  Maven

  http://maven.apache.org/
  2001


    UTF-8
    1.8
    1.8
    4.12
    1.2.17
    1.16.18
    8.0.18
    1.1.16
    1.1.10
    2.3.0.RELEASE
    Hoxton.SR4
    2.1.0.RELEASE
    1.3.0
    2.1.1
    5.1.0


      website
      scp://webhost.company.com/www/website


        com.jirath.cloud
        api
        1.0-SNAPSHOT


        org.springframework.boot
        spring-boot-dependencies
        ${spring.boot.version}
        pom
        import


        org.springframework.cloud
        spring-cloud-dependencies
        Hoxton.SR4
        pom
        import


        com.alibaba.cloud
        spring-cloud-alibaba-dependencies
        2.1.0.RELEASE
        pom
        import


        mysql
        mysql-connector-java
        ${mysql.version}


        com.alibaba
        druid
        ${druid.version}


        com.alibaba
        druid-spring-boot-starter
        ${druid.spring.boot.starter.version}


        org.mybatis.spring.boot
        mybatis-spring-boot-starter
        ${mybatis-spring-boot-starter.version}


        org.projectlombok
        lombok
        ${lombok.version}


        org.springframework.boot
        spring-boot-maven-plugin

          true
          true


      nexus-aliyun
      Nexus aliyun
      http://maven.aliyun.com/nexus/content/groups/public

        true


        false
2、搭建子maven项目
1、创建数据库
a.SpringInitializer搭建SpringBoot项目
在父maven项目下新建model,选择SpringInitializer,然后修改pom配置,
使用SpringInitializer生成的项目,默认的父项目都是SpringBoot
为了让该模块与父模块关联,需要指定parent,这里与父maven项目的设定相同
<parent>
        <artifactId>springcloud1artifactId>
        <groupId>com.jirath.cloudgroupId>
        <version>1.0-SNAPSHOTversion>
    parent>
去除SpringInitializer自动引入依赖的版本
自动生成的pom文件,可能带有依赖版本,建议修改为父pom相同,去掉版本就行。
b.maven项目搭建SpringBoot子项目
1.父maven项目下新建model,选择maven项目,然后修改pom配置
本示例中,parent要保持与父项目相同其余设定是子项目的信息,无要求,配置后不影响项目整体。
示例:
<project xmlns="http://maven.apache.org/POM/4.0.0" xmlns:xsi="http://www.w3.org/2001/XMLSchema-instance"
         xsi:schemaLocation="http://maven.apache.org/POM/4.0.0 https://maven.apache.org/xsd/maven-4.0.0.xsd">
    <modelVersion>4.0.0modelVersion>
    <parent>
        <artifactId>springcloud1artifactId>
        <groupId>com.jirath.cloudgroupId>
        <version>1.0-SNAPSHOTversion>
    parent>
    <groupId>com.jirath.cloudgroupId>
    <artifactId>producer1artifactId>
    <version>0.0.1-SNAPSHOTversion>
    <name>producer1name>
    <description>Demo project for Spring Bootdescription>

    <properties>
        <java.version>1.8java.version>
    properties>

    <dependencies>

        <dependency>
            <groupId>com.alibabagroupId>
            <artifactId>druid-spring-boot-starterartifactId>
        dependency>
        <dependency>
            <groupId>org.springframework.bootgroupId>
            <artifactId>spring-boot-starter-actuatorartifactId>
        dependency>
        <dependency>
            <groupId>org.springframework.bootgroupId>
            <artifactId>spring-boot-starter-webartifactId>
        dependency>
        <dependency>
            <groupId>org.mybatis.spring.bootgroupId>
            <artifactId>mybatis-spring-boot-starterartifactId>
        dependency>

        <dependency>
            <groupId>mysqlgroupId>
            <artifactId>mysql-connector-javaartifactId>
            <scope>runtimescope>
        dependency>
        <dependency>
            <groupId>org.springframework.bootgroupId>
            <artifactId>spring-boot-starter-testartifactId>
            <scope>testscope>
            <exclusions>
                <exclusion>
                    <groupId>org.junit.vintagegroupId>
                    <artifactId>junit-vintage-engineartifactId>
                exclusion>
            exclusions>
        dependency>
    dependencies>

    <build>
        <plugins>
            <plugin>
                <groupId>org.springframework.bootgroupId>
                <artifactId>spring-boot-maven-pluginartifactId>
            plugin>
        plugins>
    build>

project>
2、resource目录下新建 application.yml
2、resource目录下新建 application.yml
注意: mysql8的数据库驱动包是 com.mysql.cj.jdbc.Driver
mysql5是 com.mysql.jdbc.Driver
这里一昧的复制是必然报错的,比如mybatis的配置需要根据你项目实际包名确定,数据库等等等等都需要根据实际配置
server:
  port: 8001 #服务端口
  servlet:
    context-path: /

spring:
  datasource:
    type: com.alibaba.druid.pool.DruidDataSource  #当前数据源操作类型
    driver-class-name: com.mysql.cj.jdbc.Driver #数据库驱动包
    url: jdbc:mysql://localhost:3306/test?characterEncoding=utf8&useSSL=false&serverTimezone=UTC&rewriteBatchedStatements=true
    username: root
    password: root
  application:
    name: producer1
mybatis:
  mapper-locations: classpath:mapper/*Mapper.xml
  type-aliases-package: com.jirath.cloud.entity  #所有entity别名所在包
4、新建启动类Producer1Application
package com.jirath.cloud.producer1;

import org.springframework.boot.SpringApplication;
import org.springframework.boot.autoconfigure.SpringBootApplication;

@SpringBootApplication
public class Producer1Application {

    public static void main(String[] args) {
        SpringApplication.run(Producer1Application.class, args);
    }

}
至此子项目以及配置完成,为了方便学习与演示,将简单构建一下接口
5、dao层开发
新建PaymentDao接口,这里本人没有注解@Component注解,也能运行
相关文章:https://juejin.im/post/5d9c60d46fb9a04ddd42ea37
@Mapper
public interface TestDao {
    @Select("SELECT * FROM test")
    List getAll();

    void add(Test test);
}
mapper.xml
resource下创建mapper文件夹,新建PaymentMapper.xml
INSERT INTO test (id,`name`) VALUES (#{id},#{name})
6、service层
service接口
public interface TestService {
    List getAll();

    void add(Test test);
}
service实现类
这里因为我没有在mapper接口上注解@Component注解,会爆红,但是能正常运行,强迫症可以自己加一个@Repository注解
@Service
public class TestServiceImpl implements TestService {

    @Autowired
    TestDao testDao;
    @Override
    public List getAll() {
        return testDao.getAll();
    }

    @Override
    public void add(Test test) {
        testDao.add(test);
    }
}
7、controller层
@RestController
public class MsgController {
    @Autowired
    TestService testService;
    @RequestMapping(value = "/prod",method = RequestMethod.GET)
    public ResultVo> getAll(){
        return new ResultVo>(200, "所有内容", testService.getAll());
    }
    @RequestMapping(value = "/prod",method = RequestMethod.POST)
    public ResultVo add(Test test){
        testService.add(test);
        return new ResultVo(200, "增加内容","success");
    }
}
8、测试
1、get测试:浏览器输入:http://localhost:8001/prod/
2、post测试:
c.模仿前一步炮制一个调用接口的项目
该项目为了区分,项目端口放在了80
使用RestTemplate进行服务调用
1、RestTemplate
RestTemplate提供了多种便捷访问远程Http服务的方法,
是一种简单便捷的访问restful服务的模板类,是spring提供的用于访问Rest服务的客户端模板工具集。
配置类
@Configuration
public class ApplicationContextConfig {

    @Bean
    public RestTemplate getRestTemplate() {
        return new RestTemplate();
    }
}
6、controller层用RestTemplate调用就行。
这里需要用到Test与ResultVo两个类,我们选择直接复制过来这个项目即可
@RestController
public class MsgController {
    private final static String BASIC_URL="http://localhost:8001";
    @Autowired
    private RestTemplate restTemplate;
    @RequestMapping(value = "/prod",method = RequestMethod.GET)
    public ResultVo getAll(){
        return new ResultVo(200, "所有内容", restTemplate.getForEntity(BASIC_URL+"prod",ResultVo.class));
    }
    @RequestMapping(value = "/prod",method = RequestMethod.POST)
    public ResultVo add(Test test){
        restTemplate.postForEntity(BASIC_URL+"prod",test,ResultVo.class);
        return new ResultVo(200, "增加内容","success");
    }
}
7、rundashbroad
运用spring cloud框架基于spring boot构建微服务,一般需要启动多个应用程序,在idea开发工具中,多个同时启动的应用
需要在RunDashboard运行仪表盘中可以更好的管理,但有时候idea中的RunDashboard窗口没有显示出来,也找不到直接的开启按钮
idea中打开Run Dashboard的方法如下
view > Tool Windows > Run Dashboard
如果上述列表找不到Run Dashboard,则可以在工程目录下找到.idea文件夹下的workspace.xml,在其中相应位置加入以下代码(替换)即可:
关闭重启后出现。
现在我们已经做到了一个基础的互相依赖的两个项目,我们现在对这个项目进行第一次升级
3、工程重构
我们需要遵循设计模式,将共用的部分提取出来,使系统更灵活
在本项目中,entity包明显是共用的,我们着手提取出这个包为独立的项目依赖
1、新建模块 api
依赖:
这里我没有写依赖,因为lombok的一些特性,并不是很提倡使用,使用idea的一键get\set也很轻松,模块的依赖自然是需要用到一些工具,按需添加即可
注:请确认与父pom的依赖设置正确
<project xmlns="http://maven.apache.org/POM/4.0.0"
         xmlns:xsi="http://www.w3.org/2001/XMLSchema-instance"
         xsi:schemaLocation="http://maven.apache.org/POM/4.0.0 http://maven.apache.org/xsd/maven-4.0.0.xsd">
    <parent>
        <artifactId>springcloud1artifactId>
        <groupId>com.jirath.cloudgroupId>
        <version>1.0-SNAPSHOTversion>
    parent>
    <modelVersion>4.0.0modelVersion>

    <artifactId>apiartifactId>


project>
2、将消费者和服者种的entities拷贝至新模块中,
删除原来的entities包
选择api模块,clean、install cloud-api-commons 模块,
使用install命令可以将模块安装在依赖中,其他模块就能使用本模块了
在消费则服务者pom.xml中分别引入依赖,测试运行。
这里的artificialid就是api模块中配置的名称
<dependency>
            <groupId>com.jirath.cloudgroupId>
            <artifactId>apiartifactId>
            <version>1.0-SNAPSHOTversion>
            <scope>compilescope>
        dependency>
如果不能流畅成功,细心找找错误,clean所有的模块,然后从api模块开始安装,因为api被所有模块依赖
测试运行,成功
三、Eureka服务注册中心
文档wikihttps://github.com/Netflix/eureka/wiki
1、简介
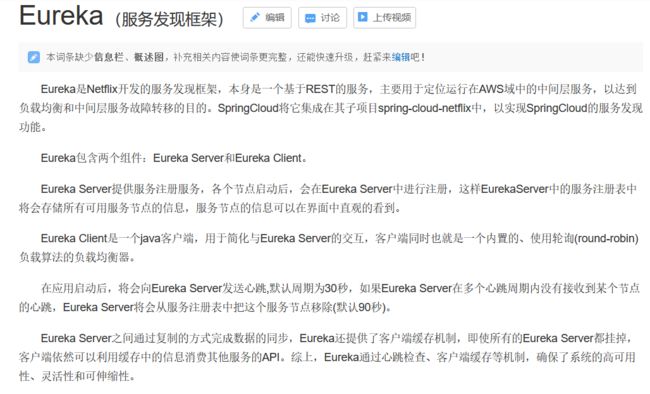
简要介绍
分布式的服务注册中心,各个服务在这里注册,Eureka会检测服务的心跳
Eureka是基于REST的服务,主要在AWS云中用于定位服务,以实现负载均衡和中间层服务器的故障转移。 我们称此服务为Eureka服务器。 Eureka还带有一个基于Java的客户端组件Eureka Client,它使与服务的交互变得更加容易。 客户端还具有一个内置的负载平衡器,可以执行基本的循环负载平衡。 在Netflix,更复杂的负载均衡器将Eureka包装起来,以基于流量,资源使用,错误条件等多种因素提供加权负载均衡,以提供出色的弹性。
Eureka的架构位置,
注意这里有多台Eureka服务器,这样做的原因是防止因为Eureka故障导致整体结构崩溃
2、Eureka服务端安装
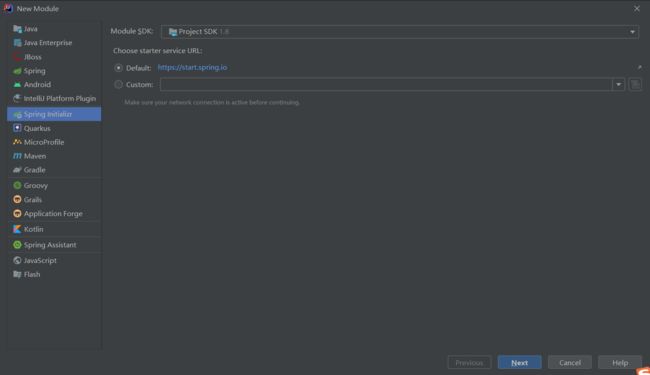
a.创建Eureka服务端服务注册中心
Eureka的服务注册中心是一个依托SpringBoot的web服务,搭建起来很轻松。
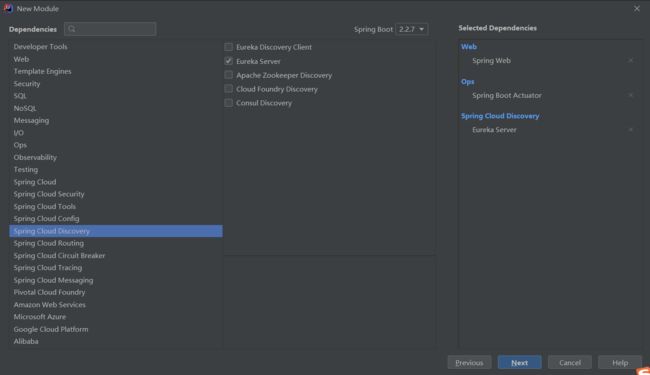
个人比较懒,使用了Initializer来快速搭建
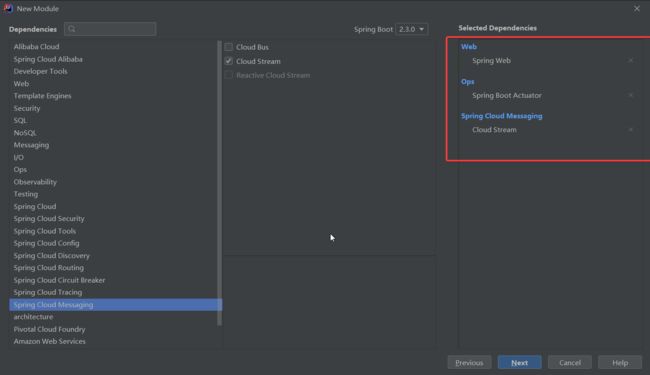
SpringBoot的web模块
另外加上一个Spring Boot Actuator
只有Eureka服务端模块就能满足我们的使用了,这两个是可不选的
最后选择服务发现里面的Eureka服务端(必选)
Actuator是什么
Spring Boot Actuator提供了生产上经常用到的功能(如健康检查,审计,指标收集,HTTP跟踪等),帮助我们监控和管理Spring Boot应用程序。这些功能都可以通过JMX或HTTP端点访问。
通过引入相关的依赖,即可监控我们的应用程序,收集指标、了解流量或数据库的状态变得很简单。该库的主要好处是我们可以获得生产级工具,而无需自己实际实现这些功能。与大多数Spring模块一样,我们可以通过多种方式轻松配置或扩展它。
Actuator还可以与外部应用监控系统集成,如Prometheus,Graphite,DataDog,Influx,Wavefront,New Relic等等。 这些系统为您提供出色的仪表板,图形,分析和警报,以帮助我们在一个统一界面监控和管理应用服务。
b.服务注册和发现中心的配置
pom.xml文件需要修改父项目(切记,使用initializer生成的子项目都需要修改!)
yml配置文件如下,
注意这里只需要简单的Eureka服务配置即可
排错:
若url字段无数值,需要配置数据源:删去数据源的依赖,这里一开始我父项目填为了依赖数据源的项目,导致Eureka也得配置数据源,把这个改回来就不用了。
设置了中心不注册自己
设置了服务的位置
server:
  port: 7000

eureka:
  instance:
    hostname: localhost #Eruka服务端的实例名称
  client:
    #不注册自己
    register-with-eureka: false
    #false表示自己就是注册中心,职责是维护服务,不需要检索服务
    fetch-registry: false
    service-url:
      defaultZone: Http://${eureka.instance.hostname}:${server.port}/eruka/
附:使用maven引入依赖:
注意是SpringCloud的新版本依赖,相对旧版本的不太一样,不要用错了,结尾要是Server
<dependency>
            <groupId>org.springframework.cloudgroupId>
            <artifactId>spring-cloud-starter-netflix-eureka-serverartifactId>
        dependency>
d.使用注解开启Eureka服务端服务
@EnableEurekaServer
@SpringBootApplication
public class EurekaApplication {

    public static void main(String[] args) {
        SpringApplication.run(EurekaApplication.class, args);
    }

}
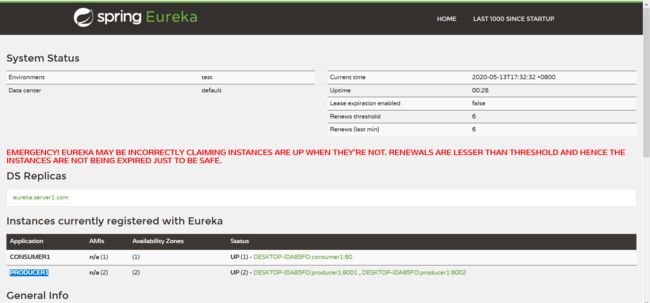
e.运行项目,测试成功
为了区分,建议划一块端口给服务中心集群专用,避免混淆
3、将其他模块配置为Client模块
在之前的项目中,添加Eureka-Client的依赖
注意这里使用的是新版本的Eureka依赖!!,版本不同会导致无法成功注册
 <dependency>
            <groupId>org.springframework.cloudgroupId>
            <artifactId>spring-cloud-starter-netflix-eureka-clientartifactId>
        dependency>
添加配置:(在原有基础上添加Eureka的配置)
这里需要设置为client模式,即注册本服务,扫描其他服务
配置本服务的名称,为spring.application.name:
另外需要配置service-url:Server的服务地址
这里要注意url,很容易写错
spring:
  application:
    name: producer1
eureka:
  client:
    service-url:
      defaultZone: http://localhost:7001/eureka/
    #服务。需要开启入驻与搜索
    register-with-eureka: true
    fetch-registry: true
使用注解开启服务
@SpringBootApplication
@EnableEurekaClient
public class Producer1Application {

    public static void main(String[] args) {
        SpringApplication.run(Producer1Application.class, args);
    }

}
测试,打开Eureka服务的地址,检查有没有加入新服务
暂时忽略红色警告
4、Eureka集群
a.Eureka集群原理
Eureka 集群的工作原理。我们假设有三台 Eureka Server 组成的集群,第一台 Eureka Server 在北京机房,另外两台 Eureka Server 在深圳和西安机房。这样三台 Eureka Server 就组建成了一个跨区域的高可用集群,只要三个地方的任意一个机房不出现问题,都不会影响整个架构的稳定性。
Eureka Server注册中心集群中每个节点都是平等的,集群中的所有节点同时对外提供服务的发现和注册等功能。同时集群中每个Eureka Server节点又是一个微服务,也就是说,每个节点都可以在集群中的其他节点上注册当前服务。又因为每个节点都是注册中心,所以节点之间又可以相互注册当前节点中已注册的服务,并发现其他节点中已注册的服务。
集群中的每个节点互相注册,互相守望,对外暴露为一个整体
b.集群配置
关键:互相守望
我们将多台服务互相守望,配置在defaultZone中,多个地址用逗号隔开就行
注意:本地运行需要配置一下host,否则Eureka无法识别是集群配置
server:
  port: 7002

eureka:
  instance:
    hostname: eureka.server2.com
  client:
    register-with-eureka: false
    fetch-registry: false
    service-url:
      defaultZone: http://eureka.server1.com:7001/eureka/
server:
  port: 7001

eureka:
  instance:
    hostname: eureka.server1.com
  client:
    register-with-eureka: false
    fetch-registry: false
    service-url:
      defaultZone: http://eureka.server2.com:7002/eureka/
要点:hostname表示本机位置,defaultZone表示关注的服务地址
eureka.server2.com,eureka.server1.com 都是指向本机127.0.0.1(localhost)的host映射,可以自己选名的
请注意两个文件中的细微差别
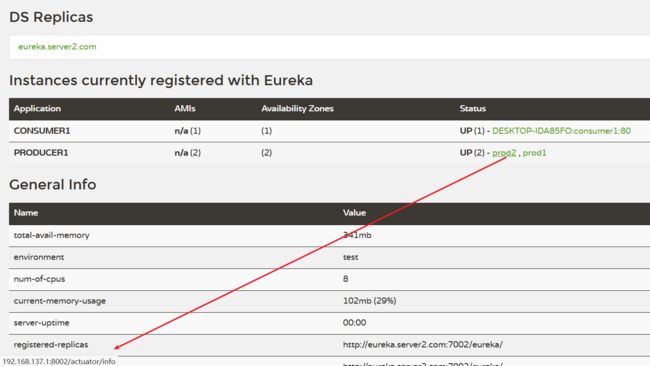
c.运行测试
如图为成功
5、部署业务项目到集群
修改一下业务模块的配置(可选),
defaultZone: http://localhost:7001/eureka/,http://localhost:7002/eureka/
因为Eureka集群会互相复制信息,使用即使你只把业务模块发布在其中之一的服务上,集群所有模块都将获得信息
运行测试
6、使用Eureka负载均衡
一般来说,服务的提供者在实际情况一般为多台服务器,SpringCloud可以使用负载均衡来均衡调用不同的服务器
两个服务节点使用了相同的Application.name的情况下,将部署为同一个服务的多个节点
如下
先增加一个服务提供方
copy一个producter,不再详细赘述,端口修改为8002,其余不改变
这样两个项目将被视作同一服务。
修改一下接口,使得我们可以知道是哪个项目做了回应
@RestController
public class MsgController {
    @Autowired
    private TestService testService;
    @Value("${server.port}")
    private String port;
    @RequestMapping(value = "/prod",method = RequestMethod.GET)
    public ResultVo<List<Test>> getAll(){
        return new ResultVo<List<Test>>(200, "所有内容,服务"+port, testService.getAll());
    }
    @RequestMapping(value = "/prod",method = RequestMethod.POST)
    public ResultVo<String> add(Test test){
        testService.add(test);
        return new ResultVo(200, "增加内容,服务"+port,"success");
    }
}
如何负载均衡,调用服务?
我们在之前的服务调用模块中,使用了以下静态常量来标注服务提供者地址,
private final static String BASIC_URL="http://localhost:8001";
a)我们可以将这个地址动态化,将基础地址修改为服务的名称
private final static String BASIC_URL="http://PRODUCER1";
b)开启RestTemplate的负载均衡(必要)
添加@LoadBalanced注解
@Configuration
public class RestTemplateConf {
    @Bean
    @LoadBalanced
    public RestTemplate getRestTemplate() {
        return new RestTemplate();
    }
}
c)测试成功
http://localhost/prod
快速刷新几次,你会看到使用的实际项目端口是不同,意味成功
负载均衡用的实际模块?
上述模块实质使用了Ribbon来达到负载均衡的目的
Ribbon的负载均衡使得消费端可以不再关心地址,同时还有负载的功能
7、修改默认显示的节点名称与地址
添加两个依赖
<dependency>
    <groupId>org.springframework.bootgroupId>
    <artifactId>spring-boot-starter-actuatorartifactId>
dependency>
<dependency>
            <groupId>org.springframework.bootgroupId>
            <artifactId>spring-boot-starter-webartifactId>
        dependency>
修改配置文件
eureka:
  instance:
    instance-id: prod2
    prefer-ip-address: true
8、服务发现Discovery
解决问题:节点如何获取微服务系统的服务以及各节点信息
解决方法:
a.启动类开启服务发现
@EnableDiscoveryClient
注意:不同的框架对服务发现都有实现,所以我们应该选择SpringCloud的接口
org.springframework.cloud.client.discovery.EnableDiscoveryClient;
@SpringBootApplication
@EnableEurekaClient
@EnableDiscoveryClient
public class Producer1Application {

    public static void main(String[] args) {
        SpringApplication.run(Producer1Application.class, args);
    }

}
b.利用DiscoveryClient获取信息
在Controller中添加下面的部分
注意:不同的框架对服务发现都有实现,所以我们应该选择SpringCloud的接口
org.springframework.cloud.client.discovery.DiscoveryClient
private static final Logger log= LoggerFactory.getLogger(MsgController.class);
@Autowired
private DiscoveryClient discoveryClient;
@RequestMapping("/msg")
public ResultVo<List<String>> getClientMsg(){
    log.info("8001");
    List<String> services=discoveryClient.getServices();
    List<String> msg=new ArrayList<>();
    msg.add(services.toString());
    List<ServiceInstance> instances=discoveryClient.getInstances(services.get(0));
    instances.stream().forEach(in->{
        log.info(in.getInstanceId()+"\t"+in.getServiceId()+"\t"+in.getScheme()+"\t");
        log.info(in.getHost()+":"+in.getPort()+"\t"+in.getUri()+"\t"+in.isSecure());
        msg.add(in.getInstanceId()+"\t"+in.getServiceId()+"\t"+in.getScheme()+"\t");
        msg.add(in.getHost()+":"+in.getPort()+"\t"+in.getUri()+"\t"+in.isSecure());
    });
    return new ResultVo<List<String>>(200,"8001获取信息",msg);
}
c.List getServices();
获取所有的服务,比如
“[producer1, consumer1]”
是微服务的服务名
d.List getInstances(String serviceId);
根据微服务的服务名获取实例,通过这个实例可以获取各种信息,如下
ServiceInstance可以获取的信息
public interface ServiceInstance {
    default String getInstanceId() {
        return null;
    }

    String getServiceId();

    String getHost();

    int getPort();

    boolean isSecure();

    URI getUri();

    Map<String, String> getMetadata();

    default String getScheme() {
        return null;
    }
}
9、Eureka自我保护机制
a)默认情况下
如果Eureka Server在一定时间内**(默认90秒)没有接收到某个微服务实例的心跳**,Eureka Server将会移除该实例。但是**当网络分区故障发生时,微服务与Eureka Server之间无法正常通信,而微服务本身是正常运行的,**此时不应该移除这个微服务,所以引入了自我保护机制。
官方解释https://github.com/Netflix/eureka/wiki/Understanding-Eureka-Peer-to-Peer-Communication
b)自我保护
自我保护模式正是一种针对网络异常波动的安全保护措施,使用自我保护模式能使Eureka集群更加的健壮、稳定的运行。
自我保护机制的工作机制是如果在15分钟内超过85%的客户端节点都没有正常的心跳,那么Eureka就认为客户端与注册中心出现了网络故障,Eureka Server自动进入自我保护机制,此时会出现以下几种情况:
1、Eureka Server不再从注册列表中移除因为长时间没收到心跳而应该过期的服务。
2、Eureka Server仍然能够接受新服务的注册和查询请求,但是不会被同步到其它节点上,保证当前节点依然可用。
3、当网络稳定时,当前Eureka Server新的注册信息会被同步到其它节点中。
因此Eureka Server可以很好的应对因网络故障导致部分节点失联的情况,而不会像ZK那样如果有一半不可用的情况会导致整个集群不可用而变成瘫痪。
c)自我保护开关
Eureka自我保护机制,通过配置eureka.server.enable-self-preservation来true打开/false禁用自我保护机制,默认打开状态,建议生产环境打开此配置。
1、 注册中心关闭自我保护机制,修改检查失效服务的时间。
eureka:
  server:
    enable-self-preservation: false
    eviction-interval-timer-in-ms: 3000
2、 微服务修改减短服务心跳的时间。
# 默认90秒
lease-expiration-duration-in-seconds: 10
# 默认30秒
lease-renewal-interval-in-seconds: 3
以上配置建议在生产环境使用默认的时间配置。
终:Eureka 停止更新
1版本仍然是活跃的,2版本将后果自负
四、使用Zookeeper代替Eureka
Zookeeper可以做服务注册中心,使用能够代替Eureka的位置
架构不需要改变,只需要改变Zookeeper的配置
- 打开端口并启动Zookeeper
- 将Zookeeper作为注册中心
1、搭建Zookeeper注册中心
直接启动Zookeeper然后开启端口即可
2、项目注册入Zookeeper
1.项目引入Zookeeper的服务发现依赖
2.配置yaml文件,注意connect-string是Zookeeper服务注册中心的 地址
3.主启动类
Zookeeper不在需要开启Eureka服务,只需要开启服务发现即可
@EnableDiscoveryClient
4.启动
Zookeeper启动失败bug之一:版本冲突
Zookeeper的jar包与远程的Zookeeper注册中心的版本不一致,将导致启动失败
解决方案:在pom中指定版本
3、Zookeeper与Eureka的区别
Zookeeper在收不到服务的心跳后,将立即去除该结点
而Eureka拥有自我保护机制
Zookeeper为临时节点
4、服务消费者入驻
与项目入驻相同,支持DiscoveryClient,所以使用方法与Eureka相同,不多赘述,需要前翻。
5、Zookeeper集群
与Eureka相同,配置服务注册中心地址时,用逗号分隔即可
五、Consul服务注册与发现
Consul官网 https://www.consul.io/
1、What is Consul
提供了微服务中服务治理、配置中心、控制总线的功能。每一个功能都能单独使用,也可以一同使用构建全方位的服务网络。
提供了一套网站的服务网格解决方案
服务发现
Consul的客户端可以注册为一个服务,api与MySQL都可以注册为一个服务,其他的节点可以用Consul发现服务的提供者。可以使用DNS或HTTP发现需要的服务
健康检查
所有的组件接受安全检查,服务发现组件使用它将流量从不健康的主机路由出去。
KV存储
类似Redis
应用程序可以将Consul的分层K/V存储,用于任何目的,包括动态配置、特性标记、协调、leader选举等。简单的HTTP API使其易于使用
安全服务通信
Consul可以为服务生成和分发TLS证书,以建立相互的TLS连接。意图可用于定义允许哪些服务通信。
服务分割可以很容易地进行管理,其目的可以实时更改,而不需要使用复杂的网络拓扑和静态防火墙规则。
集群
多中心集群部署,防止瘫痪
可视化的web界面
2、安装启动
安装https://www.consul.io/downloads.html
使用cmd工程启动,文件夹地址栏输入cmd
F:\consul>consul --version
显示版本
开发模式启动
consul agent -dev
可视化页面地址
3、注册服务到Consul
依赖
		<dependency>
            <groupId>org.springframework.bootgroupId>
            <artifactId>spring-boot-starter-actuatorartifactId>
        dependency>
        <dependency>
            <groupId>org.springframework.bootgroupId>
            <artifactId>spring-boot-starter-webartifactId>
        dependency>
        <dependency>
            <groupId>org.springframework.cloudgroupId>
            <artifactId>spring-cloud-starter-consul-discoveryartifactId>
        dependency>
配置文件
server:
  port: 8003

spring:
  application:
    name: prod3
  cloud:
    consul:
      #默认为localhost
      host: localhost
      port: 8500
      discovery:
        service-name: ${spring.application.name}
        #显示ip
        prefer-ip-address: true
启动类
依旧只需要SpringCloud的@EnableDiscoveryCilent接口
@EnableDiscoveryClient
@SpringBootApplication
public class Producer3Application {

    public static void main(String[] args) {
        SpringApplication.run(Producer3Application.class, args);
    }

}
启动
六、三个注册中心的比较
CAP理论
CAP理论是分布式架构中重要理论
一致性(Consistency) (所有节点在同一时间具有相同的数据)
可用性(Availability) (保证每个请求不管成功或者失败都有响应)
分隔容忍(Partition tolerance) (系统中任意信息的丢失或失败不会影响系统的继续运作)
AP:Eureka
CP:Consul、Zookeeper
优劣分析
引自https://blog.csdn.net/gaowenhui2008/article/details/70237908
更好的集群设计
在Eureka平台中,如果某台服务器宕机,Eureka不会有类似于ZooKeeper的选举leader的过程;客户端请求会自动切换到新的Eureka节点;当宕机的服务器重新恢复后,Eureka会再次将其纳入到服务器集群管理之中;而对于它来说,所有要做的无非是同步一些新的服务注册信息而已。所以,再也不用担心有“掉队”的服务器恢复以后,会从Eureka服务器集群中剔除出去的风险了。Eureka甚至被设计用来应付范围更广的网络分割故障,并实现“0”宕机维护需求。(多个zookeeper之间网络出现问题,造成出现多个leader,发生脑裂)当网络分割故障发生时,每个Eureka节点,会持续的对外提供服务(注:ZooKeeper不会):接收新的服务注册同时将它们提供给下游的服务发现请求。这样一来,就可以实现在同一个子网中(same side of partition),新发布的服务仍然可以被发现与访问。
自我保护模式
那些因为网络问题(注:心跳慢被剔除了)而被剔除出去的服务器本身是很”健康“的,Netflix考虑到了这个缺陷。如果Eureka服务节点在短时间里丢失了大量的心跳连接(注:可能发生了网络故障),那么这个Eureka节点会进入”自我保护模式“,同时保留那些“心跳死亡“的服务注册信息不过期。此时,这个Eureka节点对于新的服务还能提供注册服务,对于”死亡“的仍然保留,以防还有客户端向其发起请求。当网络故障恢复后,这个Eureka节点会退出”自我保护模式“。所以Eureka的哲学是,同时保留”好数据“与”坏数据“总比丢掉任何”好数据“要更好,所以这种模式在实践中非常有效。
ZooKeeper的劣势
在分布式系统领域有个著名的CAP定理(C-数据一致性;A-服务可用性;P-服务对网络分区故障的容错性,这三个特性在任何分布式系统中不能同时满足,最多同时满足两个);ZooKeeper是个CP的,即任何时刻对ZooKeeper的访问请求能得到一致的数据结果,同时系统对网络分割具备容错性;但是它不能保证每次服务请求的可用性(注:也就是在极端环境下,ZooKeeper可能会丢弃一些请求,消费者程序需要重新请求才能获得结果)。但是别忘了,ZooKeeper是分布式协调服务,它的职责是保证数据(注:配置数据,状态数据)在其管辖下的所有服务之间保持同步、一致;所以就不难理解为什么ZooKeeper被设计成CP而不是AP特性的了,如果是AP的,那么将会带来恐怖的后果(注:ZooKeeper就像交叉路口的信号灯一样,你能想象在交通要道突然信号灯失灵的情况吗?)。而且,作为ZooKeeper的核心实现算法Zab,就是解决了分布式系统下数据如何在多个服务之间保持同步问题的。
1、对于Service发现服务来说就算是返回了包含不实的信息的结果也比什么都不返回要好;再者,对于Service发现服务而言,宁可返回某服务5分钟之前在哪几个服务器上可用的信息,也不能因为暂时的网络故障而找不到可用的服务器,而不返回任何结果。所以说,用ZooKeeper来做Service发现服务是肯定错误的,如果你这么用就惨了!
如果被用作Service发现服务,ZooKeeper本身并没有正确的处理网络分割的问题;而在云端,网络分割问题跟其他类型的故障一样的确会发生;所以最好提前对这个问题做好100%的准备。就像Jepsen在ZooKeeper网站上发布的博客中所说:在ZooKeeper中,如果在同一个网络分区(partition)的节点数(nodes)数达不到ZooKeeper选取Leader节点的“法定人数”时,它们就会从ZooKeeper中断开,当然同时也就不能提供Service发现服务了。
2、ZooKeeper下所有节点不可能保证任何时候都能缓存所有的服务注册信息。如果ZooKeeper下所有节点都断开了,或者集群中出现了网络分割的故障(注:由于交换机故障导致交换机底下的子网间不能互访);那么ZooKeeper会将它们都从自己管理范围中剔除出去,外界就不能访问到这些节点了,即便这些节点本身是“健康”的,可以正常提供服务的;所以导致到达这些节点的服务请求被丢失了。(注:这也是为什么ZooKeeper不满足CAP中A的原因)
3、更深层次的原因是,ZooKeeper是按照CP原则构建的,也就是说它能保证每个节点的数据保持一致,而为ZooKeeper加上缓存的做法的目的是为了让ZooKeeper变得更加可靠(available);但是,ZooKeeper设计的本意是保持节点的数据一致,也就是CP。所以,这样一来,你可能既得不到一个数据一致的(CP)也得不到一个高可用的(AP)的Service发现服务了;因为,这相当于你在一个已有的CP系统上强制栓了一个AP的系统,这在本质上就行不通的!一个Service发现服务应该从一开始就被设计成高可用的才行!
4、如果抛开CAP原理不管,正确的设置与维护ZooKeeper服务就非常的困难;错误会经常发生,导致很多工程被建立只是为了减轻维护ZooKeeper的难度。这些错误不仅存在与客户端而且还存在于ZooKeeper服务器本身。Knewton平台很多故障就是由于ZooKeeper使用不当而导致的。那些看似简单的操作,如:正确的重建观察者(reestablishing watcher)、客户端Session与异常的处理与在ZK窗口中管理内存都是非常容易导致ZooKeeper出错的。同时,我们确实也遇到过ZooKeeper的一些经典bug:ZooKeeper-1159 与ZooKeeper-1576;我们甚至在生产环境中遇到过ZooKeeper选举Leader节点失败的情况。这些问题之所以会出现,在于ZooKeeper需要管理与保障所管辖服务群的Session与网络连接资源(注:这些资源的管理在分布式系统环境下是极其困难的);但是它不负责管理服务的发现,所以使用ZooKeeper当Service发现服务得不偿失。
七、Ribbon负载均衡
1、负载均衡
a.LoadBalance负载均衡
将用户的请求平衡的分配在多个服务上
b.集中式LoadBalance
在服务消费方与提供方中间使用独立的LoadBalance模块,(可以是软件或硬件),该设施负责转发。
c.进程内LoadBalance
将LoadBalance逻辑集成在消费方,消费方从服务中心获知有哪些地址可用,然后再从地址中选择出一个合适的服务器。
2、Ribbon特性与项目情况
RibbonGitHub仓库https://github.com/Netflix/ribbon
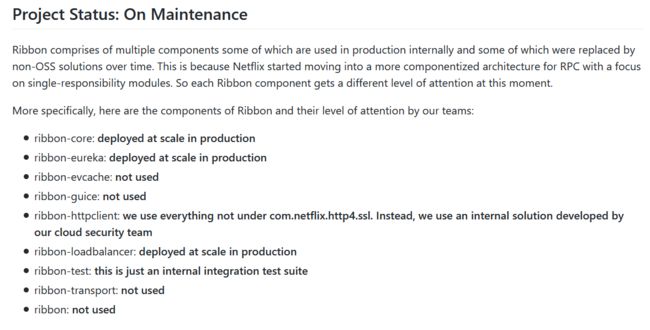
a.Ribbon项目已经进入维护,但是仍被大规模使用
b.Ribbon本地负载均衡客户端VSNginx服务端负载均衡
Nginx:服务器负载均衡,所有的请求都交给Nginx,Nginx实现转发请求,即负载均衡由服务端实现。
Ribbon:本地负载均衡,在调用微服务接口的时候,在注册中心获取服务列表,缓存在本地,在本地实现RPC远程服务调用。
c.功能
Loadbalance+RestTemplate
3、Ribbon项目架构
Ribbon工作分为两步
- 选择EurekaServer,优先选择在同一个区域内负载较少的server
- 根据用户指定的策略,从server收到的服务注册列表中选择一个地址。
RIbbon提供了多种策略:比如轮询,随机和根据响应时间加权
4、整合Ribbon
在之前我们使用SpringCloudEurekaClient的时候,我们已经拥有了负载均衡,这是为何?
新版本的Eureka依赖自动集成了Ribbon,如下
a.手动引入依赖(没必要)
<dependency>
  <groupId>org.springframework.cloudgroupId>
  <artifactId>spring-cloud-starter-netflix-ribbonartifactId>
dependency>
b.RestTemplate的两种请求方式
RestTemplate的getForObject与getForEntity有什么区别?
Object返回的是响应的json串(实体类)
Entity返回的是HttpResponse的包装类(响应)
c.开启负载均衡
配置RestTemplate,开启负载均衡即可
@Configuration
public class RestTemplateConf {
    @Bean
    @LoadBalanced
    public RestTemplate getRestTemplate() {
        return new RestTemplate();
    }
}
d.核心组件RibbonIRule
https://cloud.spring.io/spring-cloud-static/spring-cloud-netflix/2.2.2.RELEASE/reference/html/#spring-cloud-ribbon
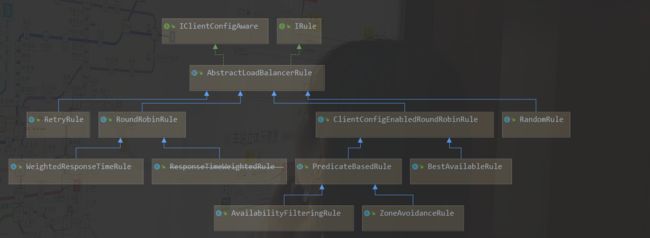
| 实现类 | 作用 |
|---|---|
| com.netflix.loadbalancer.RoundRobinRule | 轮询 |
| com.netflix.loadbalancer.RandomRule | 随机 |
| com.netflix.loadbalancer.RetryRule | 先按照RoundRobinRule的策略获取服务,如果获取服务失败则在指定时间内进行重试,获取可用的服务 |
| WeightedResponseTimeRule | 对RoundRobinRule的扩展,响应速度越快的实例选择权重越多大,越容易被选择 |
| BestAvailableRule | 会先过滤掉由于多次访问故障而处于断路器跳闸状态的服务,然后选择一个并发量最小的服务 |
| AvailabilityFilteringRule | 先过滤掉故障实例,再选择并发较小的实例 |
| ZoneAvoidanceRule | 默认规则,复合判断server所在区域的性能和server的可用性选择服务器 |
定制/替换rule
- 新建配置类包
- 包中新建规则类
- 主启动类添加@RibbonClient
- 测试
新建包
警告
The CustomConfiguration class must be a @Configuration class, but take care that it is not in a @ComponentScan for the main application context. Otherwise, it is shared by all the @RibbonClients. If you use @ComponentScan (or @SpringBootApplication), you need to take steps to avoid it being included (for instance, you can put it in a separate, non-overlapping package or specify the packages to scan explicitly in the @ComponentScan).
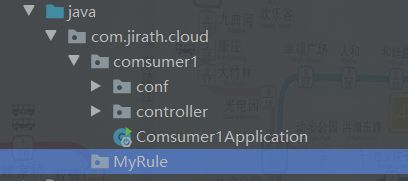
自定义配置类不能放在
@ComponmentScan所扫描的包下,否则该自定义配置类不能就会被所有的Ribbon客户端共享,达不到特殊化定制的目的
SpringBoot中,启动类包含了
@ComponmentScan注解,将扫描启动类所在目录,所以我们需要将定制的处理类放在其他的包中
由于上方的规则,我们要新建包放定制规则
新建定制规则类,使用自带的随机规则
配置类不能命名MyRule?(占用)
@Configuration
public class MyRuleConf {
    @Bean
    public IRule myRule(){
        return new RandomRule();
    }
}
添加@RibbonClient注解
@RibbonClient(value = “producer1”,configuration = MyRuleConf.class)
注意:value是服务提供者的服务名(要注意大小写!大小写要保持一致),configuration是规则类的class
@EnableEurekaClient
@SpringBootApplication
@RibbonClient(value = "PRODUCER1",configuration = MyRuleConf.class)
public class Comsumer1Application {

    public static void main(String[] args) {
        SpringApplication.run(Comsumer1Application.class, args);
    }

}
5、Ribbon复杂均衡原理
a.轮询算法
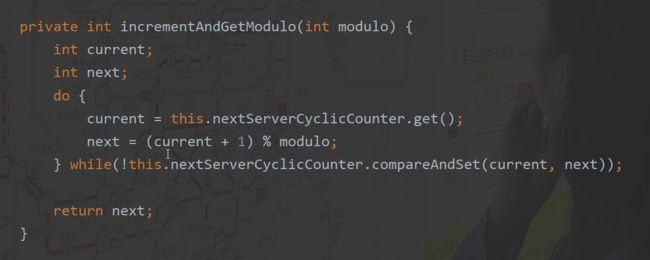
获取查询次数x,所有服务数量n,则使用(x+1)%n号服务,其中运用了自旋锁。
若不能使用就使用下一个
b.自己写一个负载均衡
利用Client获取Instance,然后自己仿照轮询编写类,注入Controller中使用,选择Instance即可。
八、OpenFeign服务接口调用
Spring官网OpenFeign地址https://spring.io/projects/spring-cloud-openfeign#overview
1.Feign简介
provide a load-balanced http client,提供负载均衡的http客户端
过去使用的Ribbon+RestTemplate对http请求进行封装处理,形成了一套模板化的调用方法。Feign对上述微服务接口进行进一步封装,帮助定义接口,我们只需要用一个注解即可对服务方的接口绑定,简化服务自动封装的开发。
概述
Feign将服务用接口的方式进行配置,开发者不必关系具体的请求方法。配置你需要的接口,就能使用Feign包装了Ribbon的负载均衡服务。
2.使用OpenFeign
接口+注解
引入依赖
<dependency>
    <groupId>org.springframework.cloudgroupId>
    <artifactId>spring-cloud-starter-openfeignartifactId>
dependency>
启动类配置@EnableFeignClients开启Feign
@SpringBootApplication
@EnableFeignClients
public class Comsumer2FeignApplication {

    public static void main(String[] args) {
        SpringApplication.run(Comsumer2FeignApplication.class, args);
    }

}
配置接口
其中
-
接口要注明@FeignClient(value = “****”)
value值为服务名
-
方法注解类似Controller,与服务提供方相似。
@FeignClient(value = "PRODUCER1")
public interface Producer {
    @RequestMapping(value = "/prod",method = RequestMethod.GET)
    ResultVo getAll();

    @RequestMapping(value = "/prod",method = RequestMethod.POST)
    ResultVo<String> add(Test test);
}
controller层调用接口
将配置好的接口直接注入,就能正常调用方法并使用了
@RestController
public class MsgController {
    @Autowired
    private Producer producer;
    @RequestMapping(value = "/prod",method = RequestMethod.GET)
    public ResultVo getAll(){
        return new ResultVo(200, "所有内容", producer.getAll() );
    }
    @RequestMapping(value = "/prod",method = RequestMethod.POST)
    public ResultVo<String> add(Test test){
        producer.add(test);
        return new ResultVo(200, "增加内容","success");
    }
}
结果如下,与之前一致。
3.Feign超时时间设置
Feign的底层是RIbbon请求,所以我们需要配置Ribbon的超时时间
Ribbon的超时时间默认为2秒
配置文件如下
ribbon:
  #响应时间
  ReadTimeout: 5000
  #建立Http连接的时间
  connectTimeout: 2000
4.OpenFeign日志增强
可以设置日志级别对Feign接口进行监控
日志级别有四个
NONE, 不记录日志 (DEFAULT).BASIC, 只记录请求方法、URL以及响应状态码和处理时间。HEADERS, 记录请求和响应头的基础信息FULL,记录请求和响应的Header,body以及元数据.
配置Feign日志
首先在配置文件中开启需要监控的接口类,设置为debug后Feign才能日志响应
格式:logging.level.接口全类名: DEBUG
logging.level.project.user.UserClient: DEBUG
java配置类接口进行配置Feign日志等级
@Configuration
public class FooConfiguration {
    @Bean
    Logger.Level feignLoggerLevel() {
        return Logger.Level.FULL;
    }
}
日志内容:
九、Hystrix断路器
1、服务雪崩、熔断、降级
服务雪崩
一个服务失败,导致整条链路的服务都失败的情形,我们称之为服务雪崩。
假设存在以下调用链:
- 当服务请求量有很大波动时,某个服务(服务3)可能会难以扛得住请求,变得不可用
- 服务2需要对服务3请求,所以服务2中请求阻塞,慢慢耗尽服务2中的资源,变为不可用
- 相似地,服务1因为服务2变的不可用。
服务熔断
当下游的服务因为某种原因突然变得不可用或相应过慢,上游的服务为了保证自身整体服务的可用性,将不再调用目标服务,直接返回,快速释放资源。若目标服务好转则恢复调用。
断路器设计模式
目前基本上使用的是断路器的设计模式
Martin Fowler断路器
https://martinfowler.com/bliki/CircuitBreaker.html
- 最开始处于
closed状态,一旦检测到错误到达一定阈值,便转为open状态; - 这时候会有个 reset timeout,到了这个时间了,会转移到
half open状态; - 尝试放行一部分请求到后端,一旦检测成功便回归到
closed状态,即恢复服务;
服务降级
将服务中断,并返回一次错误提升。简单来说,服务降级就是上游对不可用服务的处理。
服务降级有多种方式:限流降级、开关降级、熔断降级等等。
用代码表示
try{
    //调用下游的xxMethod服务
    xxRpc.xxMethod();
}catch(Exception e){
    //因为熔断,所以调不通
    doSomething();
}
2、Hystrix断路器
https://github.com/Netflix/Hystrix/wiki
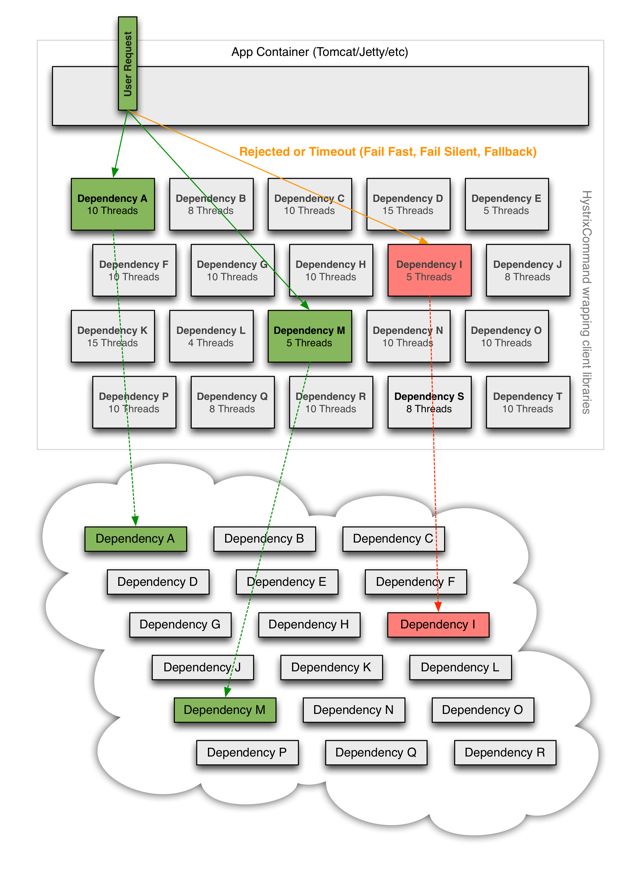
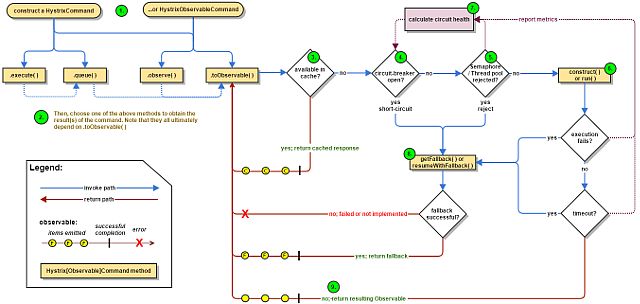
Hystrix的原理如下图
Hystrix服务降级fallback
服务器忙,稍后再试,不让客户端等待并返回提升
发生降级的情形
- 程序运行异常
- 超时
- 服务熔断触发服务降级
- 线程池、信号量打满
Hystrix服务熔断break
服务器达到最大服务访问后,拒绝访问
服务降级->熔断->恢复调用(通过小部分请求进行尝试)
Hystrix服务限流flowlimit
限制服务器同时处理的请求数量
秒杀等高并发操作,严禁大量并发处理,对请求进行限流,限制访问。
3、模拟服务雪崩
a.构建基础项目
Hystrix一般用在Client端,但服务提供端也能使用
引入Hystrix依赖
<dependency>
    <groupId>org.springframework.cloudgroupId>
    <artifactId>spring-cloud-starter-netflix-hystrixartifactId>
dependency>
两个接口,一个停顿5s,一个直接返回
@RestController
public class MsgController {
    @Value("${server.port}")
    private String port;
    private static final Logger log= LoggerFactory.getLogger(MsgController.class);
    @Autowired
    private DiscoveryClient discoveryClient;
    @RequestMapping("/msg/ok")
    public ResultVo<List<String>> getClientMsg(){
        return new ResultVo<List<String>>(200,port+"获取信息");
    }
    @RequestMapping("/msg/false")
    public ResultVo<List<String>> getClientMsgTimeOut(){
        try {
            TimeUnit.SECONDS.sleep(5);
        } catch (InterruptedException e) {
            e.printStackTrace();
        }
        return new ResultVo<List<String>>(200,port+"False获取信息");
    }
}
b.模拟项目高压
使用JMeter高压访问服务器(电脑不行不要上,16G应对不难)
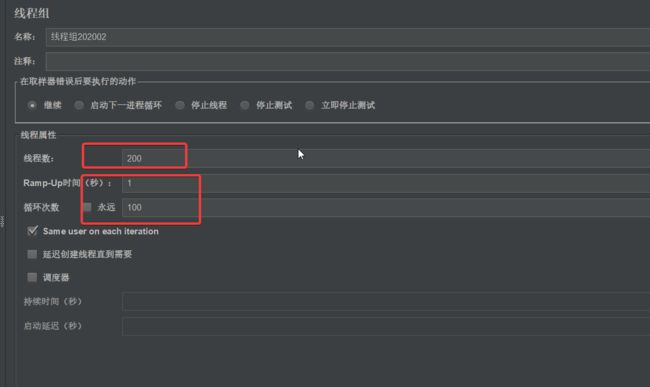
i.新建线程组
ii.设置为2w个请求
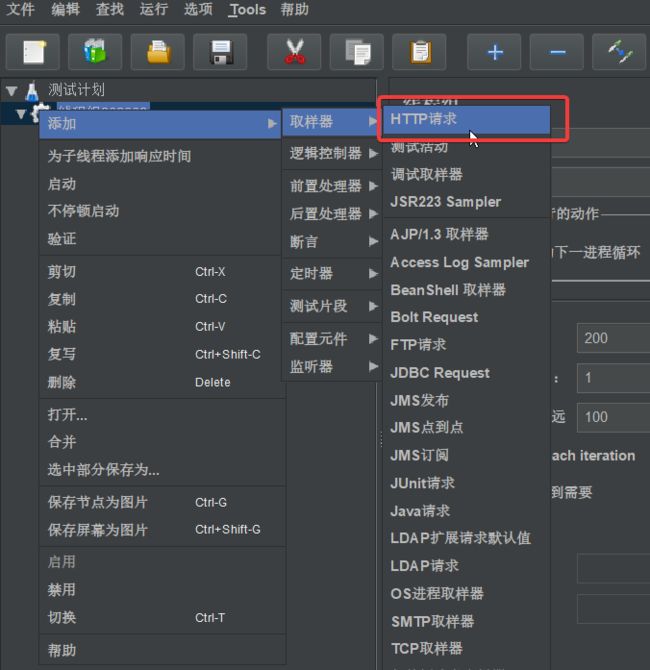
iii.新建Http请求
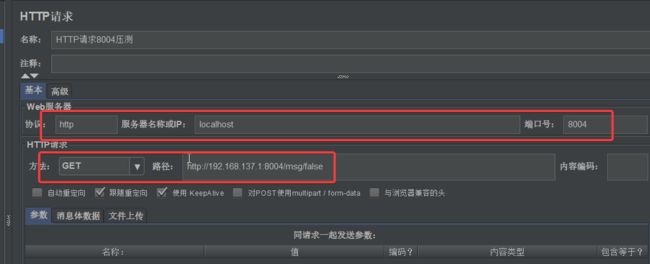
iiii.配置http请求
点击上方绿色启动按钮
我们对有停顿的接口进行高压访问,同时我们访问直接返回的接口,该接口也出现了延迟。
原因:服务器大量资源被有停顿的接口使用,导致整个服务响应缓慢
c.模拟服务雪崩
构建Client端,不停调用被JMeter大量访问的接口,该Client端最后也将崩溃。
Client服务80访问接口结果如下(使用feign要注意Ribbon的响应时间设置)
4、Hystrix服务降级
https://cloud.spring.io/spring-cloud-static/spring-cloud-netflix/2.2.3.RELEASE/reference/html/#circuit-breaker-hystrix-clients
以下内容结合Spring官方文档
当Hystrix与Ribbon一起使用时,要注意配置Hystrix的超时时间要长于Ribbon超时时间
https://cloud.spring.io/spring-cloud-static/spring-cloud-netflix/2.2.3.RELEASE/reference/html/#hystrix-timeouts-and-ribbon-clients
Hystrix可以配置在客户端,也能配置在服务端,他们的配置方法基本一致。服务端配置可以在系统异常有返回错误,客户端配置可以进行保障,防止服务不能使用导致请求大量积累,致使服务崩溃。
升级接口,配置Hystrix服务降级策略
配置主启动类激活Hystrix
使用@EnableCircuitBreaker注解在主启动类上
你会发现另一个注解
@EnableHystrix,为什么使用@EnableCircuitBreaker?
@EnableCircuitBreaker是启动熔断服务,SpringCloud有多种熔断的服务,所以使用该注解开启熔断服务更有适应性EnableHystrix引入了该注解
默认配置
@HystrixCommand(fallbackMethod = "msgTimeOutFallback")
@Override
public String msgTimeOut() {
    try {
        TimeUnit.SECONDS.sleep(5);
    } catch (InterruptedException e) {
        e.printStackTrace();
    }
    return "延期5秒";
}
public String msgTimeOutFallback() {
    return "msgTimeOutFallback";
}
默认配置会在方法执行中抛出异常后,调用备选的fallback方法,该方法要保证定义相同。
定制你的Hystrix熔断策略
如果要对断路器的时间等等等等进行定制,需要使用commandProperties属性进行定制,该属性为HystrixProperty集合,可以放入我们自己设置的值
可选配置参考文档https://github.com/Netflix/Hystrix/wiki/Configuration
下面配置了一个超时时间3秒(默认1秒)
@HystrixCommand(fallbackMethod = "msgTimeOutFallback",commandProperties = {
        @HystrixProperty(name = "execution.isolation.thread.timeoutInMilliseconds",value = "3000")
})
@Override
public String msgTimeOut() {
    try {
        TimeUnit.SECONDS.sleep(5);
    } catch (InterruptedException e) {
        e.printStackTrace();
    }
    return "延期5秒";
}
public String msgTimeOutFallback() {
    return "msgTimeOutFallback";
}
启动服务进行测试
由于该服务会停顿5秒,而Hystrix只运行3秒,所以三秒后使用了fallback接口进行服务返回。同时抛出了超时异常(不使用熔断的情况下是不会抛出的)
若方法逻辑出现错误,将抛出异常并使用fallback返回
配置默认fallback
使用@DefaultProperties注解进行配置
将该注解加在类上,将指定该类中所有Hystrix方法的默认配置
其配置内容与@HystrixCommand相同
5、通配服务降级FeignFallback
在客户端服务中,对服务端的调用是通过Feign进行调用的,Feign将服务端的接口使用一个接口进行描述,调用。如果针对该接口进行服务降级,将节省业务逻辑。
a.开启feign的Hystrix服务降级
在配置文件中进行配置,开启Hystrix
feign:
  hystrix:
    enabled: true
b.编写降级处理类
编写一个类实现feign的接口,则在服务错误时将自动使用该类返回。注意在feign接口进行配置
@FeignClient(value = "PRODUCER4",fallback = TimeOutProducerDefault.class)
public interface TimeOutProducer {
    @RequestMapping(value = "/msg/false", method = RequestMethod.GET)
    ResultVo timeOut();

    @RequestMapping(value = "msg/ok", method = RequestMethod.GET)
    ResultVo inTime();
}

@Component
public class TimeOutProducerDefault implements TimeOutProducer {
    @Override
    public ResultVo timeOut() {
        return new ResultVo(502,"服务忙");
    }

    @Override
    public ResultVo inTime() {
        return new ResultVo(502,"服务忙");
    }
}
注意要将该类注册为bean,否则不能正常使用,将启动报错:找不到该bean。
6、Hystrix服务熔断
仍然使用@HystrixCommand注解
使用注解配置类开启即可(默认开启)
官网说明:https://github.com/Netflix/Hystrix/wiki/Configuration#circuit-breaker
相关配置项如下
| 配置项 | 描述 | 默认值 |
|---|---|---|
| circuitBreaker.enabled | 是否开启断路器 | true |
| circuitBreaker.requestVolumeThreshold | 启用熔断器功能窗口时间内的最小请求数。实际阈值为该数值乘以失败率 | 20 |
| circuitBreaker.sleepWindowInMilliseconds | 与熔断恢复有关,表示熔断后经过多久允许一次请求尝试执行 | 5000 |
| circuitBreaker.errorThresholdPercentage | 失败率 | 50 |
| circuitBreaker.forceOpen | 强制开启断路 | false |
| circuitBreaker.forceClosed | 强制关闭断路 | false |
注意:若停顿时间比较长,在配置时间期内无法满足熔断次数(多线程的请求可以达到目的),在测试时可以试用runtimeException的方法测试
7、Hystrix工作流程
https://github.com/Netflix/Hystrix/wiki/How-it-Works
总共九步
- Construct a
HystrixCommandorHystrixObservableCommandObject - Execute the Command
- Is the Response Cached?
- Is the Circuit Open?
- Is the Thread Pool/Queue/Semaphore Full?
HystrixObservableCommand.construct()orHystrixCommand.run()- Calculate Circuit Health
- Get the Fallback
- Return the Successful Response
Hystrix使用了代理的模式来处理方法
大致为:
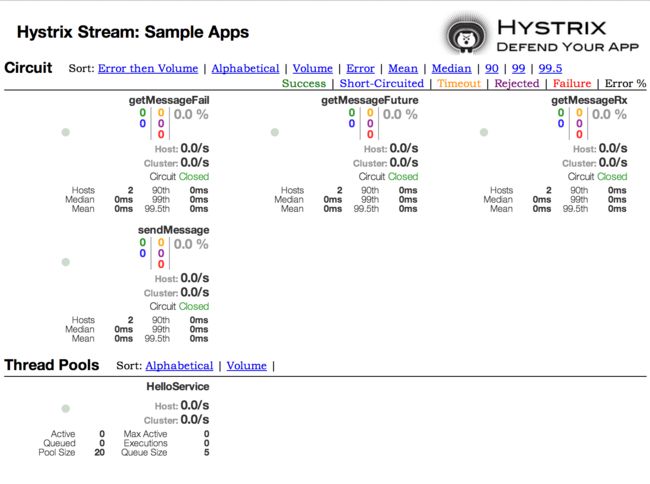
8、可视化服务监控Dashboard
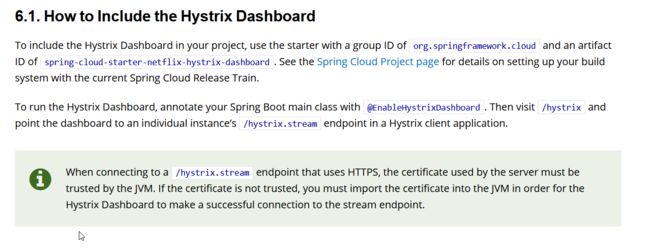
https://cloud.spring.io/spring-cloud-static/spring-cloud-netflix/2.2.3.RELEASE/reference/html/#circuit-breaker-hystrix-dashboard
——Spring官网相关描述
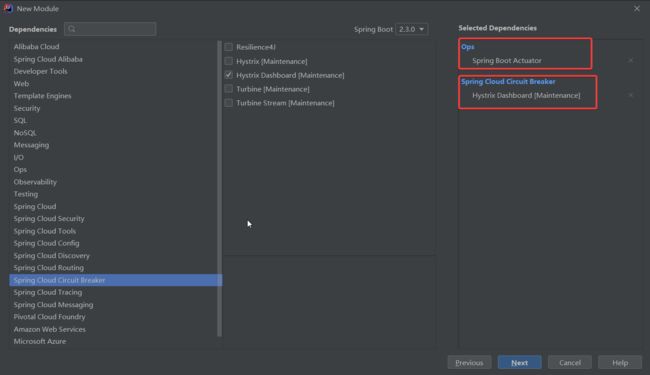
引入Dashboard
被监控的服务要保证配置了web的监控依赖actuator
<dependency>
   <groupId>org.springframework.bootgroupId>
   <artifactId>spring-boot-starter-actuatorartifactId>
dependency>
新建节点,专门用来监控(配置在其他节点也行,建议单独给出服务)
开启Dashboard@EnableHystrixDashboard
@EnableHystrixDashboard
@SpringBootApplication
public class DashboardApplication {

    public static void main(String[] args) {
        SpringApplication.run(DashboardApplication.class, args);
    }

}
由于版本原因,在新版本中2020年6月11日
被监控的服务中Hystrix没有自动加入监控Servlet,需要手动配置,才能被监控
@Bean
public ServletRegistrationBean hystrixServlet(){
   ServletRegistrationBean registrationBean=new ServletRegistrationBean(new HystrixMetricsStreamServlet());
   registrationBean.setLoadOnStartup(1);
   registrationBean.addUrlMappings("/hystrix.stream");
   registrationBean.setName("HystrixMetricsStreamServlet");
   return registrationBean;
}
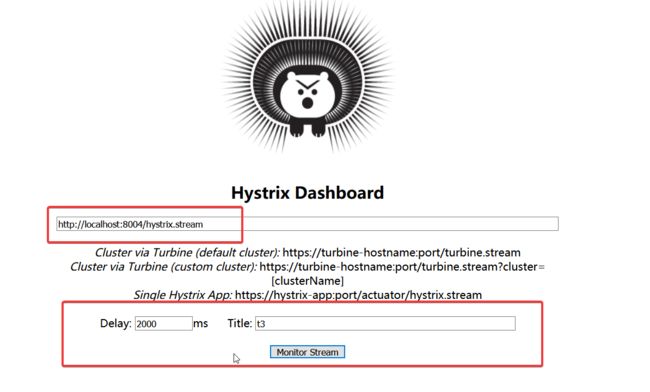
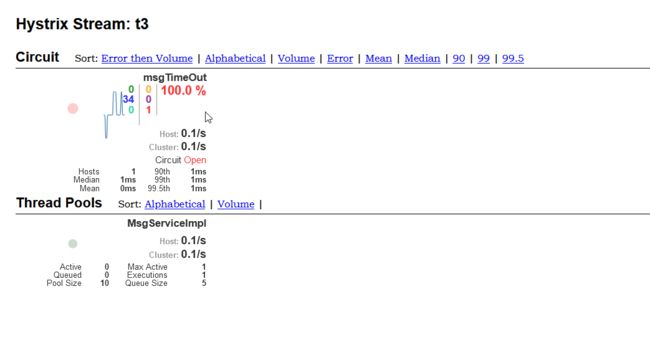
输入监控服务地址即可进入监控页面
十、Spring Cloud Gateway
官方文档https://spring.io/projects/spring-cloud-gateway
1、微服务网关API Gateway
微服务架构的一些问题:
- 消息服务提供的接口不是REST形式,而是RocketMQ形式,不便于客户端使用
- 每个微服务基于普适性的要求,提供了大量的细粒度接口,客户端需要通过调用大量接口才能够获取到足够的信息
- 因为APP是基于移动网络的,大量的前后端交互导致页面响应缓慢,严重影响客户体验
- 随着业务的发展,后端的服务会发生变更,比如提供多个服务实例并由客户端进行负载均衡,或是次一个服务进一步拆分,需要所有类型的客户端都适配修改
API Gateway的引入,可以解决这个问题
在客户端和各微服务之间,引入API Gateway为客户端提供友好易用的接口,并将根据业务逻辑向各微服务实例请求。
总结:Gateway能做到接口的整理,转发逻辑,不需要再暴露服务端口,通过网关就能访问
2、Spring Cloud Gateway概述
a.What
一个基于Spring生态系统的API Gateway,包括Spring5,Spring Boot2以及Project Reactor。Spring Cloud Gateway基于Netty、WebFlux实现(NIO服务器),Netty和WebFlux为Spring Cloud Gateway提供了大吞吐量的支持
Spring Cloud Gateway希望提供一个简单但高效方法来发送到API并提供跨域(cross cutting concerns)给类似安全,监控和弹性模块。
官方注意事项
Spring Cloud Gateway is built on Spring Boot 2.x, Spring WebFlux, and Project Reactor. As a consequence, many of the familiar synchronous libraries (Spring Data and Spring Security, for example) and patterns you know may not apply when you use Spring Cloud Gateway. If you are unfamiliar with these projects, we suggest you begin by reading their documentation to familiarize yourself with some of the new concepts before working with Spring Cloud Gateway.
Spring Cloud Gateway requires the Netty runtime provided by Spring Boot and Spring Webflux. It does not work in a traditional Servlet Container or when built as a WAR.
总结:Spring Cloud Gateway使用了netty不能使用war包打包
b.术语Glossary
官方原文解释
Route: The basic building block of the gateway. It is defined by an ID, a destination URI, a collection of predicates, and a collection of filters. A route is matched if the aggregate predicate is true.
Predicate: This is a Java 8 Function Predicate. The input type is a Spring Framework
ServerWebExchange. This lets you match on anything from the HTTP request, such as headers or parameters.Filter: These are instances of Spring Framework
GatewayFilterthat have been constructed with a specific factory. Here, you can modify requests and responses before or after sending the downstream request.
- Route(路由):Gateway的基础组成模块。由ID、一个目标URI,一系列的断言以及一系列过滤器组成。如果断言为true则匹配到该路由。
- Predicate(断言):Java8的函数式接口,其类型参数为
Interface ServerWebExchange(一个Http请求封装接口,能获取所有的请求信息)。 - Filter(过滤器):一个被工厂构造的特殊的Spring Framework
GatewayFilter实现类。通过Filter可以在转发请求和响应前对请求或响应进行处理。
c.How It Works
客户端向Spring Cloud Gateway发送请求。如果Gateway Handler Mapping确定请求匹配一个路由,该请求将被送到Gateway Web Handler。该Handler通过一个过滤器链来对请求进行处理。Filter由虚线分隔的原因是,Filter可以在发送代理请求之前和之后运行逻辑。 所有“前置”过滤器逻辑均被执行。 然后发出代理请求。 发出代理请求后,将运行“后”过滤器逻辑。
3、Spring Cloud Gateway实战
完整的SpringCloudGateway配置
https://cloud.spring.io/spring-cloud-static/spring-cloud-gateway/2.2.3.RELEASE/reference/html/appendix.html
a.引入模块
Gateway网关作为一个特殊的服务模块。
我们需要引入:Spring Web、Spring Boot Actuator(监控)、Eureka Discovery Client(微服务节点)、Gateway(网关依赖)
再次提醒,Gateway使用的是Netty而不是Tomcat,所以不要进入web依赖
Gateway依赖如下
<dependency>
    <groupId>org.springframework.cloudgroupId>
    <artifactId>spring-cloud-starter-gatewayartifactId>
dependency>
b.路由配置
Gateway有两种路由配置的模式
- 配置文件进行配置
- Java编码配置
配置文件对网关进行配置
server:
  port: 9527
spring:
  application:
    name: spring-cloud-gateway
  #网关配置
  cloud:
    gateway:
      routes:
      	#id为唯一标识
        - id: after_route
          uri: https://www.bilibili.com
          predicates:
            - Path=/bili
eureka:
  instance:
    hostname: cloud-gateway
  client:
    service-url:
      defaultZone: http://localhost:7001/eureka/
    register-with-eureka: true
    fetch-registry: true
代码配置模式
其中有构造器设计模式,Lambda表达式
@Configuration
public class GatewayConfiguration {
    @Bean
    public RouteLocator customRouteLocator(RouteLocatorBuilder routeLocatorBuilder) {
        RouteLocatorBuilder.Builder builder=routeLocatorBuilder.routes();
        builder.route("to_my_blog",r->r.path("/toBlog").uri("http://jirath.cn/"));
        return builder.build();
    }
}
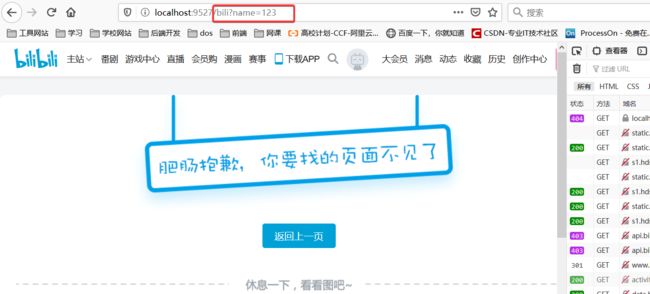
测试成功
3、Spring Cloud Gateway Predicate配置
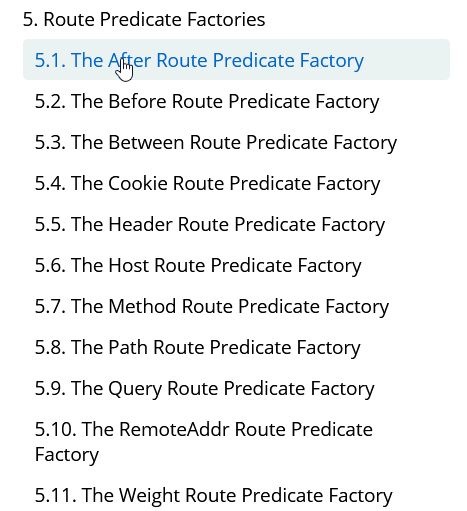
Spring Cloud Gateway Predicate底层利用了Spring WebFlux的HandlerMapping
-
After,在某时刻后
参数为
datetime(which is a javaZonedDateTime)- After=2017-01-20T17:42:47.789-07:00[America/Denver] -
Before,在某时刻前
参数为
datetime(which is a javaZonedDateTime)- Before=2017-01-20T17:42:47.789-07:00[America/Denver] -
Between,在两个时刻中间
使用逗号分隔,参数为
datetime(which is a javaZonedDateTime)- Between=2017-01-20T17:42:47.789-07:00[America/Denver], 2017-01-21T17:42:47.789-07:00[America/Denver] -
Cookie,有符合正则表达式的cookie
参数为cookie名
name,以及一个正则表达式regexp,匹配该cookie符合正则表达式的项目- Cookie=chocolate, ch.p -
Header,有符合正则表达式的Header
参数为Header名
name,以及一个正则表达式regexp,匹配该cookie符合正则表达式的项目- Header=X-Request-Id, \d+ -
Host,匹配host
参数为Host列表,Host使用Ant-style样式,可以使用URI模板变量 (such as
{sub}.myhost.org)- Host=**.somehost.org,{sub}.myhost.org -
Method,匹配请求方法
参数为请求方法列表
- Method=GET,POST -
Path,请求路径
参数为路径列表以及一个可选的标志位,
matchOptionalTrailingSeparator,路径可以使用URI模板变量 (such as/blue/{segment})- Path=/red/{segment},/blue/{segment} -
Query,请求参数匹配
第一个参数为参数名,第二个为可选参数,为修饰参数内容的正则表达式
- Query=green, \d+ #有参数green且为整数 -
RemoteAddr,匹配ip地址
ip地址列表
- RemoteAddr=192.168.1.1/24 -
Weight,多个路由关联分压
两个参数,
groupandweight(an int).下方的demo表示80%的去往https://weighthigh.org,其余20%去https://weightlow.org
routes:
      - id: weight_high
        uri: https://weighthigh.org
        predicates:
        - Weight=group1, 8
      - id: weight_low
        uri: https://weightlow.org
        predicates:
        - Weight=group1, 2
4、Spring Cloud Gateway Filter配置
官网地址
https://cloud.spring.io/spring-cloud-static/spring-cloud-gateway/2.2.3.RELEASE/reference/html/#gatewayfilter-factories
Spring Cloud Gateway提供了使用配置文件的模式来进行简单的Filter操作,也提供了自定义的Filter方式。
由于配置方法较多(31种),在使用时参考官方文档即可
a.Global Filter
Spring Cloud 同时提供了全局的Filter配置,也能利用配置文件进行简单配置
SpringCloud提供了10种配置文件的全局Filter配置
-
转发
forward:///localendpoint -
负载均衡
lb://myservice若服务无法访问,将返回503,可以设置spring.cloud.gateway.loadbalancer.use404=true来返回404
-
动态负载均衡 将负载均衡中myservice自动通过注册中心替换为地址
-
Netty路由
-
Websocket ws开头,
lb:ws://serviceid. -
…
b.实现自定的Global Filter
原理:实现Gateway中SpringMVC的过滤器
编写bean,实现GlobalFilter接口,Ordered接口(可以使用@Order注解)
@Component
@Order(value = 0)
public class CusGlobalFilter implements GlobalFilter {
    Logger log = LoggerFactory.getLogger(this.getClass());

    @Override
    public Mono<Void> filter(ServerWebExchange exchange, GatewayFilterChain chain) {
        log.info("global Filter 接收到请求");
        String name = exchange.getRequest().getQueryParams().getFirst("name");
        log.info(name);
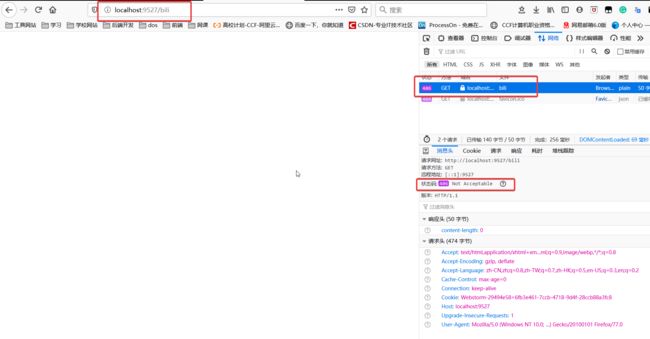
        if (!name.equals("123")){
            exchange.getResponse().setStatusCode(HttpStatus.NOT_ACCEPTABLE);
            return exchange.getResponse().setComplete();
        }
        return chain.filter(exchange);
    }
}
5、Gateway动态路由
官方文档
https://cloud.spring.io/spring-cloud-static/spring-cloud-gateway/2.2.3.RELEASE/reference/html/#the-discoveryclient-route-definition-locator
上述配置中,对路由是直接进行转发处理的
a.使用注册中心
若希望产生根据微服务注册中心的路由,需要设置spring.cloud.gateway.discovery.locator.enabled=true
在设置此项为true后,Gateway将设置默认的访问微服务的路由的断言与过滤器
默认的断言:/serviceId/**serviceId是微服务的名称(注意大小写)
默认的过滤器:一个重写的路径Filter,使用正则表达式/serviceId/(?并替换为/${remaining},相当于在发送给下游时,删去了serviceId
该过滤器实质上完成了转发的功能,因为只有断言的情况下,转发给服务后,serviceId将不会删去,而保存在请求路径中,该Filter实质上去掉了serviceId,使得能正常访问。
修改默认的断言与过滤器
个人觉得没必要,默认的挺好的
spring.cloud.gateway.discovery.locator.predicates[0].name: Path
spring.cloud.gateway.discovery.locator.predicates[0].args[pattern]: "'/'+serviceId+'/**'"
spring.cloud.gateway.discovery.locator.predicates[1].name: Host
spring.cloud.gateway.discovery.locator.predicates[1].args[pattern]: "'**.foo.com'"
spring.cloud.gateway.discovery.locator.filters[0].name: Hystrix
spring.cloud.gateway.discovery.locator.filters[0].args[name]: serviceId
spring.cloud.gateway.discovery.locator.filters[1].name: RewritePath
spring.cloud.gateway.discovery.locator.filters[1].args[regexp]: "'/' + serviceId + '/(?.*)'"
spring.cloud.gateway.discovery.locator.filters[1].args[replacement]: "'/${remaining}'"
b.使用Ribbon负载均衡
若还希望整合Ribbon的动态路由,负载均衡等等特性
在uri的地址前使用 lb://服务名
- id: prod
  uri: lb://PRODUCER1
  predicates:
    - Path=/prod
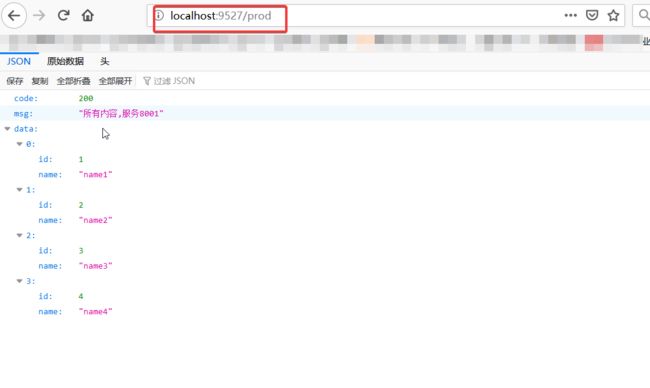
效果如下
十一、Spring Cloud Config分布式配置中心
https://spring.io/projects/spring-cloud-config
当服务增多,修改配置文件将会是一件困难的事情
分布式配置中心提供了能统一维护配置的平台
Spring Cloud Config可以通过git读取仓库中的配置文件,并用接口的形式发布
客户端能通过配置快速的拉取配置到服务中
(但是配置需要该服务重启才能刷新)
1、搭建Config服务配置中心
- 搭建远程Git仓库
- 创建Config项目
@EnableConfigServer注解启动类- 配置配置文件
a.搭建远程Git仓库
GitHub上面创建一个,或者Gitlab、gitee皆可
注意配置文件的格式有要求,properties格式也支持
{application}-{profile}.yml
b.创建Config项目
Maven依赖
<dependency>
    <groupId>org.springframework.bootgroupId>
    <artifactId>spring-boot-starter-actuatorartifactId>
dependency>
<dependency>
    <groupId>org.springframework.bootgroupId>
    <artifactId>spring-boot-starter-webartifactId>
dependency>
<dependency>
    <groupId>org.springframework.cloudgroupId>
    <artifactId>spring-cloud-config-serverartifactId>
dependency>
<dependency>
    <groupId>org.springframework.cloudgroupId>
    <artifactId>spring-cloud-starter-netflix-eureka-clientartifactId>
dependency>
启动类注解
@EnableConfigServer
@SpringBootApplication
public class ConfigApplication {

    public static void main(String[] args) {
        SpringApplication.run(ConfigApplication.class, args);
    }

}
配置文件
server:
  port: 9001

spring:
  application:
    name: config-center
  cloud:
    config:
      server:
        git:
          uri: www.yourGIT.git
          pattern: local*
      label: master
eureka:
  client:
    fetch-registry: true
    service-url:
      defaultZone: http://localhost:7001/eureka
这里的pattern相当于过滤,是一个数组配置
可以不加,将读取所有配置文件
启动该项目,这时git仓库中的文件即可被接口访问到
访问形式:Config项目地址/label/文件全名,如下
http://localhost:9001/master/spring-config.yml
2、Config访问配置的几种方式
/{label}/{application}-{profile}.yml/{application}-{profile}.yml/{application}/{profile}[/{label}]- 该条输出为json对象
没有label的情况下,默认是master
3、Config客户端配置
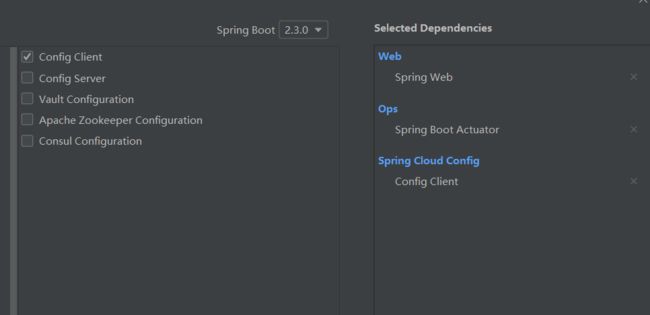
a.客户端依赖
下面缺一个EurekaClient
xml版本
<project xmlns="http://maven.apache.org/POM/4.0.0" xmlns:xsi="http://www.w3.org/2001/XMLSchema-instance"
         xsi:schemaLocation="http://maven.apache.org/POM/4.0.0 https://maven.apache.org/xsd/maven-4.0.0.xsd">
    <modelVersion>4.0.0modelVersion>
    <groupId>com.jirath.cloudgroupId>
    <artifactId>comsumer4-configartifactId>
    <version>0.0.1-SNAPSHOTversion>
    <name>comsumer4-configname>
    <description>Demo project for Spring Bootdescription>
    <parent>
        <artifactId>springcloud1artifactId>
        <groupId>com.jirath.cloudgroupId>
        <version>1.0-SNAPSHOTversion>
    parent>
    <properties>
        <java.version>1.8java.version>
        <project.build.sourceEncoding>UTF-8project.build.sourceEncoding>
        <project.reporting.outputEncoding>UTF-8project.reporting.outputEncoding>
        <spring-cloud.version>Hoxton.SR4spring-cloud.version>
    properties>

    <dependencies>
        <dependency>
            <groupId>org.springframework.cloudgroupId>
            <artifactId>spring-cloud-starter-netflix-eureka-clientartifactId>
        dependency>
        <dependency>
            <groupId>org.springframework.bootgroupId>
            <artifactId>spring-boot-starter-actuatorartifactId>
        dependency>
        <dependency>
            <groupId>org.springframework.bootgroupId>
            <artifactId>spring-boot-starter-webartifactId>
        dependency>
        <dependency>
            <groupId>org.springframework.cloudgroupId>
            <artifactId>spring-cloud-starter-configartifactId>
        dependency>

        <dependency>
            <groupId>org.springframework.bootgroupId>
            <artifactId>spring-boot-starter-testartifactId>
            <scope>testscope>
            <exclusions>
                <exclusion>
                    <groupId>org.junit.vintagegroupId>
                    <artifactId>junit-vintage-engineartifactId>
                exclusion>
            exclusions>
        dependency>
    dependencies>

    <build>
        <plugins>
            <plugin>
                <groupId>org.apache.maven.pluginsgroupId>
                <artifactId>maven-compiler-pluginartifactId>
                <configuration>
                    <source>1.8source>
                    <target>1.8target>
                    <encoding>UTF-8encoding>
                configuration>
            plugin>
            <plugin>
                <groupId>org.springframework.bootgroupId>
                <artifactId>spring-boot-maven-pluginartifactId>
            plugin>
        plugins>
    build>

project>
b.启动类
启动类不需要过多配置,开启Client即可
@EnableDiscoveryClient
c.配置文件
配置文件加载顺序
bootstrap->配置中心->application
利用配置中心,通过Config获取配置的情况下
Spring Boot将自动生成一个名为bootstrap.yml的文件
该文件是根配置文件,将配置默认的信息
特别的,你需要把微服务的配置写在这里!
SpringBoot将根据bootstrap.yml配置进行初步启动,然后根据请求得来的配置启动项目。
结果为一个将Config中获取的配置整合bootstrap.yml的配置
注意,相同的配置将覆盖,也就是说最终看到的为配置中心的配置项
示例文件
name: default #用来测试配置文件加载顺序以及规则
server:
  port: 84

eureka:
  client:
    fetch-registry: true
    register-with-eureka: true
    service-url:
      defaultZone: http://localhost:7001/eureka/

spring:
  application:
    name: config-client
  cloud:
    config:
      label: master
      name: spring
      profile: config
      uri: http://localhost:9001
仓库中配置文件
name: configFromGit
最终结果如下
4、客户端动态更新
需要给加载变量的类上面加载 @RefreshScope,在客户端执行 /actuator/refresh 的时候就会更新此类下面的变量值。
@RefreshScope
@RestController
public class TestController {
    @Value("${name}")
    private String name;
    @RequestMapping("/gn")
    public String getName(){
        return name;
    }
}
配置
Spring Boot 1.5.X 以上默认开通了安全认证,所以要在配置文件 application.yml 中添加以下配置以将 /actuator/refresh 这个 Endpoint 暴露出来
management:
  endpoints:
    web:
      exposure:
        include: refresh
测试
改造完之后,我们重启 config-client,我们以 POST 请求的方式来访问 http://localhost:13000/actuator/refresh 就会更新配置文件至最新版本。
我们再来测试:
- 访问 http://localhost:13000/info 返回
dev - 我将 Git 上对应配置文件里的值改为
dev update - 执行
curl -X POST http://localhost:13000/actuator/refresh,返回["config.client.version","info.profile"]% - 再次访问 http://localhost:13000/info 返回
dev update
这就说明客户端已经得到了最新的值,Refresh 是有效的。
十二、消息总线Bus
1、消息总线
总线这一概念与计算机中总线类似,下游的服务订阅公用的topic
上游的服务将消息发送到总线中,总线将广播给所有的下游服务。
总线只能负责消息的传达,不负责逻辑的完成。
Bus通常配合Kafka或RabbitMQ进行使用
可以达到对Config的增强的目的,广播性的刷新服务。
2、客户端改造
1、添加依赖
    org.springframework.cloud
    spring-cloud-starter-bus-amqp
需要多引入spring-cloud-starter-bus-amqp包,增加对消息总线的支持
2、服务刷新版本配置文件
## 刷新时,关闭安全验证
management.security.enabled=false
## 开启消息跟踪
spring.cloud.bus.trace.enabled=true

spring.rabbitmq.host=192.168.9.89
spring.rabbitmq.port=5672
spring.rabbitmq.username=admin
spring.rabbitmq.password=123456
配置文件需要增加RebbitMq的相关配置,这样客户端代码就改造完成了。
3、缺陷
- 打破了微服务的职责单一性。微服务本身是业务模块,它本不应该承担配置刷新的职责。
- 破坏了微服务各节点的对等性。
- 有一定的局限性。例如,微服务在迁移时,它的网络地址常常会发生变化,此时如果想要做到自动刷新,那就不得不修改WebHook的配置。
3、Config刷新版本配置
这时Spring Cloud Bus做配置更新步骤如下:
- 1、提交代码触发post请求给bus/refresh
- 2、server端接收到请求并发送给Spring Cloud Bus
- 3、Spring Cloud bus接到消息并通知给其它客户端
- 4、其它客户端接收到通知,请求Server端获取最新配置
- 5、全部客户端均获取到最新的配置
这样的话我们在server端的代码做一些改动,来支持bus/refresh
1、添加依赖
		org.springframework.cloud
		spring-cloud-config-server


		org.springframework.cloud
		spring-cloud-starter-bus-amqp


		org.springframework.cloud
		spring-cloud-starter-eureka
需要多引入spring-cloud-starter-bus-amqp包,增加对消息总线的支持
2、配置文件
server:
  port: 8001
spring:
  application:
    name: spring-cloud-config-server
  cloud:
    config:
      server:
        git:
          uri: https://github.com/ityouknow/spring-cloud-starter/     # 配置git仓库的地址
          search-paths: config-repo                             # git仓库地址下的相对地址,可以配置多个,用,分割。
          username: username                                        # git仓库的账号
          password: password                                    # git仓库的密码
  rabbitmq:
    host: 192.168.0.6
    port: 5672
    username: admin
    password: 123456

eureka:
  client:
    serviceUrl:
      defaultZone: http://localhost:8000/eureka/   ## 注册中心eurka地址


management:
  security:
     enabled: false
配置文件增加RebbitMq的相关配置,关闭安全验证。这样server端代码就改造完成了。
其它
局部刷新
某些场景下(例如灰度发布),我们可能只想刷新部分微服务的配置,此时可通过/bus/refresh端点的destination参数来定位要刷新的应用程序。
例如:/bus/refresh?destination=customers:8000,这样消息总线上的微服务实例就会根据destination参数的值来判断是否需要要刷新。其中,customers:8000指的是各个微服务的ApplicationContext ID。
destination参数也可以用来定位特定的微服务。例如:/bus/refresh?destination=customers:**,这样就可以触发customers微服务所有实例的配置刷新。
跟踪总线事件
一些场景下,我们可能希望知道Spring Cloud Bus事件传播的细节。此时,我们可以跟踪总线事件(RemoteApplicationEvent的子类都是总线事件)。
跟踪总线事件非常简单,只需设置spring.cloud.bus.trace.enabled=true,这样在/bus/refresh端点被请求后,访问/trace端点就可获得类似如下的结果:
{
  "timestamp": 1495851419032,
  "info": {
    "signal": "spring.cloud.bus.ack",
    "type": "RefreshRemoteApplicationEvent",
    "id": "c4d374b7-58ea-4928-a312-31984def293b",
    "origin": "stores:8002",
    "destination": "*:**"
  }
  },
  {
  "timestamp": 1495851419033,
  "info": {
    "signal": "spring.cloud.bus.sent",
    "type": "RefreshRemoteApplicationEvent",
    "id": "c4d374b7-58ea-4928-a312-31984def293b",
    "origin": "spring-cloud-config-client:8001",
    "destination": "*:**"
  }
  },
  {
  "timestamp": 1495851422175,
  "info": {
    "signal": "spring.cloud.bus.ack",
    "type": "RefreshRemoteApplicationEvent",
    "id": "c4d374b7-58ea-4928-a312-31984def293b",
    "origin": "customers:8001",
    "destination": "*:**"
  }
}
这个日志显示了customers:8001发出了RefreshRemoteApplicationEvent事件,广播给所有的服务,被customers:9000和stores:8081接受到了。想要对接受到的消息自定义自己的处理方式的话,可以添加@EventListener注解的AckRemoteApplicationEvent和SentApplicationEvent类型到你自己的应用中。或者到TraceRepository类中,直接处理数据。
这样,我们就可清晰地知道事件的传播细节。
十三、消息驱动
消息驱动解决的问题是
在多种消息队列的选型下,提供一个通用的操作方式,能够根据消息队列自动调整。
1.Stream消息驱动
Stream遵循的消息-订阅的设计
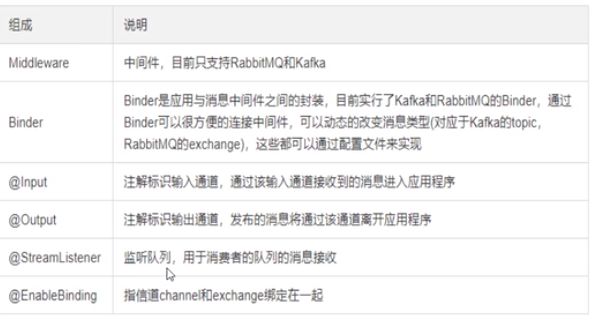
Stream对多种消息队列(Kafka与RabbitMQ)提供了对应的Binder实现类。
中间件通过Binder与服务进行交互
SpringCloudStream提供对Kafka,Rabbit MQ,Redis,和Gemfire的Binder实现。Spring Cloud Stream还包括了一个TestSupportBinder,TestSupportBinder预留一个未更改的channel以便于直接地、可靠地和channels通信。您可以使用可扩展的API来编写自己的Binder。
SpringCloudStream使用SpringBoot做配置,绑定抽象使得SpringCloudStream应用可以灵活的连接到中间件。比如,开发者可以在运行时动态的选择channels连接的目标(可以是kafka topics或RabbitMQ exchanges)。这样的配置可以通过外部配置或任何SpringBoot支持的形式(包括应用参数,环境变量和application.yml或application.properties文件)。简介一节提到的sink例子中,将spring.cloud.stream.bindings.input.destination设置成raw-sensor-data程序会从命名为raw-sensor-data的kafka主题中读取数据,或者从一个绑定到raw-sensor-data的rabbitmq交换机的队列中读取数据。
SpringCloudStream能自动发现并使用类路径中的binder,您可以很容易地以相同的代码使用不同类型的中间件:只需要在build的时候引入不同的binder。对于更复杂的情况,你可以引入多个binders并选择使用哪一个,甚至可以在运行时根据不同的channels选择不同的binder。
持久化发布/订阅支持
应用间通信遵照发布-订阅模型,数据通过共享的topics进行广播,下图显示了SpringCloudStream应用交互的典型部署.
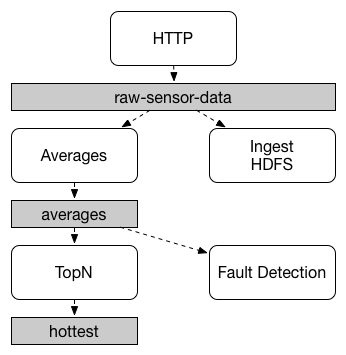
数据被发送到一个公共的目标raw-sensor-data,在目标中,数据分别被两个独立的微服务加工,一个微服务计算平均窗口时间,另一个将原始数据存储到HDFS。为了处理数据,两个微服务在运行时声明这个topic作为他们的输入源。
发布-订阅通信模型降低了生产者和消费者的复杂性,并允许新的应用程序被添加到拓扑结构,而不会破坏现有的流程。例如,下游的平均计算应用程序,您可以添加一个应用程序,该应用程序计算最高温度用来显示和监控。然后您可以再添加一个基于相同数据流的,解释故障检测的另一个应用程序。通过共同的topics做沟通相比点对点的队列更能减少微服务间的耦合。
发布订阅不是一个新概念,SpringCloudStream在你的应用中提供一个额外的手段供你选择。通过使用本地中间件支持,SpringCloudStream简化了不同平台上的发布订阅模型。
在该服务启动后,会捡起可能因为故障等,未消费的消息进行处理
消费者组
多个服务共同处理一个消息,“竞争”关系
虽然发布-订阅模型可以很容易地通过共享topics连接应用程序,但创建一个应用多实例的的扩张能力同等重要。当这样做时,应用程序的不同实例被放置在一个竞争的消费者关系中,其中只有一个实例将处理一个给定的消息。
SpringCloudStream利用消费者组定义这种行为(这种分组类似于Kafka consumer groups,灵感也来源于此),每个消费者通过spring.cloud.stream.bindings.input.group指定一个组名称,以下图所示的消费者为例,应分别设置spring.cloud.stream.bindings.input.group=hdfsWrite和spring.cloud.stream.bindings.input.group=average。
所有订阅指定topics的组都会收到发布数据的一份副本,但是每一个组内只有一个成员会收到该消息。默认情况下,当一个组没有指定时,SpringCloudStream将分配给一个匿名的、独立的只有一个成员的消费组,该组与所有其他组都处于一个发布-订阅关系中。
消费者类型
支持两种消费者类型
- 消息驱动(有时候称为异步)
- 轮询(有时称为同步)
在版本2.0前,只支持异步消费者。被投递的消息只要到达,就会有一个线程处理。
当您希望控制消息的处理速率时,可能需要使用同步使用者。
持久性
SpringCloudStream一致性模型中,消费者组订阅是持久的,也就是说一个绑定的实现确保组的订阅者是持久的。一旦组中至少有一个成员创建了订阅,这个组就会收到消息,即使组中所有的应用都被停止了,组仍然会收到消息。
匿名订阅是非持久的,一些binder的实现(如:RabbitMQ),可以创建非持久化(non-durable)组订阅
在一般情况下,将应用绑定到给定目标的时候,最好指定一个消费者组,当扩展一个SpringCloudStream应用时,必须为每个输入bindings指定一个消费组,这防止了应用程序的实例接收重复的消息(除非该行为是需要的,这是不寻常的)。
分区支持
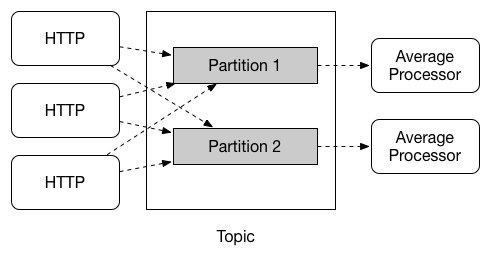
SpringCloudStream支持在一个应用程序的多个实例之间数据分区,在分区的情况下,物理通信介质(例如,topic代理)被视为多分区结构。一个或多个生产者应用程序实例将数据发送给多个消费应用实例,并保证共同的特性的数据由相同的消费者实例处理。
SpringCloudStream提供了一个通用的抽象,用于统一方式进行分区处理,因此分区可以用于自带分区的代理(如kafka)或者不带分区的代理(如rabbiemq)
分区在有状态处理中是一个很重要的概念,其重要性体现在性能和一致性上,要确保所有相关数据被一并处理,例如,在时间窗平均计算的例子中,给定传感器测量结果应该都由同一应用实例进行计算。
如果要设置分区处理方案,需要配置数据生产端点和数据消费端点
2.主要概念,编程模型
http://docs.springcloud.cn/user-guide/stream/
https://cloud.spring.io/spring-cloud-static/spring-cloud-stream/3.0.6.RELEASE/reference/html/spring-cloud-stream.html#_programming_model
本节介绍SpringCloudStream的编程模型,SpringCloudStream提供了一些预定义的注解,用于绑定输入和输出channels,以及如何监听channels。
首先了解三个概念
- Destination Binders:负责与外部消息传递系统集成的组件。
- Bindings:外部消息传递系统和应用程序之间提供的消息生成者和消费者(由目标绑定程序创建)之间的桥梁。
- Message:生产者和消费者使用的规范数据结构,用于与目标绑定程序(并因此通过外部消息传递系统与其他应用程序)进行通信。
Destination Binders
Destination Binders是Spring Cloud Stream的扩展组件,负责提供必要的配置和实现以促进与外部消息传递系统的集成。 这种集成负责连接,委派和与生产者和消费者之间的消息路由,数据类型转换,用户代码调用等。
Binder可以根据用户提供的一些信息自动完成配置,样板文件的工作
Bindings
Bindings提供了外部消息传递系统(例如队列,主题等)与应用程序提供的生产者和消费者之间的桥梁。
BindingName
每个Binding是抽象,我们需要为这些抽象指定名称
有两种方式指定名称
- 函数式,配合配置文件
- 使用注解
函数式使用起来不是很舒服
@SpringBootApplication
public class SampleApplication {

	@Bean
	public Function<String, String> uppercase() {
	    return value -> value.toUpperCase();
	}
}
spring.cloud.stream.bindings.uppercase-in-0.destination=my-topic
注解模式
Source,Sink,Processor
最常见的场景中,包含一个输入通道或者包含一个输出通道或者二者都包含,SpringCloudStream提供了三个开箱即用的预定义接口。
Source用于有单个输出(outbound)通道的应用。
public interface Source {

  String OUTPUT = "output";

  @Output(Source.OUTPUT)
  MessageChannel output();

}
Sink用于有单个输入(inbound)通道的应用。
public interface Sink {

  String INPUT = "input";

  @Input(Sink.INPUT)
  SubscribableChannel input();

}
Processor用于单个应用同时包含输入和输出通道的情况。
public interface Processor extends Source, Sink {
}
SpringCloudStream对这些接口不提供特殊的处理,仅提供开箱即用的特性。
你也可以自定义一个接口
public interface MyBinding {

  String FOO = "foo";

  @Output(MyBinding.FOO)
  MessageChannel foo();
}
声明和绑定通道
通过@EnableBinding触发绑定
将@EnableBinding注解添加到应用的配置类,就可以把一个spring应用转换成SpringCloudStream应用,@EnableBinding注解本身就包含@Configuration注解,会触发SpringCloudStream 基本配置。
...
@Import(...)
@Configuration
@EnableIntegration
public @interface EnableBinding {
    ...
    Class[] value() default {};
}
@EnableBinding注解可以接收一个或多个接口类作为参数,后者包含代表了可绑定构件(一般来说是消息通道)的方法
在SpringCloudStream1.0中,仅有的可绑定构件是Spring Messaging
MessageChannel以及它的扩展SubscribableChannel和PollableChannel. 未来版本会使用相同的机制扩展对其他类型构件的支持。在本文档中,会继续引用channels。
@Input 与 @Output
一个SpringCloudStream应用可以有任意数目的input和output通道,后者通过@Input和@Output注解在接口中定义。
public interface Barista {

    @Input
    SubscribableChannel orders();

    @Output
    MessageChannel hotDrinks();

    @Output
    MessageChannel coldDrinks();
}
使用这个接口作为@EnableBinding的参数,将触发三个bound channels的创建,后者的分别被命名为orders,hotDrinks,coldDrinks
@EnableBinding(Barista.class)
public class CafeConfiguration {

   ...
}
定制通道名字
使用@Input和@Output注解,您可以为该channel指定一个自定义的channel名称,如下面的示例所示:
public interface Barista {
    ...
    @Input("inboundOrders")
    SubscribableChannel orders();
}
访问绑定通道
注入已绑定接口
对于每一个绑定的接口,SpringCloudStream将产生一个实现接口的bean,调用这个生成类的@Input或@Output方法,会返回一个相应的channel。
下面的例子中,当hello被调用时输出channel会发送一个消息,在注入的Sourc上提供唤醒output()来检索到目标通道
@Component
public class SendingBean {

    private Source source;

    @Autowired
    public SendingBean(Source source) {
        this.source = source;
    }

    public void sayHello(String name) {
         source.output().send(MessageBuilder.withPayload(body).build());
    }
}
直接注入到通道
绑定的通道也可以直接注入
@Component
public class SendingBean {

    private MessageChannel output;

    @Autowired
    public SendingBean(MessageChannel output) {
        this.output = output;
    }

    public void sayHello(String name) {
         output.send(MessageBuilder.withPayload(body).build());
    }
}
如果channel的名字是在注解中指定的,那么请使用这个名字,而不是使用方法名。如下:
public interface CustomSource {
    ...
    @Output("customOutput")
    MessageChannel output();
}
该通道将被注入,如下面的示例所示:
@Component
public class SendingBean {

    @Autowired
    private MessageChannel output;

    @Autowired @Qualifier("customOutput")
    public SendingBean(MessageChannel output) {
        this.output = output;
    }

    public void sayHello(String name) {
         customOutput.send(MessageBuilder.withPayload(body).build());
    }
}
生产和消费消息
可以使用Spring Integration的注解或者SpringCloudStream的@StreamListener注解来实现一个SpringCloudStream应用。@StreamListener注解模仿其他spring消息注解(例如@MessageMapping, @JmsListener, @RabbitListener等),但是它增加了内容类型管理和类型强制特性。
原生Spring Integration支持
SpringCloudStream是基于Spring Integration的,所以完全的继承了后者的基础设施以及构件本身,例如,可以将Source的output通道连接到一个MessageSource
@EnableBinding(Source.class)
public class TimerSource {

  @Value("${format}")
  private String format;

  @Bean
  @InboundChannelAdapter(value = Source.OUTPUT, poller = @Poller(fixedDelay = "${fixedDelay}", maxMessagesPerPoll = "1"))
  public MessageSource timerMessageSource() {
    return () -> new GenericMessage<>(new SimpleDateFormat(format).format(new Date()));
  }
}
或者你可以在transformer中使用处理器的channels:
@EnableBinding(Processor.class)
public class TransformProcessor {
  @Transformer(inputChannel = Processor.INPUT, outputChannel = Processor.OUTPUT)
  public Object transform(String message) {
    return message.toUpper();
  }
}
使用@StreamListener进行自动内容类型处理
作为原生Spring Integration的补充,SpringCloudStream提供了自己的@StreamListener注解,该注解模仿spring的其它消息注解(如@MessageMapping, @JmsListener, @RabbitListener等)。@StreamListener注解提供了一种更简单的模型来处理输入消息,尤其是处理包含内容类型管理和类型强制的用例的情况。
SpringCloudStream提供了一个扩展的MessageConverter机制,该机制提供绑定通道实现数据处理,本例子中,数据会分发给带@StreamListener注解的方法。下面例子展示了处理外部Vote事件的应用:
@EnableBinding(Sink.class)
public class VoteHandler {

  @Autowired
  VotingService votingService;

  @StreamListener(Sink.INPUT)
  public void handle(Vote vote) {
    votingService.record(vote);
  }
}
@StreamListener和Spring Integration的@ServiceActivator是有区别的,区别体现在当输入消息内容头为application/json的字符串的时候,@StreamListener的MessageConverter机制会使用contentType头将string解析为Vote对象。
和其他Spring Messaging方法一样,方法参数可以被如下注解修饰,@Payload,@Headers和@Header
对于那些有返回数据的方法,必须使用@SendTo注解来指定返回数据的输出绑定目标。
 @EnableBinding(Processor.class)
 public class TransformProcessor {

   @Autowired
   VotingService votingService;

   @StreamListener(Processor.INPUT)
   @SendTo(Processor.OUTPUT)
   public VoteResult handle(Vote vote) {
     return votingService.record(vote);
   }
 }
在RabbitMQ中,内容类型头可以由外部应用设定。SpringCloudStream支持他们作为一个扩展的内部协议,用于任何类型的运输(包括运输,如Kafka,不能正常支持headers)
聚合
SpringCloudStream可以支持多种应用聚合,直接连接他们的输入和输出channel,并避免通过代理交换消息的额外成本,截止1.0版本,聚合只支持以下类型的应用程序:
- sources:带有名为output的单一输出channel的应用。典型情况下,该应用带有包含一个以下类型的绑定
org.springframework.cloud.stream.messaging.Source - sinks:带有名为input的单一输入channel的应用。典型情况下,该应用带有包含一个以下类型的绑定
org.springframework.cloud.stream.messaging.Sink - processors:带有名为input的单一输入channel和带有名为output的单一输出channel的应用。典型情况下,该应用带有包含一个以下类型的绑定
org.springframework.cloud.stream.messaging.Processor
可以通过创建一个相互关联的应用的序列将他们聚合在一起,其中一个序列元素的输出通道连接到下一个其中一个元素的输出通道连接到下一个元素的输入通道元素的输入通道,序列可以由一个source或者一个processor开始,可以包含任意数目的processors,且必须由processors或者sink结束。
根据开始和结束元素的特性,序列可以有一个或者多个可绑定的channels,如下:
- 如果序列由source开始,sink结束,应用之间直接通信并且不会绑定通道
- 如果序列由processor开始,它的输入通道会变成聚合的input通道并进行相应的绑定
- 如果序列由processor结束,它的输出通道会变成聚合的output通道并进行相应的绑定
使用AggregateApplicationBuilder功能类来实现聚合,如下例子所示。考虑一个包含source,processor和sink的工程,它们可以示包含在工程中,或者包含在工程的依赖中。
@SpringBootApplication
@EnableBinding(Sink.class)
public class SinkApplication {

    private static Logger logger = LoggerFactory.getLogger(SinkModuleDefinition.class);

    @ServiceActivator(inputChannel=Sink.INPUT)
    public void loggerSink(Object payload) {
        logger.info("Received: " + payload);
    }
}
@SpringBootApplication
@EnableBinding(Processor.class)
public class ProcessorApplication {

    @Transformer
    public String loggerSink(String payload) {
        return payload.toUpperCase();
    }
}
@SpringBootApplication
@EnableBinding(Source.class)
public class SourceApplication {

    @Bean
    @InboundChannelAdapter(value = Source.OUTPUT)
    public String timerMessageSource() {
        return new SimpleDateFormat().format(new Date());
    }
}
每一个配置可用于运行一个独立的组件,在这个例子中,它们可以这样实现聚合:
@SpringBootApplication
public class SampleAggregateApplication {

    public static void main(String[] args) {
        new AggregateApplicationBuilder()
            .from(SourceApplication.class).args("--fixedDelay=5000")
            .via(ProcessorApplication.class)
            .to(SinkApplication.class).args("--debug=true").run(args);
    }
}
序列的开始组件作为from()方法的参数,序列的结束组件作为to()方法的参数,中间处理器作为via()方法的参数,同一类型的处理器可以链在一起(例如,可以使用不同配置的管道传输方式)。对于每一个组件,编译器可以为Spring Boot提供运行时参数。
RxJava 支持
RxJava 是一个响应式编程框架,SpringCloudStream通过RxJavaProcessor可以支持RxJava的processor,参见spring-cloud-stream-rxjava
public interface RxJavaProcessor {
    Observable process(Observable input);
}
RxJavaProcessor(观察者设计模式)收到观察得到的对象Observable作为输入,相当于数据流的输入装载器。在启动时调用process方法来设置数据流。
用@EnableRxJavaProcessor修饰在你的处理方法上,就可以启用基于RxJava的处理器。@EnableRxJavaProcessor包含了@EnableBinding(Processor.class)注解并可以创建Processor,如下:
@EnableRxJavaProcessor
public class RxJavaTransformer {

    private static Logger logger = LoggerFactory.getLogger(RxJavaTransformer.class);

    @Bean
    public RxJavaProcessor processor() {
        return inputStream -> inputStream.map(data -> {
            logger.info("Got data = " + data);
            return data;
        })
        .buffer(5)
        .map(data -> String.valueOf(avg(data)));
    }

    private static Double avg(List data) {
        double sum = 0;
        double count = 0;
        for(String d : data) {
            count++;
            sum += Double.valueOf(d);
        }
        return sum/count;
    }
}
实施RxJava处理器,处理流程中的异常特别重要,未捕获的异常将被视为errors,并会结束Observable,中断了处理流程。
3.绑定器
SpringCloudStream提供绑定抽象用于与外部中间件中的物理目标进行连接。本章主要介绍Binder SPI背后的主要概念,主要组件以及实现细节。
生产者与消费者
任何往通道中发布消息的组件都可称作生产者。通道可以通过代理的Binder实现与外部消息代理进行绑定。调用bindProducer()方法,第一个参数是代理名称,第二个参数是本地通道目标名称(生产者向本地通道发送消息),第三个参数包含通道创建的适配器的属性信息(比如:分片key表达式)。
任何从通道中接收消息的组件都可称作消费者。与生产者一样,消费者通道可以与外部消息代理进行绑定。调用bindConsumer()方法,第一个参数是目标名称,第二个参数提供了消费者组的名称。每个组都会收到生产中发出消息的副本(即,发布-订阅语义),如果有多个消费者绑定相同的组名称,消息只会由一个消费者消费(即,队列语义)
Binding配置项
配置格式为spring.cloud.stream.bindings.,spring.cloud.stream.bindings.前缀,只关注属性参数
SpringCloudStream的bindings配置
下面的配置对于input bindings和output bindings都有效,且前缀是spring.cloud.stream.bindings.
destination
绑定中间件的目的 (e.g., the RabbitMQ exchange or Kafka topic)。如果channel绑定的是消费者,那么可以绑定多个目的,用逗号分隔。如果不设置则channel名称会替代这个值。
group
channel的消费者组,仅对inbound bindings有效。
Default: null (暗示一个匿名消费者)
contentType
The content type of the channel.
Default: null (so that no type coercion is performed).
binder
The binder used by this binding. See Multiple Binders on the Classpath for details.
Default: null (the default binder will be used, if one exists).
Consumer properties
下面的配置仅对input bindings有效,且前缀是spring.cloud.stream.bindings.
concurrency
The concurrency of the inbound consumer.
Default: 1
partitioned
Whether the consumer receives data from a partitioned producer.
Default: false
headerMode
When set to raw, disables header parsing on input. Effective only for messaging middleware that does not support message headers natively and requires header embedding. Useful when inbound data is coming from outside Spring Cloud Stream applications.
Default: embeddedHeaders.
maxAttempts
The number of attempts of re-processing an inbound message.
Default: 3.
backOffInitialInterval
The backoff initial interval on retry.
Default: 1000.
backOffMaxInterval
The maximum backoff interval.
Default: 10000.
backOffMultiplier
The backoff multiplier.
Default: 2.0.
Producer Properties
下面的配置仅对output bindings有效,且前缀是spring.cloud.stream.bindings.
partitionKeyExpression
A SpEL expression that determines how to partition outbound data. If set, or if partitionKeyExtractorClass is set, outbound data on this channel will be partitioned, and partitionCount must be set to a value greater than 1 to be effective. The two options are mutually exclusive. See Partitioning Support.
Default: null.
partitionKeyExtractorClass
A PartitionKeyExtractorStrategy implementation. If set, or if partitionKeyExpression is set, outbound data on this channel will be partitioned, and partitionCount must be set to a value greater than 1 to be effective. The two options are mutually exclusive. See Partitioning Support.
Default: null.
partitionSelectorClass
A PartitionSelectorStrategy implementation. Mutually exclusive with partitionSelectorExpression. If neither is set, the partition will be selected as the hashCode(key) % partitionCount, where key is computed via either partitionKeyExpression or partitionKeyExtractorClass.
Default: null.
partitionSelectorExpression
A SpEL expression for customizing partition selection. Mutually exclusive with partitionSelectorClass. If neither is set, the partition will be selected as the hashCode(key) % partitionCount, where key is computed via either partitionKeyExpression or partitionKeyExtractorClass.
Default: null.
partitionCount
The number of target partitions for the data, if partitioning is enabled. Must be set to a value greater than 1 if the producer is partitioned. On Kafka, interpreted as a hint; the larger of this and the partition count of the target topic is used instead.
Default: 1.
requiredGroups
A comma-separated list of groups to which the producer must ensure message delivery even if they start after it has been created (e.g., by pre-creating durable queues in RabbitMQ).
headerMode
When set to raw, disables header embedding on output. Effective only for messaging middleware that does not support message headers natively and requires header embedding. Useful when producing data for non-Spring Cloud Stream applications.
Default: embeddedHeaders.
4.搭建一个简单的demo
Producer
除了上面的依赖外,需要用到什么消息队列就要引入相应的Binder
RabbitMQ如下
<dependency>
        <groupId>org.springframework.cloudgroupId>
        <artifactId>spring-cloud-stream-binder-rabbitartifactId>
    dependency>
Kafka
<dependency>
        <groupId>org.springframework.cloudgroupId>
        <artifactId>spring-cloud-stream-binder-kafkaartifactId>
    dependency>
配置文件,有Eureka要配置一下eureka
server:
  port: 8004

spring:
  application:
    name: stream
  cloud:
    stream:
      binders:
        defaultRabbit:
          type: rabbit
          environment:
            spring:
              rabbitmq:
                host: localhost
                port: 5672
                username: name
                password: pwd
      bindings:
        #the name is the channel you make in service
        messageChannel:
          #excange name
          destination: studyExchange
          content-type: application/json
          #red doesn't matter
          binder: defaultRabbit
eureka:
  instance:
    instance-id: stream-producer
    prefer-ip-address: true
  client:
    service-url:
      defaultZone: http://localhost:7001/eureka/,http://localhost:7002/eureka/
    register-with-eureka: true
    fetch-registry: true
编写Service
注意这里的Source为Stream包中的类
@EnableBinding(Source.class)
public class TestServiceImpl implements TestService {

    @Resource
    private MessageChannel messageChannel;
    @Override
    public String send() {
        String random= UUID.randomUUID().toString();
        messageChannel.send(MessageBuilder.withPayload(random).build());
        return random;
    }
}
Consumer
依赖与上一个相同
配置文件也基本相同
server:
  port: 85

spring:
  application:
    name: stream-consumer
  cloud:
    stream:
      binders:
        defaultRabbit:
          type: rabbit
          environment:
            spring:
              rabbitmq:
                host: localhost
                port: 5672
                username: name
                password: pwd
      bindings:
        #the name is the channel you make in service
        messageChannel:
          #excange name
          destination: studyExchange
          content-type: application/json
          #red doesn't matter
          binder: defaultRabbit
eureka:
  instance:
    instance-id: stream-consumer
    prefer-ip-address: true
  client:
    service-url:
      defaultZone: http://localhost:7001/eureka/,http://localhost:7002/eureka/
    register-with-eureka: true
    fetch-registry: true
消费队列拉取,利用了监听
@Component
@EnableBinding(Sink.class)
public class TestController {

    @StreamListener(Sink.INPUT)
    public void input(Message<String> message){
        System.out.println(message.getPayload());
    }
}
5.分组消费升级
避免重复消费,同一个组内,对一个消息只能消费一次
在项目启动时,Stream将为每一个没有指定组名的Binding设置一个默认分组名
在bindings中对象中,配置group项
bindings:
        #the name is the channel you make in service
        messageChannel:
          #excange name
          destination: studyExchange
          content-type: application/json
          #red doesn't matter
          binder: defaultRabbit
          group: ga
同一个Group竞争,不同Group广播
若该组收到了消息,但是没有服务在线,
服务上线后会检索未消费的消息,进行处理。
十四、Spring Cloud Sleuth分布式链路追踪
解决问题:微服务链路复杂后调用难以追踪
支持Zipkin达到可视化目的
Zipkin为应用程序,利用Jar包部署启动
Spring Cloud Sleuth将请求信息发送到Zipkin中
https://zipkin.io/
https://github.com/spring-cloud/spring-cloud-sleuth
<dependency>
    <groupId>org.springframework.cloudgroupId>
    <artifactId>spring-cloud-starter-zipkinartifactId>
dependency>
spring:
  zipkin:
    base-url: Zipkin的地址http://localhost:9411
  sleuth:
    sampler:
      #概览,0-1
      probability: 1
