java多线程(8)---阻塞队列
阻塞队列
再写阻塞列队之前,我写了一篇有关queue集合相关博客,也主要是为这篇做铺垫的。
网址:【java提高】---queue集合 在这篇博客中我们接触的队列都是非阻塞队列,比如PriorityQueue、LinkedList(LinkedList是双向链表,它实现了Dequeue接口)。
使用非阻塞队列的时候有一个很大问题就是:它不会对当前线程产生阻塞,那么在面对类似消费者-生产者的模型时,就必须额外地实现同步策略以及线程间唤醒策略,这个实现起来就非常麻烦。
一、认识BlockingQueue
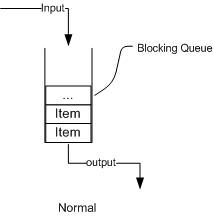
阻塞队列,顾名思义,首先它是一个队列,而一个队列在数据结构中所起的作用大致如下图所示:
从上图我们可以很清楚看到,通过一个共享的队列,可以使得数据由队列的一端输入,从另外一端输出;
常用的队列主要有以下两种:
先进先出(FIFO):先插入的队列的元素也最先出队列,类似于排队的功能。从某种程度上来说这种队列也体现了一种公平性。
后进先出(LIFO):后插入队列的元素最先出队列,这种队列优先处理最近发生的事件。
阻塞队列常用于生产者和消费者的场景,生产者线程可以把生产结果存到阻塞队列中,而消费者线程把中间结果取出并在将来修改它们。
队列会自动平衡负载,如果生产者线程集运行的比消费者线程集慢,则消费者线程集在等待结果时就会阻塞;如果生产者线程集运行的快,那么它将等待消费者线程集赶上来。
作为BlockingQueue的使用者,我们再也不需要关心什么时候需要阻塞线程,什么时候需要唤醒线程,因为这一切BlockingQueue都给你一手包办了。
看下BlockingQueue的核心方法
1、放入数据
(1)put(E e):put方法用来向队尾存入元素,如果队列满,则等待。
(2)offer(E o, long timeout, TimeUnit unit):offer方法用来向队尾存入元素,如果队列满,则等待一定的时间,当时间期限达到时,如果还没有插入成功,则返回false;否则返回true;
2、获取数据
(1)take():take方法用来从队首取元素,如果队列为空,则等待;
(2)drainTo():一次性从BlockingQueue获取所有可用的数据对象(还可以指定获取数据的个数),通过该方法,可以提升获取数据效率;不需要多次分批加锁或释放锁。
(3)poll(time):取走BlockingQueue里排在首位的对象,若不能立即取出,则可以等time参数规定的时间,取不到时返回null;
(4)poll(long timeout, TimeUnit unit):poll方法用来从队首取元素,如果队列空,则等待一定的时间,当时间期限达到时,如果取到,则返回null;否则返回取得的元素;
二、常见BlockingQueue
在了解了BlockingQueue的基本功能后,让我们来看看BlockingQueue家庭大致有哪些成员?
1、ArrayBlockingQueue
基于数组实现的一个阻塞队列,在创建ArrayBlockingQueue对象时必须制定容量大小。并且可以指定公平性与非公平性,默认情况下为非公平的,即不保证等待时间最长的队列最优先能够访问队列。
2、LinkedBlockingQueue
基于链表实现的一个阻塞队列,在创建LinkedBlockingQueue对象时如果不指定容量大小,则默认大小为Integer.MAX_VALUE。
3、PriorityBlockingQueue
以上2种队列都是先进先出队列,而PriorityBlockingQueue却不是,它会按照元素的优先级对元素进行排序,按照优先级顺序出队,每次出队的元素都是优先级最高的元素。注意,此阻塞队列为无界阻塞队列,即
容量没有上限(通过源码就可以知道,它没有容器满的信号标志),前面2种都是有界队列。
4、DelayQueue
基于PriorityQueue,一种延时阻塞队列,DelayQueue中的元素只有当其指定的延迟时间到了,才能够从队列中获取到该元素。DelayQueue也是一个无界队列,因此往队列中插入数据的操作(生产者)永远不会
被阻塞,而只有获取数据的操作(消费者)才会被阻塞。
5、小案例
有关生产者-消费者,上篇博客我写了基于wait和notifyAll实现过,也基于await和signal实现过,网址:https://www.cnblogs.com/qdhxhz/p/9206076.html
这里已经是第三个相关生产消费者的小案例了。
这里通过LinkedBlockingQueue实现生产消费模式
(1)测试类
public class BlockingQueueTest {

          public static void main(String[] args) throws InterruptedException {
              // 声明一个容量为10的缓存队列
             BlockingQueue queue = new LinkedBlockingQueue(10);

             //new了两个生产者和一个消费者,同时他们共用一个queue缓存队列
             Producer producer1 = new Producer(queue);
             Producer producer2 = new Producer(queue);
             Consumer consumer = new Consumer(queue);

             // 通过线程池启动线程
             ExecutorService service = Executors.newCachedThreadPool();

             service.execute(producer1);
             service.execute(producer2);
             service.execute(consumer);

             // 执行5s
             Thread.sleep(5 * 1000);
             producer1.stop();
             producer2.stop();

             Thread.sleep(2000);
             // 退出Executor
             service.shutdown();
         }
     }
(2)生产者
/**
  * 生产者线程
  */
 public class Producer implements Runnable {

     private volatile boolean  isRunning = true;//是否在运行标志
     private BlockingQueue queue;//阻塞队列
     private static AtomicInteger count = new AtomicInteger();//自动更新的值

     //构造函数
     public Producer(BlockingQueue queue) {
         this.queue = queue;
     }

     public void run() {
         String data = null;
         System.out.println(Thread.currentThread().getName()+" 启动生产者线程!");
         try {
             while (isRunning) {
                 Thread.sleep(1000);

                //以原子方式将count当前值加1
                 data = "" + count.incrementAndGet();
                 System.out.println(Thread.currentThread().getName()+" 将生产数据:" + data + "放入队列中");

               //设定的等待时间为2s,如果超过2s还没加进去返回false
                 if (!queue.offer(data, 2, TimeUnit.SECONDS)) {
                     System.out.println(Thread.currentThread().getName()+" 放入数据失败:" + data);
                 }
             }
         } catch (InterruptedException e) {
             e.printStackTrace();
             Thread.currentThread().interrupt();
         } finally {
             System.out.println(Thread.currentThread().getName()+" 退出生产者线程!");
         }
     }

     public void stop() {
         isRunning = false;
     }
 }
(3)消费者
/**
  * 消费者线程
  */
 public class Consumer implements Runnable {

     private BlockingQueue queue;

     //构造函数
     public Consumer(BlockingQueue queue) {
         this.queue = queue;
     }

     public void run() {
         System.out.println(Thread.currentThread().getName()+" 启动消费者线程!");

         boolean isRunning = true;
         try {
             while (isRunning) {
                //有数据时直接从队列的队首取走,无数据时阻塞,在2s内有数据,取走,超过2s还没数据,返回失败
                 String data = queue.poll(2, TimeUnit.SECONDS);

                 if (null != data) {
                     System.out.println(Thread.currentThread().getName()+" 正在消费数据:" + data);
                     Thread.sleep(1000);
                 } else {
                     // 超过2s还没数据,认为所有生产线程都已经退出,自动退出消费线程。
                     isRunning = false;
                 }
             }
         } catch (InterruptedException e) {
             e.printStackTrace();
             Thread.currentThread().interrupt();
         } finally {
             System.out.println(Thread.currentThread().getName()+" 退出消费者线程!");
         }
     }
 }
运行结果(其中一种)
三、阻塞队列的实现原理
主要看两个关键方法的实现:put()和take()
1、put方法
public void put(E e) throws InterruptedException {

    //首先可以看出,不能放null,否在报空指针异常
    if (e == null) throw new NullPointerException();
    final E[] items = this.items;

    //发现采用的是Lock锁
    final ReentrantLock lock = this.lock;

    //如果当前线程不能获取锁则抛出异常
    lock.lockInterruptibly();
    try {
        try {
            while (count == items.length)
    //这里才是关键,我们发现它的堵塞其实是通过await()和signal()来实现的
                notFull.await();
        } catch (InterruptedException ie) {
            notFull.signal();
            throw ie;
        }
        insert(e);
    } finally {
        lock.unlock();
    }
}
当被其他线程唤醒时,通过insert(e)方法插入元素,最后解锁。
我们看一下insert方法的实现:
private void insert(E x) {
    items[putIndex] = x;
    putIndex = inc(putIndex);
    ++count;
    notEmpty.signal();
}
它是一个private方法,插入成功后,通过notEmpty唤醒正在等待取元素的线程。
2、take()方法
public E take() throws InterruptedException {
    final ReentrantLock lock = this.lock;
    lock.lockInterruptibly();
    try {
        try {
            while (count == 0)
                notEmpty.await();
        } catch (InterruptedException ie) {
            notEmpty.signal();
            throw ie;
        }
        E x = extract();
        return x;
    } finally {
        lock.unlock();
    }
}
跟put方法实现很类似,只不过put方法等待的是notFull信号,而take方法等待的是notEmpty信号。在take方法中,如果可以取元素,则通过extract方法取得元素,
下面是extract方法的实现:
private E extract() {
    final E[] items = this.items;
    E x = items[takeIndex];
    items[takeIndex] = null;
    takeIndex = inc(takeIndex);
    --count;
    notFull.signal();
    return x;
}
跟insert方法也很类似。
其实从这里大家应该明白了阻塞队列的实现原理,事实它和我们用Object.wait()、Object.notify()和非阻塞队列实现生产者-消费者的思路类似,只不过它这里通过await()和signal()一起集成到了阻塞队列中实现。
参考
BlockingQueue(阻塞队列)详解
想太多,做太少,中间的落差就是烦恼。想没有烦恼,要么别想,要么多做。少校【15】


