python数据增强三种方法
程序1:
# -*- coding:utf-8 -*-
"""数据增强
   1. 色彩抖动 color jittering
   2. 噪声扰动 noise
   3. 旋转变换/反射变换 Rotation/reflection
"""
from PIL import Image, ImageEnhance, ImageOps, ImageFile
import numpy as np
import random
import threading, os, time
import logging
logger = logging.getLogger(__name__)
ImageFile.LOAD_TRUNCATED_IMAGES = True
class DataAugmentation:
    """
    包含数据增强的三种方式
    """
    def __init__(self):
        pass
    @staticmethod
    def openImage(image):
        return Image.open(image, mode="r")
    @staticmethod
    def randomRotation(image, mode=Image.BICUBIC):
        """
         对图像进行随机任意角度(0~360度)旋转
        :param mode 邻近插值,双线性插值,双三次B样条插值(default)
        :param image PIL的图像image
        :return: 旋转转之后的图像
        """
        random_angle = np.random.randint(1, 360)
        return image.rotate(random_angle, mode)
    """
   @staticmethod
    def randomCrop(image):

        对图像随意剪切,考虑到图像大小范围(68,68),使用一个一个大于(36*36)的窗口进行截图(裁剪成一小块,也没有扩展成原来的尺寸大小,对打标签的意义不大)
        :param image: PIL的图像image
        :return: 剪切之后的图像

        image_width = image.size[0]
        image_height = image.size[1]
        crop_win_size = np.random.randint(40, 68)
        random_region = (
            (image_width - crop_win_size) >> 1, (image_height - crop_win_size) >> 1, (image_width + crop_win_size) >> 1,
            (image_height + crop_win_size) >> 1)
        return image.crop(random_region)
    """
    @staticmethod
    def randomColor(image):
        """
        对图像进行颜色抖动
        :param image: PIL的图像image
        :return: 有颜色色差的图像image
        """
        random_factor = np.random.randint(0, 31) / 10.  # 随机因子
        color_image = ImageEnhance.Color(image).enhance(random_factor)  # 调整图像的饱和度
        random_factor = np.random.randint(10, 21) / 10.  # 随机因子
        brightness_image = ImageEnhance.Brightness(color_image).enhance(random_factor)  # 调整图像的亮度
        random_factor = np.random.randint(10, 21) / 10.  # 随机因子
        contrast_image = ImageEnhance.Contrast(brightness_image).enhance(random_factor)  # 调整图像对比度
        random_factor = np.random.randint(0, 31) / 10.  # 随机因子
        return ImageEnhance.Sharpness(contrast_image).enhance(random_factor)  # 调整图像锐度
    @staticmethod
    def randomGaussian(image, mean=0.2, sigma=0.3):
        """
         对图像进行高斯噪声处理
        :param image:
        :return:
        """
        def gaussianNoisy(im, mean=0.2, sigma=0.3):
            """
            对图像做高斯噪音处理
            :param im: 单通道图像
            :param mean: 偏移量
            :param sigma: 标准差
            :return:
            """
            for _i in range(len(im)):
                im[_i] += random.gauss(mean, sigma)
            return im
        # 将图像转化成数组
        img = np.asarray(image)
        img.flags.writeable = True  # 将数组改为读写模式
        width, height = img.shape[:2]
        img_r = gaussianNoisy(img[:, :, 0].flatten(), mean, sigma)
        img_g = gaussianNoisy(img[:, :, 1].flatten(), mean, sigma)
        img_b = gaussianNoisy(img[:, :, 2].flatten(), mean, sigma)
        img[:, :, 0] = img_r.reshape([width, height])
        img[:, :, 1] = img_g.reshape([width, height])
        img[:, :, 2] = img_b.reshape([width, height])
        return Image.fromarray(np.uint8(img))
    @staticmethod
    def saveImage(image, path):
        image.save(path)
def makeDir(path):
    try:
        if not os.path.exists(path):
            if not os.path.isfile(path):
                # os.mkdir(path)
                os.makedirs(path)
            return 0
        else:
            return 1
    except Exception as e:
        print(str(e))
        return -2
def imageOps(func_name, image, des_path, file_name, times=5):
    funcMap = {"randomRotation": DataAugmentation.randomRotation,
               #"randomCrop": DataAugmentation.randomCrop,
               "randomColor": DataAugmentation.randomColor,
               "randomGaussian": DataAugmentation.randomGaussian
               }
    if funcMap.get(func_name) is None:
        logger.error("%s is not exist", func_name)
        return -1
    for _i in range(0, times, 1):
        new_image = funcMap[func_name](image)
        DataAugmentation.saveImage(new_image, os.path.join(des_path, func_name + str(_i) + file_name))
opsList = {"randomRotation", "randomColor", "randomGaussian"}
def threadOPS(path, new_path):
    """
    多线程处理事务
    :param src_path: 资源文件
    :param des_path: 目的地文件
    :return:
    """
    if os.path.isdir(path):
        img_names = os.listdir(path)
    else:
        img_names = [path]
    for img_name in img_names:
        print(img_name)
        tmp_img_name = os.path.join(path, img_name)
        if os.path.isdir(tmp_img_name):
            if makeDir(os.path.join(new_path, img_name)) != -1:
                threadOPS(tmp_img_name, os.path.join(new_path, img_name))
            else:
                print('create new dir failure')
                return -1
                # os.removedirs(tmp_img_name)
        elif tmp_img_name.split('.')[1] != "DS_Store":
            # 读取文件并进行操作
            image = DataAugmentation.openImage(tmp_img_name)
            threadImage = [0] * 5
            _index = 0
            for ops_name in opsList:
                threadImage[_index] = threading.Thread(target=imageOps, args=(ops_name, image, new_path, img_name,))
                threadImage[_index].start()
                _index += 1
                time.sleep(0.2)
if __name__ == '__main__':
     threadOPS("F:/ant", "F:/ant_changes")
参考博客:
https://blog.csdn.net/qq_21997625/article/details/80195987
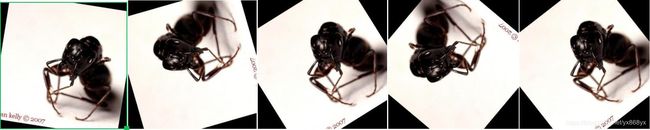
蚂蚁数据集中的样本进行测试:
原图:

颜色抖动:

高斯噪声:

旋转:
程序2:
# encoding:utf-8
"""
tf 参考链接 :https://tensorflow.google.cn/api_guides/python/image
增加数据量,减轻过拟合,增强模型的泛化能力
在预测时也可以使用
"""
import numpy as np
import os
os.environ['TF_CPP_MIN_LOG_LEVEL'] = '2'
import math
import tensorflow as tf
from skimage import io
import random
import matplotlib.pyplot as plt
def read_image(image_path):
    image_raw_data = tf.gfile.FastGFile(image_path, 'rb').read()
    image_data = tf.image.decode_png(image_raw_data)
    return image_data
"""
   图像大小的调整,放大缩小
   不同尺寸
   tf.image.resize_images(img,size,size,method),
   0,默认 双线性插值;1,最近邻算法;
   2, 双3次插值法;3,面积插值法
"""
def resize_image(image_data):
    res = []
    image_biliner = tf.image.resize_images(image_data, [256, 256], method=0)
    image_nn = tf.image.resize_images(image_data, [256, 256], method=1)
    image_bicubic = tf.image.resize_images(image_data, [256, 256], method=2)
    image_area = tf.image.resize_images(image_data, [256, 256], method=3)
    res.append(tf.to_int32(image_biliner))
    res.append(tf.to_int32(image_nn))
    res.append(tf.to_int32(image_bicubic))
    res.append(tf.to_int32(image_area))
    return res
"""
#裁剪
识别不同位置的物体
"""
def crop_image(image_data):
    res = []
    # 在中间位置进行裁剪或者周围填充0
    image_crop = tf.image.resize_image_with_crop_or_pad(image_data, 256, 256)
    image_pad = tf.image.resize_image_with_crop_or_pad(image_data, 512, 512)
    # 按照比列 裁剪图像的中心区域
    image_center_crop = tf.image.central_crop(image_data, 0.5)
    # 随机裁剪(常用方法)
    image_random_crop0 = tf.random_crop(image_data, [300, 300, 3])
    image_random_crop1 = tf.random_crop(image_data, [300, 300, 3])
    res.append(tf.to_int32(image_crop))
    res.append(tf.to_int32(image_pad))
    res.append(tf.to_int32(image_center_crop))
    res.append(tf.to_int32(image_random_crop0))
    res.append(tf.to_int32(image_random_crop1))
    return res
"""
   #旋转
   图像旋转不会影响识别的结果,可以在多个角度进行旋转,使模型可以识别不同角度的物体
   当旋转或平移的角度较小时,可以通过maxpooling来保证旋转和平移的不变性。
"""
def flip_image(image_data):
    # 镜像
    res = []
    # 上下翻转
    image_up_down_flip = tf.image.flip_up_down(image_data)
    # 左右翻转
    image_left_right_filp = tf.image.flip_left_right(image_data)
    # 对角线旋转
    image_transpose = tf.image.transpose_image(image_data)
    # 旋转90度
    image_rot1 = tf.image.rot90(image_data, 1)
    image_rot2 = tf.image.rot90(image_data, 2)
    image_rot3 = tf.image.rot90(image_data, 3)
    res.append(tf.to_int32(image_up_down_flip))
    res.append(tf.to_int32(image_left_right_filp))
    res.append(tf.to_int32(image_transpose))
    res.append(tf.to_int32(image_rot1))
    res.append(tf.to_int32(image_rot2))
    res.append(tf.to_int32(image_rot3))
    return res
# 图像色彩调整
"""
   根据原始数据模拟出更多的不同场景下的图像
   brightness(亮度),适应不同光照下的物体
   constrast(对比度), hue(色彩), saturation(饱和度)
   可自定义和随机
"""
def color_image(image_data):
    res = []
    image_random_brightness = tf.image.random_brightness(image_data, 0.5)
    image_random_constrast = tf.image.random_contrast(image_data, 0, 1)
    image_random_hue = tf.image.random_hue(image_data, 0.5)
    image_random_saturation = tf.image.random_saturation(image_data, 0, 1)
    # 颜色空间变换
    images_data = tf.to_float(image_data)
    image_hsv_rgb = tf.image.rgb_to_hsv(images_data)
    # image_gray_rgb = tf.image.rgb_to_grayscale(image_data)
    # image_gray_rgb = tf.expand_dims(image_data[2],1)
    res.append(tf.to_int32(image_random_brightness))
    res.append(tf.to_int32(image_random_constrast))
    res.append(tf.to_int32(image_random_hue))
    res.append(tf.to_int32(image_random_saturation))
    res.append(tf.to_int32(image_hsv_rgb))
    return res
# 添加噪声
def PCA_Jittering(img):
    img_size = img.size / 3
    print(img.size, img_size)
    img1 = img.reshape(int(img_size), 3)
    img1 = np.transpose(img1)
    img_cov = np.cov([img1[0], img1[1], img1[2]])
    # 计算矩阵特征向量
    lamda, p = np.linalg.eig(img_cov)
    p = np.transpose(p)
    # 生成正态分布的随机数
    alpha1 = random.normalvariate(0, 0.2)
    alpha2 = random.normalvariate(0, 0.2)
    alpha3 = random.normalvariate(0, 0.2)
    v = np.transpose((alpha1 * lamda[0], alpha2 * lamda[1], alpha3 * lamda[2]))  # 加入扰动
    add_num = np.dot(p, v)
    img2 = np.array([img[:, :, 0] + add_num[0], img[:, :, 1] + add_num[1], img[:, :, 2] + add_num[2]])
    img2 = np.swapaxes(img2, 0, 2)
    img2 = np.swapaxes(img2, 0, 1)
    return img2
def main(_):
    image_path = './dog/dog.12499.jpg'
    image_data = read_image(image_path)
    img = tf.image.per_image_standardization(image_data)
    resize = resize_image(image_data)
    crop = crop_image(image_data)
    flip = flip_image(image_data)
    color = color_image(image_data)
    init = tf.global_variables_initializer()
    with tf.Session() as sess:
        sess.run(init)
        img, resize_res, crop_res, flip_res, color_res = sess.run([img, resize, crop, flip, color])
        res = []
        res.append(resize_res)
        res.append(crop_res)
        res.append(flip_res)
        res.append(color_res)
        for cat in res:
            fig = plt.figure()
            num = 1
            for i in cat:
                x = math.ceil(len(cat) / 2)  # 向上取整
                fig.add_subplot(2, x, num)
                plt.imshow(i)
                num = num + 1
            plt.show()
        img = PCA_Jittering(img)
        plt.imshow(img)
        plt.show()
if __name__ == '__main__':
    tf.app.run()
os.environ[‘TF_CPP_MIN_LOG_LEVEL’] = ‘2’
默认为0:输出所有log信息;设置为1:进一步屏蔽INFO信息;设置为2:进一步屏蔽WARNING信息;设置为3:进一步屏蔽ERROR信息
不加这句代码,会出现警告:
2019-01-08 16:33:09.675400: IT:\src\github\tensorflow\tensorflow\core\platform\cpu_feature_guard.cc:141] Your CPU supports instructions that this TensorFlow binary was not compiled to use: AVX2
2019-01-08 16:33:09.830400: I T:\src\github\tensorflow\tensorflow\core\common_runtime\gpu\gpu_device.cc:1392] Found device 0 with properties:
name: Quadro K620 major: 5 minor: 0 memoryClockRate(GHz): 1.124
pciBusID: 0000:01:00.0
totalMemory: 2.00GiB freeMemory: 1.46GiB
2019-01-08 16:33:09.831400: I T:\src\github\tensorflow\tensorflow\core\common_runtime\gpu\gpu_device.cc:1471] Adding visible gpu devices: 0
2019-01-08 16:33:10.475400: I T:\src\github\tensorflow\tensorflow\core\common_runtime\gpu\gpu_device.cc:952] Device interconnect StreamExecutor with strength 1 edge matrix:
2019-01-08 16:33:10.475400: I T:\src\github\tensorflow\tensorflow\core\common_runtime\gpu\gpu_device.cc:958] 0
2019-01-08 16:33:10.476400: I T:\src\github\tensorflow\tensorflow\core\common_runtime\gpu\gpu_device.cc:971] 0: N
2019-01-08 16:33:10.476400: I T:\src\github\tensorflow\tensorflow\core\common_runtime\gpu\gpu_device.cc:1084] Created TensorFlow device (/job:localhost/replica:0/task:0/device:GPU:0 with 1220 MB memory) -> physical GPU (device: 0, name: Quadro K620, pci bus id: 0000:01:00.0, compute capability: 5.0)
Clipping input data to the valid range for imshow with RGB data ([0…1] for floats or [0…255] for integers))
参考博客:
https://blog.csdn.net/weixin_39561100/article/details/79414931
原图:

图像大小的调整,放大缩小不同尺寸tf.image.resize_images(img,size,size,method),
0,默认 双线性插值;1,最近邻算法;2, 双3次插值法;3,面积插值法

裁剪:
识别不同位置的物体

从左到右从上到下,为在中间裁剪250250像素;裁剪成512512像素,不够的填充0;按比例0.5裁剪图像中心区域;随机裁剪300300像素图像;随机裁剪300300像素图像
旋转:

从左到右从上到下,上下翻;左右翻;对角线翻;旋转90度;再旋90度;在旋90度
色彩调整:
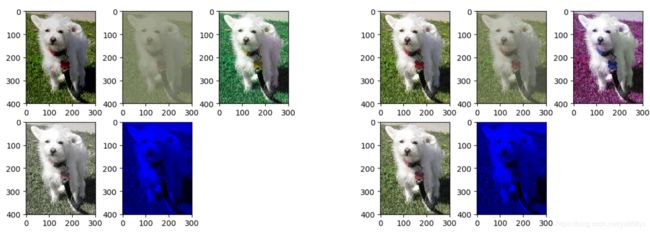
从左到右从上到下,亮度调整(不同光照);对比度;色彩;饱和度(可自定义和随机);颜色空间变换(RGB转HSV)
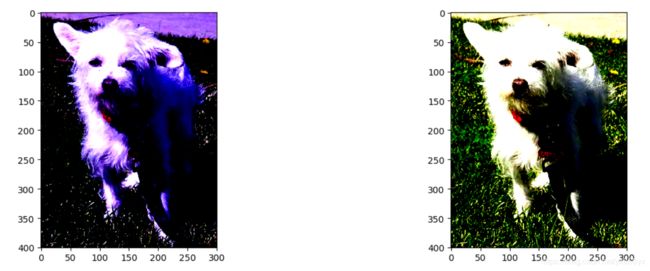
添加噪声:
(PCA白化)
程序3:
import tensorflow as tf
import os
import random
source_file = "./cat_dog/"  # 原始文件地址
target_file = "./test/"  # 修改后的文件地址
num = 50  # 产生图片次数(一张图就会产生50张图片,二张也是50,每张个数随机,以此类推)
if not os.path.exists(target_file):  # 如果不存在target_file,则创造一个
    os.makedirs(target_file)
file_list = os.listdir(source_file)  # 读取原始文件的路径
with tf.Session() as sess:
    for i in range(num):
        max_random = len(file_list)-1
        a = random.randint(0, max_random)  # 随机数字区间 ,此处为0开始,从1开始则无法取到文件夹中的第一张图片
        image_raw_data = tf.gfile.FastGFile(source_file + file_list[a], "rb").read()  # 读取图片
        print("正在处理:", file_list[a])
        image_data = tf.image.decode_jpeg(image_raw_data)
        filpped_le_re = tf.image.random_flip_left_right(image_data)  # 随机左右翻转
        filpped_up_down = tf.image.random_flip_up_down(image_data)  # 随机上下翻转
        adjust = tf.image.random_brightness(filpped_up_down, 0.4)  # 随机调整亮度
        image_data = tf.image.convert_image_dtype(adjust, dtype=tf.uint8)
        encode_data = tf.image.encode_jpeg(image_data)
        with tf.gfile.GFile(target_file + str(i) + "_enhance" + ".jpg", "wb") as f:
            f.write(encode_data.eval())
print("图像增强完毕")
参考博客:
https://blog.csdn.net/qq_38269799/article/details/80723718
运行一张图片的结果:

运行两张:(num=50,随机,可批量调节num参数)

多张: