dicker 镜像(images)
docker 镜像(images)
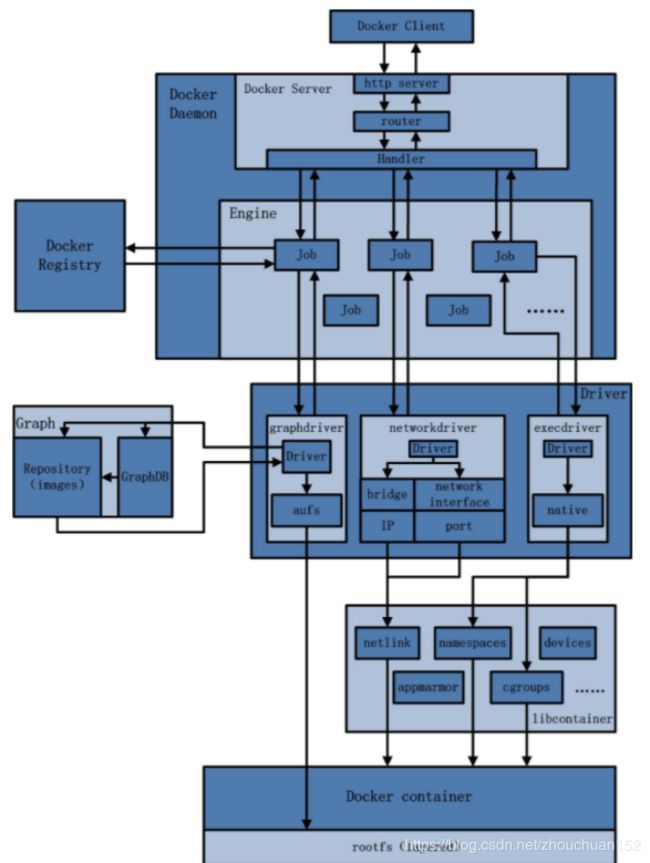
docker 架构体系图
dockerfile:制作镜像
我们在容器运行一个镜像,如果本地没有会自动下载
最小镜像:hello-world dockerfile
FROM scratch //抓取,挠,从无到有创建的一个过程
COPY hello / //镜像所要进行的操作
CMD ["/hello"] //给了一个shell 环境
dockerfile 的缓存特性:如果在相同层中。需要用到之前缓存过的镜像,就无须重新下载,但如果此镜像层上层发生变化,即使是在相同层,也用不了缓存。
通过dockerfile制作的镜像,能够很明显的看到镜像每一层的操作,安全性高,并且可移植操作强。
查看ifconfig由那个软件包含有的命令
[root@localhost /]# yum provides ifconfig
下载支持ifconfig的软件包
[root@localhost /]# yum -y install net-tools
下载一个最小的镜像(hello-world)
[root@localhost /]# docker pull hello-world
[root@localhost /]# docker images
编写dockerfile
1)编写docker镜像
[root@localhost /]# vim Dockerfile
编写以下文件
FROM centos:7 //基于centos7镜像上面运行一个容器
RUN yum -y install vim
RUN yum -y install net-tools
RUN yum -y install tomcat
CMD ["/bin/bash"] //给了一个shell 环境
运行文件, . :是指在当前路径下查找文件
[root@localhost ~]]# docker build -t test:latest .
[root@localhost ~]# docker images
再次添加一个镜像
构建一个文件
[root@localhost ~]# mkdir test
[root@localhost ~]# cd test/
[root@localhost test]# vim Dockerfile
编写下面文件
FROM centos:7
RUN yum -y install vim
RUN yum -y install net-tools
RUN yum -y install httpd
CMD ["/bin/bash"]
运行dockerfile
[root@localhost test]# docker build -t test1:latest .
[root@localhost test]# docker images
dockerfile 的缓存特性:如果在相同层中。需要用到之前缓存过的镜像,就无须重新下载,但如果此镜像层上层发生变化,即使是在相同层,也用不了缓存
再次创建一个镜像名称为test2:
要求:
下载vim
下载httpd
下载net-tools
就是和刚刚的顺序打乱一下看看是否会用到缓存
创建dockerfile
[root@localhost ~]# mkdir abc
[root@localhost ~]# cd abc
[root@localhost abc]# vim Dockerfile
添加以下文件
FROM centos:7
RUN yum -y install vim
RUN yum -y install httpd
RUN yum -y install net-tools
CMD ["/bin/bash"]
运行镜像
[root@localhost abc]# docker build -t test2:latest .
再次创建一个镜像名称为test3:
要求:
下载vim
下载elinks
下载net-tools
就是和刚刚的顺序打乱一下看看是否会用到缓存
1)创建dockerfile
[root@localhost ~]# mkdir aa
[root@localhost ~]# cd aa/
[root@localhost aa]# vim Dockerfile
添加以下文件
FROM centos:7
RUN yum -y install vim
RUN yum -y install elinks
RUN yum -y install net-tools
CMD ["/bin/bash"]
2)运行镜像
[root@localhost aa]# docker build -t test3:latest .
这里可以看出并没有用到缓存,而是重新下载
再次创建一个镜像名称为test4:
要求:
下载vim
下载elinks
下载net-tools
将宿主机上的test.txt文件,保存到镜像镜像
根据此镜像运行一个容器,查看是否有相应的文件
1)创建dockerfile
[root@localhost ~]# mkdir ab
[root@localhost ~]# cd ab
[root@localhost ab]# touch test.txt
[root@localhost ab]# echo 123456 > test.txt
[root@localhost ab]# vim Dockerfile
添加以下文件
FROM centos:7
RUN yum -y install vim
RUN yum -y install elinks
RUN yum -y install net-tools
COPY test.txt /
CMD ["/bin/bash"]
2)运行镜像
[root@localhost ab]# docker build -t test4:latest .
基于test4的镜像运行一个容器看看是否有test.txt的文件
[root@localhost ~]# docker run -it --name test4 test4
[root@c8f588c6b438 /]# cat test.txt
查看docker镜像的历史命令,可以看出这个镜像做了什么
[root@localhost ~]# docker history test4:latest
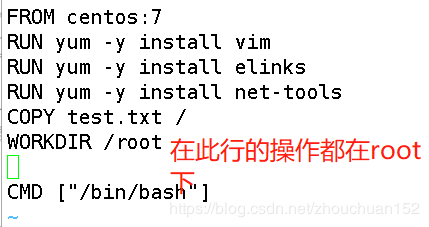
切换目录,在dockerfile文件中添加WORKDIR,就可以切换到其他目录
比如:
写一个dockerfie,然后通过此文件构建镜像,要求如下:
- 基于centos镜像,部署安装nginx服务。
- 基于以上镜像,运行一个容器,并将此容器提供的web服务的默认访问界面内容更改为:This is a testweb in container.
- 在dockerhost上访问此容器,验证页面是否更改成功。
实验如下:
上传安装包至docker系统上
- 编写dockerfile文件
添加以下内容
FROM centos
COPY nginx-1.17.3.tar.gz /
RUN yum -y install gcc
RUN yum -y install openssl-devel
RUN yum -y install pcre-devel
RUN yum -y install zlib-devel
RUN yum -y install make
RUN useradd -M -s /sbin/nologin nginx
RUN tar zxf /nginx-1.17.3.tar.gz
WORKDIR /nginx-1.17.3/
RUN ./configure --prefix=/usr/local/nginx --user=nginx --group=nginx && make && make install
RUN ln -s /usr/local/nginx/sbin/* /usr/local/sbin/
RUN nginx
CMD ["/bin/bash"]
运行镜像
[root@localhost ~]# docker build -t zhouchuan:latest .
查看镜像是否成功
[root@localhost ~]# docker images
基于以上镜像,运行一个容器,并将此容器提供的web服务的默认访问界面内容更改为:This is a testweb in container.
[root@localhost ~]# docker run -it --name zhouchuan zhouchuan
[root@371e122d350a nginx-1.17.3]# echo This is a testweb in container > /usr/local/nginx/html/index.html
[root@371e122d350a nginx-1.17.3]# curl 127.0.0.1
This is a testweb in container
在dockerhost上访问此容器,验证页面是否更改成功。
查看容器内的ip地址
在docker上面访问
用history 命令查看一下镜像的过程
[root@localhost ~]# docker history zhouchuan:latest


