基于Dubbox的微服实战学习4————基于Redis+MQ实现高并发分流
目录:
1.代码设计
2.实现商品项目
3.分布式锁
4.消息中间件
5.ActiveMQ应用
错误解决
错误1.
启动shop-goods-provider的时候报错
javax.jms.JMSException: Could not connect to broker URL: tcp://192.168.32.134:61616. Reason: java.net.ConnectException: Connection refused: connectmq.local.com在浏览器中可以看到
解决方法:
重新创建并且启动容器activemq
root@docker-HP-285-Pro-G2-MT:/home/docker/tools/dokerfiles-master/env10.1# ./run.sh mq
env10_6_Mq01
env10_6_Mq01
993e2a0595e9005188c223155f56c36d2664ed1e85337b318663c634e583a94f
启动容器
.activemq start3.分布式锁
分布式锁
- 系统中各个节点共享
- 单节点操作
常见分布式锁
- Memcached的add,cas命令
- Zookeeper
- Redis的setnx命令。
执行setnx命令后,当不存在对应key时,setnx返回1,表示设置成功。
执行setnx命令后,当存在对应key时,setnx方法返回0,标识设置失败。
redis锁命令,open console
RDM Redis Console
Connecting...
已连接。
192.168.32.134:0>set name zhangsan
"OK"
192.168.32.134:0>get name
"zhangsan"
192.168.32.134:0>set name lisi
"OK"
192.168.32.134:0>get name
"lisi"
192.168.32.134:0>setnx sex man
"1"
192.168.32.134:0>get sex
"man"
192.168.32.134:0>setnx sex woman
"0"
192.168.32.134:0>get sex
"man"
192.168.32.134:0>
实现方案
- 每一种商品规定一个key值
- 线程操作之前setnx该key值
- 设置成功进行操作
- 操作完成删除key值
- 设置失败继续等待。
删除key值有两种实现方法:
- 设置超时时间,单位是秒。expire sex 10
192.168.32.134:0>get sex
"man"
192.168.32.134:0>expire sex 10
"1"
192.168.32.134:0>get sex
"man"
192.168.32.134:0>get sex
null
192.168.32.134:0>setnx sex woman
"1"
192.168.32.134:0>get sex
"woman"- 删除key
192.168.32.134:0>del sex
"1"
192.168.32.134:0>get sex
null
4.消息中间件
分布式锁解决了高并发下的一致性问题,
java.net.SocketTimeoutException:Read time out,该错误发生的原因是请求阻塞。
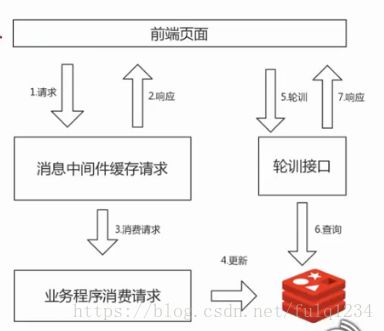
解决方法:消息中间件,缓存请求。
作用:异步处理,应用解耦。
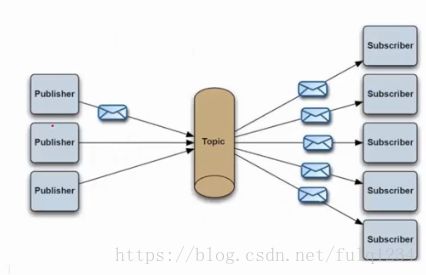
消息模式:队列模式,发布订阅。
队列模式:分为两端,一端是producer,一端是consumer.producer 消息生产者,可以生产消息,生产后消息后发送到一个队列数据结构中。队列像一个有序的数组一样,队列的规则的,先进先出,后进后出。所有的消息只能被消费一次。也就是不能重复消费,而且不能被不同消费者消费。
发布订阅:类似订阅报纸,可以订阅同一种报纸,可以收到同一张报纸。publisher(发布者)发布消息到Topic(主题)时候,其它所有subscriber(接收者)可以获取。
常见消息中间件
Kafka
由Scala和Java编写,一般用于处理日志。吞吐量高。
ActiveMQ
Apache出品,消息中间件的“瑞士军刀”
RabbitMQ
事务性好,常应用于金融领域的事务控制。
5.ActiveMQ应用
搭建ActiveMQ环境
- 下载/解压
版本:5.14.0
- 启动
打开/ur/local/apache-activemq-5.14.0/bin
./activemq start
- 注意事项
JDK环境依赖(1.7+)
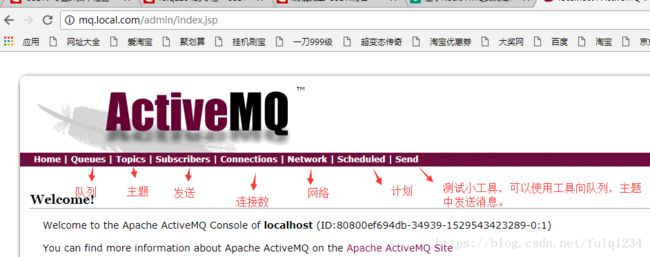
进入后的页面显示:
实现步骤
1.引入依赖
    javax.jms
    jms
    1.1


    org.apache.activemq
    activemq-core
    5.7.0


    org.apache.activemq
    activemq-pool
    5.7.0


    org.springframework.boot
    spring-boot-starter-activemq
2.实现工具类
package cn.bdqn.common;
import org.apache.activemq.command.ActiveMQQueue;
import org.apache.activemq.command.ActiveMQTopic;
import org.springframework.beans.factory.annotation.Autowired;
import org.springframework.jms.core.JmsMessagingTemplate;
import org.springframework.stereotype.Component;
import javax.jms.Queue;
import javax.jms.Topic;
import java.io.Serializable;

/**
 * 消息队列发送消息工具类
 */
@Component
public class MqUtils implements Serializable{

    @Autowired
    private JmsMessagingTemplate jmsMessagingTemplate;

    /**
     * 发送队列模式消息
     * @param target
     * @param message
     */
    public void sendQueueMessage(String target,Object message){
        Queue queue = new ActiveMQQueue(target);//生成队列
        jmsMessagingTemplate.convertAndSend(queue,message);//转发并且发送,往队列中放入消息。

    }

    /**
     * 发送 发布订阅模式
     * @param target
     * @param message
     */
    public void sendTopicMessage(String target,Object message){
        Topic topic = new ActiveMQTopic(target);//生成主题
        jmsMessagingTemplate.convertAndSend(topic,message);//往主题中放入消息

    }
}
3.编写配置文件
application.properties
#broker是执行消息发送和接收的管理的,是“代理者”的意思,是代理消息发送和接收。
#activemq是基于tcp协议的。
#ACK机制是Activemq消息确认机制,当有消息被消费后,activemq要确认消息有没有被消费,消费者要给activemq回复一个确认消息,
#jms.optimizeAcknowledge:可优化的ACK机制,对于特别频繁的消息,如果是true,对于消费者而言,可以存一批消息,统一回复给Activemq
#jsm.optimizeAcknowledgeTimeOut:可优化的ACK机制的最大超时时间。
#jms.redeliveryPolicy.maximumRedeliveries:最大重新投递次数。产生断网,有个机制,重复投递。
#user,password和刚才登录页面版activemq是一样的。
#spring.activemq.packages.trust-all=true #trust-all(信任所有),转换对象
#spring.jms.pub-sub-domain=true #用来标识activemq用的什么模式,如果是true,activemq支持topic模式,如果是false,activemq只支持queue模式。

spring.activemq.broker-url=tcp://192.168.32.134:61616?jms.optimizeAcknowledge=true&jms.optimizeAcknowledgeTimeOut=30000&jms.redeliveryPolicy.maximumRedeliveries=10
spring.activemq.user=admin
spring.activemq.password=admin
spring.activemq.packages.trust-all=true
测试
实现队列模式 实现发布订阅模式
package cn.bdqn.controller;
import cn.bdqn.common.MqUtils;
import org.springframework.jms.annotation.JmsListener;
import org.springframework.stereotype.Controller;
import org.springframework.web.bind.annotation.RequestMapping;
import org.springframework.web.bind.annotation.ResponseBody;

import javax.annotation.Resource;

@Controller
@RequestMapping("/msg")
public class TestMessageController {

    @Resource
    private MqUtils mqUtils;

    /**
     * 发送者的方法
     * @return
     */
    @RequestMapping("/send")
    @ResponseBody
    public String sendMessage(){
        mqUtils.sendQueueMessage("TestQ","我是队列模式的消息,请多多关照");
        mqUtils.sendTopicMessage("TestT","我是发布订阅的消息,请多多关照");
        return "success";

    }

    /**
     * 接收的方法,创建消费者.有了消息,自动接收到参数message里面
     * @param message:接收的消息
     */
    @JmsListener(destination = "TestQ")
    public void receiveQueue1Message(Object message){
        System.out.println("receiveQueue1Message:" + message.toString());
    }

    /**
     * 创建消费者
     * @param message
     */
    @JmsListener(destination = "TestQ")
    public void receiveQueue2Message(Object message){
        System.out.println("receiveQueue2Message:" + message.toString());

    }

    /**
     * 接收发布订阅消息
     */
    @JmsListener(destination = "TestT")
    public void receiveTopic1Message(Object message){
        System.out.println("receiveTopic1Message:" + message.toString());
    }

    @JmsListener(destination = "TestT")
    public void receiveTopic2Message(Object message){
        System.out.println("receiveTopic2Message:" + message.toString());
    }


}
浏览器输入地址http://localhost:8093/msg/send
控制台输出
receiveQueue1Message:ActiveMQTextMessage {commandId = 5, responseRequired = true, messageId = ID:QAH39MSXXUY7T8B-55821-1529568902785-1:8:1:1:1, originalDestination = null, originalTransactionId = null, producerId = ID:QAH39MSXXUY7T8B-55821-1529568902785-1:8:1:1, destination = queue://TestQ, transactionId = null, expiration = 0, timestamp = 1529569513184, arrival = 0, brokerInTime = 1529569522685, brokerOutTime = 1529569522687, correlationId = null, replyTo = null, persistent = true, type = null, priority = 4, groupID = null, groupSequence = 0, targetConsumerId = null, compressed = false, userID = null, content = org.apache.activemq.util.ByteSequence@76c23145, marshalledProperties = org.apache.activemq.util.ByteSequence@74e203d9, dataStructure = null, redeliveryCounter = 0, size = 0, properties = {timestamp=1529569513149}, readOnlyProperties = true, readOnlyBody = true, droppable = false, jmsXGroupFirstForConsumer = false, text = 我是队列模式的消息,请多多关照}
receiveQueue2Message:ActiveMQTextMessage {commandId = 5, responseRequired = true, messageId = ID:QAH39MSXXUY7T8B-55821-1529568902785-1:6:1:1:1, originalDestination = null, originalTransactionId = null, producerId = ID:QAH39MSXXUY7T8B-55821-1529568902785-1:6:1:1, destination = queue://TestQ, transactionId = null, expiration = 0, timestamp = 1529569492456, arrival = 0, brokerInTime = 1529569501961, brokerOutTime = 1529569501976, correlationId = null, replyTo = null, persistent = true, type = null, priority = 4, groupID = null, groupSequence = 0, targetConsumerId = null, compressed = false, userID = null, content = org.apache.activemq.util.ByteSequence@656815e6, marshalledProperties = org.apache.activemq.util.ByteSequence@ef1d35b, dataStructure = null, redeliveryCounter = 0, size = 0, properties = {timestamp=1529569492279}, readOnlyProperties = true, readOnlyBody = true, droppable = false, jmsXGroupFirstForConsumer = false, text = 我是队列模式的消息,请多多关照}
使用ActiveMQ解决请求阻塞
实现步骤
1.请求 -> 消息
2.消费记录
3.状态记录


