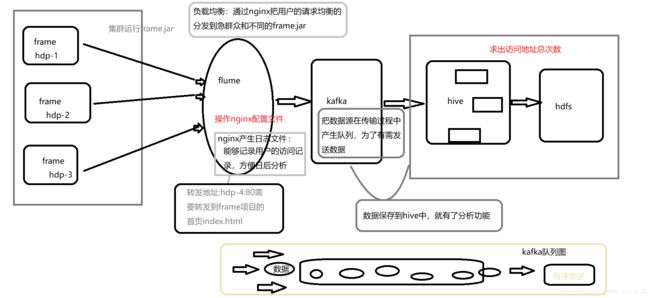
大数据项目一
一、在Idea上把frame打成jar包上传到linux集群:
1、步骤:选择idea上的一个项目,点击maven中的packeg:
把jar包拖到hdp-1的alt+p中,不需要解压,在[root@hdp-1 ~]# 通过java -jar------测试是否运行成功,在浏览器输入hdp-1:+idea程序端口号
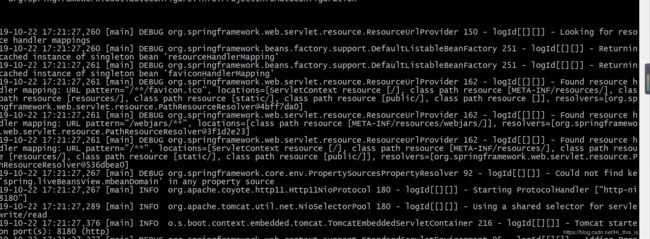
java -jar frame-1.0-SNAPSHOT.jar运行效果与浏览器效果:
2、nigex
cd /usr/local/nginx/conf/先备份nginx.conf并命名为nginx.conf.dak
cp nginx.conf nginx.conf.dak修改nginx配置文件:
#user nobody;
worker_processes 1;
#error_log logs/error.log;
#error_log logs/error.log notice;
#error_log logs/error.log info;
#pid logs/nginx.pid;
events {
worker_connections 1024;
}
http {
include mime.types;
default_type application/octet-stream;
log_format main '$remote_addr - $remote_user [$time_local] "$request" '
'$status $body_bytes_sent "$http_referer" '
'"$http_user_agent" "$http_x_forwarded_for"';
#access_log logs/access.log main;
sendfile on;
#tcp_nopush on;
#keepalive_timeout 0;
keepalive_timeout 65;
#gzip on;
upstream frame-tomcat {
server hdp-4:8180;
}
server {
listen 80;
server_name hdp-1;
#charset koi8-r;
access_log logs/host.access.log main;
location / {
# root html;
# index index.html index.htm;
proxy_pass http://frame-tomcat;
}
error_page 500 502 503 504 /50x.html;
location = /50x.html {
root html;
}
}
server {
listen 80;
server_name localhost;
#charset koi8-r;
#access_log logs/host.access.log main;
location / {
root html;
index index.html index.htm;
}
#error_page 404 /404.html;
# redirect server error pages to the static page /50x.html
#
error_page 500 502 503 504 /50x.html;
location = /50x.html {
root html;
}
# proxy the PHP scripts to Apache listening on 127.0.0.1:80
#
#location ~ \.php$ {
# proxy_pass http://127.0.0.1;
#}
# pass the PHP scripts to FastCGI server listening on 127.0.0.1:9000
#
#location ~ \.php$ {
# root html;
# fastcgi_pass 127.0.0.1:9000;
# fastcgi_index index.php;
# fastcgi_param SCRIPT_FILENAME /scripts$fastcgi_script_name;
# include fastcgi_params;
#}
# deny access to .htaccess files, if Apache's document root
# concurs with nginx's one
#
#location ~ /\.ht {
# deny all;
#}
}
# another virtual host using mix of IP-, name-, and port-based configuration
#
#server {
# listen 8000;
# listen somename:8080;
# server_name somename alias another.alias;
# location / {
# root html;
# index index.html index.htm;
# }
#}
# HTTPS server
#
#server {
# listen 443;
# server_name localhost;
# ssl on;
# ssl_certificate cert.pem;
# ssl_certificate_key cert.key;
# ssl_session_timeout 5m;
# ssl_protocols SSLv2 SSLv3 TLSv1;
# ssl_ciphers HIGH:!aNULL:!MD5;
# ssl_prefer_server_ciphers on;
# location / {
# root html;
# index index.html index.htm;
# }
#}
}
vi nginx.confnginx 配置文件如下:
修改内容如下:
启动nginx:
cd /usr/local/nginx/sbin/启动时:
./nginx
重启时:
./nginx -s reload在浏览器查询运行结果:
2、本地无法连接远程服务器(Host is not allowed to connect to this MySQL server)解决办法
由于当前的root用户限制在当前的内网ip内访问的,需要修改他的访问域
MySQL 8.0 Command Line Clients
mysql> use mysql
Database changed
mysql> select host from user where user = 'root';
+-----------+
| host      |
+-----------+
| localhost |
+-----------+
1 row in set (0.00 sec)

mysql> update user set host = '%';
Query OK, 4 rows affected (0.00 sec)
Rows matched: 4  Changed: 4  Warnings: 0

mysql> select host from user where user = 'root';
+------+
| host |
+------+
| %    |
+------+
1 row in set (0.00 sec)
在任务管理器中找到Msql,右击重启。
二、nginx采集数据到hdfs
1、1,启动集群(Instead use start-dfs.sh and start-yarn.sh)
start-all.sh2、启动zookeeper和kafka:
脚本文件启动zookeeper
脚本代码[root@hdp-1 ~]#:
#!/bin/bash
for host in hdp-1 hdp-2 hdp-4
do
echo "${host}:${1}ing..."
ssh $host "source /etc/profile;/root/apps/zookeeper-3.4.6/bin/zkServer.sh $1"
done
启动:
./zkmanager.sh start脚本文件启动kafka
脚本代码[root@hdp-2 kafka_2.12-2.2.0]#:
#!/bin/bash
for host in hdp-1 hdp-2 hdp-4
do
echo "${host}:${1}ing..."
ssh $host "source /etc/profile;/root/apps/kafka_2.12-2.2.0/bin/kafka-server-$1.sh -daemon /root/apps/kafka_2.12-2.2.0/config/server.properties"
done
启动:(启动kafka,注意启动之前要启动zookeeper,在kafka的消费者中收到数据产生临时文件)
./kafkaManager.sh start3、在网页上查看had-1:80 看是否启动网页成功。
4、(1)创建一个topic([root@hdp-2 bin]#):
./kafka-topics.sh --create --zookeeper hdp-1:2181,hdp-2:2181,hdp-4:2181 --replication-factor 2 --partitions 2 --topic qqqq(2)创建一个消费者([root@hdp-4 bin]#):(flume启动后点击网页显示ip数据)
./kafka-console-consumer.sh --bootstrap-server hdp-1:9092,hdp-2:9092,hdp-4:9092 --topic qqqq --from-beginning5、修改flume配置文件:(路径为cd apps/apache-flume-1.6.0-bin/)
vi tail-flumekafka.conf配置文件修改内容:
a1.sources = source1
a1.sinks = k1
a1.channels = c1
# Describe/configure the source
a1.sources.source1.type = exec
##指明数据源来自于一个可执行指令
a1.sources.source1.command = tail -F /usr/local/nginx/logs/log.frame.access.log
##可执行指令,跟踪一个文件中的内容
# Describe the sink
##下沉到kafka的下沉类型
a1.sinks.k1.type = org.apache.flume.sink.kafka.KafkaSink
a1.sinks.k1.topic = qqqq
a1.sinks.k1.brokerList = hdp-2:9092, hdp-3:9092
a1.sinks.k1.requiredAcks = 1
a1.sinks.k1.batchSize = 20
a1.sinks.k1.channel = c1
# Use a channel which buffers events in memory
a1.channels.c1.type = memory
a1.channels.c1.capacity = 1000
a1.channels.c1.transactionCapacity = 100
# Bind the source and sink to the channel
a1.sources.source1.channels = c1
a1.sinks.k1.channel = c1
其中注意:
启动flume:(路径cd apps/apache-flume-1.6.0-bin/bin)
./flume-ng agent -C ../conf/ -f ../tail-flumekafka.conf -n ag1 -Dflume.root.logger=INFO,console6、启动kafka消费者(在idea)
消费者:
package zpark.demo.Demo3;

import org.apache.hadoop.conf.Configuration;
import org.apache.kafka.clients.consumer.ConsumerRecord;
import org.apache.kafka.clients.consumer.ConsumerRecords;
import org.apache.kafka.clients.consumer.KafkaConsumer;
import org.apache.log4j.Logger;

import java.io.FileOutputStream;
import java.io.OutputStreamWriter;
import java.net.URI;
import java.net.URISyntaxException;
import java.util.Collections;
import java.util.Properties;

public class ConsumerDemoqqqq {

    public static void main(String[] args) {

        //调用接收消息的方法
        receiveMsg();
    }

    /**
     * 获取kafka topic(animal)上的数据
     */
    private static void receiveMsg() {
        Logger logger = Logger.getLogger("logRollingFile");
        Properties properties = new Properties();
        properties.put("bootstrap.servers", "hdp-1:9092");
        properties.put("key.deserializer", "org.apache.kafka.common.serialization.StringDeserializer");
        properties.put("value.deserializer", "org.apache.kafka.common.serialization.StringDeserializer");
        properties.put("group.id","ccc");
        properties.put("enable.auto.commit", true);
        //一个方法
        KafkaConsumer consumer = new KafkaConsumer(properties);
        consumer.subscribe(Collections.singleton("qqqq"));
        URI uri = null;
        Configuration conf = null;
        String user = "root";
        try {
            uri = new URI("hdfs://hdp-1:9000");
            conf = new Configuration();
            conf = new Configuration();
            //dfs.replication:分布式文件系统副本的数量
            conf.set("dfs.replication", "2");
            //dfs.blocksize:分布式文件系统的块的大小   100M   64+36
            conf.set("dfs.blocksize", "64m");

        } catch (URISyntaxException e) {
            e.printStackTrace();
        }
        try {
            FileOutputStream fos = new FileOutputStream("D:/text.txt");
            OutputStreamWriter osw = new OutputStreamWriter(fos);


//            FileSystem fs = FileSystem.get(uri, conf, user);
//            FSDataOutputStream fdos = fs.create(new Path("/cf.txt"));
            while(true) {

                /**
                 * 获取kafka
                 */
                ConsumerRecords records = consumer.poll(100);
                for(ConsumerRecord record: records) {
                    String msg = "key:" + record.key()+ ",value:" + record.value() + ",offset:" + record.offset()+",topic:" + record.topic()+"\r\n";
                    System.out.printf("key=%s,value=%s,offet=%s,topic=%s",record.key() , record.value() , record.offset(), record.topic());
//                    BufferedWriter bw = new BufferedWriter(osw);
//                    bw.write(msg);
//                    bw.flush();
                    logger.debug(record.value());
                }
            }
        }catch (Exception e) {
            e.printStackTrace();
        } finally {
            consumer.close();
        }
    }
}
上传到hdfs:
package zpark.demo.Demo3;

import org.apache.hadoop.conf.Configuration;
import org.apache.hadoop.fs.FileSystem;
import org.apache.hadoop.fs.Path;

import java.io.File;
import java.io.IOException;
import java.net.URI;
import java.net.URISyntaxException;

public class HdfsUtilsqqqq {
    //上传文件到hdfs
    public static void main(String[] args) {
        Configuration conf = new Configuration();
        conf.set("replication", "1");
        conf.set("dfs.blocksize","64m");

        URI uri = null;
        String user = "root";
        FileSystem fs = null;
        try {
            uri = new URI("hdfs://hdp-1:9000");
            fs = FileSystem.get(uri, conf, user);

            //上传文件
            fs.copyFromLocalFile(new Path("d:/testlog/access.log"), new Path("/flumekafka/a.log"));
            fs.close();
        } catch (URISyntaxException e) {
            e.printStackTrace();
        } catch (InterruptedException e) {
            e.printStackTrace();
        } catch (IOException e) {
            e.printStackTrace();
        }
    }
}
其中d:/testlog/access.log为本地文件路径,/flumekafka/a.log为hdfs文件路径
log4j日志文件:(在idea路径:D:\idea\kafka\src\main\resources\log4j.properties)
### 设置###
#log4j.rootLogger=debug,stdout,genlog
log4j.rootLogger=logRollingFile,stdout


log4j.appender.stdout=org.apache.log4j.ConsoleAppender
log4j.appender.stdout.Target=System.out
log4j.appender.stdout.layout=org.apache.log4j.PatternLayout
log4j.appender.stdout.layout.ConversionPattern=[%-5p] %d{yyyy-MM-dd HH:mm:ss,SSS} method:%l%n%m%n


###
log4j.logger.logRollingFile= DEBUG,test1
log4j.appender.test1 = org.apache.log4j.RollingFileAppender
log4j.appender.test1.layout = org.apache.log4j.PatternLayout
log4j.appender.test1.layout.ConversionPattern =%m%n
log4j.appender.test1.Threshold = DEBUG
log4j.appender.test1.ImmediateFlush = TRUE
log4j.appender.test1.Append = TRUE
log4j.appender.test1.File = d:/testlog/access.log
log4j.appender.test1.MaxFileSize = 64KB
log4j.appender.test1.MaxBackupIndex = 200
### log4j.appender.test1.Encoding = UTF-8日志文件中原有:log4j.appender.stdout.layout.ConversionPattern=[%-5p] %d{yyyy-MM-dd HH:mm:ss,SSS} method:%l%n%m%n这里我们只需要在文件夹中显示IP,所以我们改为:log4j.appender.test1.layout.ConversionPattern =%m%n,本文件中的log4j.appender.test1.File = d:/testlog/access.log 地址与消费者本地文件地址保持一致fs.copyFromLocalFile(new Path("d:/testlog/access.log"), new Path("/flumekafka/a.log"));
7、hive建表(hive>)(hdp-3根目录输入 hive启动hive)
create external table flumetable (ip string ) row format delimited location '/flumekafka/';8,上传数据到hive表,并查询:
select * from flumetable limit 10;结果图为:
查询总PV:
select count(*) from flumetable;结果图为:
本地文件中显示:
在hdfs中显示:
接4(2)点击网页linux消费者显示ip数据


