mmdetection离线安装与使用--填平所有坑实记
mmdetection 的背景与作用,略去1000字不表,自己百度。运用GPU加速做图像识别、检测等工作,请不要用虚拟机,本文环境基于实体机运行。
一、准备工作。
1.配置pip国内源。
在C:\Users\Administrator新建pip文件夹,并新建pip.ini配置文件,文件内容如下:
[global] index-url = https://mirrors.aliyun.com/pypi/simple/ [install] trusted-host=mirrors.aliyun.com
保存后,启动CMD重启DNS:
ipconfig/flushdns
可以使用PIP进行包安装进行速度检测和路径检查。
2.配置github代理服务地址,打开C:\Windows\System32\drivers\etc的hosts文件,在末尾加上:
192.30.253.112     github.com
151.101.72.133    assets-cdn.github.com
151.101.193.194    github.global.ssl.fastly.net
3.安装python的IDE,此处略去1000字。按照自己的喜好。
4.安装anaconda,此处略去500字。配置anaconda国内更新源,Windows 用户无法直接创建名为 .condarc 的文件,可先执行 conda config --set show_channel_urls yes 生成该文件之后再修改。生成。condarc文件后直接用下列代码覆盖:
channels:
  - defaults
show_channel_urls: true
default_channels:
  - https://mirrors.tuna.tsinghua.edu.cn/anaconda/pkgs/main
  - https://mirrors.tuna.tsinghua.edu.cn/anaconda/pkgs/free
  - https://mirrors.tuna.tsinghua.edu.cn/anaconda/pkgs/r
custom_channels:
  conda-forge: https://mirrors.tuna.tsinghua.edu.cn/anaconda/cloud
  msys2: https://mirrors.tuna.tsinghua.edu.cn/anaconda/cloud
  bioconda: https://mirrors.tuna.tsinghua.edu.cn/anaconda/cloud
  menpo: https://mirrors.tuna.tsinghua.edu.cn/anaconda/cloud
  pytorch: https://mirrors.tuna.tsinghua.edu.cn/anaconda/cloud
  simpleitk: https://mirrors.tuna.tsinghua.edu.cn/anaconda/cloud
此处重点说明,网络上搜索的各种插入镜像源方式,都多少有问题,请访问清华大学镜像源页面,查看上面的说明进行配置。网址:(https://mirror.tuna.tsinghua.edu.cn/help/anaconda/)
5.卸载老版本的visual Studio,安装2015版本(mmdetection中的一些组件是用这个版本编译的,其他版本可能会出找不到答案的错误,但本文可以引你出坑)或者**安装2017版本再单独安装visual Studio tools,**全部安装程序请在我博客下载。第二种方法较好。
6.安装对应操作系统版本的git,下载网址:(https://git-scm.com/download/)
那么到这里,准备工作已经做完了。下面开始正式安装(激动吧)。
7.下载mmcv,mmdetection,cocoapi,推荐在码云的镜像中下载,下载完毕后都会有一个-master的后缀就对了(https://gitee.com/mirrors/)
8.如果要使用GPU加速,安装显卡的cuda组件,现在支持较好的是nvdia显卡系列,要在官网上对应型号的下载最新驱动,安装相应组件,可以在控制面板-显卡-帮助中看到具体的版本信号和cuda版本,如果不是最新驱动,可能会发生兼容性不好的问题。
二、离线安装mmdetection
1.用anaconda 创建虚拟环境(小白务必做此步,免遭麻烦)
conda create -n pytorchtf python=3.6
**重点提示,必须安装python3.6版本,高版本有冲突,导致后续安装失败。**主要是会出现model not found的错误。查看环境是否安装成功: 打开cmd,输入cond info --envs ,看环境是否输出。
2.激活虚拟环境。conda activate pytorchtf
此后的安装均在此虚拟环境中安装。
3.安装mmcv依赖包,不能使用conda命令,因为anaconda并没有将mmcv库包含到里面。
pip install numpy addict pyyaml six requests opencv-python
如果pip源配置正确,安装会很快,否则,检查准备工作中的pip源配置。
4.安装mmcv
pip install matplotlib terminaltables pycocotools imagecorruptions albumentations
此处敲黑板:
1)pycocotools 以及往后的几个包安装可能会出现cl.exe无法找到。
在Visual studio 2015/ Visual Studio Tools 中打开VS2015 X86 X64 Cross Tools Command Prompt,输入conda activate pytorchtf,即激活pytorchtf环境,从pycocotools开始一个一个往后安装。如果依然报错,检查准备工作中的第5步。
2)安装pycocotools出现cl: 命令行 error D8021 :无效的数值参数“/Wno-cpp”的错误,解压前面下载的cocoapi-master,在PythonAPI目录下用记事本打开setup.py,将下面这段代码覆盖原代码。
from distutils.core import setup
from Cython.Build import cythonize
from distutils.extension import Extension
import numpy as np

# To install and compile to your anaconda/python site-packages, simply run:
# $ pip install git+https://github.com/philferriere/cocoapi.git#subdirectory=PythonAPI
# Note that the original compile flags below are GCC flags unsupported by the Visual C++ 2015 build tools.
# They can safely be removed.

ext_modules = [
    Extension(
        'pycocotools._mask',
        sources=['../common/maskApi.c', 'pycocotools/_mask.pyx'],
        include_dirs = [np.get_include(), '../common'],
        extra_compile_args=['-std=c99'] # originally was ['-Wno-cpp', '-Wno-unused-function', '-std=c99'],
    )
]

setup(name='pycocotools',
      packages=['pycocotools'],
      package_dir = {'pycocotools': 'pycocotools'},
      version='2.0',
      ext_modules=
          cythonize(ext_modules)
      )
报错的问题解决。
5.安装pytorch及相关组件。打开网址(https://pytorch.org/get-started/locally/),选择你的系统环境以及其他环境,在激活的虚拟环境下输入官网给出的命令行,如:
conda install pytorch torchvision cudatoolkit=10.1 -c pytorch
一般会依赖安装tensorflow以及tensorflow-gpu,如果没有安装成功,手动安装tensorflow 和tensorflow-gpu,使用conda命令。
6.安装mmdetection。在pytorchtf环境下,cd到准备工作中下载的mmdetection目录下,输入:
cpython setup.py install
如果报错,检查准备工作。顺利安装,恭喜你,万里长征第一步走完了。使用 conda list 检查是否将上面所列出的所有包安装成功了。注意,在anaconda的管理环境中式看不到这些包的界面的,所以要使用命令行来查看。
7.下载预训练模型,当前大概有9个可供下载的模型,1.8G左右,空间有限,可在我的博客下载,需要积分(不好意思,虽然我要的不多,但是我也要用啊)。模型是.pth的文件,同时带一个demo,可以在ide中打开测试。
三、测试mmdetection
1.进入IDE,新建test.py文件,以pycharm为例,点击file–settings–project interpreter,点击右上角齿轮按钮设置python的环境位置。
点击齿轮后,选择add local,选择刚才建立的pytorchtf虚拟环境目录,选自下面的python.exe文件,如F:\Anaconda3\envs\pytorchtf下的python.exe文件,点ok
2.在test.py文件中输入一下代码:
from mmdet.apis import init_detector, inference_detector, show_result
import mmcv
config_file ='d:/mmdetection/configs/faster_rcnn_r50_fpn_1x.py'
checkpoint_file = 'e:/mmdetection/mmdmodel/faster_rcnn_r50_fpn_1x_20181010-3d1b3351.pth'

# 初始化模型
model = init_detector(config_file, checkpoint_file)

# 测试一张图片
img = 'E:/pydata/alicompany/mdetection/li.jpg'
result = inference_detector(model, img)
#mmcv.imwrite('E:/pydata/alicompany/mdetection/testpages/detect_test.jpg',img)
show_result(img, result, model.CLASSES,out_file='E:/pydata/alicompany/mdetection/testpages/li_test.jpg')

# 测试一系列图片
#imgs = ['test1.jpg', 'test2.jpg']
#for i, result in enumerate(inference_detector(model, imgs, device='cuda:0')):
 #   show_result(imgs[i], result, model.CLASSES, out_file='result_{}.jpg'.format(i))
**再次敲黑板:**此时还会报错:
ImportError: cannot import name ‘get_dist_info’ from ‘mmcv.runner.utils’(F:\Anaconda3\envs\pytorchtf\lib\site-packages\mmcv\runner\utils.py)
原因是,mmcv.runner.utils下面只定义了get_host_info():确实没有定义这个。回溯错误的上一行:from .sampler import DistributedGroupSampler, DistributedSampler, GroupSampler
原来是在sampler这个包中导入的错误。点击samler这个错误的链接定位,并在IDE中打开。将from mmcv.runner.utils import get_dist_info 注释掉。其实这个在此包中并没有使用。
#from mmcv.runner.utils import get_dist_info
第一次发现这个错误,可能是版本更新问题。
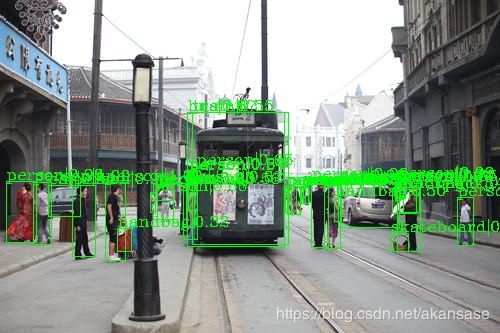
注释完毕后,再运行一次,完美检测出图片中各个设施。
到这里,恭喜你,done!!!
四、贴图,以表敬意。

