小酌Django2——博客文章发布
小酌Django2——博客文章发布
Blog应用:博客文章发布
编写数据模型类
设计数据库和表结构是做网站的基础;在Django中,不需要通过SQL直接跟数据交互,而是完全用Python的方式创建数据模型,之后交给Django完成数据库操作;
- 利用Django开发网站,一般需要先编写数据模型:就是在
./blog/models.py中写一个类BlogArticles; - 该类与数据库中的数据表具有对应关系;
BlogArticles类:
- 本质继承自
django.db.models.Model; - 类型定义的属性对应着数据库表的一个字段;
from django.db import models
from django.utils import timezone
from django.contrib.auth.models import User

class BlogArticles(models.Model):
    title = models.CharField(max_length=300) #
    author = models.ForeignKey(User, related_name="blog_posts") # 外键来自User,表示用户、文章 一对多的关系;related_name="blog_posts"作用是允许通过User类反向查找到BlogArticles;
    body = models.TextField()
    publish = models.DateTimeField(default=timezone.now)

    class Meta: # 与元类不同
        ordering = ("-publish",) # 规定BlogArticles实例对象按publish字段值倒序显示;

    def __str__(self):
        return self.title
根据数据模型类建立数据库
- 先根据数据模型类创建模型;
- 在基于模型建立数据库;
创建模型
- 请先确认已经在
mysite1目录下的settings.py中注册blog应用; - 在根目录下,执行
python manage.py makemigrations(记得先执行下ls);创建存储应用的数据库表结构的指令的文件;
这里报了一个错误:
TypeError: __init__() missing 1 required positional argument: 'on_delete'
原因:
django 升级到2.0之后,表与表之间关联的时候,必须要写on_delete参数;
	on_delete=None,               # 删除关联表中的数据时,当前表与其关联的field的行为
	on_delete=models.CASCADE,     # 删除关联数据,与之关联也删除
	on_delete=models.DO_NOTHING,  # 删除关联数据,什么也不做
	on_delete=models.PROTECT,     # 删除关联数据,引发错误ProtectedError
	# models.ForeignKey('关联表', on_delete=models.SET_NULL, blank=True, null=True)
	on_delete=models.SET_NULL,    # 删除关联数据,与之关联的值设置为null(前提FK字段需要设置为可空,一对一同理)
	# models.ForeignKey('关联表', on_delete=models.SET_DEFAULT, default='默认值')
	on_delete=models.SET_DEFAULT, # 删除关联数据,与之关联的值设置为默认值(前提FK字段需要设置默认值,一对一同理)
	on_delete=models.SET,         # 删除关联数据,
	 a. 与之关联的值设置为指定值,设置:models.SET(值)
	 b. 与之关联的值设置为可执行对象的返回值,设置:models.SET(可执行对象)
这里我们使用关联删除:on_delete=models.CASCADE;
修改代码如下:
author = models.ForeignKey(
    User, related_name="blog_posts", on_delete=models.CASCADE
)
重新执行上述命令:
$ ls
blog            db.sqlite3      manage.py       mysite1
$ python manage.py makemigrations
Migrations for 'blog':
  blog/migrations/0001_initial.py
    - Create model BlogArticles
现在,在blog/migrations 目录下我们通过执行makemigrations命令自动创建了一个BlogArticles 模型:0001_initial.py
# Generated by Django 3.0.8 on 2020-07-07 11:06

from django.conf import settings
from django.db import migrations, models
import django.db.models.deletion
import django.utils.timezone


class Migration(migrations.Migration):

    initial = True

    dependencies = [
        migrations.swappable_dependency(settings.AUTH_USER_MODEL),
    ]

    operations = [
        migrations.CreateModel(
            name='BlogArticles',
            fields=[
                ('id', models.AutoField(auto_created=True, primary_key=True, serialize=False, verbose_name='ID')),
                ('title', models.CharField(max_length=300)),
                ('body', models.TextField()),
                ('publish', models.DateTimeField(default=django.utils.timezone.now)),
                ('author', models.ForeignKey(on_delete=django.db.models.deletion.CASCADE, related_name='blog_posts', to=settings.AUTH_USER_MODEL)),
            ],
            options={
                'ordering': ('-publish',),
            },
        ),
    ]
这段代码的含义可以使用命令python manage.py sqlmigrate blog 0001查看:
- sql语句显示:上述代码创建了一个名为
blog_blogarticles的数据库表,blog是应用名,blogarticles是模型类名称全小写; - 这实际就是一个能够建立数据库表的文件,基于此就可以进行后续数据库的创建;
$ python manage.py sqlmigrate blog 0001
BEGIN;
--
-- Create model BlogArticles
--
CREATE TABLE "blog_blogarticles" ("id" integer NOT NULL PRIMARY KEY AUTOINCREMENT, "title" varchar(300) NOT NULL, "body" text NOT NULL, "publish" datetime NOT NULL, "author_id" integer NOT NULL REFERENCES "auth_user" ("id") DEFERRABLE INITIALLY DEFERRED);
CREATE INDEX "blog_blogarticles_author_id_ed798e23" ON "blog_blogarticles" ("author_id");
COMMIT;
创建数据库
- 执行命令
python manage.py migrate创建数据库;
$ python manage.py migrate
Operations to perform:
  Apply all migrations: admin, auth, blog, contenttypes, sessions
Running migrations:
  Applying blog.0001_initial... OK
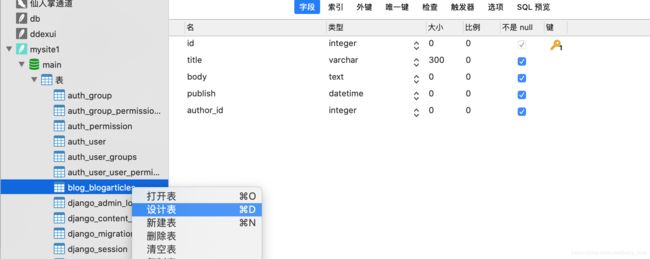
现在,使用Navicat Premium打开根目录下的数据库文件,查看相应的数据库表结构,就可以看见已经创建好的表blog_blogarticles:

发布博客文章
最简单的发布——使用Django默认的管理功能发布文章;要使用此方法需要先创建超级管理员(创建后牢记用户名和密码);
创建超级管理员
- 使用命令
python manage.py createsuperuser;
$ python manage.py createsuperuser
Username (leave blank to use 'huaqiang'): baby_hua
Email address: [email protected]
Password: h1-8
Password (again):
Superuser created successfully.
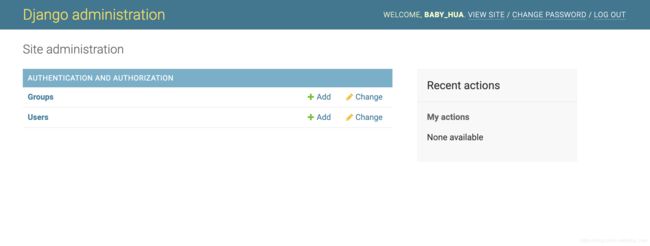
这里:
- Groups和Users是Django在用户管理应用中默认的;单击Users就能看见目前唯一的用户baby_hua;
- 可以尝试进行用户的操作;
编辑blog/admin.py 注册Blog
还记得blog/admin.py文件的作用吗:
- 可在此文件中,自定义Django管理工具,如设置在管理界面能够管理的项目,或通过重新自定义与系统管理有关的类对象,向管理功能增加新的内容;
编辑blog/admin.py:
from django.contrib import admin

# Register your models here.

from .models import BlogArticles  # 引入BlogArticles类

admin.site.register(BlogArticles)  # 在admin中注册该类
我们看到了一个新注册的BLOG:
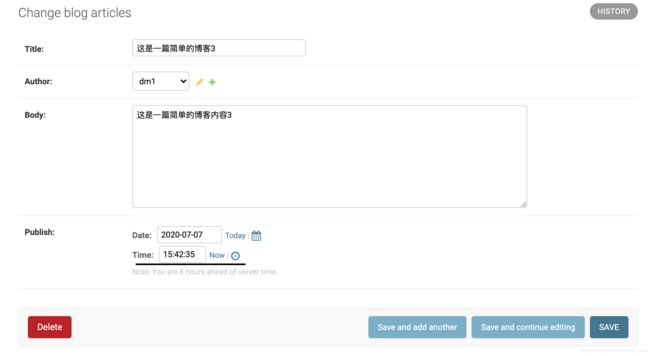
- 尝试多添加几个博客文章;可以看到新建博客文章编辑的信息与BlogArticles类中属性是一致的;
- 再查看数据库,可以看到刚刚新建文章的多条记录;BlogArticles类中ForeignKey()属性也起了作用,author_id被赋了相应的值(auth_user表的主键id);
提供时区数值:blog/models.py中使用的django.utils.timezone,依赖模块pytz
- 安装
pytz模块,执行命令pip install pytz;重启项目; - 注意上图中的时间未对应上,因为mysite1/settings.py中时区默认设置的是UTC,需要修改为东八区:TIME_ZONE = “Asia/Shanghai”;在看下显示时间就正确了;
丰富Blog列表的展示
查看已经创建的文章列表:列项的显示还可以更丰富一些,只需编辑blog/admin.py
from django.contrib import admin

# Register your models here.

from .models import BlogArticles  # 引入BlogArticles类


class BlogArticlesAdmin(admin.ModelAdmin):
    list_display = ("title", "author", "publish")
    list_filter = ("publish", "author")
    search_fields = ("title", "body")
    raw_id_fields = ("author",)
    date_hierarchy = "publish"
    ordering = ["publish", "author"]


admin.site.register(BlogArticles, BlogArticlesAdmin)  # 在admin中注册该类


