Darknet YOLO v3 入门指南
Darknet
Darknet is an open source neural network framework written in C and CUDA. It is fast, easy to install, and supports CPU and GPU computation.
For more information see the Darknet project website.
环境部署
服务器环境信息
OS: Ubuntu 16.04
Kernel: x86_64 Linux 4.13.0-38-generic
CPU: Intel Xeon CPU E5-2620 v3 @ 3.2GHz
GPU: 双路 GeForce GTX 1080
RAM: 32 GB
CUDA: 8.0.61
cuDNN: 7.0.5
GCC: 4.9.4
Python: 3.5
CUDA 及 cuDNN 环境配置
vi ~/.bashrc
追加以下内容:
export PATH=/usr/local/cuda-8.0/bin:$PATH
# 服务器环境 cuDNN 配置可能存在问题, 故自行配置如下路径
export LD_LIBRARY_PATH=/path/to/your/cudnn-lib-files:$LD_LIBRARY_PATH
# 例: export LD_LIBRARY_PATH=/server_space/zhaoym/cuda/tmp:$LD_LIBRARY_PATH
使配置生效:
source ~/.bashrc
编译
克隆官方代码
git clone https://github.com/pjreddie/darknet
切换到 darknet 目录, 修改 Makefile
cd darknet
vi Makefile
GPU=1
CUDNN=1
OPENCV=0 # 若需检测视频等, 则修改为 1, OpenCV 配置方法略. . . . . . .
COMMON+= -DGPU -I/usr/local/cuda/include/ # 需根据服务器 CUDA 安装路径修改
CFLAGS+= -DGPU
LDFLAGS+= -L/usr/local/cuda/lib64 -lcuda -lcudart -lcublas -lcurand # 需根据 cuDNN 路径修改例:
COMMON+= -DGPU -I/usr/local/cuda-8.0/include/
LDFLAGS+= -L/server_space/zhaoym/cuda/tmp -lcuda -lcudart -lcublas -lcurand
make # 编译
若编译失败需执行 make clean, 修改后重新 make 即可
验证是否配置成功
下载官方预训练权重
wget https://pjreddie.com/media/files/yolov3.weights
修改配置文件
vi cfg/yolov3.cfg
进行如下修改后保存退出
[net]
# Testing
batch=1             # 取消注释
subdivisions=1      # 取消注释
# Training
# batch=64          # 注释掉
# subdivisions=16   # 注释掉
检测测试
./darknet detect cfg/yolov3.cfg yolov3.weights data/dog.jpg
输出如下
layer     filters    size              input                output
    0 conv     32  3 x 3 / 1   416 x 416 x   3   ->   416 x 416 x  32  0.299 BFLOPs
    1 conv     64  3 x 3 / 2   416 x 416 x  32   ->   208 x 208 x  64  1.595 BFLOPs
    .......
  105 conv    255  1 x 1 / 1    52 x  52 x 256   ->    52 x  52 x 255  0.353 BFLOPs
  106 detection
truth_thresh: Using default '1.000000'
Loading weights from yolov3.weights...Done!
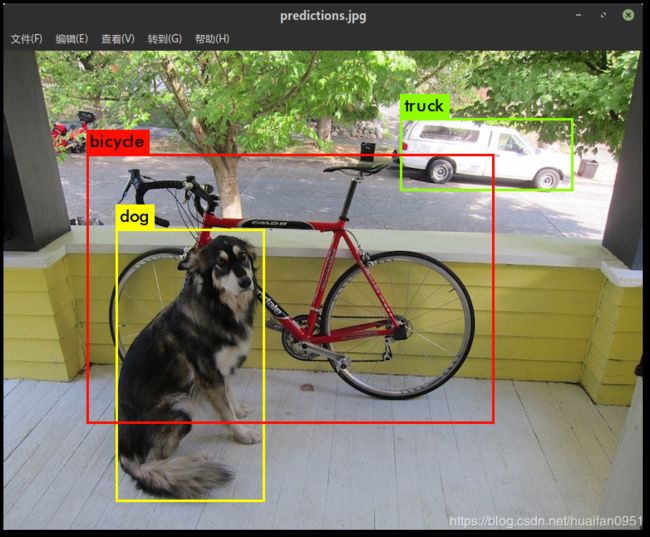
data/dog.jpg: Predicted in 0.029329 seconds.
dog: 99%
truck: 93%
bicycle: 99%
标注图片在项目根目录下, 名为 predictions.png

训练
下面以在西工大遥感数据集上训练模型为例演示如何训练自己的数据
数据集标注转换
下载数据集并放到 darknet 目录下, 解压并将文件夹中的空格替换
unrar x NWPU\ VHR-10\ dataset.rar
mv NWPU\ VHR-10\ dataset NWPU_VHR-10_dataset
cd NWPU_VHR-10_dataset
mv ground\ truth ground_truth
mv positive\ image\ set positive_image_set
转换标注, 代码见 Github
pip install numpy opencv-python scikit-image PIL    # 安装所需 Python 库
mkdir labels
python nwpu_vhr_label.py
输出如下
492     # 训练集数量


158     # 测试集数量


650     # 图片总数
输出文件有 tran.txt, val.txt 以及 labels 文件夹下的 650 个转换后的标注
darknet 默认标注文件与图片在同一目录, 故需将 labels文件夹下的 txt 复制到 positive_image_set 中
cp labels/*.txt positive_image_set
准备训练配置文件
cd ..
mkdir 0913_NWPU_v3
cd 0913_NWPU_v3
mkdir backup
cp ../cfg/yolov3-voc.cfg ./
cp ../NWPU_VHR-10_dataset/*.txt ./
创建 NWPU.data 文件并写入以下内容
classes= 10
train  = 0913_NWPU_v3/train.txt
valid  = 0913_NWPU_v3/val.txt
names  = 0913_NWPU_v3/NWPU.names
backup = 0913_NWPU_v3/backup/
classes 类别数量
train 训练集文件列表
valid 验证集文件列表
names 类别名称文件
backup 权重存放目录
创建 NWPU.names 文件并写入以下内容
aeroplane
ship
storage_tank
baseball_diamond
tennis_court
basketball_court
ground_track_field
harbor
bridge
vehicle
修改 yolov3-voc.cfg
[net]
# Testing
# batch=1           # 注释掉
# subdivisions=1    # 注释掉
#Training
batch=64            # 取消注释
subdivisions=16     # 取消注释
......
# 605, 689, 773 行的 filters
filters=45          # (4个位置 + 1个objectness + C个类别) * 3, 只改 [yolo] 层上一层中的filters
# 611, 695, 779 行的 classes
classes=10          # 类别数
训练
下载预训练文件
cd ..
wget https://pjreddie.com/media/files/darknet53.conv.74
开始训练
./darknet detector train 0913_NWPU_v3/voc.data 0913_NWPU_v3/yolov3-voc.cfg darknet53.conv.74 -gpus 0,1
-gpus 指定训练使用的 GPU, 这里使用了第 0 块和第 1 块显卡
输出
layer     filters    size              input                output
    0 conv     32  3 x 3 / 1   416 x 416 x   3   ->   416 x 416 x  32  0.299 BFLOPs
    1 conv     64  3 x 3 / 2   416 x 416 x  32   ->   208 x 208 x  64  1.595 BFLOPs
    2 conv     32  1 x 1 / 1   208 x 208 x  64   ->   208 x 208 x  32  0.177 BFLOPs
    ......
  105 conv     45  1 x 1 / 1    52 x  52 x 256   ->    52 x  52 x  45  0.062 BFLOPs
  106 yolo
Loading weights from darknet53.conv.74...Done!
Learning Rate: 0.001, Momentum: 0.9, Decay: 0.0005
Resizing
320
Loaded: 0.000029 seconds
Region 82 Avg IOU: -nan, Class: -nan, Obj: -nan, No Obj: 0.539972, .5R: -nan, .75R: -nan,  count: 0
Region 94 Avg IOU: 0.527418, Class: 0.748367, Obj: 0.665674, No Obj: 0.590720, .5R: 1.000000, .75R: 0.000000,  count: 1
Region 106 Avg IOU: 0.204739, Class: 0.530762, Obj: 0.475587, No Obj: 0.427459, .5R: 0.142857, .75R: 0.000000,  count: 42
Region 82 Avg IOU: 0.334140, Class: 0.682158, Obj: 0.326366, No Obj: 0.540248, .5R: 0.000000, .75R: 0.000000,  count: 1
Region 94 Avg IOU: 0.279358, Class: 0.548496, Obj: 0.595618, No Obj: 0.589648, .5R: 0.333333, .75R: 0.166667,  count: 6
Region 106 Avg IOU: 0.175368, Class: 0.478585, Obj: 0.391913, No Obj: 0.430448, .5R: 0.000000, .75R: 0.000000,  count: 9
......
注:
-
yolov3-voc.cfg配置文件中的batch和subdivisions需根据 GPU 显存大小修改, 若显存较小, 应相应地减小batch增大subdivisions -
查看显存占用可用
nvidia-smi, 输出如下Wed Mar 13 15:36:29 2019 +-----------------------------------------------------------------------------+ | NVIDIA-SMI 384.111 Driver Version: 384.111 | |-------------------------------+----------------------+----------------------+ | GPU Name Persistence-M| Bus-Id Disp.A | Volatile Uncorr. ECC | | Fan Temp Perf Pwr:Usage/Cap| Memory-Usage | GPU-Util Compute M. | |===============================+======================+======================| | 0 GeForce GTX 1080 Off | 00000000:02:00.0 Off | N/A | | 59% 83C P2 104W / 180W | 2729MiB / 8112MiB | 93% Default | +-------------------------------+----------------------+----------------------+ | 1 GeForce GTX 1080 Off | 00000000:03:00.0 Off | N/A | | 54% 81C P2 133W / 180W | 6861MiB / 8114MiB | 18% Default | +-------------------------------+----------------------+----------------------+ +-----------------------------------------------------------------------------+ | Processes: GPU Memory | | GPU PID Type Process name Usage | |=============================================================================| | 0 28529 C python 2719MiB | | 1 2040 C python3 6851MiB | +-----------------------------------------------------------------------------+ -
如果输出中全都是
-nan,count全为0问题很有可能在数据集上 -
官方代码默认前
1000次, 每100次保存一次权重;1000次之后每10000次保存一次权重, 可在examples/detector.c的130及138行自行修改, 重新编译即可生效 -
若训练中途停止, 将训练命令中的
darknet53.conv.74改为已得到的最新的权重的路径即可继续训练 -
训练输出日志含义见此文
-
保存训练日志到文件追加
tee命令, 例如./darknet detector train 0913_NWPU_v3/voc.data 0913_NWPU_v3/yolov3-voc.cfg darknet53.conv.74 -gpus 0,1 | tee -a 0913_train.log
评估
生成检测结果
修改 yolov3-voc.cfg
[net]
# Testing
batch=1             # 取消注释
subdivisions=1      # 取消注释
# Training
# batch=64          # 注释掉
# subdivisions=16   # 注释掉
使用 valid 命令,将验证集结果批量生成
./darknet detector valid 0913_NWPU_v3/NWPU.data 0913_NWPU_v3/yolov3-voc.cfg 0913_NWPU_v3/backup/yolov3-voc_10500.weights
输出如下
results: Using default 'results'
layer     filters    size              input                output
    0 conv     32  3 x 3 / 1   416 x 416 x   3   ->   416 x 416 x  32  0.299 BFLOPs
    1 conv     64  3 x 3 / 2   416 x 416 x  32   ->   208 x 208 x  64  1.595 BFLOPs
    2 conv     32  1 x 1 / 1   208 x 208 x  64   ->   208 x 208 x  32  0.177 BFLOPs
    ......
  105 conv     45  1 x 1 / 1    52 x  52 x 256   ->    52 x  52 x  45  0.062 BFLOPs
  106 yolo
Loading weights from 0913_NWPU_v3/backup/yolov3-voc_10500.weights...Done!
Learning Rate: 0.001, Momentum: 0.9, Decay: 0.0005
eval: Using default 'voc'
4
8
12
......
160
Total Detection Time: 14.854030 Seconds
输出文件均保存在 results 目录下
计算 mAP
将西工大数据集转换为 VOC 格式, 代码: nwpu2voc.py
cd NWPU_VHR-10_dataset
python nwpu2voc.py  # 将 nwpu2voc.py 放到 NWPU_VHR-10_dataset 目录下
下载 reval_voc.py 和 voc_eval.py, 以下代码需在 Python2 环境下运行并预先装好 numpy, 推荐用 Miniconda 管理 Python 环境
cd ..
python reval_voc.py --voc_dir NWPU_VHR-10_dataset/VOCdevkit --year 2007 --image_set test --class ./0913_NWPU_v3/NWPU.names ./valid_results
输出如下
Evaluating detections
VOC07 metric? Yes
AP for aeroplane = 0.9949
AP for ship = 0.8182
AP for storage_tank = 0.8013
AP for baseball_diamond = 0.9827
AP for tennis_court = 0.8040
AP for basketball_court = 0.8182
AP for ground_track_field = 0.9947
AP for harbor = 0.7442
AP for bridge = 0.8961
AP for vehicle = 0.8689
Mean AP = 0.8723

--------------------------------------------------------------
Results computed with the **unofficial** Python eval code.
Results should be very close to the official MATLAB eval code.
-- Thanks, The Management
--------------------------------------------------------------
更多信息参见 Darknet 评估训练好的网络的性能
其它参考资料
DarkNet-YOLOv3 训练自己的数据集 Ubuntu16.04+cuda8.0
YOLOv3批量测试图片并保存在自定义文件夹下
YOLO(v1)用自己的数据集训练模型
后记
个人水平有限, 文章难免出现错误, 欢迎指出
