1.前言
- 最近一直在看 《Android进阶解密》 的一本书,这本书编写逻辑、流程都非常好,而且很容易看懂,非常推荐大家去看看(没有收广告费,单纯觉得作者写的很好)。
- 上一篇简单的介绍了Android进阶(四):Activity启动过程(最详细&最简单)。
- 今天就介绍Service 2种启动方式中:startService启动 (基于Android 8.0 系统)。
- 本文提供一种看源码的思路,因此bindService启动流程就没有再本文展开(与startService流程类似)。
- 文章中实例 linhaojian的Github
2.Context继承关系
-
在讲解Service启动过程前,先了解一下它的继承关系,便于后续的源码理解:
- 从图中,可以发现:
- Activity,Service,Application都是ContextWrapper的子类;
- ContextWrapper里面引用着一个ContextImpl实例;
- ContextWrapper里所有的方法都是通过调用ContextImpl进行实现;
- 通过上述3点可以发现,其他就是
[装饰者模式](https://www.jianshu.com/p/16e946f42ce1)
2.Service启动过程的时序图
3.源码分析
3.1 startService()启动分析
3.1.1 ContextImpl:
class ContextImpl extends Context {
    @Override
    public ComponentName startService(Intent service) {
        warnIfCallingFromSystemProcess();
        return startServiceCommon(service, false, mUser);// 1
    }
    private ComponentName startServiceCommon(Intent service, boolean requireForeground,
            UserHandle user) {
        try {
            validateServiceIntent(service);
            service.prepareToLeaveProcess(this);
            ComponentName cn = ActivityManager.getService().startService(
                mMainThread.getApplicationThread(), service, service.resolveTypeIfNeeded(
                            getContentResolver()), requireForeground,
                            getOpPackageName(), user.getIdentifier());// 2
            // ....
            return cn;
        } catch (RemoteException e) {
            throw e.rethrowFromSystemServer();
        }
    }
}
- 注释1:startService最终也是调用startServiceCommon函数;
- 注释2:ActivityManager.getService()其实就是ActivityManagerService,调用ActivityManagerService类里面的startService方法;
3.1.2 ActivityManagerService:
    public ComponentName startService(IApplicationThread caller, Intent service,
            String resolvedType, boolean requireForeground, String callingPackage, int userId)
            throws TransactionTooLargeException {
        //.....
        synchronized(this) {
            final int callingPid = Binder.getCallingPid();
            final int callingUid = Binder.getCallingUid();
            final long origId = Binder.clearCallingIdentity();
            ComponentName res;
            try {
                res = mServices.startServiceLocked(caller, service,
                        resolvedType, callingPid, callingUid,
                        requireForeground, callingPackage, userId);// 1
            } finally {
                Binder.restoreCallingIdentity(origId);
            }
            return res;
        }
    }
- 注释1:调用ActiveServices的startServiceLocked();
3.1.3 ActiveServices:
    ComponentName startServiceLocked(IApplicationThread caller, Intent service, String resolvedType,
            int callingPid, int callingUid, boolean fgRequired, String callingPackage, final int userId)
            throws TransactionTooLargeException {
        //.....
        ServiceLookupResult res =
            retrieveServiceLocked(service, resolvedType, callingPackage,
                    callingPid, callingUid, userId, true, callerFg, false, false);// 1
        if (res == null) {
            return null;
        }
        if (res.record == null) {
            return new ComponentName("!", res.permission != null
                    ? res.permission : "private to package");
        }
        ServiceRecord r = res.record;
        if (!mAm.mUserController.exists(r.userId)) {
            Slog.w(TAG, "Trying to start service with non-existent user! " + r.userId);
            return null;
        }
        //.....
        ComponentName cmp = startServiceInnerLocked(smap, service, r, callerFg, addToStarting);// 2
        return cmp;
    }
- 注释1:创建 & 封装启动Service的相关数据;
- 注释2:调用自身的startServiceInnerLocked();
    ComponentName startServiceInnerLocked(ServiceMap smap, Intent service, ServiceRecord r,
            boolean callerFg, boolean addToStarting) throws TransactionTooLargeException {
        ServiceState stracker = r.getTracker();
        if (stracker != null) {
            stracker.setStarted(true, mAm.mProcessStats.getMemFactorLocked(), r.lastActivity);
        }
        r.callStart = false;
        synchronized (r.stats.getBatteryStats()) {
            r.stats.startRunningLocked();
        }
        String error = bringUpServiceLocked(r, service.getFlags(), callerFg, false, false); // 3
        if (error != null) {
            return new ComponentName("!!", error);
        }
        //.....
        return r.name;
    }
- 注释3:调用自身的bringUpServiceLocked();
    private String bringUpServiceLocked(ServiceRecord r, int intentFlags, boolean execInFg,
            boolean whileRestarting, boolean permissionsReviewRequired)
            throws TransactionTooLargeException {
            // ....
        final boolean isolated = (r.serviceInfo.flags&ServiceInfo.FLAG_ISOLATED_PROCESS) != 0;
        final String procName = r.processName;
        String hostingType = "service";
        ProcessRecord app;
        if (!isolated) {
            app = mAm.getProcessRecordLocked(procName, r.appInfo.uid, false);
            if (DEBUG_MU) Slog.v(TAG_MU, "bringUpServiceLocked: appInfo.uid=" + r.appInfo.uid
                        + " app=" + app);
            if (app != null && app.thread != null) {
                try {
                    app.addPackage(r.appInfo.packageName, r.appInfo.longVersionCode, mAm.mProcessStats);
                    realStartServiceLocked(r, app, execInFg);// 4
                    return null;
                } catch (TransactionTooLargeException e) {
                    throw e;
                } catch (RemoteException e) {
                    Slog.w(TAG, "Exception when starting service " + r.shortName, e);
                }
            }
        } else {
            app = r.isolatedProc;
            if (WebViewZygote.isMultiprocessEnabled()
                    && r.serviceInfo.packageName.equals(WebViewZygote.getPackageName())) {
                hostingType = "webview_service";
            }
        }
        //.....
    }
- 注释4:调用自身的realStartServiceLocked();
    private final void realStartServiceLocked(ServiceRecord r,
            ProcessRecord app, boolean execInFg) throws RemoteException {
        //.....
        boolean created = false;
        try {
            if (LOG_SERVICE_START_STOP) {
                String nameTerm;
                int lastPeriod = r.shortName.lastIndexOf('.');
                nameTerm = lastPeriod >= 0 ? r.shortName.substring(lastPeriod) : r.shortName;
                EventLogTags.writeAmCreateService(
                        r.userId, System.identityHashCode(r), nameTerm, r.app.uid, r.app.pid);
            }
            synchronized (r.stats.getBatteryStats()) {
                r.stats.startLaunchedLocked();
            }
            mAm.notifyPackageUse(r.serviceInfo.packageName,
                                 PackageManager.NOTIFY_PACKAGE_USE_SERVICE);
            app.forceProcessStateUpTo(ActivityManager.PROCESS_STATE_SERVICE);
            app.thread.scheduleCreateService(r, r.serviceInfo,
                    mAm.compatibilityInfoForPackageLocked(r.serviceInfo.applicationInfo),
                    app.repProcState);// 5
            r.postNotification();
            created = true;
        } catch (DeadObjectException e) {
            Slog.w(TAG, "Application dead when creating service " + r);
            mAm.appDiedLocked(app);
            throw e;
        } finally {
            //...
        }
        // 通知ActivityThread调用Service的onStartCommand方法
        sendServiceArgsLocked(r, execInFg, true);// 6
        //.....
    }
- 注释5:通知ActivityThread,真正的创建Service;
- 注释6:调用自身的sendServiceArgsLocked()启动Service的其他生命周期方法,下面会介绍;
3.1.4 ActivityThread:
- scheduleCreateService()其实就是通过Handler机制进行线程切换,最后会调用handleCreateService();
    private void handleCreateService(CreateServiceData data) {
        unscheduleGcIdler();
        LoadedApk packageInfo = getPackageInfoNoCheck(
                data.info.applicationInfo, data.compatInfo);// 1
        Service service = null;
        try {
            // 通过类加载器,创建Service实例
            java.lang.ClassLoader cl = packageInfo.getClassLoader();// 2
            service = packageInfo.getAppFactory()
                    .instantiateService(cl, data.info.name, data.intent);// 3
        } catch (Exception e) {
            if (!mInstrumentation.onException(service, e)) {
                throw new RuntimeException(
                    "Unable to instantiate service " + data.info.name
                    + ": " + e.toString(), e);
            }
        }
        try {
            if (localLOGV) Slog.v(TAG, "Creating service " + data.info.name);
            ContextImpl context = ContextImpl.createAppContext(this, packageInfo);
            context.setOuterContext(service);
            Application app = packageInfo.makeApplication(false, mInstrumentation);
            //向Service对象中初始化基本设置
            service.attach(context, this, data.info.name, data.token, app,
                    ActivityManager.getService());// 4
            //调用service的onCreate生命周期函数
            service.onCreate();// 5
            mServices.put(data.token, service);
            try {
                ActivityManager.getService().serviceDoneExecuting(
                        data.token, SERVICE_DONE_EXECUTING_ANON, 0, 0);
            } catch (RemoteException e) {
                throw e.rethrowFromSystemServer();
            }
        } catch (Exception e) {
            if (!mInstrumentation.onException(service, e)) {
                throw new RuntimeException(
                    "Unable to create service " + data.info.name
                    + ": " + e.toString(), e);
            }
        }
    }
- 注释1:获取LoadedApk对象,负责解析manifest文件;
- 注释2:获取ClassLoader类加载器,负责创建Service实例;
- 注释3:通过AppComponentFactory,创建Service对象;
- 注释4:设置Service基础参数;
- 注释5:调用Service的onCreate方法;
3.1.5 AppComponentFactory:
public class AppComponentFactory {
    public @NonNull Service instantiateService(@NonNull ClassLoader cl,
            @NonNull String className, @Nullable Intent intent)
            throws InstantiationException, IllegalAccessException, ClassNotFoundException {
        return (Service) cl.loadClass(className).newInstance();// 1
    }
}
- 注释1:通过类加载器,创建Service实例;
3.1.6 ActiveServices的sendServiceArgsLocked()函数:
    private final void sendServiceArgsLocked(ServiceRecord r, boolean execInFg,
            boolean oomAdjusted) throws TransactionTooLargeException {
        //...
       Exception caughtException = null;
        try {
            r.app.thread.scheduleServiceArgs(r, slice);// 1
        } catch (TransactionTooLargeException e) {
            if (DEBUG_SERVICE) Slog.v(TAG_SERVICE, "Transaction too large for " + args.size()
                    + " args, first: " + args.get(0).args);
            Slog.w(TAG, "Failed delivering service starts", e);
            caughtException = e;
        }
        //....
    }
- 注释1:调用ActivityThread的scheduleServiceArgs函数(在Service创建之后,会调用sendServiceArgsLocked(),实现其他的生命周期方法的调用);
3.1.7 ActivityThread的handleServiceArgs函数:
- scheduleServiceArgs()最终通过Handler机制切换线程 & 调用handleServiceArgs();
    private void handleServiceArgs(ServiceArgsData data) {
        Service s = mServices.get(data.token);
        if (s != null) {
            try {
                if (data.args != null) {
                    data.args.setExtrasClassLoader(s.getClassLoader());
                    data.args.prepareToEnterProcess();
                }
                int res;
                if (!data.taskRemoved) {
                    res = s.onStartCommand(data.args, data.flags, data.startId);// 1
                } else {
                    s.onTaskRemoved(data.args);
                    res = Service.START_TASK_REMOVED_COMPLETE;
                }
               //...
            } catch (Exception e) {
                // ...
            }
        }
    }
- 注释1:调用Service的onStartCommand();
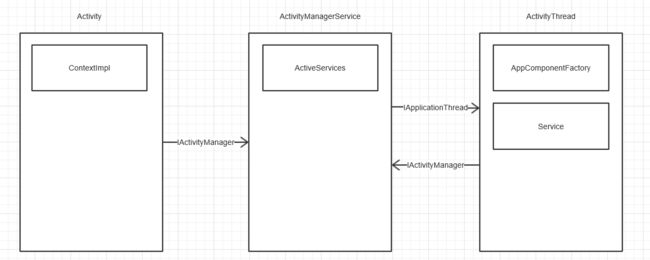
4.类关系
- 通过上图发现,Service启动过程就是AMS与ActivityThread不同的进程交互实现的。
5.总结
- 到此,
Service启动过程介绍完毕。 - 如果喜欢我的分享,可以点击 关注 或者 赞,你们支持是我分享的最大动力 。
- linhaojian的Github
欢迎关注linhaojian_CSDN博客或者linhaojian_!
不定期分享关于安卓开发的干货。
写技术文章初心
- 技术知识积累
- 技术知识巩固
- 技术知识分享
- 技术知识交流


