【SpringBoot框架篇】13.使用springboot admin对springboot应用进行监控
文章目录
- 简介
- 非微服务应用集成admin
- Spring Boot Admin Server搭建
- 引入依赖
- 添加启动注解
- 配置文件
- Spring Boot Admin Client搭建
- 引入依赖
- 配置文件
- 启动测试
- 添加服务离线上线通知
- 在admin server应用的pom文件中添加邮件客户端依赖
- 添加邮件配置
- 邮件发送工具类
- 添加自定义通知事件
- 测试邮件通知
- 停止clent应用
- 启动clent应用
- 微服务应用集成admin
- Spring Boot Admin Server 搭建
- 添加依赖
- 添加配置
- 添加启动注解
- 测试
- 项目配套代码
简介
Spring Boot Admin是一个开源社区项目,用于管理和监控SpringBoot应用程序。 应用程序作为Spring Boot Admin Client向为Spring Boot Admin Server注册(通过HTTP)或使用SpringCloud注册中心(例如Eureka,Nacos)。 UI是的AngularJs应用程序,展示Spring Boot Admin Client的Actuator端点上的一些监控。常见的功能或者监控如下:
- 显示健康状况
- 显示详细信息,如下
JVM和内存指标
micrometer.io指标
数据源指标
缓存指标 - 显示构建信息编号
- 关注并下载日志文件
- 查看jvm系统和环境属性
- 查看Spring Boot配置属性
- 轻松的日志级管理
- 与JMX-beans交互
- 查看线程转储
- 查看http跟踪
- 下载heapdump
- 状态变更通知(通过电子邮件,…)
非微服务应用集成admin
Spring Boot Admin Server搭建
引入依赖
            de.codecentric
            spring-boot-admin-starter-server
            2.2.2
添加启动注解
在springboot启动类里添加@EnableAdminServer注解
@EnableAdminServer
@SpringBootApplication
public class MonitorApplication {}
配置文件
server:
port: 8013
spring:
application:
name: monitor
boot:
admin:
ui:
# ui页面的自定义内容信息
title: 我的服务监控中心
brand: >Service Monitoring Center >
Spring Boot Admin Client搭建
引入依赖
            org.springframework.boot
            spring-boot-starter-web


            de.codecentric
            spring-boot-admin-starter-client
配置文件
spring:
  application:
    name: service
  boot:
    admin:
      client:
        # spring boot admin server的注册地址,多个以逗号隔开,并把localhost换成ip
        url: http://localhost:8013
        instance:
          prefer-ip: true
        register-once: false

#需要暴露监控端口给spring boot admin server访问
management:
  endpoints:
    web:
      exposure:
        include: '*'
  endpoint:
    health:
      show-details: ALWAYS
启动测试
先启动 admin server应用,然后再启动admin clent 应用.
访问 http://localhost:8013/

查看被监控的服务详细信息


添加服务离线上线通知
在admin server应用添加服务离线上线邮件通知功能
在admin server应用的pom文件中添加邮件客户端依赖
            org.springframework.boot
            spring-boot-starter-mail
添加邮件配置
spring:
  #配置发送邮件需要的参数
  mail:
    #邮件服务器
    host: smtp.qq.com
    #发送邮件的帐号
    username: 你的邮箱帐号
    #邮箱帐号的授权码
    password: 你的邮件授权码
    properties:
      mail:
        smtp:
          auth: true

client:
  notify:
    mail:
      #邮件内容的标题
      subject: test service notification
      #收邮件的帐号,多个用 , 隔开
      to: 你收邮件的帐号
邮件发送工具类
@Component
public class EmailUtil {

    private final Logger logger= LoggerFactory.getLogger(EmailUtil.class);

    @Autowired
    private JavaMailSender mailSender;

    @Value("${spring.mail.username}")
    private String form;
    @Value("${client.notify.mail.to}")
    private String to;

    public  void sendEmail(String subject,String message){
        try {
            if(StringUtils.isEmpty(to)){
                logger.error("email to is Emtry ... send Email stop");
                return;
            }
            MimeMessage mimeMessage = mailSender.createMimeMessage();
            MimeMessageHelper helper = new MimeMessageHelper(mimeMessage, true);
            //发件人
            helper.setFrom(form);
            //收件人
            String []toArray=to.split(",");
            helper.setTo(toArray);
            //标题
            helper.setSubject(subject);
            //文本
            helper.setText(message,true);
            mailSender.send(mimeMessage);
        }catch (Exception e){
            logger.info("sendEmail error,message={}",e);
        }
    }

}
添加自定义通知事件
@Component
public class CustomNotifier extends AbstractStatusChangeNotifier {
private static final Logger logger = LoggerFactory.getLogger(CustomNotifier.class);
@Value("${client.notify.mail.subject}")
private String subject;
@Autowired
EmailUtil emailUtil;
//邮件模板内容信息
private String content="亲爱的运维人员:
您好!
您的运维管理的服务程序已经${服务状态},
服务名称是:${服务名称},服务部署的服务器ip是:${服务器ip地址}。
请查看及时服务运行状态,.
如有打扰,请见谅!
服务监控中心!
'";
public CustomNotifier(InstanceRepository repository) {
super(repository);
}
@Override
protected Mono<Void> doNotify(InstanceEvent event, Instance instance) {
return Mono.fromRunnable(() -> {
if (event instanceof InstanceStatusChangedEvent) {
logger.info("Instance {} ({}) is {}", instance.getRegistration().getName(), event.getInstance(),
((InstanceStatusChangedEvent) event).getStatusInfo().getStatus());
//获取服务状态 status UP上线,OFFLINE离职
String status = ((InstanceStatusChangedEvent) event).getStatusInfo().getStatus();
//服务名称,
String clientName = instance.getRegistration().getName().toLowerCase();
//服务所在的服务器ip地址
String clientServerUrl = instance.getRegistration().getServiceUrl();
String statusName="OFFLINE".equals(status)?"已经宕机了":"已经重新上线!";
if ("OFFLINE".equals(status) || "UP".equals(status)) {
emailUtil.sendEmail(subject + "-" + clientName + "-" + status, repelateMessage(content,statusName,clientName,clientServerUrl));
}
} else {
logger.info("Instance {} ({}) {}", instance.getRegistration().getName(), event.getInstance(),
event.getType());
}
});
}
/**
* 替换邮件模板内占位符
*/
private String repelateMessage(String msg, String state, String appName, String serverIp) {
msg = msg.replace("${服务状态}", state);
msg = msg.replace( "${服务名称}", appName);
msg =msg.replace("${服务器ip地址}", serverIp);
return msg;
}
}
测试邮件通知
先重启spring boot admin server,spring boot admin clent应用.
停止clent应用
停止spring boot admin clent应用,然后就能收到服务离线的邮件通知了

启动clent应用
启动spring boot admin clent应用,然后就能收到服务上限的邮件通知了

微服务应用集成admin
需要对spring cloud有一定的了解才能完成微服务集成,如果不了解的,请等学习完spring cloud后,再来
尝试下面的服务集成。
Spring Boot Admin Server会往注册中心里拉取各个客户端的监控信息,所以微服务模块只需要
往注册中心里面注册就行,无需再往Admin Server里面注册,spring-boot-admin-starter-client依赖就不需要再添加了。
Spring Boot Admin Server 搭建
添加依赖
            de.codecentric
            spring-boot-admin-starter-server
            2.2.2


            org.springframework.cloud
            spring-cloud-starter-netflix-eureka-client
添加配置
server:
  port: 8764
spring:
  application:
    name: monitor
#eureka注册中心配置
eureka:
  client:
    serviceUrl:
      defaultZone: http://admin:123456@localhost:8761/eureka/
添加启动注解
@EnableAdminServer
public class MonitorApplication {
}
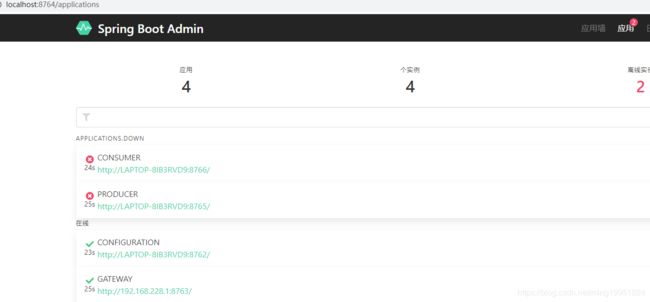
测试
先启动eureka注册中心,然后再启动Spring boot admin server,然后再启动别的微服务模块.
项目配套代码
github地址
要是觉得我写的对你有点帮助的话,麻烦在github上帮我点 Star
【SpringBoot框架篇】其它文章如下,后续会继续更新。
- 1.搭建第一个springboot项目
- 2.Thymeleaf模板引擎实战
- 3.优化代码,让代码更简洁高效
- 4.集成jta-atomikos实现分布式事务
- 5.分布式锁的实现方式
- 6.docker部署,并挂载配置文件到宿主机上面
- 7.项目发布到生产环境
- 8.搭建自己的spring-boot-starter
- 9.dobbo入门实战
- 10.API接口限流实战
- 11.Spring Data Jpa实战
- 12.使用druid的monitor工具查看sql执行性能
- 13.使用springboot admin对springboot应用进行监控
- 14.mybatis-plus实战