书小宅之android——聊天界面的实现
制作Nine-Patch图片
说明:一种被特殊处理过的图片,指定哪些区域可以被拉伸,哪些区域不可以。
从android Studio2.3开始,不再单独提供draw9patch.bat文件,要生成Nine-Patch图片文件,则在res/drawable目录下添加.png格式的图片,并且将其命名改成bubble_right.9.png形式。

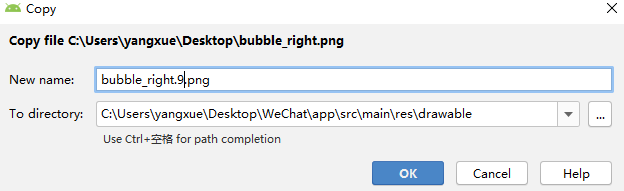
双击打开图片拖拉点限定拉伸区域。

在layout文件中写入如下句子测试拉伸效果:
android:background="@drawable/bubble_right"
![]()
添加库依赖
添加RecyclerView的库依赖的参考链接
RecyclerView用法参考
在SDK manager中添加库:

常见问题解决
1、若出现依赖包冲突问题:
All com.android.support libraries must use the exact same version specification (mixing versions can lead to runtime crashes). Found versions 27.1.1, 25.3.0. Examples include com.android.support:animated-vector-drawable:27.1.1 and com.android.support:design:25.3.0 less... (Ctrl+F1)
There are some combinations of libraries, or tools and libraries, that are incompatible, or can lead to bugs. One such incompatibility is compiling with a version of the Android support libraries that is not the latest version (or in particular, a version lower than your targetSdkVersion.)
按提示加入
//noinspection GradleCompatible
2、若出现Configuration ‘compile’ is obsolete and has been replaced with ‘implementation’ and ‘api’.的问题是因为有些配置过时,其解决方式如下:
compile 改成implementation
androidTestCompile改成androidTestImplementation
testCompile 改成testImplementation
3、若出现Failed to resolve: com.android.support:recyclerview-v7:28.0.0,提示migrate to androidX libraries问题:
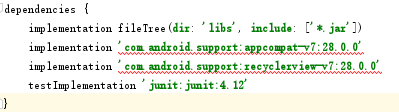
这是因为添加了不存在的依赖
在build gradle中发现此时依赖中的编译版本和配置中的依赖版本不同:

修改其中的三句话重新编译即可
    compileSdkVersion 28
	targetSdkVersion 28
4、若出现闪退问题
教程上recyclerview写法如下,一直会出现闪退问题
<android.support.v7.widget.RecyclerView
       android:id="@+id/msg_recycler_view"
       android:layout_width="match_parent"
       android:layout_height="0dp"
       android:layout_weight="1" />
如下修改代码,问题解决:
<androidx.recyclerview.widget.RecyclerView
       android:id="@+id/msg_recycler_view"
       android:layout_width="match_parent"
       android:layout_height="0dp"
       android:layout_weight="1"/>
编写聊天界面
chat.xml
<?xml version="1.0" encoding="utf-8"?>
<LinearLayout xmlns:android="http://schemas.android.com/apk/res/android"
              android:orientation="vertical"
              android:layout_width="match_parent"
              android:layout_height="match_parent"
              android:background="#d8e0e8">

    <androidx.recyclerview.widget.RecyclerView
            android:id="@+id/msg_recycler_view"
            android:layout_width="match_parent"
            android:layout_height="0dp"
            android:layout_weight="1"
            android:divider="#0000"/>

    <LinearLayout
            android:layout_width="match_parent"
            android:layout_height="wrap_content">

        <EditText
                android:id="@+id/input_text"
                android:layout_width="0dp"
                android:layout_height="wrap_content"
                android:layout_weight="1"
                android:hint="Type something here"
                android:maxLines="2" />

        <Button
                android:id="@+id/send"
                android:layout_width="wrap_content"
                android:layout_height="wrap_content"
                android:text="Send" />
    </LinearLayout>

</LinearLayout>
msg_item.xml
<?xml version="1.0" encoding="utf-8"?>
<LinearLayout xmlns:android="http://schemas.android.com/apk/res/android"
              android:layout_width="match_parent"
              android:layout_height="wrap_content"
              android:orientation="vertical"
              android:padding="10dp">

    <LinearLayout
            android:layout_width="wrap_content"
            android:layout_height="wrap_content"
            android:orientation="horizontal">

        <ImageView
                android:id="@+id/head_left"
                android:layout_width="wrap_content"
                android:layout_height="wrap_content"
                android:layout_gravity="left"
                android:src="@drawable/portrait1"/>

        <LinearLayout
                android:id="@+id/left_layout"
                android:layout_height="wrap_content"
                android:layout_width="wrap_content"
                android:layout_gravity="left"
                android:background="@drawable/bubble_left">

            <TextView
                    android:id="@+id/left_msg"
                    android:layout_width="wrap_content"
                    android:layout_height="wrap_content"
                    android:layout_gravity="center"
                    android:layout_margin="10dp"
                    android:textColor="#fff"/>
        </LinearLayout>
    </LinearLayout>

    <LinearLayout
            android:layout_width="wrap_content"
            android:layout_height="wrap_content"
            android:layout_gravity="right"
            android:orientation="horizontal">

        <LinearLayout
                android:id="@+id/right_layout"
                android:layout_height="wrap_content"
                android:layout_width="wrap_content"
                android:layout_gravity="right"
                android:background="@drawable/bubble_right">

            <TextView
                    android:id="@+id/right_msg"
                    android:layout_width="wrap_content"
                    android:layout_height="wrap_content"
                    android:layout_gravity="center"
                    android:layout_margin="10dp"/>

        </LinearLayout>
        <ImageView
                android:id="@+id/head_right"
                android:layout_width="wrap_content"
                android:layout_height="wrap_content"
                android:src="@drawable/portrait2"/>
    </LinearLayout>

</LinearLayout>
Msg类
package com.example.wechat;

public class Msg {
    //收到的消息
    public static final int TYPE_RECEIVED = 0;
    //发送的消息
    public static final int TYPE_SEND=1;
    private String content;
    private int type;
    public Msg(String content,int type){
        this.content=content;
        this.type=type;
    }
    public String getContent(){
        return content;
    }
    public int getType(){
        return type;
    }
}
MsgAdapter类
package com.example.wechat;

import android.view.LayoutInflater;
import android.view.View;
import android.view.ViewGroup;
import android.widget.ImageView;
import android.widget.LinearLayout;
import android.widget.TextView;
import androidx.recyclerview.widget.RecyclerView;

import java.util.List;

public class MsgAdapter extends RecyclerView.Adapter<MsgAdapter.ViewHolder> {
     private List<Msg> mMsgList;
     static class ViewHolder extends RecyclerView.ViewHolder{
         LinearLayout leftLayout;
         LinearLayout rightLayout;
         TextView leftMsg;
         TextView rightMsg;
         ImageView protrait1;
         ImageView protrait2;
         public ViewHolder(View view){
             super(view);
                leftLayout=(LinearLayout)view.findViewById(R.id.left_layout);
                rightLayout=(LinearLayout)view.findViewById(R.id.right_layout);
                leftMsg=(TextView)view.findViewById(R.id.left_msg);
                rightMsg=(TextView)view.findViewById(R.id.right_msg);
                protrait1=(ImageView)view.findViewById(R.id.head_right);
                protrait2=(ImageView)view.findViewById(R.id.head_left);
         }
    }
    public MsgAdapter(List<Msg> msgList){
         mMsgList=msgList;
     }
     @Override
    public ViewHolder onCreateViewHolder(ViewGroup parent, int viewType){
         //onCreateViewHolder()用于创建ViewHolder实例
         View view= LayoutInflater.from(parent.getContext()).inflate(R.layout.msg_item,parent,false);
         return new ViewHolder(view);
         //把加载出来的布局传到构造函数中,再返回
     }
    @Override
    public void onBindViewHolder(ViewHolder Holder,int position){
         //onBindViewHolder()用于对RecyclerView子项的数据进行赋值,会在每个子项被滚动到屏幕内的时候执行
         Msg msg=mMsgList.get(position);
            if(msg.getType()==Msg.TYPE_RECEIVED){
                //增加对消息类的判断,如果这条消息是收到的,显示左边布局,是发出的,显示右边布局
               Holder.leftLayout.setVisibility(View.VISIBLE);
               Holder.protrait2.setVisibility(View.VISIBLE);
               Holder.rightLayout.setVisibility(View.GONE);
               Holder.protrait1.setVisibility(View.GONE);
               Holder.leftMsg.setText(msg.getContent());
            }else if(msg.getType()==Msg.TYPE_SEND) {
                Holder.rightLayout.setVisibility(View.VISIBLE);
                Holder.protrait1.setVisibility(View.VISIBLE);
                Holder.leftLayout.setVisibility(View.GONE);
                Holder.protrait2.setVisibility(View.GONE);
                Holder.rightMsg.setText(msg.getContent());
            }
        }
    @Override
    public int getItemCount(){
         return mMsgList.size();
     }
}
Main类
package com.example.wechat;

import android.os.Bundle;
import android.view.View;
import android.widget.Button;
import android.widget.EditText;
import androidx.appcompat.app.AppCompatActivity;
import androidx.recyclerview.widget.LinearLayoutManager;
import androidx.recyclerview.widget.RecyclerView;

import java.util.ArrayList;
import java.util.List;

public class Main extends AppCompatActivity {
    private List<Msg> msgList=new ArrayList<>();
    private EditText inputText;
    private Button send;
    private RecyclerView msgRecyclerView;
    private MsgAdapter adapter;

    @Override
    protected void onCreate(Bundle savedInstanceState) {
        super.onCreate(savedInstanceState);
        setContentView(R.layout.chat);
        //初始化消息数据
        initMsgs();
        inputText=(EditText)findViewById(R.id.input_text);
        send=(Button)findViewById(R.id.send);
        msgRecyclerView=(RecyclerView)findViewById(R.id.msg_recycler_view);

        //LinearLayoutLayout即线性布局,创建对象后把它设置到RecyclerView当中
        LinearLayoutManager layoutManager=new LinearLayoutManager(this);
        msgRecyclerView.setLayoutManager(layoutManager);

        //创建MsgAdapter的实例并将数据传入到MsgAdapter的构造函数中
        adapter=new MsgAdapter(msgList);
        msgRecyclerView.setAdapter(adapter);

        //发送按钮点击事件
        send.setOnClickListener(new View.OnClickListener(){
            @Override
            public void onClick(View v){
                //获取EditText中的内容
                String content=inputText.getText().toString();
                //内容不为空则创建一个新的Msg对象,并把它添加到msgList列表中
                if(!"".equals(content)){
                    Msg msg=new Msg(content,Msg.TYPE_SEND);
                    msgList.add(msg);
                    //调用适配器的notifyItemInserted()用于通知列表有新的数据插入,这样新增的一条消息才能在RecyclerView中显示
                    adapter.notifyItemInserted(msgList.size()-1);
                    //调用scrollToPosition()方法将显示的数据定位到最后一行,以保证可以看到最后发出的一条消息
                    msgRecyclerView.scrollToPosition(msgList.size()-1);
                    //调用EditText的setText()方法将输入的内容清空
                    inputText.setText("");
                }
            }
        });
    }
    private void initMsgs(){
        Msg msg1=new Msg("Hello guy.",Msg.TYPE_RECEIVED);
        msgList.add(msg1);
        Msg msg2=new Msg("Hello.Who is that?",Msg.TYPE_SEND);
        msgList.add(msg2);
        Msg msg3=new Msg("This is Tom!",Msg.TYPE_RECEIVED);
        msgList.add(msg3);
    }
}
效果演示
