深入理解JVM(1):类加载器
文章目录
- 一、类加载简介
- 1.简介
- 2.Java虚拟机与程序的生命周期
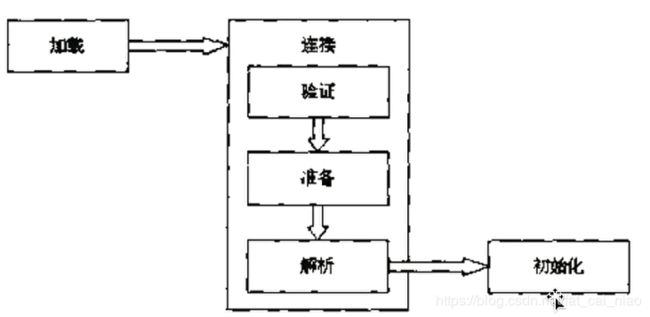
- 3.类的加载、连接与初始化(类加载的最重要的3个阶段)
- 3.1加载
- 3.2连接
- 3.3 初始化
- 4.类的使用和卸载(类加载的剩余两个阶段)
- 5 类加载阶段小结
- 6.Java对类的使用方式(主动使用和被动使用)
- 6.1主动使用(7种)
- 6.2程序实例1
- 代码1
- 代码2
- 小结
- 6.3添加虚拟机参数,查看类被加载的信息:-XX:TraceClassLoading
- 6.4JVM参数的3种形式和含义
- 6.5 程序实例2(常量编译期可确定时常量的位置)
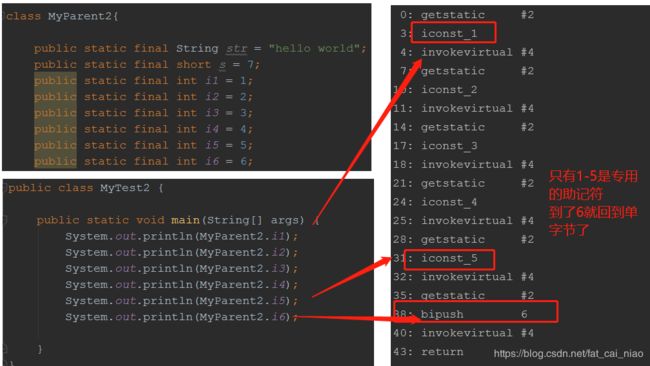
- 6.5.1 反编译MyTest2.class(以及助记符:ldc)
- 6.5.2 常用助记符探析
- bipush
- sipush
- iconst_m1/iconst_0/iconst_1/iconst_2/......../iconst_5
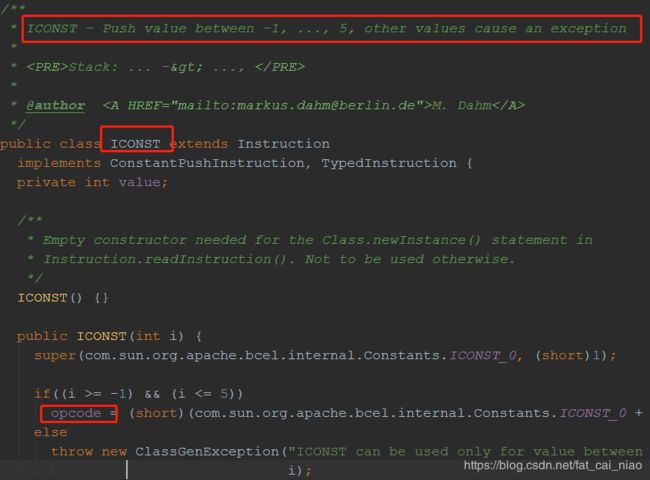
- 6.5.3助记符的本质(了解)
- 6.6 程序实例3(常量编译期不可确定时常量的位置)
- 6.7 程序实例4
- 6.8 程序实例5(数组类型的本质)
- 6.8.1 程序实例5.1(基本数据类型数组的本质)
- 6.8.2 相关助记符
- 7.接口初始化规则
- 7.1 当一个接口在初始化时,并不必须要求其父接口完成了初始化
- 7.2 接口中定义的静态变量默认是常量(final)
- 7.3 接口中的属性(变量)是默认被public static final修饰的
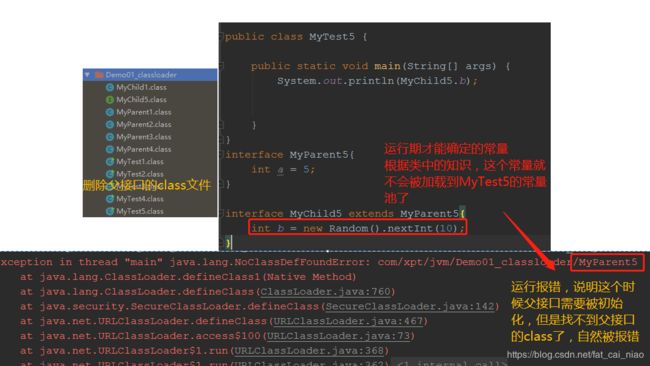
- 7.4只有在真正使用到父接口,(如访问接口中运行期才能确定的常量时),才会初始化父接口
- 8.准备阶段和初始化阶段的过程分析(静态变量赋初值问题)
- 8.1例1
- 8.2例2
- 8.2.1分析:准备阶段,为类的静态变量赋默认值。初始化阶段,为静态变量赋予正确的初值
- 二、 类的加载
- 1.完整定义
- 2.加载.class文件的方式
- 3类加载的顺序
- 3.1完整的生命周期
- 3.2更深入的每一步
- 4 类的加载的最终产品是什么?
- 5类加载器的类型
- 5.1Java虚拟机自带的加载器
- 5.2用户自定义的类加载器
- 5.3类加载器层次关系
- 6 类加载器并不需要等到某个类被“首次主动使用”时再加载它
- 7.父(双)亲委托机制简介
- 7.1 程序实例:getClassLoader方法
- 三、类的连接
- 1.类的验证
- 1.1类验证阶段的主要内容
- 2.类的准备
- 四、类的初始化
- 1初始化方式和顺序
- 2初始化步骤
- 3类的初始化时机
- 4. 接口的初始化规则(和类不同)
- 5. 初始化对于类和接口异同点深入分析
- 5.1 第一节7.1中所举例子的问题
- 5.2 当初始化一个类的时候,并不会先初始化它的父类
- 5.2.1Java中的普通代码块{}
- 5.2.2 实例1
- 5.3 当初始化一个接口时,并不会先初始化它的父接口
- 五、类的加载和初始化深入剖析(大量实例,巩固理论)
- 1.问题1:常量是否能在编译期确定对类是否被初始化的影响
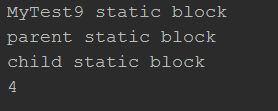
- 2. 问题2:入口类,父类,子类的初始化顺序
- 3. 问题3:声明引用不是主动使用,初始化只会在首次主动使用执行一次
- 4:问题4:通过子类去访问父类的静态变量和方法都仅仅是对父类的主动使用,不是对子类的主动使用!
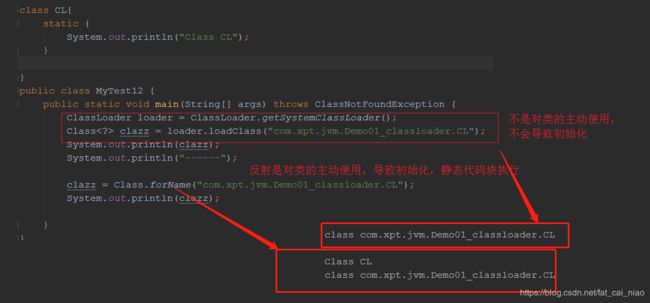
- 问题5:调用ClassLoader类的loadClass方法加载一个类不是对该类的主动使用,不会导致初始化/反射是对类的主动使用
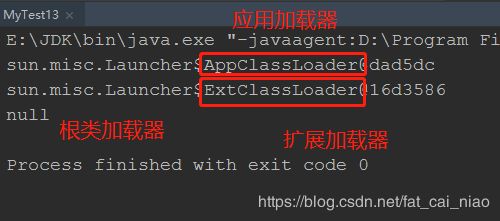
- 6.类加载器的层次结构实例
- 7. 通过字节码文件路径获取其对应的资源信息
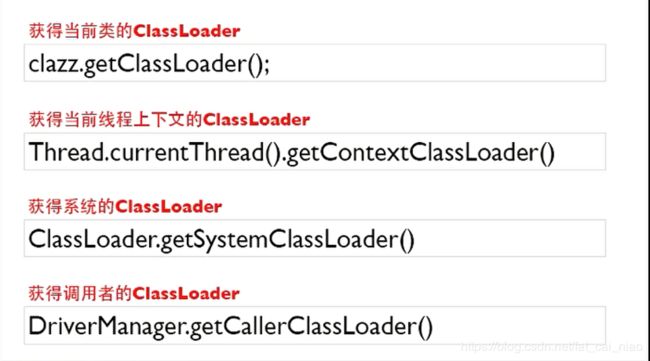
- 8. 获取ClassLoader的途径
- 六、ClassLoader源码分析
- 数组类型的加载(特殊且重要)
- 实例
- 自定义类加载器1
- findClass
- defineClass
- 文档
- 源码
- loadClass
- 文档
- 源码
- 自定义类加载器1中存在的问题!
- 自定义类加载器2
- version01
- version02
- version03
- version04
- version05(类加载器的命名空间问题)
- version06
- version07
- version08
- version09
- 小结
- 七、类的卸载
- 1.理论
- 2.实例
- 3.实例的另一种观测方法
- 八、自定义类加载器在复杂类加载时的分析
- MyCat
- MySample
- MyTest17
- version02
- version03
- version04
- version05(深刻理解双亲委托机制)
- version06(类加载器命名空间深入理解:父加载器加载的类无法访问到子加载器加载的类)
- MyCat(修改)
- version07(子加载器加载的类能够访问到父加载器所加载的类)
- MySample(修改)
- 类加载器命名空间的深入理解
- 1.下述输出是true还是false?
- 2下述的代码是否会报错?
- 3.修改代码,以及环境,再次运行
- 九、双亲委托机制、命名空间小结
- 十、不同的类(根/扩展/系统(应用))加载器从什么样的目录下加载类文件呢?
- 1.通过系统属性查看不同的加载器的默认加载目录
- 1.1 命令运行上述代码,结果不一样
- 2.为何当前项目中的类是由系统了加载器来加载的?
- 3.通过不同的类加载器所加载的路径来深刻理解双亲委托机制
- 4.扩展类加载器加载类
- 5.修改扩展类加载器的默认加载目录,能否完成类的加载呢?(扩展类加载器只能加载jar包中的class文件)
- 6.修改根类加载器的默认系统属性值sun.boot.class.path
- 7. 根类加载器,扩展类加载器,系统类加载器是由谁来加载的?
- 8.系统类加载器和扩展类加载器源码分析
- 8.1为何扩展/系统类加载的加载目录对应某个特定的系统属性?
- 9 ClassLoader.getSystemClassLoader()
- 9.1 ClassLoader.getSystemClassLoader()源码分析
- 9.2 Class.forName(String name,boolean initialize,ClassLoader loader)
- 十一、线程上下文类加载器
- 1.当前线程的加载器和线程类的加载器
- 2.当前类加载器和线程上下文类加载器
- 3.线程上下文类加载器的重要性
- 4.Java应用运行时的初始线程的上下文类加载器是系统类加载器
- 5.线程上下文类加载器的一般使用模式:获取-使用-还原
- 5.1JDBC实例
- 5.2 ServiceLoader
- 文档解读
- 5.3 案例5.1深度分析
- 5.3.1 通过JVM参数跟踪一下类加载的过程
- 5.4手动修改当前线程的上下文类加载器
- 6.通过JDBC驱动加载来理解上下文类加载器
- 6.1注册驱动
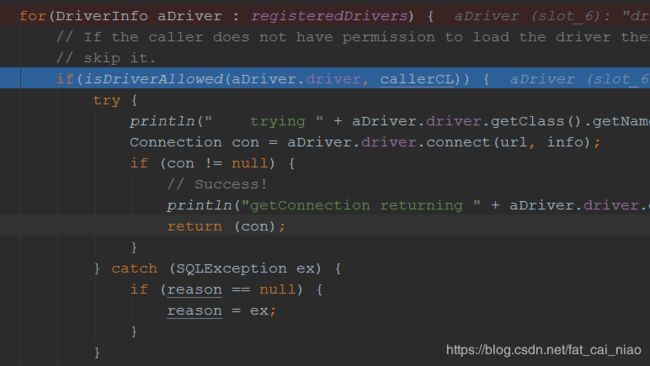
- 6.2 获取连接
- 十二、 类加载器系统回顾与延伸
一、类加载简介
1.简介
- 在Java代码中,类型的加载、连接与初始化过程都是在程序运行期间完成的。
- 提供了更大的灵活性,增加了更多的可能性。
要注意理解上面的第一句话,首先类型是什么?
类型:指的是类/接口/枚举这类的信息,这些被称为类型,这里暂时涉及到任何的对象,这些是类本身。这里要和平日里用到最多的对象概念区分开来。可以这样理解,要想创建对象,应该有类的相关信息。所有这里的类型应该理解为一个具体的Class,大多数情况下类都是提前编写好的,当然也有运行期动态生成类型的情况,典型的就是动态代理。其他的一些语言,加载和连接的过程都是在编译阶段做好的,Java中是在运行期才完成的。这就给Java的语言带来了更多的灵活性,可以在运行期对提前已经存在好的一些内容做结合。Java是一门拥有动态语言特性的静态语言,让Java拥有动态语言特性的原因就是因为这句话。类型的加载:最常见(不唯一)的一种情况是把磁盘中的字节码问题加载到内存中。连接:处理好类与类之间的关系,以及完成对字节码文件的检查,校验!注意这里字节码问题不是编译器生成好的吗?它还需要再校验吗?当然,因为字节码文件是可以人为的手动修改的,可能有一些恶意的可能。只有字节码没有问题,Java虚拟机才会去执行它。还有将一些符号引用转换为直接引用也是在这个阶段完成的。初始化:静态变量的赋值- 整个过程大概是按加载、连接、初始化这个顺序,但并不是严格的按照这个顺序的,只要满足Java规范即可。
2.Java虚拟机与程序的生命周期
首先类加载器就是用来加载类的,把类加载到虚拟机中,后续所有的操作由虚拟机来管辖
在如下的几种情况,Java虚拟机(本质上就是一个进程)将结束生命周期
- Java代码显式的执行了
System.exit()方法。(联想try/catch/finally的执行顺序)- 在一般情况下,
finally代码块中的内容是一定会执行的,但是如果在前存在System.exit()就不会执行finally中的内容了。
- 在一般情况下,
- 程序正常执行结束
- 程序执行过程遇到异常或错误而异常终止(没能Catch住)(多见)
- 由于操作系统错误导致虚拟机进程终止(相对不可控制)
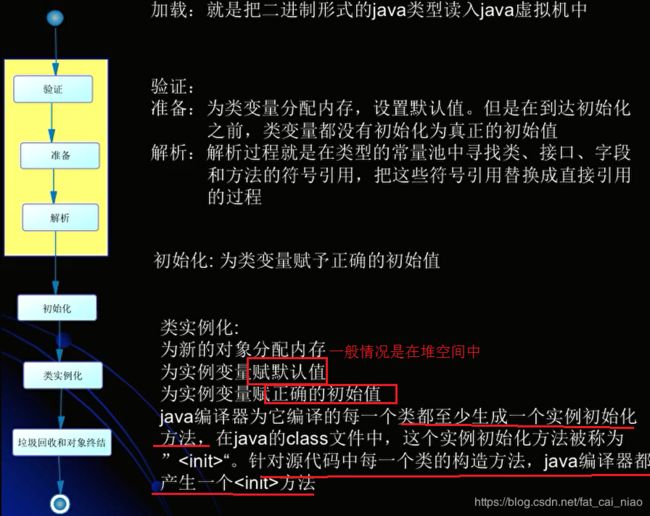
3.类的加载、连接与初始化(类加载的最重要的3个阶段)
3.1加载
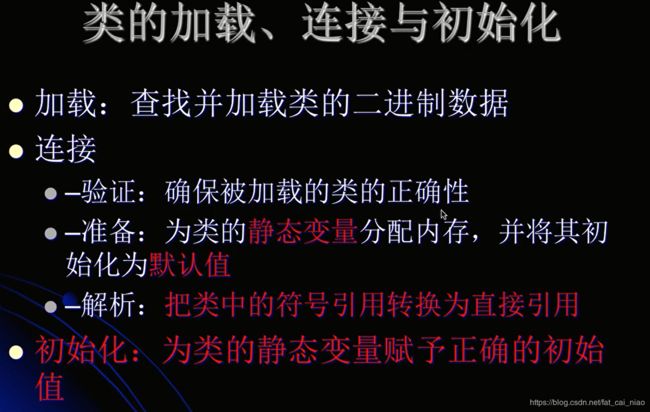
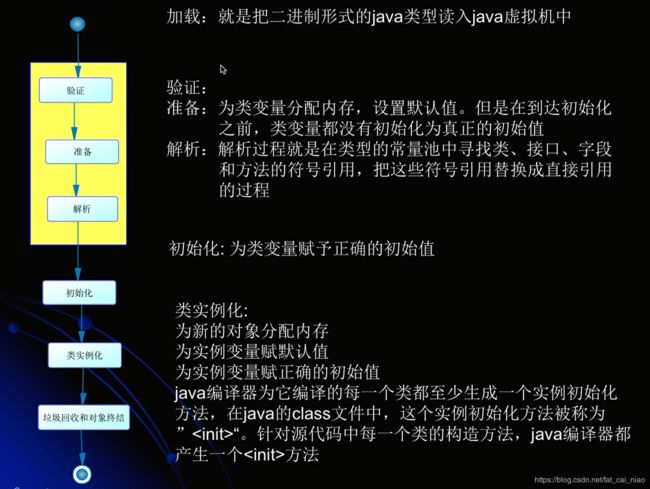
查找并加载类的二进制数据
3.2连接
分为3个阶段
-
验证:确保被加载类的正确性
-
准备:为类的静态变量分配内存,并将其初始化为默认值
-
解析:把类中的符号引用转换为直接引用
- 符号引用:Java在编译的时候并不知道一个引用指向的实际地址,所以只好先用一个符号引用来代替。可以认为是一个间接的指针
- 直接引用:直接指向目标的指针。
3.3 初始化
为类的静态变量赋予正确的初始值
- 联系上述准备阶段的默认值
4.类的使用和卸载(类加载的剩余两个阶段)
5 类加载阶段小结
6.Java对类的使用方式(主动使用和被动使用)
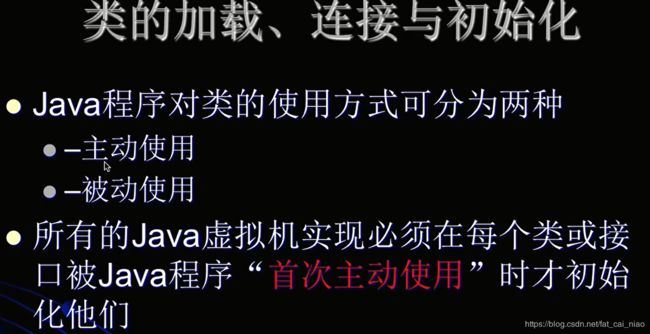
- Java对类的使用分为两种方式
- 主动使用
- 被动使用
- 所有的Java虚拟机实现必须在每个类或接口被Java程序首次主动使用时才初始化
- 主动使用:表示被动使用的时候不会初始化
- 首次:表示初始化只有一次
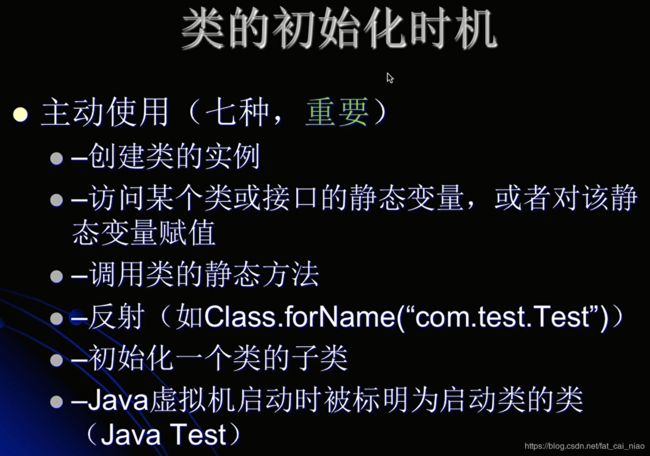
6.1主动使用(7种)
大概有7种情况下,都是采取主动使用方式,当然这个划分并不完全精准
- 创建类的实例:
new一个对象嘛 - 访问某个类或接口的静态变量,或者对该静态变量赋值:一个是取值一个赋值
- 调用类的静态方法
- 相关的字节码助记符:
getstatic,putstatic,invokestatic
- 相关的字节码助记符:
- 使用反射:
Class.forName(com.test.Test) - 初始化一个类的子类:
比如初始化一个Child类,它的父类是Parent,那么这个父类肯定也要被使用 - Java虚拟机启动时被标明为启动类的类:入口类,
main方法所在的类,Java Test JDK1.7开始提供的动态语言支持:java.lang.invoke.MethodHandle实例的解析结果REF_getStatic,REF_putStatic,REF_invokeStatic句柄对应的类没有被初始化时,则初始化
除了以上7中情况,其他的Java类的使用方式都被看做是对类的被动使用,都不会导致类的初始化。但是这并不代表不会发生加载和连接过程
6.2程序实例1
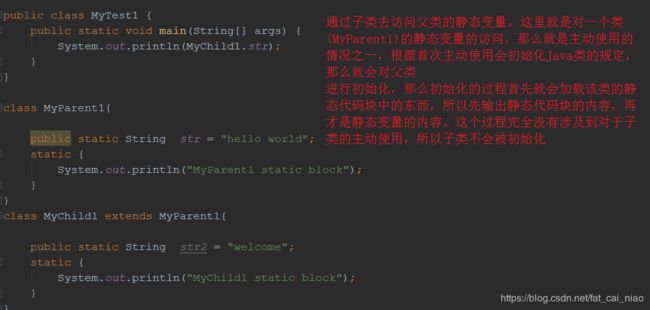
代码1
- 输出什么?
public class MyTest1 {
    public static void main(String[] args) {
        System.out.println(MyChild1.str);
    }
}

class MyParent1{

    public static String  str = "hello world";
    static {
        System.out.println("MyParent1 static block");
    }
}
class MyChild1 extends MyParent1{

    public static String  str2 = "welcome";
    static {
        System.out.println("MyChild1 static block");
    }
}
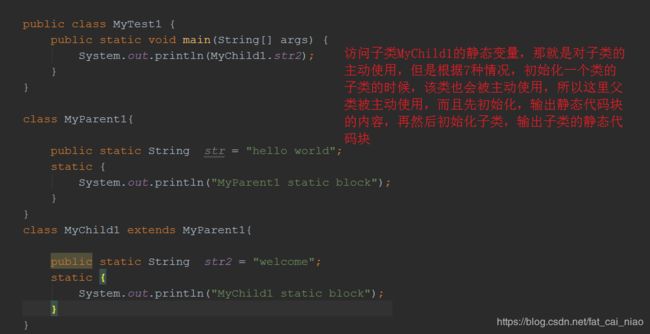
代码2
public class MyTest1 {
    public static void main(String[] args) {
        System.out.println(MyChild1.str2);
    }
}

class MyParent1{

    public static String  str = "hello world";
    static {
        System.out.println("MyParent1 static block");
    }
}
class MyChild1 extends MyParent1{

    public static String  str2 = "welcome";
    static {
        System.out.println("MyChild1 static block");
    }
}
小结
- 1.对于静态字段来说,只有直接定义了该字段的类才会被初始化
- 2.当一个类被初始化时,要求其所有的父类都先被初始化完毕了才行。(直到
Object类)
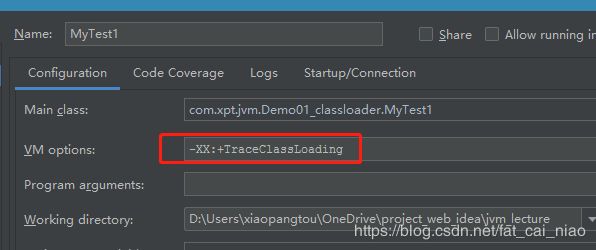
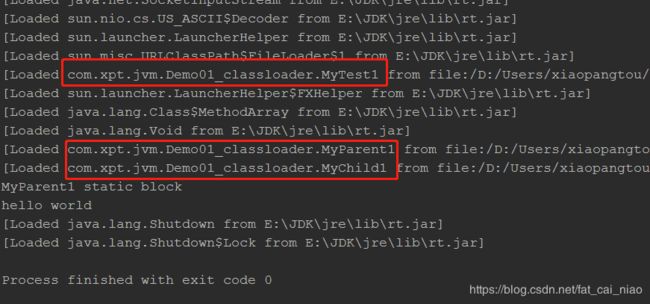
6.3添加虚拟机参数,查看类被加载的信息:-XX:TraceClassLoading
-
我们重点关注以下几个
-
程序入口类:
MyTest1,根据Java对类的主动使用的7种情况来看,程序的入口类是主动使用的情况之一所以会先使用
- 然后我们可以看到先加载了父类
MyParent1 - 然后再加载了子类
MyChild1 - 这里的先后关系也要注意
- 然后我们联系代码,这里的
MyChild1访问了父类的静态成员变量,根据上面的分析,子类不会被初始化,但是并不表明这个类不被加载(这也是需要强调的一点)
6.4JVM参数的3种形式和含义
因为讲到这里,就顺便对JVM运行时的参数进行一些简单的说明,JVM参数呢有很多很多,不需要刻意去记,在学习中一个一个的去学就可以了。
-XX:+:表示开启option选项-XX:-:表示关闭option选项- 因为有些选项是默认关闭和开启的,所以需要手动关闭和开启
- 这两类本质上是赋予了一个
boolean值
-XX::将option选项的值设置为value(设置堆空间大小常用)
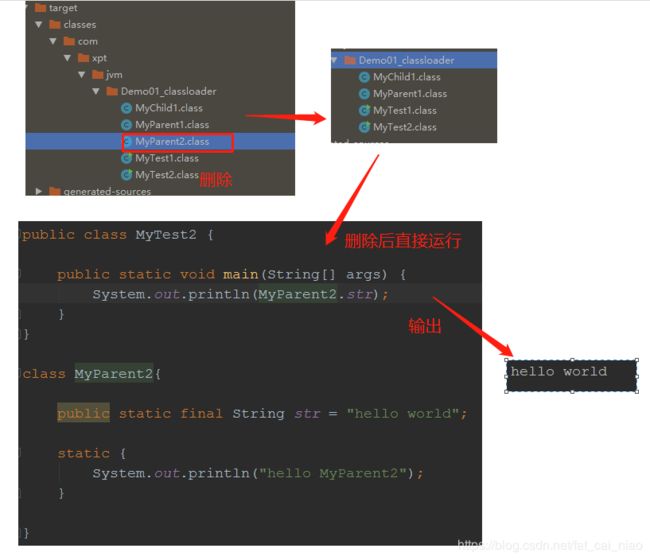
6.5 程序实例2(常量编译期可确定时常量的位置)
-
上述图片左侧的代码和输出,我们都可以很容易的理解,访问类的静态变量会导致类的初始化,那么在类初始化的时候静态代码块会被先加载,随后再输出了该静态变量的值
-
对于右侧的代码和输出可能有一点超乎想象了!加了一个
final修饰后输出的结果就完全变了,这是为什么呢? -
经过试验后,完美的证明了上述的结论
-
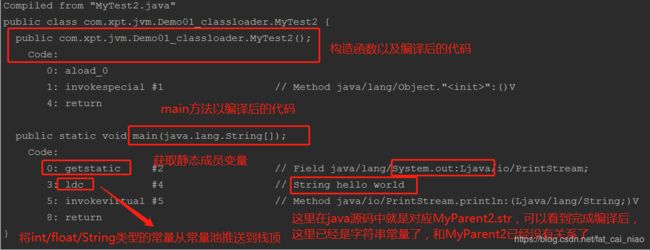
为了更深入的理解,我们尝试查看
MyTest2的字节码文件(反编译后查看),这里需要再编译一次项目,因为上面把MyParent2的字节码文件删除了
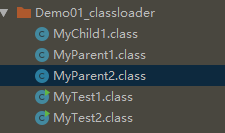
6.5.1 反编译MyTest2.class(以及助记符:ldc)
字节码文件中有大量的助记符,遇到一个学一个
javap -c class文件所在路径
6.5.2 常用助记符探析
bipush
将单字节(-128~127)的常量值推送到栈顶
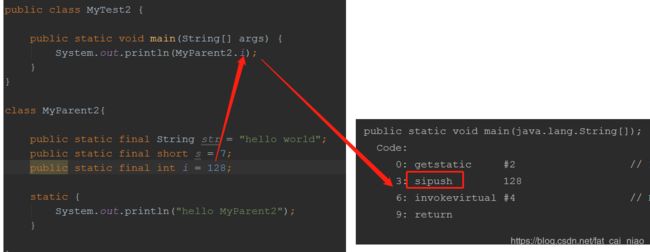
sipush
将整型
int(-32678 ~ 32676)的常量值推送到栈顶
iconst_m1/iconst_0/iconst_1/iconst_2/…/iconst_5
只有这7个,从-1到5;因为1-5使用得比较多,所以就专门有5个专用的助记符
6.5.3助记符的本质(了解)
助记符的本质也是有底层类的定义才能实现的,可以在IDEA中搜索相关类。了解即可,平时开发不会用到
6.6 程序实例3(常量编译期不可确定时常量的位置)
- 问下述代码的输出
public class MyTest3 {
    public static void main(String[] args) {
        System.out.println(MyParent3.str);
    }

}

class MyParent3{
    //随机生成一串数字,然后转换为字符串
    //关键在于这行数字在编译阶段,显然无法知道是什么
    public static final String str = UUID.randomUUID().toString();

    static {
        System.out.println("MyParent3 static code");
    }

}
-
本质上的问题和例2的区别在于
MyParent3这个类会不会被初始化 -
发现静态代码块被加载了,说明该类完成了初始化了,但是这是为什么呢?常量不应该是在调用类的常量池中吗?
-
原因在于:
-
当一个常量的值并非编译期可以确定的,那么其值就不会被放入调用类
MyTest3的常量池中,这时在程序运行时,会导致主动使用这个常量所在的类,显然导致这个类被初始化** -
这里,我们同样可以尝试删除
MyParent3的字节码文件,然后再运行MyTest3,可以发现运行结果报错,就是因为这个常量是属于这个类,类的字节码文件没了,自然找不到

6.7 程序实例4
- 下述代码输出什么
public class MyTest4 {
    public static void main(String[] args) {
        MyParent4 myParent4 = new MyParent4();
        System.out.println("------------");
        MyParent4 myParent5 = new MyParent4();
    }
}

class MyParent4{
    static {
        System.out.println("MyParent4 static code");
    }
}
- 结果

- 首先使用
new关键字来创建对象显然是对类的主动使用,那么MyParent5被主动使用,然后被初始化,静态代码块被加载 - 其次,这个例子非常完美的阐述了类的主动使用的前提:所有的Java虚拟机实现必须在每个类或接口被Java程序首次主动使用时才初始化。
- 显然只有第一次创建该类的对象才触发了初始化操作,所以静态代码块中的内容只被输出了一次
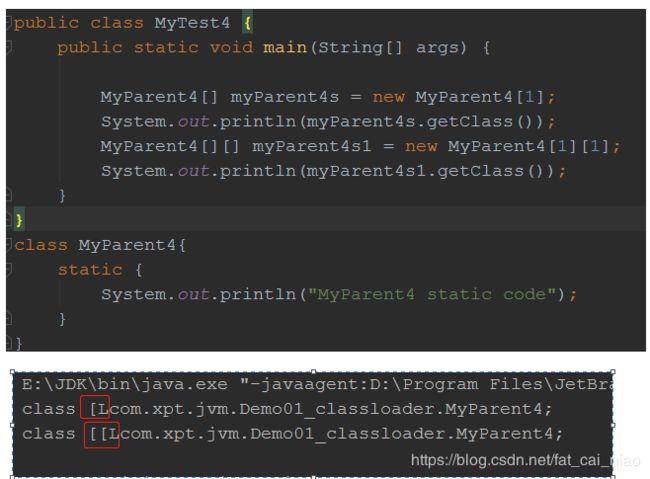
6.8 程序实例5(数组类型的本质)
- 下述代码的输出
public class MyTest4 {
    public static void main(String[] args) {

        MyParent4[] myParent4s = new MyParent4[1];
    }
}

class MyParent4{
    static {
        System.out.println("MyParent4 static code");
    }
}
-
发现居然什么都没有输出,也就是在数组创建的过程中,并没有触发对类
MyParent4的主动使用,所以没有导致初始化。其实这一点也可以在前面7种Java主动使用类的情况中看到,前面没有提到任何和数组相关的情况。 -
但是既然都
new了一个数组,那么肯定生成了一个对象呀,那这个对象又是什么呢,我们不妨用类.getClass()方法来查看
- 可以看到一维数组和二维数组的类型是
[L类的全限定名/[[L类的全限定名 - 有几个左括号就表示是几维数组
- 我们接着继续看一下数组类型的父类是什么

- 可以看到不管是针对一维数组还是二维数组其父类都是
Object - 关于数组,我们有如下几个结论
- 对于数组对象来说,其类型是由JVM在运行期动态生成的
- 数组对象的创建不会导致对应的类的主动使用
- 表示为
[L类的全限定名。([对应数组维度) - 对于数组来说,JavaDoc经常将构成数组的元素为
Component(组件类型),实际上就是将数组降低一个维度后的类型
6.8.1 程序实例5.1(基本数据类型数组的本质)
上面讲述了引用类型的数组创建的对应类型,那么原始的基本数据对应的数组是属于什么类呢?
6.8.2 相关助记符
反编译查看数组创建相关的助记符
anewarray:表示创建一个引用类型的(类,接口,数组)的数组,并将其引用值压入栈顶newarray:表示创建一个指定的原始类型(int/char/boolean/fliat等)的数组,并将其引用值压入栈顶。(再次提醒数组中存放的都是引用!)
7.接口初始化规则
7.1 当一个接口在初始化时,并不必须要求其父接口完成了初始化
- 下述代码输出是?
public class MyTest5 {

    public static void main(String[] args) {
        System.out.println(MyChild5.b);
    }
}

interface MyParent5{

    public static int a = 4;

}

interface MyChild5 extends MyParent5{

    public static int b = 5;
}
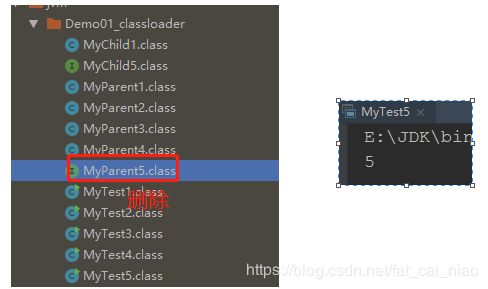
-
在类中,一个类被初始化前,要求其所有的父类都要完成初始化才行,显然这一点在接口中是不成立的
-
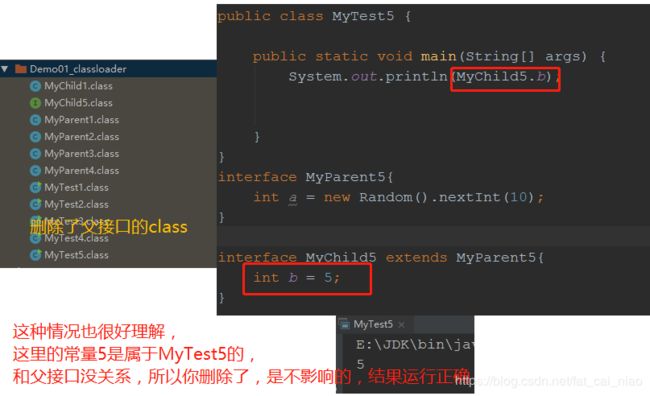
删除后,输出仍然是5,说明确实和父接口没有关系
7.2 接口中定义的静态变量默认是常量(final)
-
在类里,我们知道在编译期可以确定的常量在编译阶段是放在
调用该常量的方法所属的类中的,那么在接口中是否也成立这一点呢? -
上述结果已经足以说明这一点了,在删除
MyChild5的基础上,再次运行,依然输出了5,这一点完全印证了前面的分析
7.3 接口中的属性(变量)是默认被public static final修饰的
简单的说,就是接口中的变量一定是静态常量,且访问权限是public的
- 下面的例子,很好的说明了这一点

- 为什么呢?为什么接口中需要这样规定呢?可以从以下几个方面来分析
public:使接口的实现类或者子接口可以使用这个常量,不然定义常量干嘛呢static:接口不涉及任何具体实例的细节,因此接口是不可能被实例化的,所以只可能有静态的变量,因为只有静态变量才属于这个接口(类)本身,随着类的加载而存在。如果是非静态变量的话,那这个变量就只有属于对象,只有当实例化对象的时候才能访问这个变量,但是接口是不可能被实例化的finla:如果没有final修饰的话,子类以及子接口就可以随意改变这个接口,这样就没有意义了,因为接口定义了这个常量就意味着一套规范,所有的实现类和子接口,都只能遵守这种规范,而不能改变它- 综上,接口中的属性默认被
public static final修饰
7.4只有在真正使用到父接口,(如访问接口中运行期才能确定的常量时),才会初始化父接口
8.准备阶段和初始化阶段的过程分析(静态变量赋初值问题)
8.1例1
- 下述程序输出什么?
public class MyTest6 {
    public static void main(String[] args) {
        Singleton singleton = Singleton.getInstance();
        System.out.println("count1: " + Singleton.count1);
        System.out.println("count2: " + Singleton.count2);
    }
}

class Singleton{

    public static int count1;
    public static int count2 = 0;

    private static Singleton singleton = new Singleton();

    private Singleton(){
        count1++;
        count2++;
    }
    public static Singleton getInstance(){
        return singleton;
    }
}
8.2例2
- 问下述程序输出什么
public class MyTest6 {
    public static void main(String[] args) {
        Singleton singleton = Singleton.getInstance();
        System.out.println("count1: " + Singleton.count1);
        System.out.println("count2: " + Singleton.count2);
    }
}

class Singleton{

    public static int count1;

    private static Singleton singleton = new Singleton();

    private Singleton(){
        count1++;
        count2++;
        System.out.println(count1);
        System.out.println(count2);
    }
    public static int count2 = 0;

    public static Singleton getInstance(){
        return singleton;
    }
}
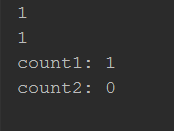
- 输出:
8.2.1分析:准备阶段,为类的静态变量赋默认值。初始化阶段,为静态变量赋予正确的初值
分析上述程序的执行步骤
- 通过这个例子,相信对于准备阶段和初始化阶段认识更深了
- 那么下述代码输出是:
public class MyTest6 {
    public static void main(String[] args) {
        Singleton singleton = Singleton.getInstance();
        System.out.println("count1: " + Singleton.count1);
        System.out.println("count2: " + Singleton.count2);
    }
}

class Singleton{

    public static int count1 = 1;

    private static Singleton singleton = new Singleton();

    private Singleton(){
        count1++;
        count2++;
        System.out.println(count1);
        System.out.println(count2);
    }
    public static int count2 = 0;

    public static Singleton getInstance(){
        return singleton;
    }
}
二、 类的加载
1.完整定义
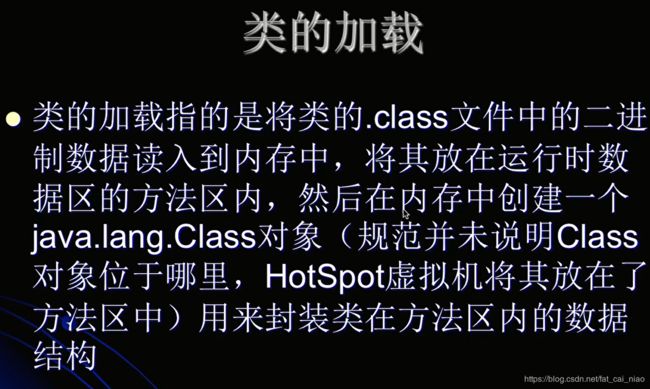
- 类的加载是指将类的.class文件中的二进制数据读入内存,将其放在运行时数据区的方法区(JDK1.8改造成了元空间),然后在内存中创建一个
java.lang.Class对象,(联系反射的知识点,另外要注意的是Java规范中并没说明Class对象应该位于哪里,HotSpot虚拟机将其放在了方法区中)用来封装类在方法区的数据结构
2.加载.class文件的方式
- 从本地系统直接加载(大多数人平时使用最多的方式)
- 通过网络下载.class文件
- 从zip,jar等归档文件中加载.class文件
- 大量的第三方的api都打包为jar包的方式提供使用
- 从专有数据库中提取.class文件
- 将java源文件动态的编译为.class文件
- 动态代理中,类的生成是在运行期
- JavaWeb开发中的
jsp文件
3类加载的顺序
本质上还是前文的顺序
3.1完整的生命周期
3.2更深入的每一步
4 类的加载的最终产品是什么?
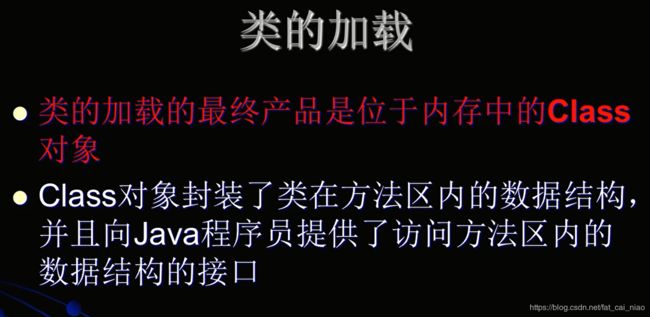
- 类的加载的最终产品是位于内存中的Class对象
- Class对象封装了类在方法区内的数据结构(成员变量,方法),并且向Java程序员提供了访问方法区内的数据结构接口
5类加载器的类型
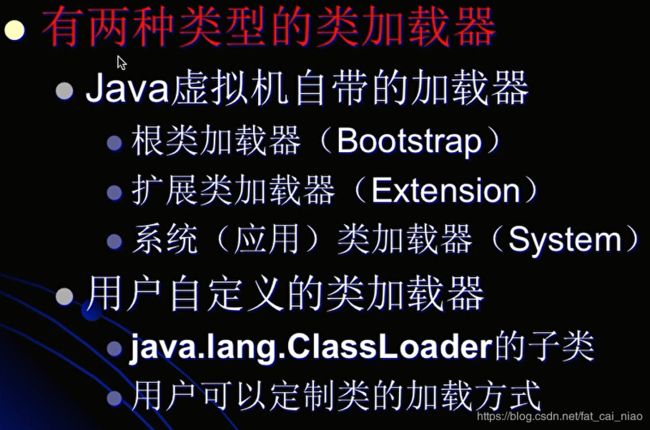
5.1Java虚拟机自带的加载器
- 根类加载器
BootStrap- 该加载器没有父加载器,它负责加载虚拟机的核心类库,如
java.lang.*。java.lang.Object就是由根类加载器加载的,根类加载器从系统属性sun.boot.class.path所指定的目录中加载类库。根类加载器的实现依赖于底层操作系统,属于虚拟机的实现的一部分。它并没有继承java.lang.ClassLoader类
- 该加载器没有父加载器,它负责加载虚拟机的核心类库,如
- 扩展类加载器
Extension- 它的父加载器为根类加载器。它从
java.ext.dirs系统属性所指定的目录中加载类库,或者从JDK的安装目录的jre\lib\ext子目录(扩展目录)下加载类库,如果把用户创建的JAR文件放在这个目录下,也会自动由扩展类加载器加载。扩展类加载器是纯Java类,是java.lang.ClassLoader类的子类
- 它的父加载器为根类加载器。它从
- 系统(应用)类加载器
System- 也称应用类记载器。它的父加载器为扩展类加载器。它从环境变量
classpath或者系统属性java.class.path所指定的目录中加载类,它是用户自定义的类加载器的默认父加载器。系统类加载器是纯Java类,是java.lang.ClassLoader类的子类
- 也称应用类记载器。它的父加载器为扩展类加载器。它从环境变量
5.2用户自定义的类加载器
java.lang.ClassLoader的子类- 用户可以自定义类的加载方式
- 所有用户自定义的类加载器都应该继承
ClassLoader类(抽象类)
- 所有用户自定义的类加载器都应该继承
5.3类加载器层次关系
表面看是继承关系,实质上是包含关系,下层的包含上层
6 类加载器并不需要等到某个类被“首次主动使用”时再加载它
这句话的本质就是前面一直反复提到的一个类不被主动使用代表不会被初始化,但是这不代表这个类不会被加载。详情查看第一节的6.3
-
JVM规范允许类加载器在预料某个类将要被使用时就预先加载了它,如果在预先加载的过程遇到.class文件缺失或存在错误,类加载器必须在程序首次主动使用该类时才报告错误(LinkageError错误)
-
如果这个类一直没有被程序主动使用,那么类加载器就不会报告错误
7.父(双)亲委托机制简介
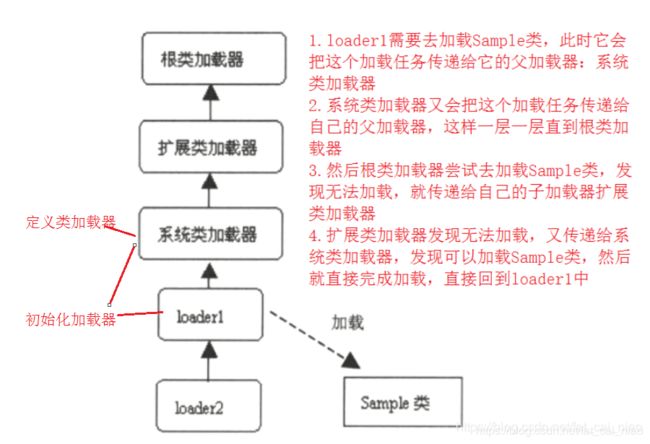
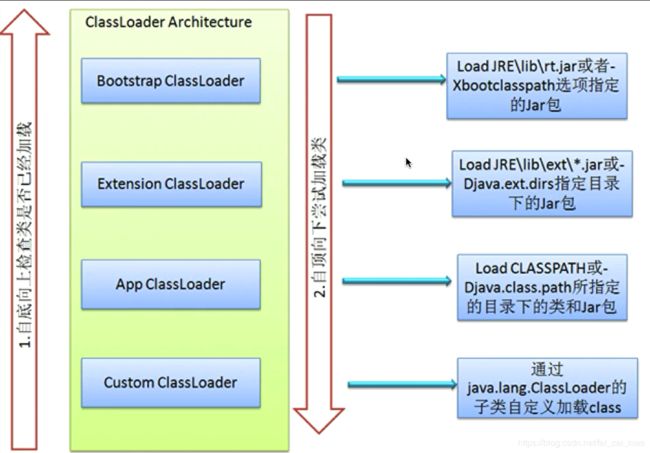
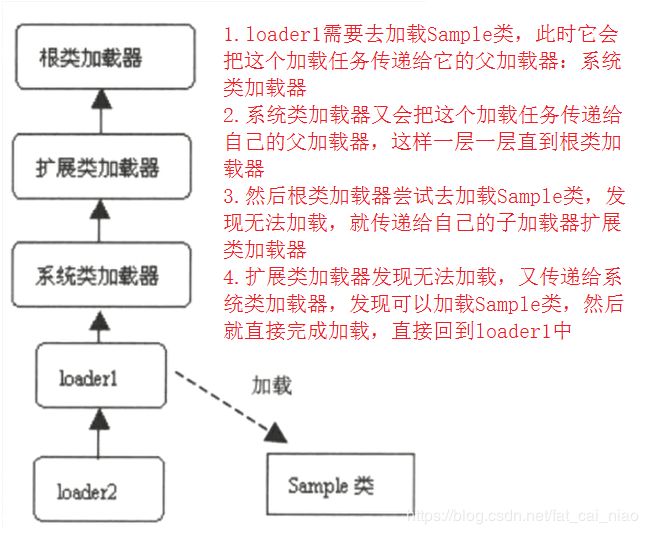
类加载器用来把类加载到java虚拟机中,从JDK1.2版本开始,类的加载采用父亲委托机制,这种机制能更好的保证Java平台的安全。在此委托机制中,除了Java虚拟机自带的根类加载器以外,其余的类加载器都有且只有一个父加载器。当Java程序请求加载器loader1加载某个类的时候,loader1首先委托自己的父加载器去加载该类,若父加载器可以完成加载,则由父加载器完成加载任务,否则才有loader1来加载。
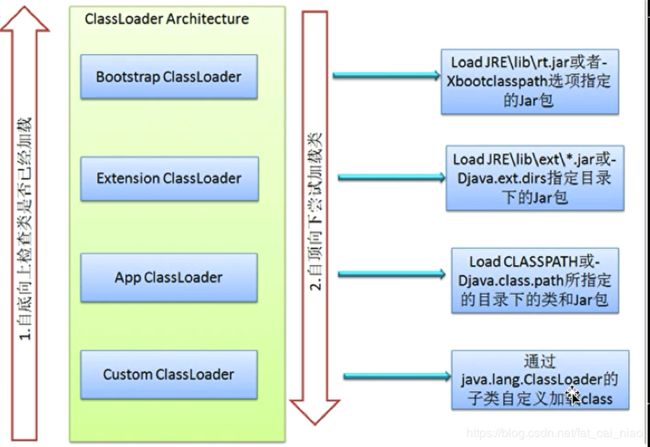
-
Bootstrap ClassLoader:启动类加载器$JAVA_HOME$中jre/lib/rt.jar里的所有的class,由C++实现,不是ClassLoader子类,这个包下面的类是平时开发中用到的绝大多数的类,是JDK的核心类实现
-
Extension ClassLoader:扩展类加载器- 负责
java平台中扩展功能的一些jar包,包括$JAVA_HOME$中的jre/lib/*.jar或-Djava.ext.dirs指定目录下的jar包
- 负责
-
App ClassLoader:系统类加载器- 负责加载
classpath中指定的jar包以及目录中的class
- 负责加载
-
如果有一个类加载器能够成功加载
Test类,那么这个类加载器被称为定义类加载器(真正去加载那个类的加载器),所有能成功返回Class对象引用的类加载器(包括定义类加载器)都被称为初始类加载器(了解即可)
7.1 程序实例:getClassLoader方法
- 代码
public class MyTest7 {

    public static void main(String[] args) throws ClassNotFoundException {

        Class<?> clazz =  Class.forName("java.lang.String");
        //返回加载类 clazz的 类加载器
        System.out.println(clazz.getClassLoader());


        Class<?> clazz1 = Class.forName("com.xpt.jvm.Demo01_classloader.C");
        System.out.println(clazz1.getClassLoader());

    }

}


class C{

}
    /**
     * Returns the class loader for the class.  Some implementations may use
     * null to represent the bootstrap class loader. This method will return
     * null in such implementations if this class was loaded by the bootstrap
     * class loader.
     *
     *  If a security manager is present, and the caller's class loader is
     * not null and the caller's class loader is not the same as or an ancestor of
     * the class loader for the class whose class loader is requested, then
     * this method calls the security manager's {@code checkPermission}
     * method with a {@code RuntimePermission("getClassLoader")}
     * permission to ensure it's ok to access the class loader for the class.
     *
     * If this object
     * represents a primitive type or void, null is returned.
     *
     * @return  the class loader that loaded the class or interface
     *          represented by this object.
     * @throws SecurityException
     *    if a security manager exists and its
     *    {@code checkPermission} method denies
     *    access to the class loader for the class.
     * @see java.lang.ClassLoader
     * @see SecurityManager#checkPermission
     * @see java.lang.RuntimePermission
     */
    @CallerSensitive
    public ClassLoader getClassLoader() {
        ClassLoader cl = getClassLoader0();
        if (cl == null)
            return null;
        SecurityManager sm = System.getSecurityManager();
        if (sm != null) {
            ClassLoader.checkClassLoaderPermission(cl, Reflection.getCallerClass());
        }
        return cl;
    }
三、类的连接
1.类的验证
类被加载后,就进入连接阶段,连接就是将已经读入到内存的类的二进制数据合并到虚拟机的运行时环境中去
1.1类验证阶段的主要内容
- 类文件的结构检查
- 语义检查
- 字节码验证
- 二进制兼容性的验证
2.类的准备
在准备阶段,Java虚拟机为类的静态变量分配内存,并设置默认的初始值,例如,对于如下的Sample类,在准备阶段将int类型的静态变量a分配4个字节的内存空间,并且赋予默认值0;为long类型的静态变量b分配8个字节的内存空间,且赋值默认值0
public class Sample{
    private static int a = 1;
    public static long b;
    static {
        b = 2;
    }

}
四、类的初始化
1初始化方式和顺序
在初始化阶段,Java虚拟机执行类的初始化语句,为类的静态变量赋予初始值。在程序中,有两种方式对静态变量进行初始化
- 1.在类的声明处进行初始化
- 2.在静态代码块中进行初始化
例如,在如下的代码中,a和b都被显式的初始化了,而静态变量c没有被显式的初始化,保持默认值0
public class Sample{
    private static int a = 1;
    public static long b;
    private static int c;
    static {
        b = 2;
    }

}
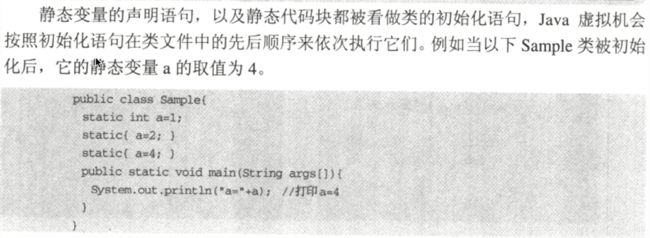
静态变量的声明语句,静态代码块都被看做是类的初始化语句,Java虚拟机会按照初始化语句在类文件中的先后顺序依次执行他们,例如当如下的Sample类初始化后,a= 4
public class Sample{
    private static int a = 1;

    static {
        a = 2;
    }
    static {
        a = 4;
    }

}
2初始化步骤
- 假如这个类还没有被加载和连接,那就先加载和连接
- 加入类存在直接父类,并且这个父类还没有被初始化,那就先初始化直接父类
- 假如类中存在初始化语句,那就依次执行这些初始化语句
3类的初始化时机
和类被主动使用的7中情况完全一致
- 创建类的实例:
new一个对象嘛 - 访问某个类或接口的静态变量,或者对该静态变量赋值:一个是取值一个赋值
- 调用类的静态方法
- 相关的字节码助记符:
getstatic,putstatic,invokestatic
- 相关的字节码助记符:
- 使用反射:
Class.forName(com.test.Test) - 初始化一个类的子类:
比如初始化一个Child类,它的父类是Parent,那么这个父类肯定也要被使用 - Java虚拟机启动时被标明为启动类的类:入口类,
main方法所在的类,Java Test JDK1.7开始提供的动态语言支持:java.lang.invoke.MethodHandle实例的解析结果REF_getStatic,REF_putStatic,REF_invokeStatic句柄对应的类没有被初始化时,则初始化
除了以上7中情况,其他的Java类的使用方式都被看做是对类的被动使用,都不会导致类的初始化。但是这并不代表不会发生加载和连接过程
4. 接口的初始化规则(和类不同)
- 当Java虚拟机初始化一个类时,要求其所有的父类都已经被初始化,但是这条规则不适合接口
- 当初始化一个类时,并不会先初始化它所实现的接口
- 当初始化一个接口时,并不会先初始化它的父接口
因此,一个父接口不会因为它的子接口或者实现类初始化而初始化。只有当程序首次使用特定接口的静态变量时才会导致该接口的初始化
- 只有当程序访问的静态变量和静态方法确实在当前类或当前接口中定义时,才可以被认为是对类或接口的主动使用
- 调用
ClassLoader类的loadClass方法加载一个类,并不是对类的主动使用,不会导致类的初始化(后续讲解)
5. 初始化对于类和接口异同点深入分析
前面关于这个问题,也举过一些例子,但是前面的例子并不能很好的反应出正确的结论,这里我们先具体分析前面例子的问题出在哪里
5.1 第一节7.1中所举例子的问题
-
在7.1节中,我们举的例子是这样的,接口
MyChild5继承了父接口MyParent5,然后通过main方法去访问接口MyChild5中的变量b,继续我们删除了MyParent5的class文件,然后再次运行,仍然可以正常运行,这里我们就认为这里的运行和父接口的class文件是没有关系的。 -
但是这里有个问题在于!我们现在知道的一个基本事实是**接口中的变量都默认被
public static final修饰,也就是说接口中的变量都是常量 -
同时,例子中的变量
b是一个编译期可以确定的常量!也就说这个例子能得出的结论仍然是前面的结论,也就是说这里的输出和子接口MyChild5父接口MyParent5都没有关系,因为常量在编译期就已经被记载到MyTest5类中了 -
为了说明这一点,我们可以从两方面来验证
-
输出很好的印证了我们的猜想
-
验证方式2:从类加载角度,此时保留二者的class文件,看类加载过程是否记载了这两个接口
-
只加载了入口类,并没有记载到两个接口
-
所以一系列例子能得到的结论是:当接口中定义的常量是编译期可以确定的,在访问这个常量的时候,不会加载这个接口
5.2 当初始化一个类的时候,并不会先初始化它的父类
这一节通过一个实例来说明这一点
5.2.1Java中的普通代码块{}
- 静态代码块很熟悉了,普通代码块其实就是一段普通的代码,它和静态代码块的区别在于,静态代码块中的内容属于类,不管创建多少对象,就只有这一份,普通代码块中的内容属于对象,有多少对象,就有多少分
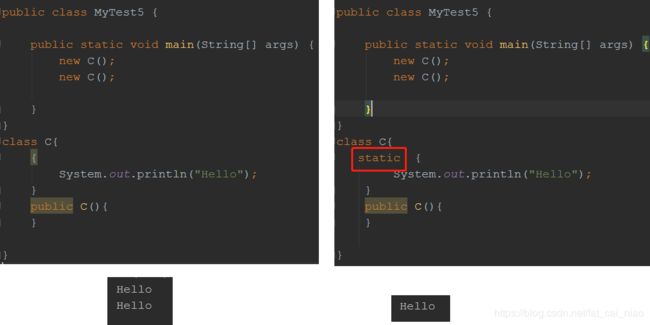
- 有了上面的知识点,下面可以设计这一节的实验
5.2.2 实例1
public class MyTest5 {

    public static void main(String[] args) {
        System.out.println(MyChild5.b);
    }
}

interface MyParent5{
    public static Thread thread = new Thread(){
        {
            System.out.println("MyParent5 invoked");
        }
    };

}

class MyChild5 implements MyParent5{
    public static  int b = 5;
}
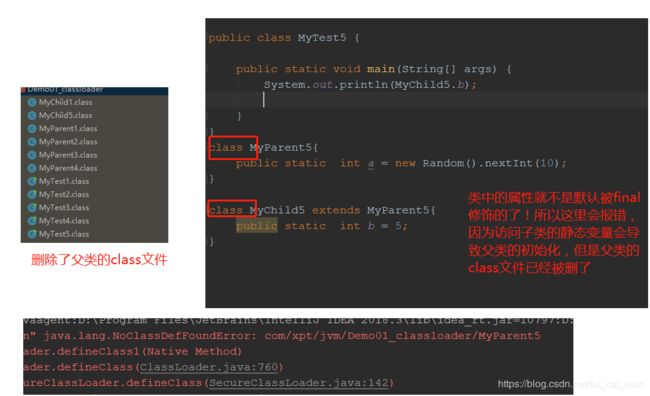
- 首先调用一个类的静态变量,这是对类的主动使用,那么会导致类的初始化
- 此时核心问题在于
这个类的接口会不会被初始化? - 具体到这个例子就是
MyParent5 invoked是否会被输出?
- 结果值输出了
5,成功了证明了结论 - 同时不会被初始化不代表不被加载,可以看到接口还是被加载了的
- 我们基于上面的例子,查看一下如果是类与类之间的关系,最终的表现会是什么
5.3 当初始化一个接口时,并不会先初始化它的父接口
- 下述例子输出?
public class MyTest5 {

    public static void main(String[] args) {
        System.out.println(MyParent5_1.thread);
    }
}

interface MyGrandPa5_1{
    public static Thread thread = new Thread(){
        {
            System.out.println("MyGrandPa5_1 invoked");
        }
    };
}

interface MyParent5_1 extends MyGrandPa5_1{
    public static Thread thread = new Thread(){
        {
            System.out.println("MyParent5_1 invoked");
        }};
}
五、类的加载和初始化深入剖析(大量实例,巩固理论)
前面几节学习了很多理论,这里以实例的方式再次总结一下,以加深理解
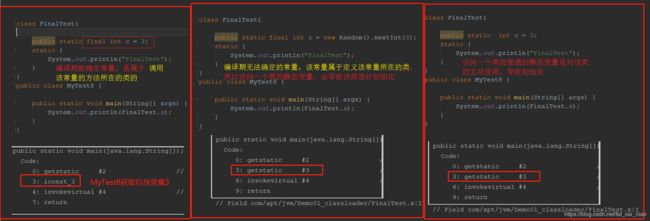
1.问题1:常量是否能在编译期确定对类是否被初始化的影响
-
下述三段程序输出什么?以及为什么?
-
程序1
class FinalTest{

    public static final int x = 3;
    static {
        System.out.println("FinalTest static block");
    }

}
public class MyTest8 {

    public static void main(String[] args) {
        System.out.println(FinalTest.x);
    }

}
- 程序2
class FinalTest{

    public static final int x = new Random().nextInt(3);
    static {
        System.out.println("FinalTest static block");
    }

}
public class MyTest8 {

    public static void main(String[] args) {
        System.out.println(FinalTest.x);
    }

}
- 程序3:
class FinalTest{

    public static int x = 3;
    static {
        System.out.println("FinalTest static block");
    }

}
public class MyTest8 {

    public static void main(String[] args) {
        System.out.println(FinalTest.x);
    }

}
2. 问题2:入口类,父类,子类的初始化顺序
- 问下述代码的输出(注意顺序)
class Parent{
    static int a = 3;
    static {
        System.out.println("parent static block");
    }
}

class Child extends Parent{
    static int b = 4;
    static {
        System.out.println("child static block");
    }
}
public class MyTest9 {
    static {
        System.out.println("MyTest9 static block");
    }
    public static void main(String[] args) {
        System.out.println(Child.b);
    }
}
-
分析
-
其实很容易理解,类的初始化顺序,一定是先初始化
入口类(暂时不考虑入口类的父类) -
然后入口类中涉及到其他类(
Child)的使用(访问类的静态变量),那么会先去初始化该类的所有父类Parent -
最后才初始化该类本身
Child -
最后完成对类的静态变量的访问
-
上述过程,从类加载的顺序角度更容易理解,通过JVM参数
-XX:+TraceClassLoading可以看到类的加载顺序
3. 问题3:声明引用不是主动使用,初始化只会在首次主动使用执行一次
- 下述程序输出什么
class Parent2{
    static int a = 3;
    static {
        System.out.println("Parent2 static block");
    }
}

class Child2 extends Parent2{
    static int b = 4;
    static {
        System.out.println("Child2 static block");
    }
}
public class MyTest10 {
    static {
        System.out.println("MyTest10 static block");
    }

    public static void main(String[] args) {
        Parent2 parent2;
        System.out.println("-------");
        parent2 = new Parent2();
        System.out.println("-------");
        System.out.println(parent2.a);
        System.out.println("-----");
        System.out.println(Child2.b);
    }

}
4:问题4:通过子类去访问父类的静态变量和方法都仅仅是对父类的主动使用,不是对子类的主动使用!
- 下述输出?
class Parent3{

    static int a = 3;
    static {
        System.out.println("Parent3 static block");
    }

    static void dosomething(){
        System.out.println("do something");
    }

}
class Child3 extends Parent3{
    static {
        System.out.println("Child3 static block");
    }
}


public class MyTest11 {
    public static void main(String[] args) {
        System.out.println(Child3.a);
        System.out.println("------");
        Child3.dosomething();
    }
}
- 分析

问题5:调用ClassLoader类的loadClass方法加载一个类不是对该类的主动使用,不会导致初始化/反射是对类的主动使用
- 输出?
class CL{
    static {
        System.out.println("Class CL");
    }

}
public class MyTest12 {
    public static void main(String[] args) throws ClassNotFoundException {
        ClassLoader loader = ClassLoader.getSystemClassLoader();
        Class<?> clazz = loader.loadClass("com.xpt.jvm.Demo01_classloader.CL");
        System.out.println(clazz);
        System.out.println("------");

        clazz = Class.forName("com.xpt.jvm.Demo01_classloader.CL");
        System.out.println(clazz);

    }
}
6.类加载器的层次结构实例
public class MyTest13 {
    public static void main(String[] args) {
        //0. 获取系统类(应用)加载器
        ClassLoader classLoader = ClassLoader.getSystemClassLoader();

        System.out.println(classLoader);
        //1. 逐层获取该加载器的父加载器
        while (classLoader != null){
            classLoader = classLoader.getParent();
            System.out.println(classLoader);
        }
    }
}
7. 通过字节码文件路径获取其对应的资源信息
public class MyTest14 {

    public static void main(String[] args) throws IOException {
        ClassLoader classLoader = Thread.currentThread().getContextClassLoader();

        String resourceName = "com/xpt/jvm/Demo01_classloader/MyTest13.class";

        Enumeration<URL> urls = classLoader.getResources(resourceName);

        while (urls.hasMoreElements()){
            URL url = urls.nextElement();
            System.out.println(url);
        }

    }

}
8. 获取ClassLoader的途径
目前所有的讲解都和对象无关!都只是获取类的阶段!
- 下面就探究不同的类对应的类加载器是什么
public class MyTest14 {

    public static void main(String[] args) throws IOException {

        Class<?> clazz = MyTest14.class;
        System.out.println(clazz.getClassLoader());

        clazz = String.class;
        System.out.println(clazz.getClassLoader());
}
六、ClassLoader源码分析
-
A class loader is an object that is responsible for loading classes- 一个ClassLoader对象是负责加载classes的(字节码文件)
-
Given the binary name of a class -
class loader should attempt to locate or generate data that constitutes a definition for the class.- 类加载器应该尝试去定位或者生成数据,这个数据构成了对类的定义
- 定位:该类的数据已经提前定义好了,被放在某个位置,去寻找到即可。最典型的就是我们自定义的类
- 生成:类的数据没有被定义好,需要在这个过程中生成。最典型的就是动态代理,动态代理中的类就是在运行期才生成的。
-
A typical strategy is to transform the name into a file name and then read a "class file" of that name from a file system.- 一个典型的策略就是把名字转换为文件名,然后从文件系统中读取该字节码文件
- 注意这里是典型的策略,而不是唯一的策略,还可以通过网络地址来获取相应文件。
-
Every Class object contains a reference to the ClassLoader that defined it.(重点)- 每一个Class对象都包含一个指向定义它的ClassLoader的引用
- 这也是为什么,可以通过Class对象,来获取到它对应的ClassLoader
- 进入到
Class类的源码中,可以获取到相关的变量和方法
 private final ClassLoader classLoader;
  public ClassLoader getClassLoader() {
        ClassLoader cl = getClassLoader0();
        if (cl == null)
            return null;
        SecurityManager sm = System.getSecurityManager();
        if (sm != null) {
            ClassLoader.checkClassLoaderPermission(cl, Reflection.getCallerClass());
        }
        return cl;
    }
数组类型的加载(特殊且重要)
-
Class objects for array classes are not created by class loaders, but are created automatically as required by the Java runtime.(重点)- 对于数组类的对象,并不是由ClassLoader来创建的,而是自动的根据需要被Java在运行期创建的
- 也就是对于数组实例来说,它的类型是由JVM在动态运行期创建出来的
- 只有数组比较特殊
-
The class loader for an array class, as returned by Class.getClassLoader() is the same as the class loader for its element type; if the element type is a primitive type, then the array class has no class loader.- 数组对象的类加载器是和这个数组中元素的类加载器是一样的
- 很简单嘛,就是在加载这个元素的时候使用的什么类加载器,那么加载这个数组的时候就用什么
- 如果数组元素是原生的数据类型(8个),那它就没有类加载器
实例
public class MyTest15 {
    public static void main(String[] args) {
        //0. String的类加载器是根类加载器
        String[] strings = new String[2];
        System.out.println(strings.getClass());
        //0.1 所以String[]的类加载器也是根类加载器
        System.out.println(strings.getClass().getClassLoader());
        System.out.println("------");
        //1. 同理,自定义类的类加载器是系统加载器,那么数组也是系统加载器
        MyTest15[] myTest15s = new MyTest15[2];
        System.out.println(myTest15s.getClass());
        System.out.println(myTest15s.getClass().getClassLoader());
        System.out.println("-------");
        //2. 原生数据类型的数组,没有类加载器
        int[] ints = new int[2];
        System.out.println(ints.getClass());
        System.out.println(ints.getClass().getClassLoader());
    }
}
-
Applications implement subclasses of ClassLoader in order to extend the manner in which the Java virtual machine dynamically loads classes- 实现ClassLoader的子类是为了扩展JAVA虚拟机动态的类加载的方式
- 提供了一些灵活性嘛,因为JAVA虚拟机默认的是用双亲委托机制来加载
-
Class loaders may typically be used by security managers to indicate security domains- 类加载器可以典型的被安全管理者使用来标记安全域
- 这主要是为了保证类加载过程的安全
-
The ClassLoader class uses a delegation model to search for classes and resources. Each instance of ClassLoader has an associated parent class loader. When requested to find a class or resource, a ClassLoader instance will delegate the search for the class or resource to its parent class loader before attempting to find the class or resource itself. The virtual machine's built-in class loader, called the "bootstrap class loader", does not itself have a parent but may serve as the parent of a ClassLoader instance.- ClassLoader使用一种委托机制去搜寻类和资源。每一个
ClassLoader的实例都有一个与之关联的父加载器 - 当要求去寻找一个类或资源的时候,一个
ClassLoader实例将会委托它的父类加载器去搜寻类和资源在找到类和资源本身之前 - Java虚拟机内建的类加载器被称为启动类加载器,它没有父类加载器但可以作为其他类加载器实例的父加载器
- ClassLoader使用一种委托机制去搜寻类和资源。每一个
-
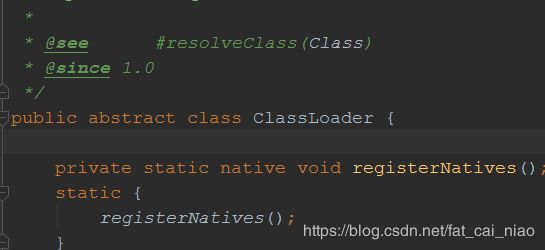
Class loaders that support concurrent loading of classes are known as parallel capable class loaders and are required to register themselves at their class initialization time by invoking the ClassLoader.registerAsParallelCapable method. Note that the ClassLoader class is registered as parallel capable by default. However, its subclasses still need to register themselves if they are parallel capable. In environments in which the delegation model is not strictly hierarchical, class loaders need to be parallel capable, otherwise class loading can lead to deadlocks because the loader lock is held for the duration of the class loading process (see loadClass methods).- 支持并发操作的类加载器被称为有并发能力的类加载器,而且需要在类初始化阶段进行注册通过方法
ClassLoader.registerAsParallelCapable - 注意,
ClassLoader本身是默认具有并发能力,但是它的子类如果想获取并发的能力,仍然需要调用上述方法注册 - 在委托模型并不是严格的层次关系的环境下(自定义的加载器),类加载器需要实现并行化,为了防止在类加载期间造成死锁
- 支持并发操作的类加载器被称为有并发能力的类加载器,而且需要在类初始化阶段进行注册通过方法
-
Normally, the Java virtual machine loads classes from the local file system in a platform-dependent manner. For example, on UNIX systems, the virtual machine loads classes from the directory defined by the CLASSPATH environment variable.- 通常情况下,Java虚拟机以平台相关的方式从本地的文件系统中加载类
- 例如,在
UNIX系统下,虚拟机加载了是通过定义在环境变量中的CLASSPATH进行加载的
-
However, some classes may not originate from a file; they may originate from other sources, such as the network, or they could be constructed by an application. The method defineClass converts an array of bytes into an instance of class Class. Instances of this newly defined class can be created using Class.newInstance.(重要)- 然而,一些类可能并不是来自一个文件,也可能来自网络资源
- 或者被一个应用所创建(动态代理)
defineClass方法将一个字节数组转换为一个Class类的实例- 新定义的类的实例可以用
Class.newInstance来定义(联系反射) - 注意上面是两个步骤,先创建
Class类的实例,然后用Class的方法来创建这个类的对象实例
-
The methods and constructors of objects created by a class loader may reference other classes. To determine the class(es) referred to, the Java virtual machine invokes the loadClass method of the class loader that originally created the class.- 由一个类加载器创建的方法和构造方法可能引用其他类
- 为了确定这个类的引用指向,Java虚拟机会调用最开始和创建这个类的类加器的
loadClass方法
-
For example, an application could create a network class loader to download class files from a server. Sample code might look like:- 一个应用可以创建一个网络内加载器去从某个服务器下载
	//主机名 端口号
   ClassLoader loader = new NetworkClassLoader(host, port);
   Object main = loader.loadClass("Main", true).newInstance();
The network class loader subclass must define the methods findClass and loadClassData to load a class from the network. Once it has downloaded the bytes that make up the class, it should use the method defineClass to create a class instance. A sample implementation is:- 网络类加载器的子类必须定义两个方法
findClass和loadClassData
- 网络类加载器的子类必须定义两个方法
   class NetworkClassLoader extends ClassLoader {
         String host;
         int port;

         public Class findClass(String name) {
       		//首先把类名转换为一个字节数组
             byte[] b = loadClassData(name);
               //字节数组转换为了一个Class实例
             return defineClass(name, b, 0, b.length);
         }

         private byte[] loadClassData(String name) {
             // load the class data from the connection
              . . .
         }
     }
自定义类加载器1
自定义一个类加载器需要的最简单的组件
package com.xpt.jvm.Demo01_classloader;

import java.io.*;
public class MyTest16 extends ClassLoader {

    private String classLoaderName;
    //常量 不改变
    private final String fileExtension = ".class";

    //构造方法1
    public MyTest16(String classLoaderName){
        //将系统类加载器 当作当前类加载器的父加载器
        super();
        this.classLoaderName = classLoaderName;
    }
    //构造方法2
    public MyTest16(ClassLoader parent, String classLoaderName){
        //显式的指定该类的父加载器(因为完全可以自定义多个类加载器啊)
        //比如自定义类加载器A,B。A的父加载器完全可以指定为B
        super(parent);
        this.classLoaderName = classLoaderName;
    }
    @Override
    protected Class<?> findClass(String className){

        byte[] data = this.loadClassData(className);
        return this.defineClass(className, data, 0, data.length);
    }
    private byte[] loadClassData(String name){
        InputStream is = null;
        byte[] data = null;
        ByteArrayOutputStream baos = null;

        try {
            //转换为 win下的路径格式
            this.classLoaderName = this.classLoaderName.replace(".", "/");

            is = new FileInputStream(new File(name + this.fileExtension));
            baos = new ByteArrayOutputStream();

            int ch = 0;
            while (-1 != (ch = is.read())){
                baos.write(ch);
            }
            data = baos.toByteArray();

        }catch (Exception e){
            e.printStackTrace();
        }finally {
            try {
                is.close();
                baos.close();
            }catch (Exception e){
                e.printStackTrace();
            }
        }
        return  data;
    }
    public static void test(ClassLoader classLoader) throws Exception {
        Class<?> clazz = classLoader.loadClass("com.xpt.jvm.Demo01_classloader.MyTest1");
        Object object = clazz.newInstance();
        System.out.println(object);
    }
    public static void main(String[] args) throws Exception {
        MyTest16 loader1 = new MyTest16("loader1");
        test(loader1);
    }
}
findClass
上面的代码不难发现,关键的地方就仅仅在于重写了父类的
findClass方法
- 首先看
ClassLoader中的findClass方法的作用是什么
  /**
     * Finds the class with the specified binary name.
     * This method should be overridden by class loader implementations that
     * follow the delegation model for loading classes, and will be invoked by
     * the {@link #loadClass loadClass} method after checking the
     * parent class loader for the requested class.  The default implementation
     * throws a ClassNotFoundException.
     *
     * @param  name
     *         The binary name of the class
     *
     * @return  The resulting Class object
     *
     * @throws  ClassNotFoundException
     *          If the class could not be found
     *
     * @since  1.2
     */
    protected Class<?> findClass(String name) throws ClassNotFoundException {
        throw new ClassNotFoundException(name);
    }
- 可以看到文档中的描述是找到带有特定名称(binary name)对应的类。
- 这个方法应该被
class loader的实现类重写,且这个实现类在加载类的时候遵循委派模型 - 另外关注源码,这个方法除了抛出异常外,没有任何具体的实现。所以自定义的加载类必须实现这个方法
- 注意方法的返回值,这个返回值明显就是类文件对应的
Class对象 - 然后我们看一下
findClass方法是如何被重写的
   @Override
    protected Class<?> findClass(String className){

        byte[] data = this.loadClassData(className);
        return this.defineClass(className, data, 0, data.length);
    }
- 首先有一个
loadClassData方法,这个方法就是把类文件转换为了一个字节数组,这个方法是我们自己实现的,就是根据文件名找到该二进制文件,然后转换为字节数组。其实就是一个IO操作。得到的字节码就是该的相关信息 - 然后又调用了父类的
defineClass方法 - 下面我们详细研究一下这个方法
defineClass
依然阅读文档+跟踪源码
文档
protected final Class<?> defineClass(String name,
                                     byte[] b,
                                     int off,
                                     int len)
                              throws ClassFormatError
Converts an array of bytes into an instance of class Class. Before the Class can be used it must be resolved.
//将给定的字节数粗转换为Class类的实例

This method assigns a default ProtectionDomain to the newly defined class.
The ProtectionDomain is effectively granted the same set of permissions returned when
Policy.getPolicy().getPermissions(new CodeSource(null, null)) is invoked. The default domain
is created on the first invocation of defineClass, and re-used on subsequent invocations.

To assign a specific ProtectionDomain to the class,
use the defineClass method that takes a ProtectionDomain as one of its arguments.
//上面两段都在讲这个过程的安全性问题,暂时不是关注的重点


Parameters:
name - The expected binary name of the class, or null if not known
//期待的类的二进制名字,如果不知道可以传递为null
b - The bytes that make up the class data. The bytes in positions off through off+len-1
should have the format of a valid class file as defined by The Java™ Virtual Machine Specification.
//构成类数据的字节数组,字节的位置 在 off~len+1之间必须是遵守JAVA虚拟机规范有效的class文件
//这里需要解读一下,这里可能传入的字节文件不全是有效的文件,所以会存在off和len这两个参数
//要保证这个两个参数是直接的字节文件是有效的

off - The start offset in b of the class data
//字节码文件的起始位置
len - The length of the class data
//长度
Returns:
The Class object that was created from the specified class data.
//来自给定的类数据的Class对象
Throws:
ClassFormatError - If the data did not contain a valid class
//如果数据没有包含有效的class
IndexOutOfBoundsException - If either off or len is negative,
or if off+len is greater than b.length.
//如果给定的off或者len是负数,或者说二者之和大于了字节数组的长度
SecurityException - If an attempt is made to add this class to a package that contains
classes that were signed by a different set of certificates than this class (which is
unsigned), or if name begins with "java.".
//包名是`java.`开头的,所以不允许定义这样的包名
源码
  protected final Class<?> defineClass(String name, byte[] b, int off, int len)
        throws ClassFormatError
    {
        return defineClass(name, b, off, len, null);
    }

    protected final Class<?> defineClass(String name, byte[] b, int off, int len)
        throws ClassFormatError
    {	//第5个参数是security相关的,也就是文档中提到的安全域
        return defineClass(name, b, off, len, null);
    }

   protected final Class<?> defineClass(String name, byte[] b, int off, int len,
                                         ProtectionDomain protectionDomain)
        throws ClassFormatError
    {
        protectionDomain = preDefineClass(name, protectionDomain);
        String source = defineClassSourceLocation(protectionDomain);
        //注意前后的安全域
        Class<?> c = defineClass1(name, b, off, len, protectionDomain, source);
        postDefineClass(c, protectionDomain);
        return c;
    }
    //最后发现是一个本地方法,不是Java实现的了
 private native Class<?> defineClass1(String name, byte[] b, int off, int len,
                                         ProtectionDomain pd, String source);
loadClass
在我们的main方法中,还有一个loadClass方法,也是调用父类的,下面将重点研究这个方法
 public static void test(ClassLoader classLoader) throws Exception {
        Class<?> clazz = classLoader.loadClass("com.xpt.jvm.Demo01_classloader.MyTest1");
        Object object = clazz.newInstance();
        System.out.println(object);
    }

    public static void main(String[] args) throws Exception {
        MyTest16 loader1 = new MyTest16("loader1");
        test(loader1);
    }
文档
protected Class<?> loadClass(String name,
                             boolean resolve)
                      throws ClassNotFoundException
Loads the class with the specified binary name. The default implementation of this method
searches for classes in the following order:
//加载给定二进制名的类,该方法的默认实现会按照以下顺序来搜索这个类
Invoke findLoadedClass(String) to check if the class has already been loaded.
//首先,调用这个方法检查该类是否已经被加载

Invoke the loadClass method on the parent class loader. If the parent is null the class
loader built-in to the virtual machine is used, instead.
//调用父类加载器的loadClass方法,如果父类加载器为空,那么就会调用虚拟机内建的class loader(根类加载器)

Invoke the findClass(String) method to find the class.
//调用findClass方法去寻找这个类(就是前面要求必须重写的那个类)

If the class was found using the above steps, and the resolve flag is true, this method will then invoke the resolveClass(Class) method on the resulting Class object.
//如果使用上述的步骤找到了该类,这个方法然后将会调用resolveClass方法在结果的Class对象上

Subclasses of ClassLoader are encouraged to override findClass(String), rather than this method.
//鼓励ClassLoader类的子类去重写findClass方法,而不是使用ClassLoader的

Unless overridden, this method synchronizes on the result of getClassLoadingLock method during the entire class loading process.

Parameters:
name - The binary name of the class
resolve - If true then resolve the class
Returns:
The resulting Class object
Throws:
ClassNotFoundException - If the class could not be found
源码
   public Class<?> loadClass(String name) throws ClassNotFoundException {
        return loadClass(name, false);
    }
    protected Class<?> loadClass(String name, boolean resolve)
        throws ClassNotFoundException
    {
        synchronized (getClassLoadingLock(name)) {
            // First, check if the class has already been loaded
            Class<?> c = findLoadedClass(name);
            if (c == null) {
                long t0 = System.nanoTime();
                try {
                    if (parent != null) {
                        c = parent.loadClass(name, false);
                    } else {
                        c = findBootstrapClassOrNull(name);
                    }
                } catch (ClassNotFoundException e) {
                    // ClassNotFoundException thrown if class not found
                    // from the non-null parent class loader
                }

                if (c == null) {
                    // If still not found, then invoke findClass in order
                    // to find the class.
                    long t1 = System.nanoTime();
                    //注意这个方法!!就是我们重写的那个!
                    c = findClass(name);

                    // this is the defining class loader; record the stats
                    sun.misc.PerfCounter.getParentDelegationTime().addTime(t1 - t0);
                    sun.misc.PerfCounter.getFindClassTime().addElapsedTimeFrom(t1);
                    sun.misc.PerfCounter.getFindClasses().increment();
                }
            }
            if (resolve) {
                resolveClass(c);
            }
            return c;
        }
    }
自定义类加载器1中存在的问题!
注意观察MyTest16中的test方法和main方法,那么问题来了,谁加载了,MyTest1?
    private static void test(ClassLoader classLoader) throws Exception {
        Class<?> clazz = classLoader.loadClass("com.xpt.jvm.Demo01_classloader.MyTest1");
        Object object = clazz.newInstance();

    }

    public static void main(String[] args) throws Exception {
        MyTest16 loader1 = new MyTest16("loader1");
        test(loader1);
    }
- 首先尝试对
findClass方法进行改造
   @Override
    protected Class<?> findClass(String className){
        System.out.println("findClass invoke: "  + className);
        System.out.println("class loader name: " + this.classLoaderName);

        byte[] data = this.loadClassData(className);
        return this.defineClass(className, data, 0, data.length);
    }
MyTest16 loader1 = new MyTest16("loader1");
  //构造方法1
    public MyTest16(String classLoaderName){
        //将系统类加载器 当作当前类加载器的父加载器
        super();
        this.classLoaderName = classLoaderName;
    }
- 发现这里直接
super传给父加载器了 - 所以,我们在
test方法中,打印出来这个对象到底是由谁加载的!
  private static void test(ClassLoader classLoader) throws Exception {
        Class<?> clazz = classLoader.loadClass("com.xpt.jvm.Demo01_classloader.MyTest1");
        Object object = clazz.newInstance();
        System.out.println(object);

        System.out.println(object.getClass().getClassLoader());
    }
- 是由系统(应用)类加载器加载了
MyTest1 - 所以根据前面类加载器的知识
 - 这里的系统类加载器就是定义类加载器
 - 这里的系统类加载器和应用类加载器都是初始类加载器
- 下面我们对自定义类加载器进行一些改造
自定义类加载器2
version01
public class MyTest1601 extends ClassLoader {

    private String classLoaderName;
    //指定从哪个路径下加载
    private String path;

    public String getPath() {
        return path;
    }

    public void setPath(String path) {
        this.path = path;
    }

    //常量 不改变
    private final String fileExtension = ".class";

    //构造方法1
    public MyTest1601(String classLoaderName){
        //将系统类加载器 当作当前类加载器的父加载器
        super();
        this.classLoaderName = classLoaderName;
    }
    //构造方法2
    public MyTest1601(ClassLoader parent, String classLoaderName){
        //显式的指定该类的父加载器(因为完全可以自定义多个类加载器啊)
        //比如自定义类加载器A,B。A的父加载器完全可以指定为B
        super(parent);
        this.classLoaderName = classLoaderName;
    }

    @Override
    protected Class<?> findClass(String className){
        System.out.println("findClass invoke: "  + className);
        System.out.println("class loader name: " + this.classLoaderName);

        byte[] data = this.loadClassData(className);
        return this.defineClass(className, data, 0, data.length);
    }

    private byte[] loadClassData(String name){
        InputStream is = null;
        byte[] data = null;
        ByteArrayOutputStream baos = null;
        try {
            //转换为 win下的路径格式
            this.classLoaderName = this.classLoaderName.replace(".", "/");

            is = new FileInputStream(new File( this.path + name + this.fileExtension));
            baos = new ByteArrayOutputStream();

            int ch = 0;
            while (-1 != (ch = is.read())){
                baos.write(ch);
            }
            data = baos.toByteArray();

        }catch (Exception e){
            e.printStackTrace();
        }finally {
            try {
                is.close();
                baos.close();
            }catch (Exception e){
                e.printStackTrace();
            }
        }
        return  data;
    }


    public static void main(String[] args) throws Exception {
        //0. 创建了一个自定义的类加载器,其父加载器是系统类加载器
        MyTest1601 loader1 = new MyTest1601("loader1");
        //1. 要加载的目录的绝对路径
        loader1.setPath("/target/classes");
        //2. 加载这个目录下的一个具体的字节码文件
        Class<?> clazz = loader1.loadClass("com.xpt.jvm.Demo01_classloader.MyTest1");
        System.out.println("class: " + clazz);
        System.out.println("class: " + clazz.hashCode());
        Object object = clazz.newInstance();
        System.out.println(object);

    }

}
- 输出
- 因为这里的加载仍然是从当前项目下的
classpath进行加载的
version02
我们尝试把MyTest1的字节码文件放在其他地方(只要不在当前项目的目录下),然后再项目中删除该字节码文件,然后再修改程序加载桌面上的字节码文件。要注意IO操作的变化
public class MyTest1602 extends ClassLoader {

    private String classLoaderName;
    //指定从哪个路径下加载
    private String path;

    public String getPath() {
        return path;
    }

    public void setPath(String path) {
        this.path = path;
    }

    //常量 不改变
    private final String fileExtension = ".class";

    //构造方法1
    public MyTest1602(String classLoaderName){
        //将系统类加载器 当作当前类加载器的父加载器
        super();
        this.classLoaderName = classLoaderName;
    }
    //构造方法2
    public MyTest1602(ClassLoader parent, String classLoaderName){
        //显式的指定该类的父加载器(因为完全可以自定义多个类加载器啊)
        //比如自定义类加载器A,B。A的父加载器完全可以指定为B
        super(parent);
        this.classLoaderName = classLoaderName;
    }

    @Override
    protected Class<?> findClass(String className){
        System.out.println("findClass invoke: "  + className);
        System.out.println("class loader name: " + this.classLoaderName);

        byte[] data = this.loadClassData(className);
        return this.defineClass(className, data, 0, data.length);
    }

    private byte[] loadClassData(String name){
        InputStream is = null;
        byte[] data = null;
        ByteArrayOutputStream baos = null;
        try {
            //转换为 win下的路径格式

            this.classLoaderName = this.classLoaderName.replace(".", "/");
            is = new FileInputStream(new File(this.path + name.replace(".", "\\") + this.fileExtension));
            baos = new ByteArrayOutputStream();

            int ch = 0;
            while (-1 != (ch = is.read())){
                baos.write(ch);
            }
            data = baos.toByteArray();

        }catch (Exception e){
            e.printStackTrace();
        }finally {
            try {
                is.close();
                baos.close();
            }catch (Exception e){
                e.printStackTrace();
            }
        }
        return  data;
    }


    public static void main(String[] args) throws Exception {
        //0. 创建了一个自定义的类加载器,其父加载器是系统类加载器
        MyTest1602 loader1 = new MyTest1602("loader1");
        //1. 要加载的目录的绝对路径
        loader1.setPath("D:\\");
        //2. 加载这个目录下的一个具体的字节码文件
        Class<?> clazz = loader1.loadClass("com.xpt.jvm.Demo01_classloader.MyTest1");
        System.out.println("class: " + clazz);
        System.out.println("class: " + clazz.hashCode());
        Object object = clazz.newInstance();
        System.out.println(object);

    }

}
- 输出
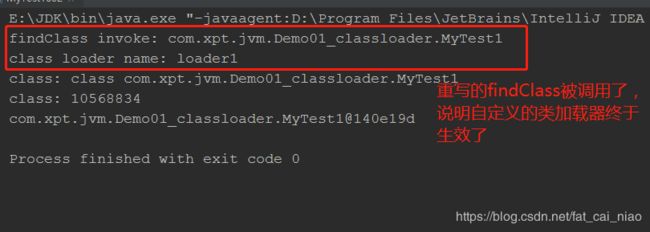
- 分析
- 现在了类加载路径不在当前项目的目录下了
- 根据双亲委托机制,此时自定义加载器有一个类加载任务,它会把这个任务给它的父加载器,一层一层传到根加载器
- 上面都加载失败
- 所以最后回到自定义的类加载器本身,所以只能它自己去完成加载
version03
在version02的基础上,重新编译整个项目,再次输出。重新编译的目的显然是让MyTest01.class重新生成
- 现在的输出结果就很好理解了,因为现在在委托的过程中,系统类加载器可以完成加载任务
version04
在version03的基础上,定义多个类加载器
    public static void main(String[] args) throws Exception {
        //0. 创建了一个自定义的类加载器,其父加载器是系统类加载器
        MyTest1603 loader1 = new MyTest1603("loader1");
        //1. 要加载的目录的绝对路径
        loader1.setPath("D:\\");
        //2. 加载这个目录下的一个具体的字节码文件
        Class<?> clazz = loader1.loadClass("com.xpt.jvm.Demo01_classloader.MyTest1");
        System.out.println("class: " + clazz);
        System.out.println("class: " + clazz.hashCode());
        Object object = clazz.newInstance();
        System.out.println(object);
        System.out.println("---------");

        //2. 加载这个目录下的一个具体的字节码文件
        MyTest1603 loader2 = new MyTest1603("loader2");
        loader2.setPath("D:\\");
        Class<?> clazz2 = loader2.loadClass("com.xpt.jvm.Demo01_classloader.MyTest1");
        System.out.println("class: " + clazz2);
        System.out.println("class: " + clazz2.hashCode());
        Object object2 = clazz.newInstance();
        System.out.println(object2);
    }
    }
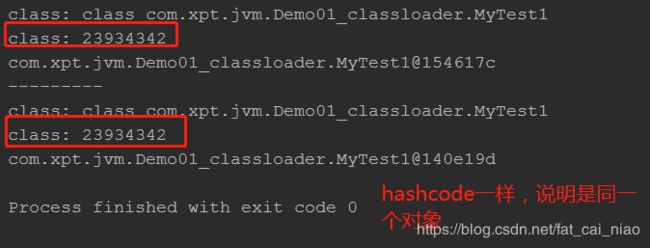
version05(类加载器的命名空间问题)
在04的基础上,删除掉当前目录下的
MyTest1.class,再次运行
-
首先是调用的是自定义类加载器
-
其次,发生了两次加载!这是为何呢?同一个类不是只能被加载一次吗?
-
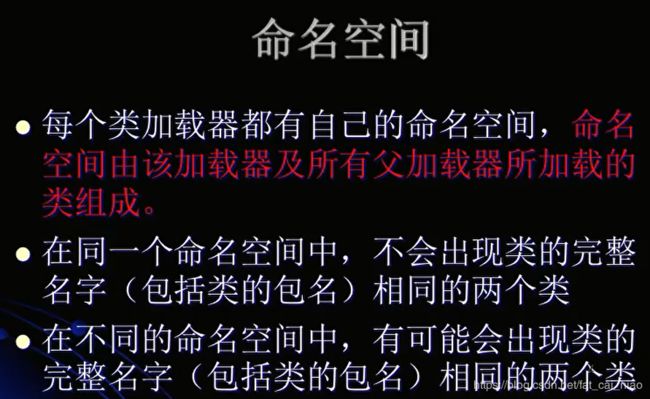
在上述的例子中,
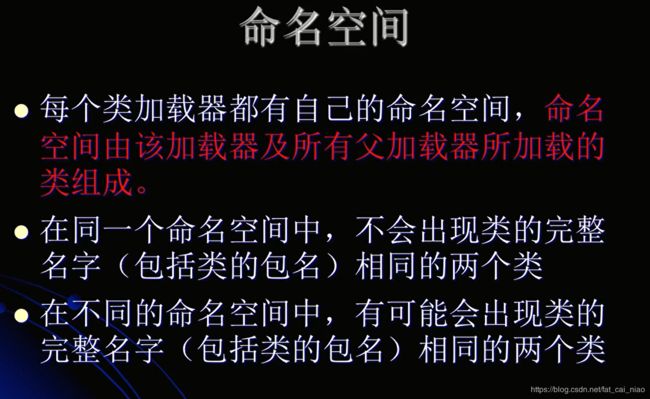
loader1和loader2构成了两个不同的命名空间 -
所以在不同的命名空间中,可以对同一个类加载多次
-
如果恢复
MyTest1.class在当前项目的目录下,就是version4的例子,则只构成一个命名空间,相同的类只会被加载一次
version06
将
loader1作为loader2的父加载器,修改创建loader2的构造函数
public static void main(String[] args) throws Exception {
        //0. 创建了一个自定义的类加载器,其父加载器是系统类加载器
        MyTest1604 loader1 = new MyTest1604("loader1");
        //1. 要加载的目录的绝对路径
        loader1.setPath("D:\\");
        //2. 加载这个目录下的一个具体的字节码文件
        Class<?> clazz = loader1.loadClass("com.xpt.jvm.Demo01_classloader.MyTest1");
        System.out.println("class: " + clazz);
        System.out.println("class: " + clazz.hashCode());
        Object object = clazz.newInstance();
        System.out.println(object);
        System.out.println("---------");

        //2. 加载这个目录下的一个具体的字节码文件
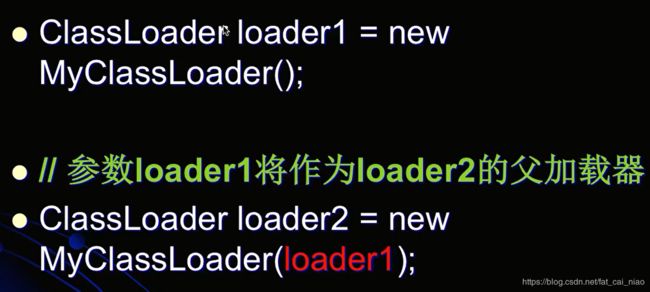
        MyTest1604 loader2 = new MyTest1604(loader1,"loader2");
        loader2.setPath("D:\\");
        Class<?> clazz2 = loader2.loadClass("com.xpt.jvm.Demo01_classloader.MyTest1");
        System.out.println("class: " + clazz2);
        System.out.println("class: " + clazz2.hashCode());
        Object object2 = clazz.newInstance();
        System.out.println(object2);
    }
-
有几个点值得注意的是:
loader2的findClass并没有被执行,因为在双亲委托机制下,loader1会去帮助loader2加载MyTest1,而恰好loader1又可以加载MyTest1,所以loader2不会再加载了- 其次,还有一个现象是此时同一个类的加载又只完成了一次,这是因为当
loader2和loader1共同构成了同一个命名空间。所以只能对同一个类加载一次
-
loader1和loader2都是MyTest16的实例,但是他们之间的关系并不是平级的,而是一种父子关系
version07
新增一个类加载器
loader3,并且重新编译MyTest1.class在当前项目中
  public static void main(String[] args) throws Exception {
        //0. 创建了一个自定义的类加载器,其父加载器是系统类加载器
        MyTest1605 loader1 = new MyTest1605("loader1");
        //1. 要加载的目录的绝对路径
        loader1.setPath("D:\\");
        //2. 加载这个目录下的一个具体的字节码文件
        Class<?> clazz = loader1.loadClass("com.xpt.jvm.Demo01_classloader.MyTest1");

        System.out.println("class: " + clazz.hashCode());
        Object object = clazz.newInstance();
        System.out.println(object);
        System.out.println("---------");

        //2. 加载这个目录下的一个具体的字节码文件
        MyTest1605 loader2 = new MyTest1605(loader1,"loader2");
        loader2.setPath("D:\\");
        Class<?> clazz2 = loader2.loadClass("com.xpt.jvm.Demo01_classloader.MyTest1");

        System.out.println("class: " + clazz2.hashCode());
        Object object2 = clazz.newInstance();
        System.out.println(object2);
        System.out.println("---------");
        //3. 加载这个目录下的一个具体的字节码文件
        MyTest1605 loader3 = new MyTest1605("loader3");
        loader3.setPath("D:\\");
        Class<?> clazz3 = loader3.loadClass("com.xpt.jvm.Demo01_classloader.MyTest1");

        System.out.println("class: " + clazz3.hashCode());
        Object object3 = clazz.newInstance();
        System.out.println(object3);
    }
version08
在上面的基础删,删除掉
MyTest1.class,再次运行,观察结果。
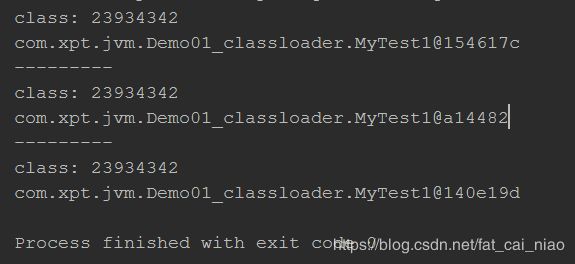
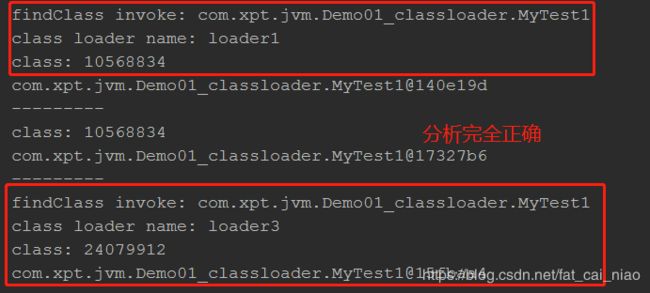
根据前面的学习,我这里预判会加载两次,loader1和loader2构成一个命名空间对该类完成一次加载,这是由loader1完成的,最后loader3构成另一个命名空间,完成一次加载
version09
在上面的基础上,将
loader2设置为loader3的父加载器
结果预判:只会加载一次,因为现在loader1和loader2、loader3一起构成了一个命名空间。由于双亲委托机制,最后会由loader1完成加载
小结
- 通过前面9个例子的讲解,应该可以清楚的理解类加载的双亲委托模型了
七、类的卸载
1.理论
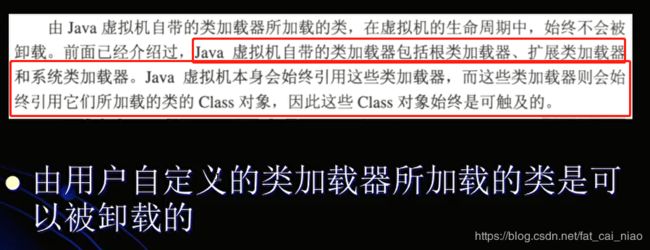
- 简单的说,只有自定义的类加载器加载的类才能被卸载掉
2.实例
- 首先准备下面的代码,在上一节的基础上
    public static void main(String[] args) throws Exception {
        //0. 创建了一个自定义的类加载器,其父加载器是系统类加载器
        MyTest1606 loader1 = new MyTest1606("loader1");
        //1. 要加载的目录的绝对路径
        loader1.setPath("D:\\");
        //2. 加载这个目录下的一个具体的字节码文件
        Class<?> clazz = loader1.loadClass("com.xpt.jvm.Demo01_classloader.MyTest1");

        System.out.println("class: " + clazz.hashCode());
        Object object = clazz.newInstance();
        System.out.println(object);
        System.out.println("---------");

        loader1 = null;
        clazz = null;
        object = null;
        //调用一次垃圾回收
        System.gc();

        loader1 = new MyTest1606("loader1");
        loader1.setPath("D:\\");
        clazz = loader1.loadClass("com.xpt.jvm.Demo01_classloader.MyTest1");
        System.out.println("class: " + clazz.hashCode());
        object = clazz.newInstance();
        System.out.println(object);
        System.out.println("---------");
    }
3.实例的另一种观测方法
- 上述代码增加一行睡眠时间
    public static void main(String[] args) throws Exception {
        //0. 创建了一个自定义的类加载器,其父加载器是系统类加载器
        MyTest1606 loader1 = new MyTest1606("loader1");
        //1. 要加载的目录的绝对路径
        loader1.setPath("D:\\");
        //2. 加载这个目录下的一个具体的字节码文件
        Class<?> clazz = loader1.loadClass("com.xpt.jvm.Demo01_classloader.MyTest1");

        System.out.println("class: " + clazz.hashCode());
        Object object = clazz.newInstance();
        System.out.println(object);
        System.out.println("---------");

        loader1 = null;
        clazz = null;
        object = null;
        //调用一次垃圾回收
        System.gc();
        Thread.sleep(100000);

        loader1 = new MyTest1606("loader1");
        loader1.setPath("D:\\");
        clazz = loader1.loadClass("com.xpt.jvm.Demo01_classloader.MyTest1");
        System.out.println("class: " + clazz.hashCode());
        object = clazz.newInstance();
        System.out.println(object);
        System.out.println("---------");
    }
八、自定义类加载器在复杂类加载时的分析
在平时的业务开发中,往往一个类里面含有多个其他的类,自定义类记载器在加载这种类的时候会作何表现呢?
MyCat
public class MyCat {
    public MyCat(){
        System.out.println("MyCat is loaded by: " + this.getClass().getClassLoader());
    }
}
MySample
中间新建
MyCat
public class MySample {
    public MySample(){
        System.out.println("MySample is loader by: " + this.getClass().getClassLoader());
        new MyCat();
    }
}
MyTest17
- 请问下述的输出?
MySample是否由自定义类加载器加载的?
public class MyTest17 {

    public static void main(String[] args) throws Exception {

        MyTest16 loader1 = new MyTest16("loader1");

        loader1.setPath("/target/classes/");
        Class<?> clazz = loader1.loadClass("com.xpt.jvm.Demo01_classloader.MySample");
        System.out.println("class: " + clazz.hashCode());

        Object object = clazz.newInstance();
    }

}
version02
public class MyTest17 {

    public static void main(String[] args) throws Exception {

        MyTest16 loader1 = new MyTest16("loader1");

        loader1.setPath("/target/classes/");
        Class<?> clazz = loader1.loadClass("com.xpt.jvm.Demo01_classloader.MySample");
        System.out.println("class: " + clazz.hashCode());
        //如果注释掉改行,则不会导致MySample的实例化,不会调用其构造方法
        //因此也不会实例化MyCat对象,即没有对MyCat主动使用,这里就不会加载MyCat了吗?
        //其实这里是不一定的!因为类的加载不需要等到对某个类的主动使用才去加载它!
//        Object object = clazz.newInstance();
    }

}
- 可以添加JVM参数
-XX:TraceClassLoading来查看这一点
- 这里呢,这个例子是没有加载
MyCat的 - 但是要清楚的是类的加载不会等到某个类被主动使用才开始加载,类加载器会有一个预判
version03
删除掉当前项目目录下的
MySample.class和MyCat.class,然后从其他盘符加载
public class MyTest17_1 {

    public static void main(String[] args) throws Exception {

        MyTest16 loader1 = new MyTest16("loader1");
        loader1.setPath("D:\\");

        Class<?> clazz = loader1.loadClass("com.xpt.jvm.Demo01_classloader.MySample");
        System.out.println("class: " + clazz.hashCode());

        Object object = clazz.newInstance();
    }

}
version04
重新编译整个项目,让当前项目目录下有
MySample.class和MyCat.class然后,删除MyCat.class只保留MySample.class,同时仍然从其他盘符加载这两个类,其他盘符下这两个类的class文件均有。代码部分和version03完全一样,这时候又会输出什么呢?
- 这里加载
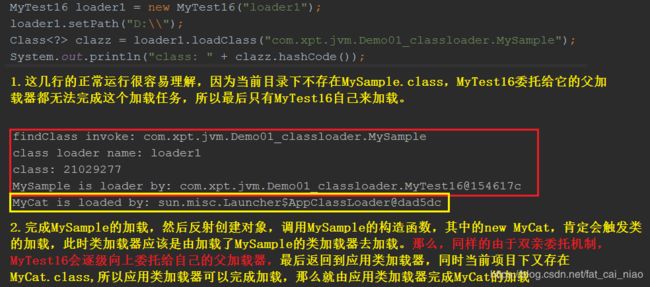
MySample的是应用加载器,那么在调用MySample的构造函数new Cat()的时候是由应用类加载器来加载的,那么它会执行双亲委托机制,发现从根类加载到到扩展类加载器再到自己都无法加载MyCat
version05(深刻理解双亲委托机制)
和version04一样,此时保留项目中的
MyCat.class,删除MySample.class。仍然从其他盘符加载,其他盘符二者类都有,此时又会输出什么呢?
version06(类加载器命名空间深入理解:父加载器加载的类无法访问到子加载器加载的类)
修改MyCat,在MyCat的构造函数中引用MySample。那么此时二者就会存在一个互相引用的关系了。
同时,重新build整个项目,然后把整个项目的class文件拷贝到外面的盘符中(因为此时的MyCat.class已经改变了,所以要用新的),然后在当前项目的目录下删除掉MySample.class。
然后运行输出,看会产生什么样的输出结果。其实这个例子和version05是一样的,区别在于MyCat中引用了MySample
MyCat(修改)
public class MyCat {

    public MyCat(){
        System.out.println("MyCat is loaded by: " + this.getClass().getClassLoader());
        System.out.println("from MyCat: " + MySample.class);
    }
}
version07(子加载器加载的类能够访问到父加载器所加载的类)
在上例的基础上,修改
MySample,在MySample的构造函数中引用MyCat。然后修改MyCat,不再引用MySample。同样地,重新build项目,然后删除掉项目中的MySample.class然后更新其他盘符的class文件,然后运行查看结果。
MySample(修改)
public class MySample {
    public MySample(){
        System.out.println("MySample is loader by: " + this.getClass().getClassLoader());
        new MyCat();
        System.out.println("from MySample: " + MyCat.class);
    }
}
类加载器命名空间的深入理解
1.下述输出是true还是false?
public class MyPerson {

    private MyPerson myPerson;

    public void setMyPerson(Object object){
        this.myPerson = (MyPerson) object;
    }

}
public class MyTest20 {
    public static void main(String[] args) throws ClassNotFoundException {
        MyTest16 loader1 = new MyTest16("loader1");
        MyTest16 loader2 = new MyTest16("loader2");

        Class<?> clazz1 = loader1.loadClass("com.xpt.jvm.Demo01_classloader.MyPerson");
        Class<?> clazz2 = loader2.loadClass("com.xpt.jvm.Demo01_classloader.MyPerson");

        System.out.println(clazz1 == clazz2);

    }

}
2下述的代码是否会报错?
public class MyTest20 {
    public static void main(String[] args) throws Exception {
        MyTest16 loader1 = new MyTest16("loader1");
        MyTest16 loader2 = new MyTest16("loader2");

        Class<?> clazz1 = loader1.loadClass("com.xpt.jvm.Demo01_classloader.MyPerson");
        Class<?> clazz2 = loader2.loadClass("com.xpt.jvm.Demo01_classloader.MyPerson");

        System.out.println(clazz1 == clazz2);
        Object object1 = clazz1.newInstance();
        Object object2 = clazz2.newInstance();


        Method method = clazz1.getMethod("setMyPerson",Object.class);
        method.invoke(object1,object2);

    }

}
3.修改代码,以及环境,再次运行
首先设置两个自定义类加载器的加载路径为其他盘符,然后将当前项目下的字节码文件拷贝到该盘符,然后删除当前目录下的
MyPerson,然后观察输出结果,并作出分析。
- 代码
public class MyTest21 {
    public static void main(String[] args) throws Exception {
        //0. loader1和loader2是两个不同的对象,同一个自定义类加载器的不同的实例
        MyTest16 loader1 = new MyTest16("loader1");
        MyTest16 loader2 = new MyTest16("loader2");

        loader1.setPath("D:\\");
        loader2.setPath("D:\\");

        Class<?> clazz1 = loader1.loadClass("com.xpt.jvm.Demo01_classloader.MyPerson");
        Class<?> clazz2 = loader2.loadClass("com.xpt.jvm.Demo01_classloader.MyPerson");
        //为true的原因是因为,loader1尝试去加载MyPerson,由双亲委托机制,会委托给父加载器来加载,最后由系统类加载器
        //loader2也尝试加载 MyPerson,同样由双亲委托机制,也会由系统了加载器,但是加载之前会检查类MyPerson是否被加载过了
        //发现被加载了,那么直接返回已经加载到内存中的那个对象
        System.out.println(clazz1 == clazz2);

        Object object1 = clazz1.newInstance();
        Object object2 = clazz2.newInstance();
        //获取一个方法对象
        Method method = clazz1.getMethod("setMyPerson",Object.class);
        //在对象object1上调用方法setMyPerson,参数是object2
        method.invoke(object1,object2);
    }
}
九、双亲委托机制、命名空间小结
类加载器的双亲委托模型的好处
- 1.可以确保Java核心库的类型安全,所有的Java应用都至少会引用
java.lang.Object类,也就是说在运行期,java.lang.Object这个类会被加载到Java虚拟机中,如果这个加载过程是由Java应用自己的类加载器所完成的,那么很可能在JVM中存在多个版本的java.lang.Object类,而且这些类之间还是不兼容的,相互不可见的。(这正是命名空间在发挥作用) - 2.可以确保Java核心类库所提供的类不会被自定义的类所替代。开发者完全可以自定义一个
java.lang.Object类,但是显然不会被根类加载器所加载 - 3.不同的类加载器可以为相同名称(
binary name)的类创建额外的命名空间。相同名称的类可以并存在Java虚拟机中,只需要用不同的类加载器来加载他们即可。不同类加载器所加载的类之间是不兼容的,这就相当于在Java虚拟机内部创建了一个又一个相互隔离的Java类空间,这类技术在很多框架这种得到了实际应用。要注意这里的不同的类加载器的准确理解,只要是两个不存在父子关系的类加载器,在双亲委托模型下都是不同的类加载器,例如前面大量的例子中,同一个自定义类加载的两个不同的实例,完全是两个不同的类加载器。 - 4.在运行期,一个Java类是由该类的完全限定名(binary name)和用于加载该类的定义类加载器所共同决定的。如果全限定名相同的类由不同的加载器所加载,那么在运行期这就是两个不同的类,即是这个类从同一位置加载,即是其字节码文件相同
十、不同的类(根/扩展/系统(应用))加载器从什么样的目录下加载类文件呢?
1.通过系统属性查看不同的加载器的默认加载目录
public class MyTest18 {
    public static void main(String[] args) {
        System.out.println(System.getProperty("sun.boot.class.path"));
        System.out.println(System.getProperty("java.ext.dirs"));
        System.out.println(System.getProperty("java.class.path"));
    }
}
1.1 命令运行上述代码,结果不一样
上面的代码是通过IDEA运行的,下面通过命令行运行,查看结果
- 发现系统类加载器的目录变成了一个点,这和前面的运行结果不一样
- 这是因为前面的结果通过IDEA来运行,IDEA会自动把一些路径添加到系统类加载器中
2.为何当前项目中的类是由系统了加载器来加载的?
因为系统类加载器会默认把当前项目所在目录添加到自己的加载目录下面
3.通过不同的类加载器所加载的路径来深刻理解双亲委托机制
- 首先我们尝试通过下面的代码来完成一次普通的加载,查看类加载器是谁
public class MyTest18_1 {
    public static void main(String[] args) throws Exception {
        MyTest16 loader1 = new MyTest16("loader1");
        loader1.setPath("D:\\");
        Class<?> clazz = loader1.loadClass("com.xpt.jvm.Demo01_classloader.MyTest1");
        System.out.println("class: " + clazz.hashCode());
        System.out.println("class loader: " + clazz.getClassLoader());
    }
}
-
现在我们想做的事情是,如果把
MyTest1.class放在根类加载器所加载的某个目录下,看MyTest1.class是否会被根类加载器所加载呢 -
这个例子又一次深刻的说明了双亲委托机制,应用类加载器尝试加载类
MyTest1.class,然后它会一层一层的把加载任务交给根类加载器,然后根类加载器尝试去加载这个类,如果发现可以加载(该类在根类加载器能够加载的特定的目录中),则完成加载。如果无法加载,则向下抛出这个加载任务。
4.扩展类加载器加载类
前面我们看到了自定义类加强器,应用类加载器,根类加载器都完成过类的加载,唯独扩展类加载器没有被用到。
public class MyTest19 {
    public static void main(String[] args) {
        AESKeyGenerator aesKeyGenerator = new AESKeyGenerator();
        System.out.println(aesKeyGenerator.getClass().getClassLoader());
        System.out.println(MyTest19.class.getClassLoader());
    }
}
5.修改扩展类加载器的默认加载目录,能否完成类的加载呢?(扩展类加载器只能加载jar包中的class文件)
- 先看下面的例子
public class MyTest22 {
    static {
        System.out.println("MyTest22 initializer");
    }
    public static void main(String[] args) {

        System.out.println(MyTest22.class.getClassLoader());

        System.out.println(MyTest1.class.getClassLoader());

    }
}
-
这个输出结果应该非常好理解,二者都是由同一个应用类加载器来完成加载的
-
现在想做的事情是,把扩展类加载器的默认加载目录修改到当前项目目录下,那么这个两个类是否就会由扩展类加载器来加载?
-
下面我们通过命令的方式,先修改扩展类加载器的系统属性为当前目录,然后运行上述代码
 - 这里关于扩展类加载器的一个重要的点是扩展类加载器只能加载jar包中的class文件,所以我们尝试把上面代码中的类打包为jar包,然后再运行
 - 再次运行程序,发现
MyTest1的类加载器已经是由扩展类加载器来加载的了
6.修改根类加载器的默认系统属性值sun.boot.class.path
- 会发生如下的报错信息
- 这是因为在Oracle的Hotspot的实现中,系统属性
sun.boot.class.path如果修改错了,则运行会出错,提示如下的错误信息 - 因为所有的类的运行都需要先加载根类
Object,这是由根类加载器来完成的,但是这里修改了根类加载器的默认的加载地址,所以无法加载到Object所以会报错 - Java中所有的类肯定都是由类加载器先完成加载的,除了数组!数组是由JVM在运行期间动态生成的!
- 但是,在Java中类加载器本身也是一个类,那么类加载器是由谁来加载的呢?
7. 根类加载器,扩展类加载器,系统类加载器是由谁来加载的?
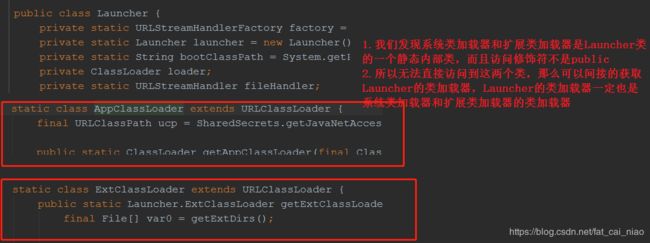
-
内建于JVM中的启动类(根类)加载器会加载
java.lang.ClassLoader以及其他的Java平台类 -
当JVM启动时,一块特殊的机器码会运行,它会加载扩展类加载器与系统类加载器
-
这块特殊的机器码就叫启动类加载器(
BootStrap) -
启动类加载器并不是Java类,而其他的加载器都是Java类
-
启动类加载器是特定于平台的机器指令,它负责整个加载过程
-
所有的类加载器(除了启动类加载器),都被实现为Java类,不过总归要有一个组件来加载第一个Java类加载器,从而让整个加载过程能够顺序进行下去,加载第一个纯Java类加载器就是启动类加载器的指责
-
启动类加载器还会负责加载供
JRE正常运行所需要的基本组件,这包括java.util与java.lang包中的类等等 -
下述代码输出是
public class MyTest23 {
    public static void main(String[] args) {
        System.out.println(ClassLoader.class.getClassLoader());
    }
}
-
上述代码很简单,就是想查看
ClassLoader它的类加载器是谁,根据前面的知识,这里肯定是根类加载器 -
查看
Lanucher的类加载器是谁
System.out.println(Launcher.class.getClassLoader());
- 果然也是启动类加载器
- 所以现在可以得出结论, 系统类加载器和扩展类加载器都是由启动类加载器加载的
8.系统类加载器和扩展类加载器源码分析
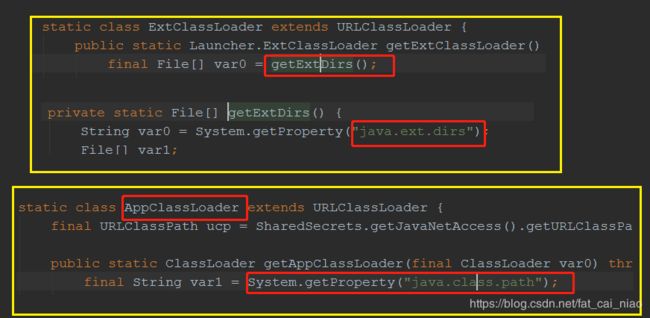
8.1为何扩展/系统类加载的加载目录对应某个特定的系统属性?
都是源码中规定了的
9 ClassLoader.getSystemClassLoader()
- 可以通过这个静态方法直接获取当前的系统类加载器
System.out.println(ClassLoader.getSystemClassLoader());
- 阅读该方法的文档,会有一些有趣的发现
public static ClassLoader getSystemClassLoader()
//但会系统类加载器用于委托。对于新创建的ClassLoader实例,这是默认的委托双亲,而且这个类加载器被用来启动这个应用
Returns the system class loader for delegation. This is the default delegation parent for new ClassLoader instances, and is typically the class loader used to start the application.
//这个方法(getSystemClassLoader)首次被调用是在运行期开始阶段的早期,在这个时间点,它会先创建系统类加载器
//然后将它设置为调用这个方法所在线程的上下文类加载器(重要!留在后面讲)
This method is first invoked early in the runtime's startup sequence, at which point it creates the system class loader and sets it as the context class loader of the invoking Thread.
//默认的系统类加载器是与类的实例相关的实现
The default system class loader is an implementation-dependent instance of this class.
//java.system.class.loader的属性值决定了系统类加载器的名字
If the system property "java.system.class.loader" is defined when this method is first invoked then the value of that property is taken to be the name of a class that will be returned as the system class loader.
//使用默认的系统类加载器加载类的时候,必须定义一个含有公有的构造函数,函数有一个ClassLoader类型的单个参数,这个单数被用作委托的父加载器
The class is loaded using the default system class loader and must define a public constructor that takes a single parameter of type ClassLoader which is used as the delegation parent.
//一个实例随后被创建,使用这个构造函数和默认的系统类加载器
An instance is then created using this constructor with the default system class loader as the parameter.
The resulting class loader is defined to be the system class loader.
//返回用于委派的系统类加载器,如果没有则返回null
Returns:
The system ClassLoader for delegation, or null if none
- 简单的说我们可以通过修改属性
java.system.class.loader来使自定义的类加载器成为系统类加载器 - 这个对自定义类加载器有一个要求是必须提供一个
public的构造方法,含有一个参数,指定器父加载器是谁 - 为了实现这一点,我们先为自定义的类加载器
MyTest16添加一个这样共有的构造方法
 public MyTest16(ClassLoader parent){
        super(parent);
    }
- 下面尝试运行如下代码
 System.out.println(ClassLoader.getSystemClassLoader());
        System.out.println(MyTest23.class.getClassLoader());
        System.out.println(MyTest16.class.getClassLoader());
        System.out.println(ClassLoader.getSystemClassLoader());
9.1 ClassLoader.getSystemClassLoader()源码分析
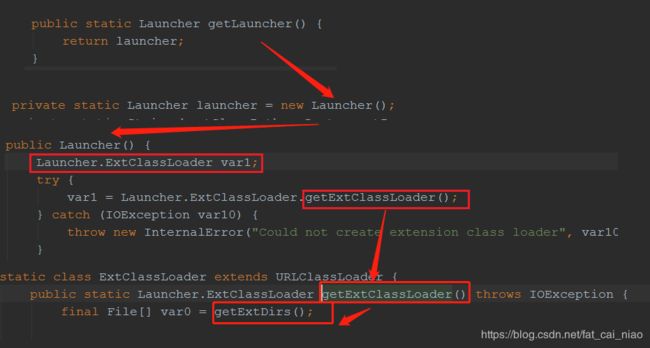
  private static File[] getExtDirs() {
  //1/获取系统属性,该属性值记录了扩展类加载器默认的加载目录
            String var0 = System.getProperty("java.ext.dirs");
            //2.声明一个文件类数组
            File[] var1;

            if (var0 != null) {
                StringTokenizer var2 = new StringTokenizer(var0, File.pathSeparator);
                int var3 = var2.countTokens();
                var1 = new File[var3];

                for(int var4 = 0; var4 < var3; ++var4) {
                    var1[var4] = new File(var2.nextToken());
                }
            } else {
                var1 = new File[0];
            }

            return var1;
        }
- 下面我们回到
ClassLoader中的initSystemClassLoader()继续往下看
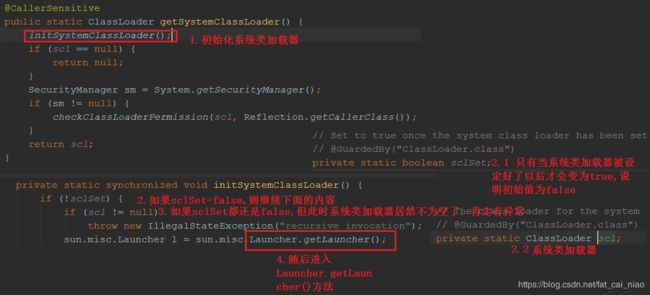
 private static synchronized void initSystemClassLoader() {
 		//0. 如果sclSet为假,也就是当前的系统类加载器还没有被设置
        if (!sclSet) {
       //1. 如果scl != null,这里scl就是系统了加载器,这里不难看出 scl = System Classs Loader
       //1.1 这里其实在最外层的if又加了一层判断,如果sclSet=false,这里scl != null,这明显是矛盾的
       //所以会抛出异常
            if (scl != null)
                throw new IllegalStateException("recursive invocation");
            //2. 这里就是获取一个 Launcher   类的实例
            sun.misc.Launcher l = sun.misc.Launcher.getLauncher();
            if (l != null) {
                Throwable oops = null;
                //2.1 返回当前的系统类加载器!
                scl = l.getClassLoader();
                try {
                //2.2 这里非常的疑惑了,因为scl已经被赋值了,为什么这里还需要再次调用这个方法以及把scl
                //作为某个类的构造函数传进去呢?进入这个方法一探究竟!
                    scl = AccessController.doPrivileged(
                        new SystemClassLoaderAction(scl));
                //2.2.1 经过进入这个类的分析后,这里的scls可能就是默认的AppClassLoader,
       			 //也可以是我们自定义的类加载器来作为系统类加载器
       			 //所以到这里执行完了以后,系统类加载器已经被确定下来了!
                } catch (PrivilegedActionException pae) {
                    oops = pae.getCause();
                    if (oops instanceof InvocationTargetException) {
                        oops = oops.getCause();
                    }
                }
                if (oops != null) {
                    if (oops instanceof Error) {
                        throw (Error) oops;
                    } else {
                        // wrap the exception
                        throw new Error(oops);
                    }
                }
            }
            sclSet = true;
        }
    }

//接上面2.2
class SystemClassLoaderAction
    implements PrivilegedExceptionAction<ClassLoader> {
    private ClassLoader parent;
	//2.2.1 构造函数,2.2处传入的scl,就被赋值给了这个类的parent
    SystemClassLoaderAction(ClassLoader parent) {
        this.parent = parent;
    }
	//重点看这个run方法
    public ClassLoader run() throws Exception {
    	//2.2.2首先获取系统属性 java.system.class.loader。这里敲黑板,划重点!
    	//因为前面我们说过可以为这个属性赋值以达到自定义系统类加载器的目的!这里就解释了为什么是修改这个属性
        String cls = System.getProperty("java.system.class.loader");
        //2.2.3 如果cls为null,说明没有自定义的系类加载器那么久返回parent作为系统类加载器
        //     再结合前面的parent就等于传入的cls,可以不难得出结论,之所以需要传入cls,
        //就是当用户没有自定义类加载器的时候,就返回默认的系统类加载器,也就是AppClassLoader
        if (cls == null) {
            return parent;
        }
		//2.2.4 反射获取一个构造器类
		//注意这里的Class.forName的参数,好像和我们平时用的不太一样,这里有三个参数
		//这个方法也是和类加载器密切相关的一个方法,下面也会深入研究一下这个方法
        Constructor<?> ctor = Class.forName(cls, true, parent)
            .getDeclaredConstructor(new Class<?>[] { ClassLoader.class });
         //2.2.5 反射获取一个ClassLoader,注意看这里的参数,需要一个ClassLoader类型的参数
         //	这也解释了为何在前面自定义类加载器MyTest16中需要提供一个参数类型为ClassLoader的构造函数
        ClassLoader sys = (ClassLoader) ctor.newInstance(
            new Object[] { parent });
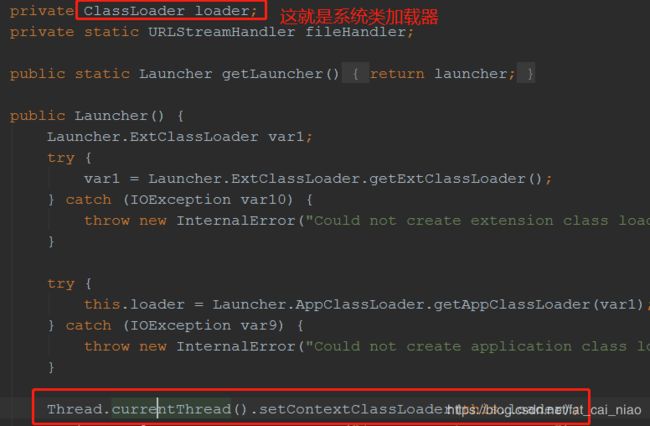
         //2.2.6把获取到的系统类加载器设置为当前线程的上下文类加载器
        Thread.currentThread().setContextClassLoader(sys);
        //2.2.7 所以我们可以看到这里返回的sys可能就是默认的AppClassLoader,
        //也可以是我们自定义的类加载器来作为系统类加载器
        return sys;
    }
}
9.2 Class.forName(String name,boolean initialize,ClassLoader loader)
- 下面是这个方法的文档
public static Class<?> forName(String name,
                               boolean initialize,
                               ClassLoader loader)
                        throws ClassNotFoundException
Returns the Class object associated with the class or interface with the given string name, using the given class loader.
//1.使用给定的类加载器(参数3)来返回与给定的字符串名字相关的类或接口的Class对象
Given the fully qualified name for a class or interface (in the same format returned by getName) this method attempts to locate, load, and link the class or interface.
//2.给定类或接口的全限定名,这个方法尝试去定位,加载和连接这个类或接口
The specified class loader is used to load the class or interface.
//3. 给定的类加载器被用来加载这个类或接口,就是第三个参数是用来加载第一个参数所代表的的类或接口的
If the parameter loader is null, the class is loaded through the bootstrap class loader.
//4.如果参数3为空,这个会由启动类加载器来加载参数1所代表的类
The class is initialized only if the initialize parameter is true and if it has not been initialized earlier.
//5. 只有当初始化参数为true的时候这个类才会被初始化,或者说如果这个类没有更早的被初始化
If name denotes a primitive type or void, an attempt will be made to locate a user-defined class in the unnamed package whose name is name. Therefore, this method cannot be used to obtain any of the Class objects representing primitive types or void.
//6. 如果这个name对应的类是原生的数据类型(8种)或者为空,会尝试去定位用户自定义的类在一个未命名的包中。因此这个方法不能用于获取任何的原生数据类型或空的类
If name denotes an array class, the component type of the array class is loaded but not initialized.
//7. 如果给定的类是一个数组类,那么这个数组类的组件类型会被加载,但不会被初始化
For example, in an instance method the expression:
Class.forName("Foo")
is equivalent to:
Class.forName("Foo", true, this.getClass().getClassLoader())
//8. 两种实例方式,第一种等价于第二种

Note that this method throws errors related to loading, linking or initializing as specified in Sections 12.2, 12.3 and 12.4 of The Java Language Specification. Note that this method does not check whether the requested class is accessible to its caller.
If the loader is null, and a security manager is present, and the caller's class loader is not null, then this method calls the security manager's checkPermission method with a RuntimePermission("getClassLoader") permission to ensure it's ok to access the bootstrap class loader.

Parameters:
name - fully qualified name of the desired class
initialize - if true the class will be initialized. See Section 12.4 of The Java Language Specification.
loader - class loader from which the class must be loaded
Returns:
class object representing the desired class
//9.返回代表指定类的Class对象
- 下面是相关源码
 @CallerSensitive
    public static Class<?> forName(String className)
                throws ClassNotFoundException {
        Class<?> caller = Reflection.getCallerClass();
        return forName0(className, true, ClassLoader.getClassLoader(caller), caller);
    }
    @CallerSensitive
    public static Class<?> forName(String name, boolean initialize,
                                   ClassLoader loader)
        throws ClassNotFoundException
    {
        Class<?> caller = null;
        SecurityManager sm = System.getSecurityManager();
        if (sm != null) {
            // Reflective call to get caller class is only needed if a security manager
            // is present.  Avoid the overhead of making this call otherwise.
            caller = Reflection.getCallerClass();
            if (sun.misc.VM.isSystemDomainLoader(loader)) {
                ClassLoader ccl = ClassLoader.getClassLoader(caller);
                if (!sun.misc.VM.isSystemDomainLoader(ccl)) {
                    sm.checkPermission(
                        SecurityConstants.GET_CLASSLOADER_PERMISSION);
                }
            }
        }
        return forName0(name, initialize, loader, caller);
    }
- 简单的说,
Class.forName这个方法就是用于初始化给定的类
十一、线程上下文类加载器
1.当前线程的加载器和线程类的加载器
- 下述程序输出什么
public class MyTest24 {
    public static void main(String[] args) {
        System.out.println(Thread.currentThread().getContextClassLoader());
        System.out.println(Thread.class.getClassLoader());
    }
}
2.当前类加载器和线程上下文类加载器
-
当前类加载器(Curretn Classloader)
- 每个类都会使用自己的类加载器(即加载自身的类加载器)去加载其他类(指的是所以依赖的类)
- 如果
ClassX引用了ClassY,那么ClassX的类加载器就会尝试去加载ClassY(前提是ClassY尚未被加载)
-
线程上下文类加载器(Context ClassLoader)
- 线程上下文类加载器是从JDK1.2开始引入的,类
Thread中的getContextClassLoader()与setContextClassLoader(ClassLoader cl)分别用来获取和设置上下文类加载器 - 如果没有通过
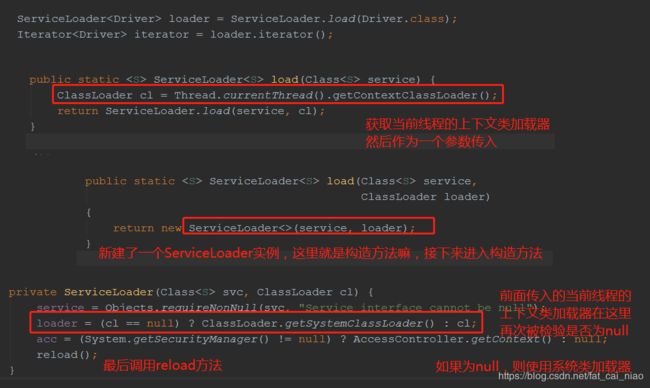
setContextClassLoader(ClassLoader cl)来进行设置的话,线程将继承器父线程的上下文类加载器 - Java应用运行时的初始线程的上下文类加载器是系统类加载器,在线程中运行的代码可以通过该类加载器来加载类与资源
- 线程上下文类加载器是从JDK1.2开始引入的,类
3.线程上下文类加载器的重要性
是对双亲委托模型的重要补充。
SPI (Service Provider Interface)- 服务提供接口,最典型的就是JDBC,JDK提供一些接口来规范,不同的数据库厂家开发jar包来实现这些接口
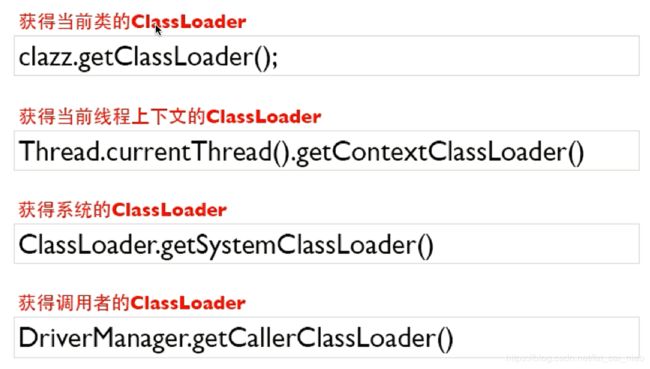
父ClassLoader可以使用当前线程Thread.currentThread().getContextClassLoader()所指定的classloader加载的类。这改变了父ClassLoader不能访问由子ClassLoader或者没有直接父子关系的ClassLoader所加载的类的情况,即改变了双亲委托模型。- 线程上下文类加载我就是当前线程的
Current ClassLoader - 在双亲委托模型下,类加载是由下至上的,即下层的类加载器会委托上层进行加载。但是对于
SPI来说,有些接口是Java核心库所提供的,而核心库是由启动类加载器所加载的,而这些接口的具体实现却来自不同的jar包(厂商提供),Java的启动类加载器是不会加载其他来源的jar包的,这样核心的接口是由上层的启动类加强器加载的,而具体实现又是由下层的系统类加载器来加载的,所以传统的双亲委托机制就无法满足SPI的要求。而通过当前线程设置上下文类加载器,就可以由设置的上下文类加载器来实现对于接口类的加载
4.Java应用运行时的初始线程的上下文类加载器是系统类加载器
- 代码
public class MyTest25 implements Runnable {

    private Thread thread;

    public MyTest25(){
        thread = new Thread(this);
        thread.start();
    }

    public void run() {
        //0. 获取当前线程的上下文类加载器
        ClassLoader classLoader = this.thread.getContextClassLoader();
        this.thread.setContextClassLoader(classLoader);
        System.out.println("Class: " + classLoader.getClass());
        System.out.println("Parent: " + classLoader.getParent().getClass());
    }

    public static void main(String[] args) {
        new MyTest25();
    }

}
5.线程上下文类加载器的一般使用模式:获取-使用-还原
- 基本使用
ClassLoader classLoader = Thread.currentThread().getContextClassLoader();
    try {
        Thread.currentThread().setContextClassLoader(targetTcc1);
        myMethod();
    }finally {
        Thread.currentThread().setContextClassLoader(classLoader);
    }
       // myMethod()调用了Thread.currentThread().getContextClassLoader();获取当前线程的上下文类加载器做某些事情

     //如果一个类由类加载器A加载,那么这个类的依赖类也是由相同的类加载器加载的

     //ContextClassLoader的作用就是为了破坏Java的类加载委托机制

     //当高层提供了统一的接口让低层去实现,同时又要在高层加载或实例化低层的类的时候,就必    //须通过线程上下文类加载器来帮助高层的ClassLoader找到并加载该类
5.1JDBC实例
- 代码
public class MyTest26 {
    public static void main(String[] args) {
        ServiceLoader<Driver> loader = ServiceLoader.load(Driver.class);
        Iterator<Driver> iterator = loader.iterator();

        while (iterator.hasNext()){
            Driver driver = iterator.next();
            System.out.println("driver: " + driver.getClass() + ", loader: " + driver.getClass().getClassLoader());
        }
        System.out.println("当前线程的上下文类加载器: " + Thread.currentThread().getContextClassLoader());
        System.out.println("ServiceLoader的类加载器: " + ServiceLoader.class.getClassLoader());
    }
}
5.2 ServiceLoader
在SPI中非常重要的一个类
文档解读
A simple service-provider loading facility.
//一个简单的服务提供者加载设施
A service is a well-known set of interfaces and (usually abstract) classes.
//一个服务是一套指定的接口或者通常是抽象类。(所谓service就是利用接口或抽象类提供了一套规范)
A service provider is a specific implementation of a service.
//一个服务提供者是一个服务的具体实现
The classes in a provider typically implement the interfaces and subclass the classes defined in the service itself.
//位于服务提供者的类通常是服务中(接口或抽象类)的实现类或子类
Service providers can be installed in an implementation of the Java platform in the form of extensions, that is, jar files placed into any of the usual extension directories.
//服务提供者可以以扩展,jar包的形式安装在Java平台上
Providers can also be made available by adding them to the application's class path or by some other platform-specific means.
//服务提供者也可以被访问通过增加其到这个应用的class path下,或者其他平台指定的目录
- 上面两段可以明确两个重要的概念
service:接口,或抽象类,JDK自己定义的一套规范service provider:具体的实现类,第三方根据service的具体实现
For the purpose of loading, a service is represented by a single type, that is, a single interface or abstract class. (A concrete class can be used, but this is not recommended.)
//处于加载的目的,一个服务由一个单一类型表示,也就是单个接口或者抽象类。一个具体的类也可以,但是不推荐
A provider of a given service contains one or more concrete classes that extend this service type with data and code specific to the provider.
//给定服务的提供者包含了一个或多个具体的实现类,这些含有具体的数据和编码的类扩展了服务类型对于提供者来说。
The provider class is typically not the entire provider itself but rather a proxy which
contains enough information to decide whether the provider is able to satisfy a particular
request together with code that can create the actual provider on demand.
//提供者通常不是全部服务提供的本身,而是一种代理(典型的动态代理)模型能够包含足够的信息来决定这个提供者能够
满足一个特定的需求带着代码可以按需创建真正的提供者
The details of provider classes tend to be highly service-specific; no single class or interface could possibly unify them, so no such type is defined here.
//提供者类的细节往往是高度特定于服务的;没有单个类或接口可能会统一它们,因此此处未定义此类。
The only requirement enforced by this facility is that provider classes must have a zero-argument constructor so that they can be instantiated during loading.
//这类设施(指的就是ServiceLoader)只有唯一的要求就是服务提供者的类必须有一个0参的构造函数,以便他们在加载的时候能被实例化。
A service provider is identified by placing a provider-configuration file in the resource
directory META-INF/services.
//通过将提供者配置文件放在资源目录META-INF / services中来标识服务提供者。
The file's name is the fully-qualified binary name of the service's type.
//文件名是服务类型的全限定名
The file contains a list of fully-qualified binary names of concrete provider classes, one per line.
//这个文件包含了一列具体提供者类的全限定二进制名,一行代表一个
 Space and tab characters surrounding each name, as well as blank lines, are ignored. The comment character is '#' ('\u0023', NUMBER SIGN); on each line all characters following the first comment character are ignored. The file must be encoded in UTF-8.
- 上面这一段话,非常重要,前面5.1的例子中通过顶层的
Drive.class找到了具体的MySQL的相关信息,这是怎么找到的呢,就是通过这里的配置文件找到的,我们可以尝试在MySQL的jar包中找一下
 - 这里可以看到,之所以通过顶层的接口,能找到具体的服务提供者的细节,这是因为在
ServiceLoader就是这样设计的,服务提供者需要遵守这样的规范,在META-INF/services中要提供相应的信息
If a particular concrete provider class is named in more than one configuration file,
or is named in the same configuration file more than once, then the duplicates are ignored.
//如果一个具体的服务提供者类在多个配置文件中被命名,或者一个名字在一个配置文件中被多次命名,重复的将会被忽略
The configuration file naming a particular provider need not be in the same jar file or
other distribution unit as the provider itself.
//命名特定提供程序的配置文件不必与提供程序本身位于同一jar文件或其他分发单元中
The provider must be accessible from the same class loader that was initially queried to
locate the configuration file; note that this is not necessarily the class loader from which \
the file was actually loaded.
//该提供程序必须可以从最初查询以查找配置文件的同一类加载程序进行访问;请注意,这不一定是实际从中加载文件的类加载器。
Providers are located and instantiated lazily, that is, on demand.
//提供者被懒惰地定位和实例化,或者是按需
A service loader maintains a cache of the providers that have been loaded so far.
//服务价值者会维护已经被价值的提供者的一个缓存
Each invocation of the iterator method returns an iterator that first yields all of the
elements of the cache, in instantiation order, and then lazily locates and instantiates any
remaining providers, adding each one to the cache in turn. The cache can be cleared via the
reload method.
//每次迭代器方法的调用都会返回一个迭代器,该迭代器首先按实例化顺序生成高速缓存的所有元素,
//然后懒惰地定位和实例化任何剩余的提供程序,依次将每个提供程序添加到缓存中。
//可以通过reload方法清除缓存。
5.3 案例5.1深度分析
跟进一下5.1的实例代码,看一下背后的方法都在干些什么
- 上述最关键的部分是

- 这里从最外面的
MyTest26说起,MyTest26肯定由系统类加载器来加载,调用load方法,那么由于双亲委托机制,对于ServiceLoader的加载最终委托给了启动类加载器来加载,那么,如果没有这一行!后面ServiceLoader的引用类都会用启动了加载器来加载,而启动类加载器没有双亲了,它又无法加载当前应用目录下的class和jar包中的类。这是双亲委托机制的局限性 - 所以这一行获取到了当前线程的上下文加载器,就是系统类加载器嘛,后续当前目录下的加载可以仍然由系统类加载器来加载。
- 所以这里就体现了上下文类加载器的重要性,成功的解决了双亲委托机制的不足
5.3.1 通过JVM参数跟踪一下类加载的过程
5.4手动修改当前线程的上下文类加载器
- 代码
public class MyTest26_1 {
    public static void main(String[] args) {
        //手动修改上下文类加载器 为当前类加载器的父加载器(扩展类加载器)
        Thread.currentThread().setContextClassLoader(MyTest26_1.class.getClassLoader().getParent());

        ServiceLoader<Driver> loader = ServiceLoader.load(Driver.class);
        Iterator<Driver> iterator = loader.iterator();

        while (iterator.hasNext()){
            Driver driver = iterator.next();
            System.out.println("driver: " + driver.getClass() + ", loader: " + driver.getClass().getClassLoader());
        }
        System.out.println("当前线程的上下文类加载器: " + Thread.currentThread().getContextClassLoader());
        System.out.println("ServiceLoader的类加载器: " + ServiceLoader.class.getClassLoader());
    }
}
- 这个例子很好的验证了前面的分析
6.通过JDBC驱动加载来理解上下文类加载器
- 代码
public class MyTest27 {

    public static void main(String[] args) throws Exception {
        Class.forName("com.mysql.jdbc.Driver");
        Connection conn = DriverManager.getConnection("jdbc:mysql://localhost:3306/mytestdb","username","password");
    }
}
6.1注册驱动
分析上述代码完成了哪些事情?
- 首先分析第一行:
Class.forName("com.mysql.jdbc.Driver");根据前面的学习,我们了解到,这个方法就是初始化给定的类,但是具体如何初始化呢?下面我们进入到这个类Driver中看一下。(IDEA中全局搜索Driver)
public class Driver extends NonRegisteringDriver implements java.sql.Driver {
    public Driver() throws SQLException {
    }

    static {
        try {
            DriverManager.registerDriver(new Driver());
        } catch (SQLException var1) {
            throw new RuntimeException("Can't register driver!");
        }
    }
}
- 我们知道初始化是类的加载,连接,初始化的第三个步骤了,导致初始化的是类的首次主动使用
- 而且初始化这个过程是为静态成员变量赋上正确的初值,以及执行静态代码块中的内容
- 那么,上述代码中静态代码块中的内容就是关键之处了

- 这里调用了一个类的静态方法,那么这里也会存在一个初始化的过程,所以我们下面跟进类
DriverManager这个类看一下 - 进入到这个类,那么它的加载、连接、初始化的过程也是从上到下完成的,也会依次完成静态变量的正确初值的赋予,以及静态代码块的执行
public class DriverManager {


    // List of registered JDBC drivers
    private final static CopyOnWriteArrayList<DriverInfo> registeredDrivers = new CopyOnWriteArrayList<>();
    private static volatile int loginTimeout = 0;
    private static volatile java.io.PrintWriter logWriter = null;
    private static volatile java.io.PrintStream logStream = null;
    // Used in println() to synchronize logWriter
    private final static  Object logSync = new Object();

    /* Prevent the DriverManager class from being instantiated. */
    private DriverManager(){}


    /**
     * Load the initial JDBC drivers by checking the System property
     * jdbc.properties and then use the {@code ServiceLoader} mechanism
     */
    static {
        loadInitialDrivers();
        println("JDBC DriverManager initialized");
    }
-
关注到上面最后的这个静态代码块中,以及相应的注释:加载初始化的JDBC驱动通过检查系统属性
jdbc.properties,随后使用ServiceLoader机制进行加载 -
为了更明显的看到这个过程,下面我们分别在
MyTest27,Driver,DriverManager中打上断点,通过Debug来看一下这个过程

-
按照断点依次执行,最后来到
DriverManager的静态代码块中,证明我们前面的分析完全正确 -
所以我们接下来需要跟进
loadInitialDrivers();来看这个方法具体完成了什么
 private static void loadInitialDrivers() {
        String drivers;
        try {
            drivers = AccessController.doPrivileged(new PrivilegedAction<String>() {
                public String run() {
                    return System.getProperty("jdbc.drivers");
                }
            });
        } catch (Exception ex) {
            drivers = null;
        }
        // If the driver is packaged as a Service Provider, load it.
        // Get all the drivers through the classloader
        // exposed as a java.sql.Driver.class service.
        // ServiceLoader.load() replaces the sun.misc.Providers()

        AccessController.doPrivileged(new PrivilegedAction<Void>() {
            public Void run() {

                ServiceLoader<Driver> loadedDrivers = ServiceLoader.load(Driver.class);
                Iterator<Driver> driversIterator = loadedDrivers.iterator();

                /* Load these drivers, so that they can be instantiated.
                 * It may be the case that the driver class may not be there
                 * i.e. there may be a packaged driver with the service class
                 * as implementation of java.sql.Driver but the actual class
                 * may be missing. In that case a java.util.ServiceConfigurationError
                 * will be thrown at runtime by the VM trying to locate
                 * and load the service.
                 *
                 * Adding a try catch block to catch those runtime errors
                 * if driver not available in classpath but it's
                 * packaged as service and that service is there in classpath.
                 */
                try{
                    while(driversIterator.hasNext()) {
                        driversIterator.next();
                    }
                } catch(Throwable t) {
                // Do nothing
                }
                return null;
            }
        });

        println("DriverManager.initialize: jdbc.drivers = " + drivers);

        if (drivers == null || drivers.equals("")) {
            return;
        }
        String[] driversList = drivers.split(":");
        println("number of Drivers:" + driversList.length);
        for (String aDriver : driversList) {
            try {
                println("DriverManager.Initialize: loading " + aDriver);
                Class.forName(aDriver, true,
                        ClassLoader.getSystemClassLoader());
            } catch (Exception ex) {
                println("DriverManager.Initialize: load failed: " + ex);
            }
        }
    }
 - 那么这个系统属性到达是什么呢?我们其实可以打印出来看一下

-
可以看到这个属性默认为空,所以通过这个属性去加载,一般情况下是加载不到的
-
所以下面我们进入到
registerDriver这个方法进行分析
 public static synchronized void registerDriver(java.sql.Driver driver)
        throws SQLException {
        registerDriver(driver, null);
    }
- 根据文档这个方法就是用来注册给的驱动
- 下面又进入到这个方法内部的
registerDriver
  public static synchronized void registerDriver(java.sql.Driver driver,
            DriverAction da)
        throws SQLException {

        /* Register the driver if it has not already been added to our list */
        //注册驱动,如果还没有被添加到我们的列表中
        if(driver != null) {
        //注意这里一个变量registeredDrivers
            registeredDrivers.addIfAbsent(new DriverInfo(driver, da));
        } else {
            // This is for compatibility with the original DriverManager
            throw new NullPointerException();
        }

        println("registerDriver: " + driver);

    }
- 进入到
registeredDrivers
// List of registered JDBC drivers
 private final static CopyOnWriteArrayList<DriverInfo> registeredDrivers = new CopyOnWriteArrayList<>();
6.2 获取连接
Connection conn = DriverManager.getConnection("jdbc:mysql://localhost:3306/mytestdb","username","password");
-
首先
DriveManange是JDK内部提供的一个类,显然应该是由启动类加载器来进行加载的,再根据其静态方法getConnection,以及提供的一些字符串,就能获取到mySQL数据库的一条连接。 -
但是,这里有个奇怪的问题,关于这里其实没有使用任何关于
MySQL的API,就可以获得MySQL的连接,这是为什么呢?最后到底怎么实现的呢? -
简单翻译一下就是:尝试从给定的数据库的URL中创建一个连接,
DriverManager尝试从已经注册的JDBC的驱动集合中选择一个合适的驱动 -
下面分析
getConnection的源码
    @CallerSensitive
    public static Connection getConnection(String url,
        String user, String password) throws SQLException {
        java.util.Properties info = new java.util.Properties();

        if (user != null) {
            info.put("user", user);
        }
        if (password != null) {
            info.put("password", password);
        }
		//url:数据库连接地址
		//info:封装了数据库和用户名的properties对象
		// Reflection.getCallerClass():调用者的Class对象
        return (getConnection(url, info, Reflection.getCallerClass()));
    }
-
这里的
Reflection.getCallerClass()到底是什么?可以打一个断点查看一下 -
现在结果真相大白了,这个所谓的获取调用者的
Class对象就是我们的入口类的Class对象 -
而且这里的类加载器就是系统类加载器,这也很好理解嘛,因为入口类肯定是由系统类加载器来加载的
-
继续往后
-
通过Debug发现这个集合里已经有了两个注册好的驱动了!
-
但是我们在注册驱动的时候仅仅只传递了一个驱动的全限定类名啊?
-
Class.forName("com.mysql.jdbc.Driver"); -
但是这里居然有两个,这又是为何呢?
-
继续往下,这里要注意到一个非常重要的方法
 - 这里还会对已经注册过的驱动和调用者的加载器(系统加载器)一起作为参数进行传递,然后判断
 -
下面进入
isDriverAllowed(aDriver.driver, callerCL)
  private static boolean isDriverAllowed(Driver driver, ClassLoader classLoader) {
        boolean result = false;
        if(driver != null) {
            Class<?> aClass = null;
            try {
            	//用classLoader这个加载器来加载类driver.getClass().getName(),并且初始化
            	//driver.getClass().getName()这显然是获取驱动的全限定类名嘛
                aClass =  Class.forName(driver.getClass().getName(), true, classLoader);
            } catch (Exception ex) {
                result = false;
            }
			//这里会再次把获取到的aClass对象和 driver的Class对象进行比较,二者相等才发回true
			//这里到底是为何呢?
			//这里就是因为命名空间的问题了!!
			//我们知道由于命名空间的存在,两个完全一样的对象可以出现在两个不同的命名空间内
			//而且无法互相访问,这里就是在确定这一点
			//因为在开发中,可以很容易的改变上下文类加载器
             result = ( aClass == driver.getClass() ) ? true : false;
        }

        return result;
    }
- 整个遍历,其实就是在获取当前已经注册的驱动对应的连接
- 综上,这部分的讲解基本结束
十二、 类加载器系统回顾与延伸
- 语义检查:Java中一个类肯定不能同时是
final和abstract的 - 兼容性:老版本的JDK编译的字节码文件可以运行在新的JDK上,但反过来不行

