Maven+Spring boot+mybatis项目搭建(本文采用的是oracle数据库,sts工具)
本文为了大家少走弯路,一步一步教新手搭建项目,废话不多说,让我们开始。
这里用的是STS插件工具,可以手动去下载,也可以在eclipse中的help-->Marketplace安装。
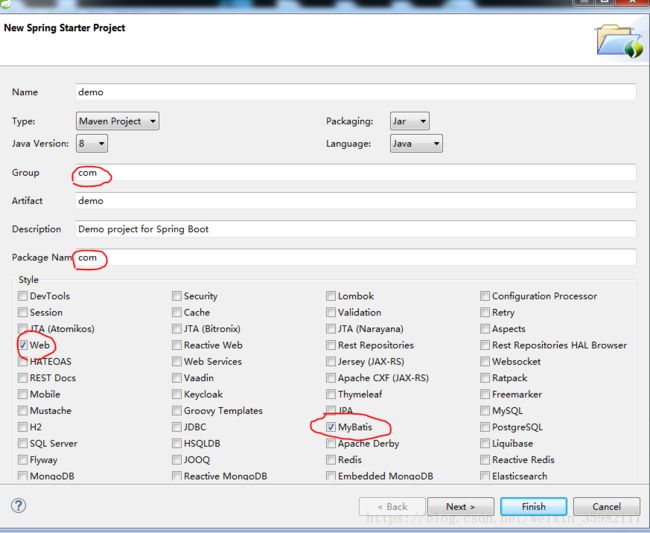
一切准备就绪,右键-->new-->Spring Starter Project
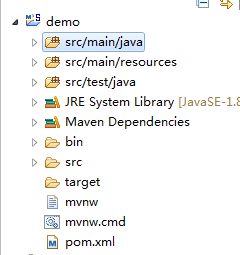
next-->finish,产生如下项目结构:
我们把test相关的包删掉,这里目前没用。
接着我们来配置pom.xml文件,这里列出基本的配置,自行选取适用的,嫌麻烦的直接复制:
	4.0.0

	com
	demo
	0.0.1-SNAPSHOT
	jar

	demo
	Demo project for Spring Boot

		org.springframework.boot
		spring-boot-starter-parent
		2.0.2.RELEASE


		UTF-8
		UTF-8
		1.8


			org.springframework.boot
			spring-boot-starter-web


			org.mybatis.spring.boot
			mybatis-spring-boot-starter
			1.3.2


                        org.springframework.boot
                        spring-boot-starter-thymeleaf


			org.springframework.boot
			spring-boot-starter-test
			test


                        org.springframework.boot
                        spring-boot-devtools


			javax.servlet
			jstl


			org.apache.tomcat.embed
			tomcat-embed-jasper


			org.apache.commons
			commons-lang3


			com.alibaba
			fastjson
			1.2.13


                        com.oracle
                        ojdbc6
                        11.2.0.1.0


			org.springframework.boot
			spring-boot-starter-tomcat
			provided


                        org.apache.maven.plugins
                        maven-resources-plugin
                        2.4.3


                        org.jsoup
                        jsoup
                        1.9.1


                org.mybatis.generator
                mybatis-generator-maven-plugin
                1.3.2

                    ${basedir}/src/main/resources/generator/generatorConfig.xml
                    true
                    true


			org.springframework.boot
			spring-boot-maven-plugin


                    src/main/java

                        **/*.properties
                        **/*.xml

                        false


                        src/main/resources
继续,我们来创建项目要用到的package(这里基于mvc模式):
创建好包之后,修改启动类:
package com;
import org.mybatis.spring.annotation.MapperScan;
import org.springframework.boot.SpringApplication;
import org.springframework.boot.autoconfigure.SpringBootApplication;
import org.springframework.web.bind.annotation.RestController;
@RestController
@SpringBootApplication
@MapperScan("com.dao")
public class DemoApplication {
	public static void main(String[] args) {
		SpringApplication.run(DemoApplication.class, args);
	}
}
server.port=9090

spring.thymeleaf.prefix=classpath:/templates/

spring.datasource.url=jdbc:oracle:thin:@192.168.60.204:1521/tdmes
spring.datasource.username=tdmesdev
spring.datasource.password=tdmesdev
spring.datasource.driver-class-name=oracle.jdbc.driver.OracleDriver
spring.datasource.max-idle=10
spring.datasource.max-wait=10000
spring.datasource.min-idle=5
spring.datasource.initial-size=5

mybatis.mapperLocations=classpath*:com/mapper/*.xml
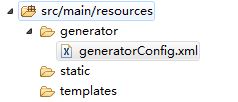
基本的springboot已经配置好了,接下来我们来利用mybatis自动生成(反向工程)dao类、model类、映射文件,前提是要建好数据库(这里省略不讲),我们先在resources下创建一个generatorConfig.xml:
接着贴出generatorConfig.xml的代码(大家仔细看注释)
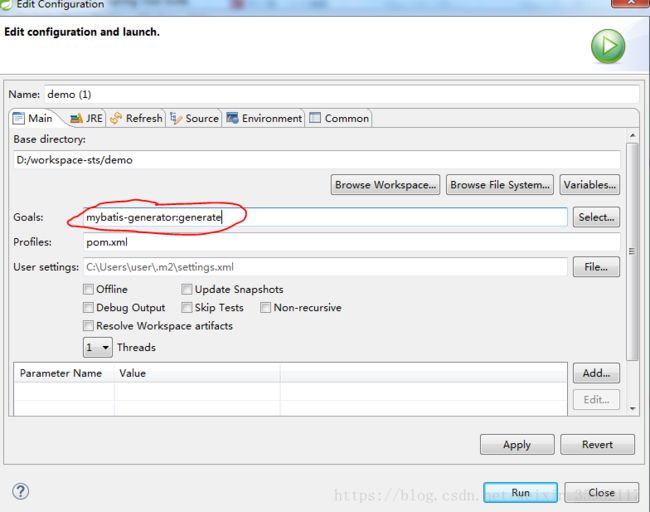
好的,接下来我们开始自动生成,右击项目-->run as -->Maven build...,在goals输入mybatis-generator:generate
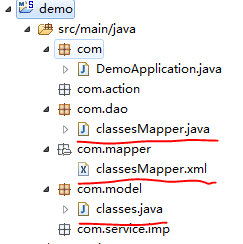
点击Run,等待,然后刷新项目,生成3个文件
接下来我们创建service层interface接口:
package com.service;

import com.model.classes;

public interface ClassService {
	public classes getoneclass(Integer id);
}
然后创建ClassServiceImp类:
package com.service.imp;

import org.springframework.beans.factory.annotation.Autowired;
import org.springframework.stereotype.Service;

import com.dao.classesMapper;
import com.model.classes;
import com.service.ClassService;
@Service(value = "ClassService")
public class ClassServiceImp implements ClassService {
	@Autowired
	private classesMapper classesmapper;
	@Override
	public classes getoneclass(Integer id) {
		// TODO Auto-generated method stub
		return classesmapper.selectByPrimaryKey(id);
	}

}
最后创建Action类:
package com.action;

import org.springframework.beans.factory.annotation.Autowired;
import org.springframework.stereotype.Controller;
import org.springframework.web.bind.annotation.RequestMapping;
import org.springframework.web.bind.annotation.ResponseBody;

import com.model.classes;
import com.service.ClassService;

@Controller
public class Action {
	@Autowired
	private ClassService classservice;
	@RequestMapping("/class")
        public String getclass(){
		classes c=classservice.getoneclass(1);
		System.out.println(c.getClassname());
                return "index";
    }
}
在templates下创建index.html
Insert title here


hi girl
大功告成了,运行程序。
注:有时会遇到报错找不到mapper映射文件中的方法,排查代码没问题,一般是在IDEA下编译的问题,在构建路径中把jre换成自己的就行了。还有如果找不到模板,可能也是编译的问题,clean项目,maven update项目就可以。
