Python selenium+beautifulsoup 登录爬取拉勾网
声明在前:
我的代码和文章仅做学习研究分享,如需转载请注明作者(笨小孩)和出处
https://blog.csdn.net/CC_Cynthia
转载请知会作者;
此文仅供非商业用途,谢谢。
————————————————
拉勾反爬很厉害,先测试下,看使用request看能否解析。
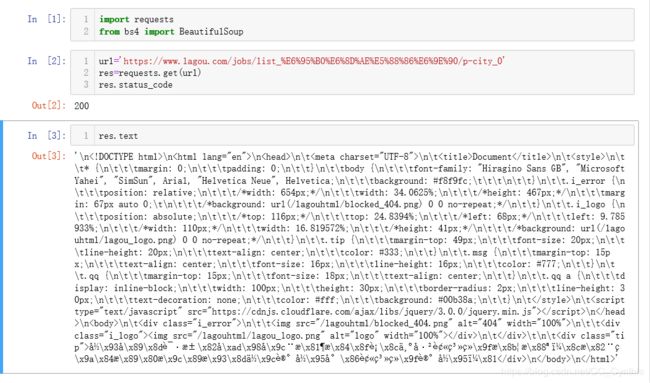
乱码,之后试了一些方法还是不行,防爬系统太严密,所以我决定使用终极杀器selenium。selenium在Jupyter上无法运行,所以我改到Vs上进行。
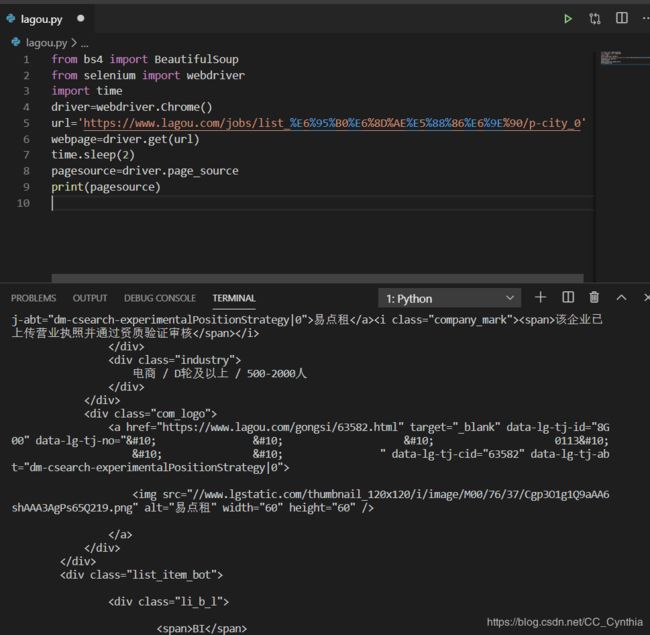
完美!可以提取。
在测试代码时,爬到10页左右会出现登录界面卡住,所以我决定先登录再爬。
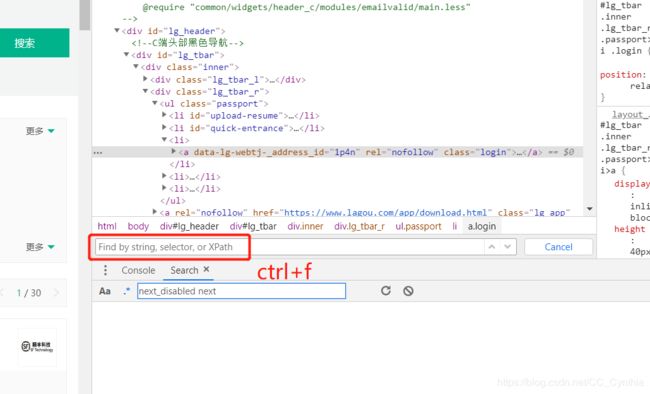
登录,翻页,搜索这些涉及到Xpath的获取,简单的使用class=’xx’,或id=’xxx’无法准确定位到需要的元素。这里详细讲讲,如何使用Chorme得到Xpath的定位。Chorme浏览器功能很强大,能很好的实现Xpath定位,所以建议大家使用爬虫的时候优先考虑它。
先进入拉勾网网址https://www.lagou.com/
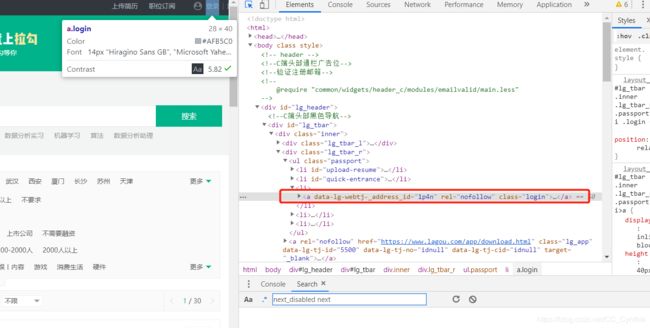
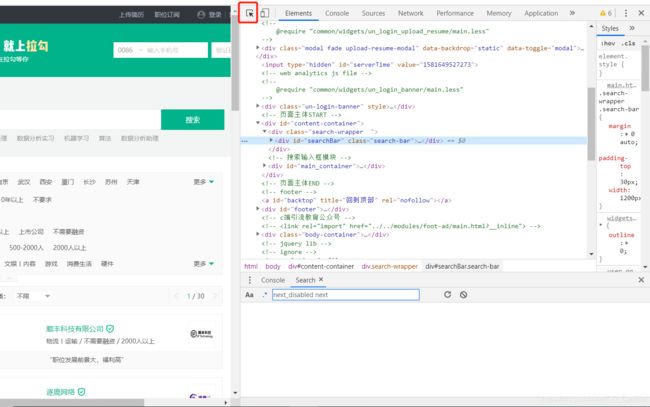
单击鼠标右键,选择检查。进入开发者界面,点选左上角网页元素选择。
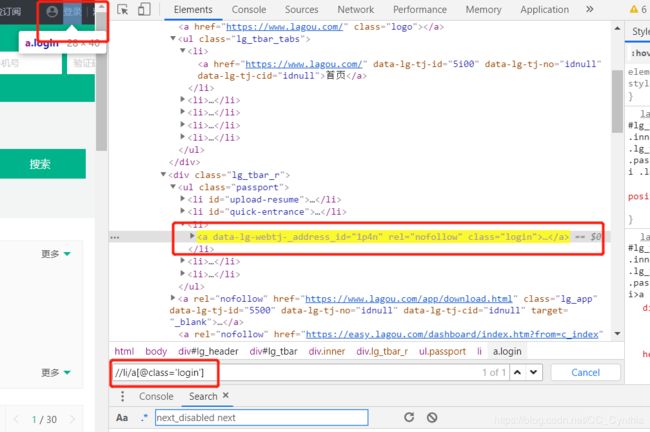
观察父级子级关系,a标签在li标签之下,class属性为login。
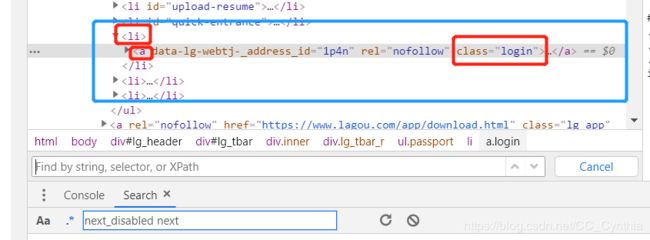
很好,能找到。我们就可以带入到selenium里面,让selenium和Xpath合作啦~

下面上代码o(////▽////)q
from bs4 import BeautifulSoup
from selenium import webdriver
import time
import csv

#职位
job_title_list=[]
#职位具体链接
job_link_list=[]
job_skills=[]
#经验要求
experience_list=[]
#公司名
company_list=[]
#公司规模
industry_list=[]
#公司福利
company_describe_list=[]
#公司介绍
company_link_list=[]
#薪资待遇
salary_list=[]
#工作地点
location_list=[]
head=['job_title','job_link','job_skills','experience','company','industry',
'company_describe','company_link','salary','location']


keywords=['数据分析','bi','商业数据分析']
for keyword in keywords:
    a=1
    driver=webdriver.Chrome()
    webpage=driver.get('https://www.lagou.com/')
    time.sleep(2)
    #选全国
    quanguo=driver.find_element_by_xpath('//p[@class="checkTips"]/a')
    quanguo.click()
    #登录
    login=driver.find_element_by_xpath('//li/a[@class="login"]')
    login.click()
    username=driver.find_element_by_xpath('//div/input[@type="text"]')
    username.send_keys('xxx')
    psw=driver.find_element_by_xpath('//div/input[@type="password"]')
    psw.send_keys('xxx')
    log_in=driver.find_element_by_xpath('//div/div[@class="login-btn login-password sense_login_password btn-green"]')
    log_in.click()
    time.sleep(20)
    #输入搜索keyword内容
    search=driver.find_element_by_xpath('//input[@id="search_input"]')
    search.send_keys(keyword)
    time.sleep(2)
    search_button=driver.find_element_by_xpath('//input[@id="search_button"]')
    search_button.click()
    time.sleep(3)
    #关闭红包界面
    hongbao=driver.find_element_by_xpath('//div[@class="body-btn"]')
    hongbao.click()
    time.sleep(2)
    #我想要全国的数据
    city=driver.find_element_by_xpath('//a[@data-id="$workcity.id"]')
    city.click()
    time.sleep(2)
    #数据转为text格式,方便进行beautiful soup
    pagesource=driver.page_source
    #print(pagesource)
    soup=BeautifulSoup(pagesource,'html.parser')
    #提取页码总数
    pagenum=driver.find_element_by_xpath('//span[@class="span totalNum"]').text
    while a<(int(pagenum)+1):
        time.sleep(2)
        print('正在爬取第'+str(a)+'页……')
        #提取最小父级标签
        jobs=soup.find_all('li',attrs={'data-index':True})
        for job in jobs:
            job_title=job['data-positionname']
            job_title_list.append(job_title)
            job_link=job.find('a',attrs={'class':'position_link'})['href']
            job_link_list.append(job_link)
            skills=job.find('div',attrs={'class':'list_item_bot'}).find('div',attrs={'class':'li_b_l'}).find_all('span')
            job_skills.append(skills)
            experience=job.find('div',attrs={'class':'li_b_l'}).text
            experience_list.append(experience)
            company=job['data-company']
            company_list.append(company)
            industry=job.find('div',attrs={'class':'industry'}).text.strip()
            industry_list.append(industry)
            company_describe=job.find('div',attrs={'class':'li_b_r'}).text.strip()
            company_describe_list.append(company_describe)
            company_link=job.find('div',attrs={'class':'company_name'}).find('a')['href']
            company_link_list.append(company_link)
            salary=job['data-salary']
            salary_list.append(salary)
            location=job.find('span',attrs={'class':'add'}).find('em').text
            location_list.append(location)
        a=a+1
        #翻页
        page=driver.find_element_by_xpath("//span[@class='pager_next ']")
        page.click()
        time.sleep(2)
    driver.quit()

#存数据
rows =zip(job_title_list,job_link_list,job_skills,experience_list,company_list,
industry_list,company_describe_list,company_link_list,salary_list,location_list)
csv_file=open('lagou.csv','w',newline='',encoding='gbk')
writer=csv.writer(csv_file)
writer.writerow(head)
for row in rows:
    writer.writerow(row)
csv_file.close()
这里说明几个我在写代码过程中遇到的问题。
1.time.sleep( )的设置
由于我的代码比较简陋,没有封装函数判断网页中元素是否加载完成,所以只能通过预估时间设置time.sleep()。
这部分代码的改进可以引用WebDriverWait解决。
2.验证码部分只能手工操作。
验证码部分的输入很复杂,我目前没有好的解决办法,所以是自己手动输入的。
3.a=1一开始设置for keyword in keywords循环之外
这样导致后面的while a<(int(pagenum))循环在爬取第一个“数据分析”之后无法进行。后来才发现是a值太大while循环无法进行。
4.存储数据时
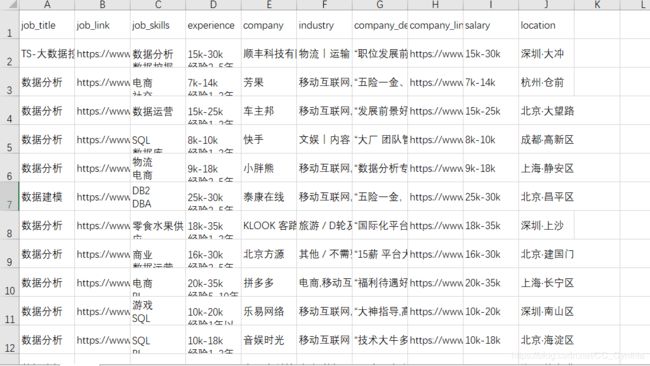
在存储数据之前,为了确保每个列表的长度是一样的,每个列表先跑一次len( )函数。但是csv存储数据是一行一行的,为了实现每个列表存成一列,就需要使用zip( )函数,实现转置。
rows =zip(job_title_list,job_link_list,job_skills,experience_list,company_list,
industry_list,company_describe_list,company_link_list,salary_list,location_list)
csv_file=open('lagou.csv','w',newline='',encoding='gbk')
writer=csv.writer(csv_file)
writer.writerow(head)
for row in rows:
    writer.writerow(row)
csv_file.close()
可以改进的地方:
1.可以封装函数,使得代码简洁;
2.使用input输入搜索内容,用户名及密码;
3.找到自动识别验证码的方法,实现全自动;
4.翻页功能可以更加细化,判断是否到底停止;
5.存储按照列表显得很繁琐,应该有更加简洁的办法。
