Java学习知识点小结17(Mybatis框架)
目录
- Mybatis简介
- Mybatis使用示例(不使用maven依赖):
- mybatis接口式编程
- mybatis全局配置文件
- Mybatis映射文件
- 参数处理
- select:映射查询语句
- resultMap
- 动态SQL
- MyBatis缓存
- MyBatis整合Spring
Mybatis简介
1.Mybatis是一个持久化层框架(与数据库交互)
2.Mybatis是一个半自动框架:Sql与Java编码分离并且sql是由开发人员通过配置文件控制
3.Mybatis原理

Mybatis使用示例(不使用maven依赖):
(1)导入mybatis的jar包,以及mysql驱动jar包下载地址
(2)创建全局配置文件 mybatis-config.xml:
<configuration>
    <environments default="development">
        <environment id="development">
            <transactionManager type="JDBC"/>
            <dataSource type="POOLED">
                <property name="driver" value="com.mysql.cj.jdbc.Driver"/>
                <property name="url" value="jdbc:mysql://localhost:3306/mybatis?useUnicode=true&characterEncoding=UTF-8&userSSL=false&serverTimezone=GMT%2B8"/>
                <property name="username" value="root"/>
                <property name="password" value="xjh1999"/>
            dataSource>
        environment>
    environments>

    <mappers>
        <mapper resource="EmployeeMapper.xml"/>
    mappers>
configuration>
(4)在数据库中创建数据表,编写对应的实体类
(这里是employee表,字段有id,last_name,eamli,gender)
(3)编写sql映射文件EmployeeMapper.xml,配置了每一个sql,以及sql封装规则
<mapper namespace="cn.xjh.mybatis.EmployeeMapper">
    <select id="selectEmp" resultType="cn.xjh.mybatis.bean.Employee">
      select id,last_name lastname,email,gender from employee where id = #{id}
    select>
mapper>
(4)将sql映射文件注册到全局配置文件中 (第二步内)
写代码:
(5)根据全局配置文件创建一个SqlSessionFactory对象
(6)使用sqlSession工厂获取到sqlSession对象,使用该对象进行增删改查
(7)使用sql唯一标识告诉mybatis使用哪个sql
/**
 * @author XJH
 */
public class MyBatisTest {
    public SqlSessionFactory getSqlSessionFactory() throws IOException {
//        工具类Resources加载配置文件,并根据配置文件创建SqlSessionFactory对象
        String resource = "mybatis-config.xml";
        InputStream inputStream = Resources.getResourceAsStream(resource);
        return new SqlSessionFactoryBuilder().build(inputStream);
    }

    @Test
    public void test01() throws IOException {
//        获取sqlSession工厂对象
        SqlSessionFactory sqlSessionFactory = getSqlSessionFactory();
//        获取sqlSession实例,能直接执行已经映射的sql语句。autoCommit默认为false,手动提交事务
        SqlSession openSession = sqlSessionFactory.openSession();

//        使用配置文件EmployeeMapper配置好的sql语句
        try {
            Employee employee = openSession.selectOne("cn.xjh.mybatis.EmployeeMapper.selectEmp", 1);
            System.out.println(employee.toString());
        } finally {
            openSession.close();
        }
    }
}
mybatis接口式编程
首先在sql映射文件内,将namespace名称空间指定为接口的全类名,select标签id与接口的方法绑定。
<mapper namespace="cn.xjh.mybatis.dao.EmployeeMapper">
    <select id="getEmpById" resultType="cn.xjh.mybatis.bean.Employee">
      select id,last_name lastname,email,gender from employee where id = #{id}
    select>
mapper>
编写测试类:接口绑定配置文件后,不需要实现类也可以调用
    @Test
    public void test02() throws IOException {
//        获取sqlSession工厂对象
        SqlSessionFactory sqlSessionFactory = getSqlSessionFactory();
//        获取sqlSession实例,能直接执行已经映射的sql语句。
        SqlSession openSession = sqlSessionFactory.openSession();
//        获取接口的实现类对象
        try {
            EmployeeMapper mapper = openSession.getMapper(EmployeeMapper.class);
//        调用接口内的函数得到Emp对象
            Employee employee = mapper.getEmpById(1);
            System.out.println(employee.toString());
        }finally {
            openSession.close();
        }
    }
mybatis全局配置文件
(1)
resource=“引入类路径下资源”" url="引入网络路径或者磁盘下路径资源
(2)⭐
name=“设置项名” value=“设置项取值”
<settings>

    <setting name="mapUnderscoreToCamelCase" value="true"/>

    <setting name="logImpl" value="STDOUT_LOGGING"/>
settings>
(3)
(4)
(5)
(6)
(7)
内部必须有两个标签:事务管理器
数据源
(8)
首先使用
然后在sql映射配置文件中配置语句时添加
(9)
resource:引用类路径下的sql映射文件
url:引用网络或磁盘路径下的sql映射文件
class:应用(注册)接口,如果有映射文件则映射文件必须与定义的接口同名,并且放在接口同一目录下;还可以使用注解配置
(重要,复杂的Dao接口写sql映射配置文件;简单的Dao接口可以直接使用注解方式)
知识点:源码文件夹内所有的东西都会合并在类路径下。所以为了简洁明了可以给src源代码文件夹与conf配置文件夹这两个源码文件夹都分别创建同名的cn.xjh.dao包。将dao接口放在src目录下的dao包,将sql映射配置xml文件放在conf目录下的dao包。 可以实现简洁,且满足编译时映射文件与接口在同一目录下。
Mybatis映射文件
(1)在sql映射配置文件mapper标签内增加
insert:映射插入语句
update:映射更新语句
delete:映射删除语句
❗在编写增删改的接口时候,mybatis允许的返回值是Integer(修改影响的行),Long,Boolean(将修改影响的行封装为修改结果)
//useGeneratedKeys="true" keyProperty="id" 代表获取自增的主键值
<insert id="addEmp" parameterType="cn.xjh.mybatis.bean.Employee"  useGeneratedKeys="true" keyProperty="id">
  insert into employee(last_name,gender,email)values (#{lastName},#{gender},#{email})
insert>
<update id="updateEmp" parameterType="cn.xjh.mybatis.bean.Employee">
 update employee set last_name=#{lastName},gender=#{gender},email=#{email} where id=#{id}
update>
<delete id="deleteEmpById" >
    delete from employee where id=#{id}
delete>
测试代码:
    @Test
    public void test03() throws IOException {
//        获取sqlSession工厂对象
        SqlSessionFactory sqlSessionFactory = getSqlSessionFactory();
//        获取sqlSession实例,能直接执行已经映射的sql语句,openSession函数内没有参数代表手动提交事务
        SqlSession openSession = sqlSessionFactory.openSession();
//        获取接口的实现类对象
        try {
            EmployeeMapper mapper = openSession.getMapper(EmployeeMapper.class);
//        调用接口内的函数得到Emp对象
            mapper.addEmp(new Employee(null,"curry","goldenstatewarrior","1"));
//        手动提交事务
            openSession.commit();
        }finally {
            openSession.close();
        }
    }
参数处理
单个参数,mybatis不会做特殊处理 #{参数名}:取出参数值
多个参数,会做特殊处理。会将多个参数封装为一个map
key:param1;value:参入的参数值
#{param1}:取出第一个参数
多参数时的传值方法(以及第五项集合参数的处理):
(1) 命名参数:多个参数时,在定义接口的时候,通过注解明确指定参数key值
public Employee getEmpByIdAndName(@Param("id") Integer id,@Param("lastName") String lastName);也可以直接传入map
(2) POJO
如果多个参数正好是业务逻辑模型,可以直接传入pojo
#{属性名}:取出传入pojo属性值(3) Map
如果多个参数不是业务模型中的数据,没有对应的pojo,也可以直接传入map
#{key}:取出map内对应的值(4) 如果多个参数不是业务模型中的数据,但要经常使用,推荐写一个TO 数据传输对象(例如page分页对象)
(5) 特别注意:如果参数是Collection类型或者是数组也会特殊处理,即使只有一个参数也会封装为map
key:collection[0];value是传入的第一个集合对象
如果是链表 ,key可以写成list[0];如果是数组,key可以写成array[0]
#{}与${}取值的差别:
#{}是以预编译的形式,将参数设置到sql语句中,防止sql注入
${}取出的值直接拼接到sql语句中,会有安全问题
大多数情况选用#{},但在原生JDBC不支持占位符的情况(例如分库分表时候select from 表 名 , 或 者 o r d e r b y {表名},或者order by 表名,或者orderby{列名}),只能使用${} 直接将参数拼接在sql中。
select:映射查询语句
(1)如果接口内定义函数返回值为list
接口定义:public List
在xml配置select语句时候,resultType内写的是集合中元素的类型
<select id="getEmpById" resultType="cn.xjh.mybatis.bean.Employee">
      select * from employee where id = #{id}
select>
(2)如果接口内定义函数返回值需要返回map(key是id,value是employee对象)
接口定义:
@MapKey("id")//注解能够将存放对象的 List 转化为 key 值为对象的某一属性的 Map(对象即为value值)
     public Map<Integer,Employee> selectEmp(Integer id);
在xml配置中:(resultType内为返回的map内value的类)
<select id="selectemp" resultType="cn.xjh.mybatis.bean.Employee">
        select * from employee where id = #{id}
select>
resultMap

resultMap与resultType属性只能二选一
(1)普通查询
首先在在映射文件内配置:
<resultMap id="myRM" type="cn.xjh.mybatis.bean.Employee">

    <id column="id" property="id"/>


    <result column="last_name" property="lastName"/>

resultMap>
在select标签内引用:
<select id="getEmpById" resultMap="myRM">
    select * from employee where id=#{id}
select>
(2)联合查询
在Employee类内有个属性为Department类的对象,存储部门信息,查询两张表,使用级联属性封装结果集到一个Emp对象内。
<resultMap id="myRM2" type="cn.xjh.mybatis.bean.Employee">
    <id column="id" property="id"/>
    <result column="last_name" property="lastName"/>
    <result column="gender" property="gender"/>


    <result column="did" property="department.id"/>
    <result column="dept_name" property="department.departmentName"/>
resultMap>

<select id="getEmpAndDept" resultMap="myRM2">
 SELECT e.id id,e.last_name last_name,e.gender gender,d.id did,d.dept_name dept_name
 FROM employee e,department d
 WHERE e.d_id=d.id AND e.id=#{id}
select>
(3)使用association进行分步式查询
✔先按照员工id查询employee表内员工信息
✔根据查出员工信息中的d_id值去部门表查询部门信息
✔把查出的部门设置到员工中;
首先 编写DepartmentMapper接口
public interface DepartmentMapper {
    public Department getDeptById(Integer id);
}
然后是DepartmentMapper.xml配置文件
<select id="getDeptById" resultType="cn.xjh.mybatis.bean.Department">
     select id,dept_name departmentName  from department where id=#{id}
select>
编写EmployeeMapperPlus对应的映射文件,分步查询(先查员工,再用查到的部门id查询部门,在封装好返回给员工对象)
<resultMap id="myRM3" type="cn.xjh.mybatis.bean.Employee">
    <id column="id" property="id"/>
    <result column="last_name" property="lastName"/>
    <result column="gender" property="gender"/>

    <association property="department"  select="cn.xjh.mybatis.dao.DepartmentMapper.getDeptById" column="d_id">
    association>
resultMap>


<select id="getEmpAndDeptStep" resultMap="myRM3">
 select * from employee where id=#{id}
select>
使用联合查询时,employee的信息和department的信息会同时查出,会造成资源浪费。
可以在全局配置文件内使用setting标签实现延迟加载,先加载主信息,等到需要使用关联信息时再去加载关联信息。
<setting name="lazyLoadingEnabled" value="true"/>

<setting name="aggressiveLazyLoading" value="false"/>
(4)使用association定义对象内单个关联对象的封装规则。
还可以使用collection标签定义对象的关联对象集合。
(5)在resultMap标签内使用鉴别器discriminator,可以简单的理解为在resultMap中的swith:case语句。
实例:
<resultMap id="myRM3" type="cn.xjh.mybatis.bean.Employee">
    <id column="id" property="id"/>
    <result column="last_name" property="lastName"/>
    <result column="gender" property="gender"/>

    <discriminator javaType="String" column="gender">

        <case value="0" resultType="cn.xjh.mybatis.bean.Employee">
            <association property="department"  select="cn.xjh.mybatis.dao.DepartmentMapper.getDeptById" column="d_id">association>
        case>
    discriminator>
resultMap>
动态SQL
MyBatis强大特性,简化拼装SQL操作
(1)动态SQL的标签:
◾ if:判断
◾ choose(when,otherwise):选择
◾ trim(where封装查询条件,set封装修改条件):字符串裁剪
◾foreach
(3)if标签的使用实例:
接口函数定义:(输入一个对象,根据该对象有的属性进行查询)
public List<Employee> getEmpByConditionIf(Employee employee);sql映射文件:
<select id="getEmpByConditionIf" resultType="cn.xjh.mybatis.bean.Employee">
    select * from employee where 1=1
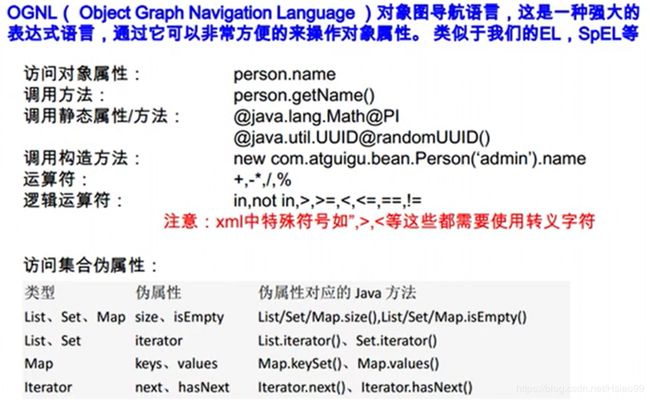
    /*test内使用OGNL判断表达式,从传入的参数取值进行判断,遇到特殊字符需要使用转义字符*/
    <if test="id!=null">and id=#{id}if>
    <if test="lastName!=null && lastName!=""">and last_name like #{lastName}if>
    <if test="email!=null and email.trim()!=""">and email=#{email}if>
    <if test="gender==0 or gender==1">and gender=#{gender}if>
select>
❗在语句where后使用1=1或者使用where标签防止sql语法错误
(4)trim标签的使用实例:
prefix属性:给拼串后的整个字符串加一个前缀 (例如where,set)
prefixOverrides:前缀覆盖,去掉字符串前面多余的字符
suffix:给拼串后的整个字符串加一个后缀
suffixOverrides:后缀覆盖,去掉整个字符串后面多余的字符 (例如and或者逗号)
(5)choose的使用实例:
choose标签用于分支选择,按照when标签的顺序,只会进入其中一个分支进行查询。如果都不满足表达式,则进入otherwise中。
<select id="getEmpByConditionChoose" resultType="cn.xjh.mybatis.bean.Employee">
    select * from employee
    <where>
    <choose>
        <when test="id!=null">id=#{id}when>
        <when test="lastName!=null">last_name=#{lastName}when>
        <when test="gender!=null">gender=#{gender}when>
        <otherwise>1=1otherwise>
    choose>
    where>
select>
(5)foreach的使用实例:
当mabatis定义的接口函数传入参数为集合时,需要构建in条件语句或者批量操作语句,使用
批量查询:
传入id集合,查询所有的id
public List<Employee> getEmpByConditionForeach(@Param("ids") List<Integer> ids);<select id="getEmpByConditionForeach" resultType="cn.xjh.mybatis.bean.Employee">
select * from employee where id in
/*collection:指定要遍历的集合,在接口参数前使用@Param注解定义
item:将当前遍历出的元素赋值给指定的变量
separator:每个元素之间的分隔符
open:给遍历出所有的结果拼接一个开始字符
close:给遍历出所有的结果拼接一个结束字符
index:遍历list的时候是索引,遍历mao时候index表示是map的key,item是map的值*/
<foreach collection="ids" item="id" separator="," open="(" close=")" >
#{id}
</foreach>
</select>批量保存:
传入list集合,将集合内所有emp对象保存
public void addEmps(@Param("emps") List<Employee> emps);
<insert id="addEmps">
    insert into employee(last_name,email,gender,d_id)
    values
    <foreach collection="emps" item="emp" separator=",">
        (#{emp.lastName},#{emp.email},#{emp.gender},#{emp.department.id})
    foreach>
insert>
(6)mybatis两个内置参数
_parameter:代表接口函数传入的参数(如果是单个参数则代表这个参数,如果是多个参数则代表多个参数封装成的map)
_databaseId:如果配置了databaseId则代表当前数据库的别名
(7)bind标签的使用实例:
可以将OGNL表达式的值绑定到一个变量中,方便引用
<bind name="变量名" value="OGNL表达式"/>(8)sql标签的使用实例:
抽取可以重用的sql片段
1.例如将经常需要查询或插入的列名抽取出来方便引用
2.用include标签来引用,include标签还可以自定义一些property,sql标签内部可以${}使用自定义的属性。
MyBatis缓存
一级缓存(本地缓存):
(1)与数据库同一次会话期间查询到的数据会放在本地缓存中,以后如果需要相同的数据,直接从缓存中获取,不再查询。
(2)一级缓存失效情况:
◾sqlSession不同
◾sqlSession相同但是查询条件不同(当前缓存中还没有数据)
◾sqlSession相同,但是两次查询之间执行了增删改操作
◾openSession.clearCache(); 查询后手动清除了一级缓存
二级缓存(本地缓存):
一个namespace(存储作用域为Mapper)对应一个二级缓存
(1)工作机制:
◾当一个会话关闭,该会话一级缓存中的数据会被保存在二级缓存中,新的会话可以在二级缓存内获取已查询到的信息。
◾不同namespace查出的数据放在自己对应的缓存中(map形式)
◾只有会话提交或关闭后,该会话的一级缓存的数据才转移到二级缓存中
(2)使用方法:
◾在全局配置文件内开启全局二级缓存配置
<setting name="cacheEnabled" value="true"/>◾在mapper.xml中使用
seviction:缓存的回收策略(LRU,FIFO,SOFT,WEAK) 默认为LRU最近最少使用
flushInterval:缓存刷新间隔,设置缓存多长时间(ms)清空,默认不清空
readOnly:缓存是否只读,true直接将数据在缓存中的引用交给用户,不安全;默认false,利用序列化技术克隆一份数据,安全。
size:表示缓存存放多少个元素
type:指定自定义缓存全类名(实现Cache接口自定义缓存或者第三方缓存)
◾因为缓存需要序列化与反序列化,所以POJO对象需要实现序列化接口(implements Serializable)

(3)和缓存有关的设置:
◾在全局配置中 cacheEnabled=false:关闭缓存(二级缓存关闭,一级缓存可用)
◾在映射配置的select标签内的属性 useCashe=flase (不使用二级缓存,一级缓存可用)
◾每一个增删改标签的属性 flushCache=true (执行完成后清除所有的缓存)
◾openSession.clearCache()(清除当前Session的一级缓存,二级缓存可用)
MyBatis整合ehcache
mybatis本身缓存是简单的map实现,所以mybatis定义了cache接口,允许缓存由第三方缓存来实现,第三方缓存只要实现该接口即可。整合后就可以由mybatis在程序中调用。
使用方法:
(1)导入ehcache的jar包并使用slf4j日志来记录
jar包下载地址
(2)下载mybatis和ehcache的适配包
(3)创建ehcache.xml配置文件
<ehcache xmlns:xsi="http://www.w3.org/2001/XMLSchema-instance"
 xsi:noNamespaceSchemaLocation="http://ehcache.org/ehcache.xsd">

 <diskStore path="D:\ehcache" />

 <defaultCache
   maxElementsInMemory="1000"
   maxElementsOnDisk="100000"
   eternal="false"
   overflowToDisk="true"
   timeToIdleSeconds="120"
   timeToLiveSeconds="120"
   diskExpiryThreadIntervalSeconds="120"
   memoryStoreEvictionPolicy="LRU">
 defaultCache>
ehcache>
(3)在mapper.xml中配置自定义缓存
<mapper namespace="cn.xjh.mybatis.dao.EmployeeMapper">

    <cache type="org.mybatis.caches.ehcache.EhcacheCache"/>
    <select id="getEmpById" resultType="cn.xjh.mybatis.bean.Employee" useCache="true">
      select * from employee where id = #{id}
    select>
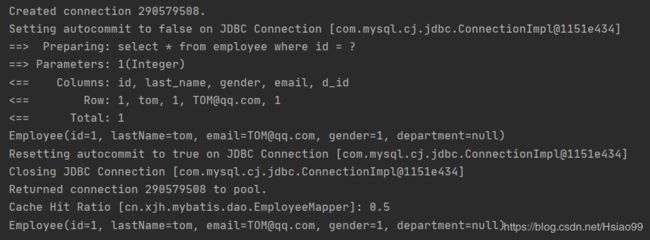
mapper>测试:使用两个openSession创建的mapper对象调用查找函数 getEmpById(1),第二次从缓存中获取。

MyBatis整合Spring
☘(1)项目结构

添加spring框架模块:(自动配置web.xml,自动生成spring配置文件applicationContext.xml以及springmvc配置文件dispatcher-servlet.xml。

☘(2)首先引入所有需要的jar包

☘(3)引入mybatis全局配置文件以及sql映射配置文件

☘(4)web.xml文件编写
<web-app xmlns="http://xmlns.jcp.org/xml/ns/javaee"
         xmlns:xsi="http://www.w3.org/2001/XMLSchema-instance"
         xsi:schemaLocation="http://xmlns.jcp.org/xml/ns/javaee http://xmlns.jcp.org/xml/ns/javaee/web-app_4_0.xsd"
         version="4.0">

    <context-param>
        <param-name>contextConfigLocationparam-name>
        <param-value>/WEB-INF/applicationContext.xmlparam-value>
    context-param>
    <listener>
        <listener-class>org.springframework.web.context.ContextLoaderListenerlistener-class>
    listener>

    <servlet>
        <servlet-name>dispatcherservlet-name>
        <servlet-class>org.springframework.web.servlet.DispatcherServletservlet-class>
        <load-on-startup>1load-on-startup>
    servlet>
    <servlet-mapping>
        <servlet-name>dispatcherservlet-name>
        <url-pattern>/url-pattern>
    servlet-mapping>
web-app>
☘(5)spring配置文件applicationContext.xml
<beans xmlns="http://www.springframework.org/schema/beans"
       xmlns:xsi="http://www.w3.org/2001/XMLSchema-instance"
       xmlns:context="http://www.springframework.org/schema/context"
       xmlns:tx="http://www.springframework.org/schema/tx"
       xmlns:mybatis-spring="http://mybatis.org/schema/mybatis-spring"
       xsi:schemaLocation="http://www.springframework.org/schema/beans http://www.springframework.org/schema/beans/spring-beans.xsd http://www.springframework.org/schema/context http://www.springframework.org/schema/context/spring-context.xsd http://www.springframework.org/schema/tx http://www.springframework.org/schema/tx/spring-tx.xsd http://mybatis.org/schema/mybatis-spring http://mybatis.org/schema/mybatis-spring.xsd">


    <context:component-scan base-package="cn.xjh.ssm" >
        <context:exclude-filter type="annotation" expression="org.springframework.stereotype.Controller"/>
    context:component-scan>


    <context:property-placeholder location="classpath:db.properties"/>
    <bean id="dataSource" class="com.alibaba.druid.pool.DruidDataSource">
        <property name="url" value="${url}"/>
        <property name="driverClassName" value="${driverClassName}"/>
        <property name="username" value="${user}"/>
        <property name="password" value="${password}"/>
        <property name="initialSize" value="${initialSize}"/>
        <property name="maxActive" value="${maxActive}"/>
    bean>

    <bean id="dataSourceTransactionManager" class="org.springframework.jdbc.datasource.DataSourceTransactionManager">
        <property name="dataSource" ref="dataSource"/>
    bean>

    <tx:annotation-driven transaction-manager="dataSourceTransactionManager"/>


    <bean id="sqlSessionFactoryBean" class="org.mybatis.spring.SqlSessionFactoryBean">
        <property name="dataSource" ref="dataSource"/>

        <property name="configLocation" value="classpath:mybatis-config.xml"/>

        <property name="mapperLocations" value="classpath:EmployeeMapper.xml"/>
    bean>


  <mybatis-spring:scan base-package="cn.xjh.ssm.dao"/>
beans>
☘(6)springMVC配置文件dispatcher-servlet.xml
<beans xmlns="http://www.springframework.org/schema/beans"
       xmlns:xsi="http://www.w3.org/2001/XMLSchema-instance"
       xmlns:context="http://www.springframework.org/schema/context"
       xmlns:mvc="http://www.springframework.org/schema/mvc"

       xsi:schemaLocation="http://www.springframework.org/schema/beans http://www.springframework.org/schema/beans/spring-beans.xsd http://www.springframework.org/schema/context http://www.springframework.org/schema/context/spring-context.xsd http://www.springframework.org/schema/mvc http://www.springframework.org/schema/mvc/spring-mvc-4.0.xsd">


    <context:component-scan base-package="cn.xjh.ssm" use-default-filters="false">
        <context:include-filter type="annotation" expression="org.springframework.stereotype.Controller"/>
    context:component-scan>


    <bean class="org.springframework.web.servlet.view.InternalResourceViewResolver">
        <property name="prefix" value="/WEB-INF/pages/"/>
        <property name="suffix" value=".jsp"/>
    bean>

    <mvc:annotation-driven/>
    <mvc:default-servlet-handler/>
beans>编写Service层EmployeeService:
service要加上注解@Service,注册到Spring容器内
@Autowired标签得到容器内已经注入的mapper对象(dao层)
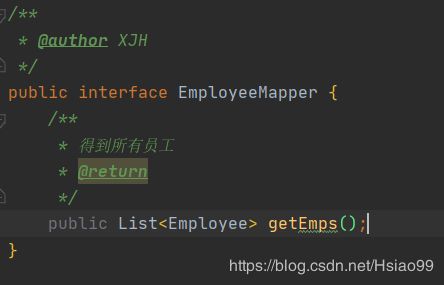
调用mapper内的getEmps方法

Employeemapper(mapper的配置文件在参考上面sql映射配置):

编写控制器类EmployeeController:
控制器类加上注解@Controller
使用@Autowired标签得到容器里的service对象
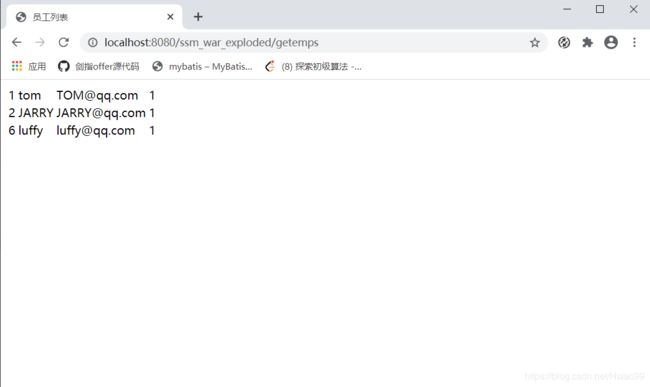
请求发送到控制类内,控制器封装查询结果并跳转到pages包下的list页面打印。


