HTML&CSS实验(8)
【实验目的】
学习网页的版块设计和菜单设计。
【实验工具】
采用记事本编辑,也可以采用Visual Studio、Dreamweaver等具有网页编辑功能的软件打开并编辑页面,或者直接在Eclipse或netbeans下编辑运行。
或者使用在线试:http://172.18.187.11:8080/lab/html8/
【安全设置】
如果网页中有xss安全问题,在Chrome下运行在线调试会出现xss审计错误。解决方法是,先关闭所有Chrome窗口,然后找到Chrome程序,并使用以下命令启动Chrome:
C:\Users\isszym\AppData\Local\Google\Chrome\Application\chrome.exe
–args –disable-xss-auditor
也可以在快捷方式中加入参数。
【实验内容】
1、(board1.html)参考源码中给出的部分样式,并在只修改样式的情况下按照下图设计一个类似的版块。要求:多个div采用inline-block放于一行,通过增加前面元素的宽度进行对齐。列表图标通过:before加上。 * 这里的修改表示增改删。

* .bulletin加上背景色(WhiteSmoke)参考一下:
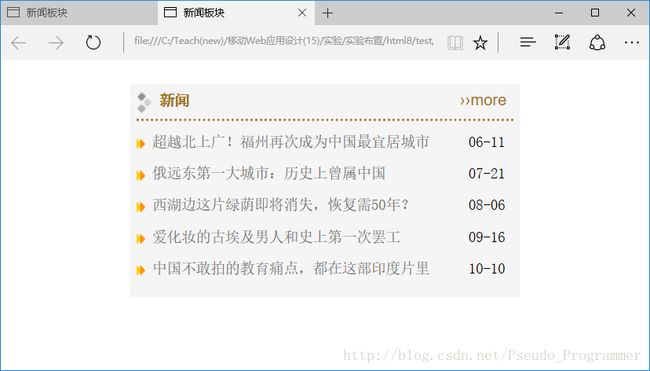
特别的样式属性提示:vertical-align
完成后截图:
① 未加入背景色:
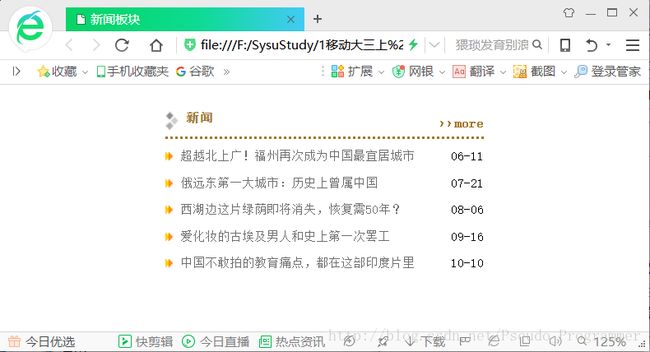
② 加入背景色后:

样式源代码(board1.html):
<style>
        * {
            margin: 0;
            padding: 0;
            line-height: 1.2em;
        }
        *, a:link, a:visited, a:hover, a:active {
            text-decoration: none;
            font-size: 12px;
            font-family: 宋体;
        }
        .clear {clear: both;}
        li {list-style-type: none;}
        #board1 {
            width: 310px;
            margin: auto;
            margin-top: 25px;
            background-color:whitesmoke;
            padding:7px;
        }
        div div {display: inline-block;}
        .boardmenu {
            height: 18px;
            width: 100%;
            border-bottom: dotted #a17525;
            padding-bottom: 7px;
            margin-bottom: 10px;
        }
        .boardmenu .title {width:260px;}
        .boardmenu .title img {
            vertical-align: text-top;
            padding-right:7px;
        }
        .boardmenu .title span {
            color: #a17525;
            font-weight: bold;
            font-family: 黑体;
        }
        .boardmenu .more {font-weight: bolder; }
        .boardmenu .more a {
            font-size: 13px;
            font-family: sans-serif;
            color: #a17525;
        }
        .boardcontent li {height: 26px;}
        .boardcontent a {
            font-size: 12px;
            color: #6f6f6f;
        }
        .boardcontent li:before {
            content: url('images/list_icon.gif');
            padding-right: 7px;
        }
        li  span {float: right;}
    style>
2、(menu1.html) 参考源码中给出的部分样式,并在只修改样式的情况下按照下图设计一个类似的版块,动图见menu1.mp4。要求:菜单项(li)采用浮动方式布局,整个菜单栏#nav采用相对定位,选中的主菜单背景采用过渡设计(background-position-y),子菜单.subnav采用绝对定位。
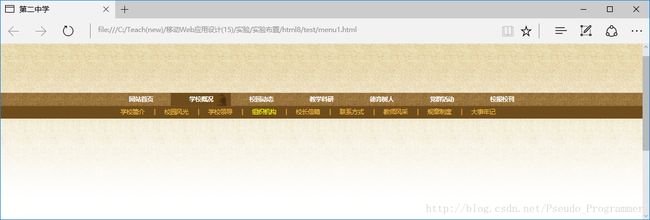
特别的样式属性提示:background-position-x,background-position-y,background-clip,vertical-align,transition-property,transition-duration
颜色:#6f4c1b,#f1c149
字体:微软雅黑
完成后截图:
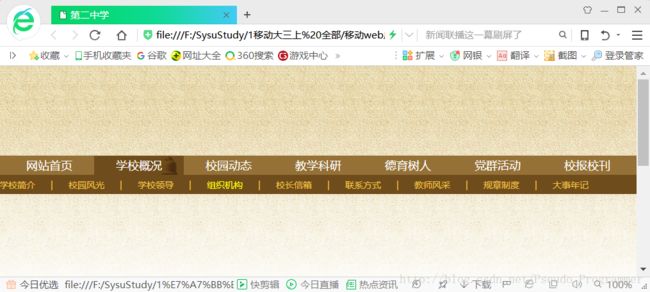
样式源代码:
<style>
        * { margin:0; padding:0;font-size:12px;font-family:宋体;line-height:1.2em;text-align:center;}
        a:link, a:visited, a:hover, a:active {text-decoration: none;}
        .wrapper {
            margin: 0 auto;
            width: 980px;
            position:relative;
        }
        li {list-style-type:none;
            float:left;
        }
        #header_outer {
            height: 140px;
            background: url("images/header_bg.png") repeat-x;
        }
        #header { overflow: hidden;}
        #nav_outer {
            height: 60px;
            background: linear-gradient(to bottom,#957137 30px,#6f4c1b 30px);
        }
        #nav{position:relative;}
        #nav span, #nav a {
            font-size: 14px;
            font-family: 'Microsoft YaHei';
            padding-top:5px;
        }
        #nav .subnav {
            height: 26px;
            width: 960px;
            position: absolute;
            top: 30px;
            right:40px;
            padding-top:7px;
            }
        #main_outer {
            height: 500px;
            background: url("images/header_bg.png") repeat-x;
            background-position: 0 -180px;
        }
        #nav > li > a {
            font-size: 1.5em;
            color: white;
            width: 140px;
            float: left;
            vertical-align: text-bottom;
            background-clip: border-box;
        }
        #nav > li {
            transition-property: background-position-y;
            background-image: url('images/nav_bg2.gif');
            background-position-y: -65px;
            transition-duration: 0s;
            height: 30px;
        }
        #nav > li:hover {
            background-position-y: -32px;
            transition-property: background-position-y;
            transition-duration: 0.2s;
        }
        .subnav { display: none;}
        #nav > li:hover .subnav{ display:block;}
        #nav .subnav a, span {
            color: #f1c149;
            margin: 12px;
        }
        #nav .subnav a:hover {
            color: yellow;
        }
style>
3、(menu2.html)在menu1.html的基础上,并在只修改样式的情况下设计子菜单为下拉菜单,动图见menu2.mp4,下拉增加了opacity的过渡(transition)。提示:每个主菜单项(li)要改为相对定位。

完成后截图:
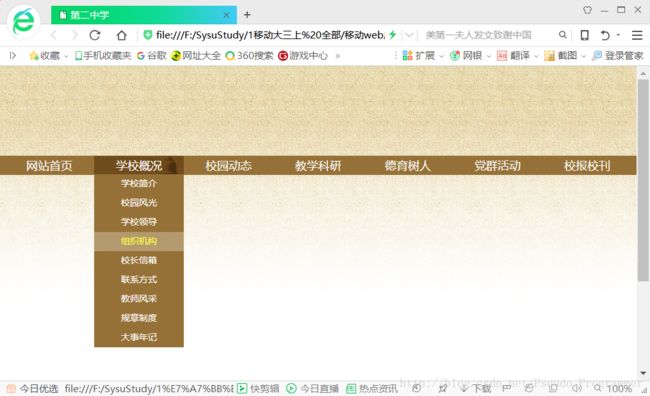
样式表如下:
   <style>
        * {
            margin: 0;
            padding: 0;
            font-size: 12px;
            font-family: 宋体;
            line-height: 1.2em;
            text-align: center;
        }
        a:link, a:visited, a:hover, a:active { text-decoration: none;}
        .wrapper {
            margin: 0 auto;
            width: 980px;
            position: relative;
        }
        li {list-style-type: none;}
        #header_outer {
            height: 140px;
            background: url("images/header_bg.png") repeat-x;}
        #header { overflow: hidden;}
        #nav_outer {
            height: 30px;
            background-color:#957137;
        }
        #nav span, #nav a {
                font-size: 14px;
                font-family: 'Microsoft YaHei';
                padding-top: 5px;
            }
        #nav .subnav {
            height: 26px;
            position: absolute;
            top: 22px;
            padding-top: 7px;
        }
        #main_outer {
            height: 530px;
            background: url("images/header_bg.png") repeat-x;
            background-position: 0 -180px;
        }
        #nav > li > a {
            font-size: 1.5em;
            color: white;
            width: 140px;
            float: left;
        }
        #nav > li {
            position: relative;
            float:left;
            transition-property: background-position-y;
            background-image: url('images/nav_bg2.gif');
            background-position-y: -65px;
            transition-duration: 0s;
            height: 30px;
        }
        #nav > li:hover {
                background-position-y: -32px;
                transition-property: background-position-y;
                transition-duration: 0.2s;
        }
        .subnav,#nav .subnav span { display: none;}
        #nav > li:hover .subnav {display: block;}
        #nav .subnav a {
            color: white;
        }
        #nav .subnav li {
            width: 140px;
            line-height: 30px;
            background-color:#957137;
            opacity: 1;
            transition:opacity 0.3s;
        }
        #nav .subnav li:hover { opacity:0.7; }
        #nav .subnav a:hover {color: yellow;}
style>
4、(选做)(board2.html)为了在版块宽度(#board1)变化(可以手动修改)时版面自动对齐,见下图,尝试把board1.html中的inline-block改为浮动方式。
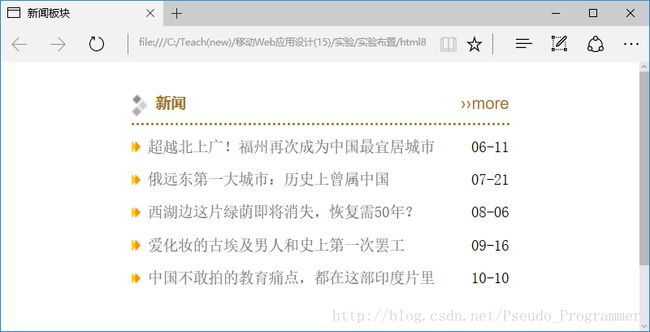
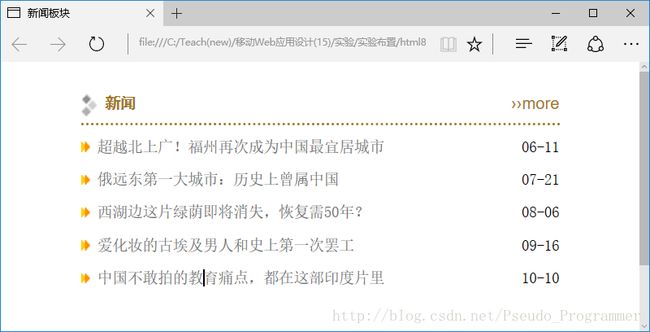
完成后截图:
① 宽度取310px

② 宽度取600px
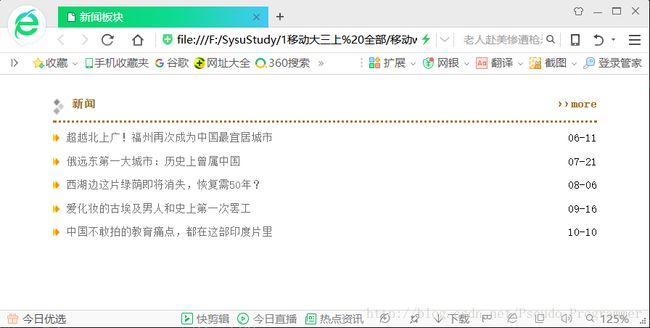
样式表如下:
<style>
        * {
            margin: 0;
            padding: 0;
            line-height: 1.2em;
        }
        *, a:link, a:visited, a:hover, a:active {
            text-decoration: none;
            font-size: 12px;
            font-family: 宋体;
        }
        .clear {clear: both;}
        li {list-style-type: none;}
        #board1 {
            width: 600px;
            margin: auto;
            margin-top: 25px;
            /*background-color:whitesmoke;
            padding:7px;*/
        }
        /*div div {display: inline-block;}*/
        .boardmenu {
            height: 18px;
            width: 100%;
            border-bottom: dotted #a17525;
            padding-bottom: 7px;
            margin-bottom: 10px;
        }
        .boardmenu .title {width:260px;}
        .boardmenu .title img {
            vertical-align: text-top;
            padding-right:7px;
        }
        .boardmenu .title span {
            color: #a17525;
            font-weight: bold;
            font-family: 黑体;
        }
        .boardmenu .more {
            font-weight: bolder;
            float:right;
            margin-top:-20px;
        }
        .boardmenu .more a {
            font-size: 13px;
            font-family: sans-serif;
            color: #a17525;
        }
        .boardcontent li {height: 26px;}
        .boardcontent a {
            font-size: 12px;
            color: #6f6f6f;
        }
        .boardcontent li:before {
            content: url('images/list_icon.gif');
            padding-right: 7px;
        }
        li  span {float: right;}
    style>
5、(选做)(menu3.html)尝试把menu1.html中的浮动元素改为display:inline-block,也可以得到类似的页面。
完成后截图:
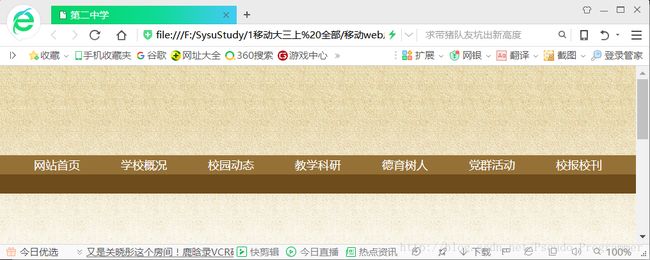
样式表如下:
<style>
        * { margin:0; padding:0;font-size:12px;font-family:宋体;line-height:1.2em;text-align:center;}
        a:link, a:visited, a:hover, a:active {text-decoration: none;}
        .wrapper {
            margin: 0 auto;
            width: 980px;
            position:relative;
        }
        li {list-style-type:none;
            display:inline-block;
        }
        #header_outer {
            height: 140px;
            background: url("images/header_bg.png") repeat-x;
        }
        #header { overflow: hidden;}
        #nav_outer {
            height: 60px;
            background: linear-gradient(to bottom,#957137 30px,#6f4c1b 30px);
        }
        #nav{position:relative;}
        #nav span, #nav a {
            font-size: 14px;
            font-family: 'Microsoft YaHei';
            padding-top:5px;
        }
        #nav .subnav {
            height: 26px;
            width: 960px;
            position: absolute;
            top: 30px;
            right:40px;
            padding-top:7px;
            }
        #main_outer {
            height: 500px;
            background: url("images/header_bg.png") repeat-x;
            background-position: 0 -180px;
        }
        #nav > li > a {
            font-size: 1.5em;
            color: white;
            width: 130px;
            display:inline-block;
            vertical-align: text-bottom;
            background-clip: border-box;
        }
        #nav > li {
            transition-property: background-position-y;
            background-image: url('images/nav_bg2.gif');
            background-position-y: -65px;
            transition-duration: 0s;
            height: 30px;
        }
        #nav > li:hover {
            background-position-y: -32px;
            transition-property: background-position-y;
            transition-duration: 0.2s;
        }
        .subnav { display: none;}
        #nav > li:hover .subnav{ display:block;}
        #nav .subnav a, span {
            color: #f1c149;
            margin: 9px;
        }
        #nav .subnav a:hover {
            color: yellow;
        }
    style>
【完成情况】
是否完成了这些步骤?(√完成 ×未做或未完成)
1 [√] 2 [√] 3 [√] 4 [√] 5 [√]
【实验体会】
(1)CSS3 transition-property 属性:把鼠标指针放到 div 元素上,会产生带有平滑改变元素宽度的过渡效果。
(2)CSS3 transition-duration 属性:属性规定完成过渡效果需要花费的时间(以秒或毫秒计)。
(3)menu1.html中,一开始对hover前后的.subnav采用了visibility属性,然后发现每次点击主菜单栏的时候,最后一个子菜单栏都会出现,这是因为visibility隐藏的对象还保留对象显示时所占的物理空间,而最后一个子菜单栏在最上层,因此会出现,后来改为display就不会了,这是因为display不保留对象显示时所占的物理空间。
① vilibility:hidden(隐藏)、visible(显示) style=”vislbility:hidden”
② display:none(隐藏)、block(显示) style=”display:none”