android基于opencv的车牌识别,高识别率
android基于opencv的车牌识别(LPR),高识别率

LPR是一个开源的车牌识别的框架,源码在此,大家可以去github下载
LPR源码
https://github.com/zeusees/HyperLPR.git
下面我们一步步来如何移植LPR到Android
开发IDE是android stduio
我们先来移植一下Opencv到android上。
OpenCV是一个基于BSD许可(开源)发行的跨平台计算机视觉库,可以运行在Linux、Windows、Android和Mac OS操作系统上。它轻量级而且高效——由一系列 C 函数和少量 C++ 类构成,同时提供了Python、Ruby、MATLAB等语言的接口,实现了图像处理和计算机视觉方面的很多通用算法。
官网下载sdk
https://opencv.org/
OPENCV
首先新建一个项目


这些根据你自己填

创建新工程完成

移植opencv,打开opencv的sdk的java目录·

把它复制到工程上

然后导入
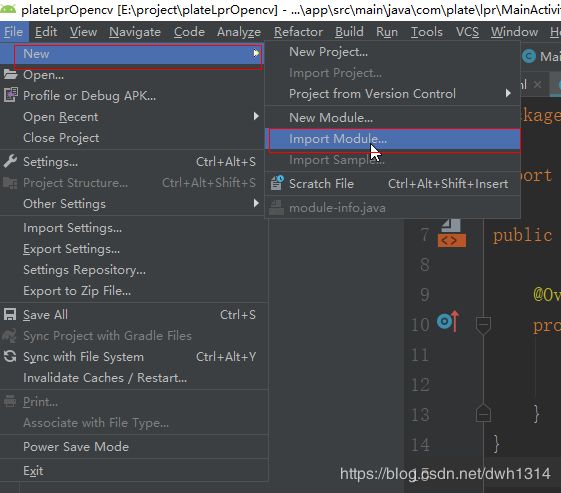
选择刚刚的java目录
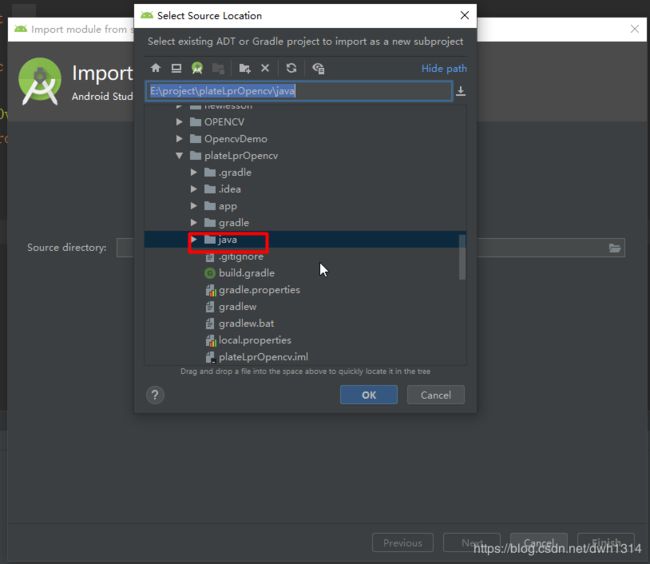
导入

点完成

然后编译的时候会出现报错我们需要改一下Androidmanifest.xml文件

把下面的那一行注释掉

还有就是,在open
apply plugin: 'com.android.library'

android {
    compileSdkVersion 29
    buildToolsVersion "29.0.2"

    defaultConfig {
        minSdkVersion 8
        targetSdkVersion 29
    }

    buildTypes {
        release {
            minifyEnabled false
            proguardFiles getDefaultProguardFile('proguard-android.txt'), 'proguard-rules.txt'
        }
    }
}
然后添加依赖
implementation project(path: ':openCVLibrary343')
然后再MainActivity.java添加以下代码
@Override
    protected void onResume() {
        super.onResume();
        if (!OpenCVLoader.initDebug()) {
            Log.d(TAG, "Internal OpenCV library not found. Using OpenCV Manager for initialization");
            OpenCVLoader.initAsync(OpenCVLoader.OPENCV_VERSION_3_4_0, getApplicationContext(), mLoaderCallback);
        } else {
            Log.d(TAG, "OpenCV library found inside package. Using it!");
            mLoaderCallback.onManagerConnected(LoaderCallbackInterface.SUCCESS);
        }
    }
![]()
最后添加so库
打开opencv复制opencv_sdk\OpenCV-android-sdk\sdk\native\libs里面的v7a库,当然也可以全部复制过去
![]()
复制过去后的样子
![]()
添加这段代码到app的
build.gradle上
然后android 的opencv环境搭建好了
然后要用到NDK,
NDK:(Native Development Kit),原生开发工具包是一组可以让您在Android应用中利用C和c++代码的工具,可用以从您自己的源代码构建,或者利用现有的预构建库.
我们用到的NDK版本是r14的,注意(版本太高不行,目前用r14稳定)
这里是下载链接
ndk_r14b (Dec 2016)
Windows 32-bit : https://dl.google.com/android/repository/android-ndk-r14b-windows-x86.zip
Windows 64-bit :
https://dl.google.com/android/repository/android-ndk-r14b-windows-x86_64.zip
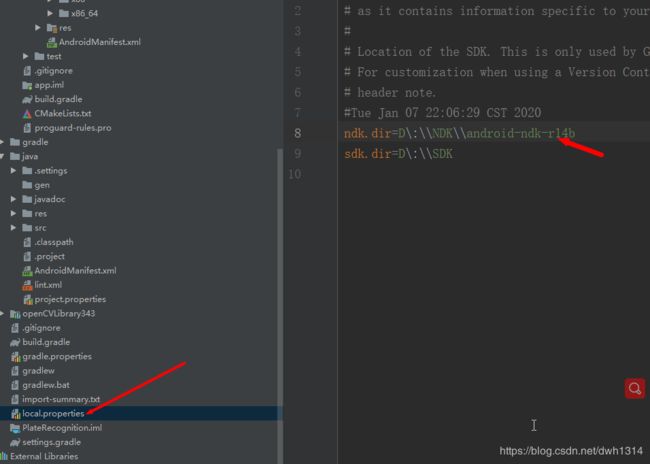
把这里改成自己的目录
添加jni


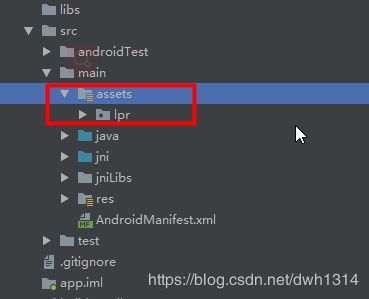
把这几个文件复制过去


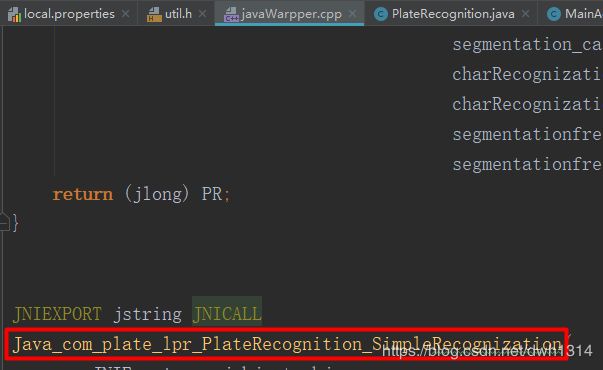
javaWarpper.cpp里面记得替换成自己的包名
添加CMakeLists.txt文件,自己复制过去

这里修改成自己的本地路径

修改

最后的样子
apply plugin: 'com.android.application'

android {
    compileSdkVersion 29
    buildToolsVersion "29.0.2"
    defaultConfig {
        applicationId "com.plate.lpr"
        minSdkVersion 15
        targetSdkVersion 29
        versionCode 1
        versionName "1.0"
        testInstrumentationRunner "androidx.test.runner.AndroidJUnitRunner"
    }
    sourceSets {
        main {
            jniLibs.srcDirs = ['src/main/jniLibs']
            jni.srcDirs = ['src/main/jni', 'src/main/jni/']
        }
    }

    externalNativeBuild {
        cmake {
            path "CMakeLists.txt"
        }
    }

    buildTypes {
        release {
            minifyEnabled false
            proguardFiles getDefaultProguardFile('proguard-android-optimize.txt'), 'proguard-rules.pro'
        }
    }
    compileOptions {
        sourceCompatibility = '1.8'
        targetCompatibility = '1.8'
    }
}

dependencies {
    implementation fileTree(dir: 'libs', include: ['*.jar'])
    implementation 'androidx.appcompat:appcompat:1.1.0'
    implementation 'androidx.constraintlayout:constraintlayout:1.1.3'
    testImplementation 'junit:junit:4.12'
    androidTestImplementation 'androidx.test:runner:1.2.0'
    androidTestImplementation 'androidx.test.espresso:espresso-core:3.2.0'
    implementation project(path: ':openCVLibrary343')
}
布局
<?xml version="1.0" encoding="utf-8"?>
<LinearLayout xmlns:android="http://schemas.android.com/apk/res/android"
    xmlns:app="http://schemas.android.com/apk/res-auto"
    xmlns:tools="http://schemas.android.com/tools"
    android:layout_width="match_parent"
    android:layout_height="match_parent"
    tools:context=".MainActivity"
    android:orientation="vertical"
    >

    <ImageView
        android:id="@+id/img"
        android:layout_width="350dp"
        android:layout_height="200dp"
        android:layout_gravity="center"
        android:layout_marginTop="100dp"
        android:layout_marginBottom="100dp"/>
    <Button
        android:layout_width="wrap_content"
        android:layout_height="wrap_content"
        android:text="调入图片"
        android:layout_gravity="center"
        android:id="@+id/in_img"/>
    <Button
        android:layout_width="wrap_content"
        android:layout_height="wrap_content"
        android:text="识别"
        android:layout_gravity="center"
        android:id="@+id/reg"/>

</LinearLayout>
剩下的java部分
import androidx.appcompat.app.AppCompatActivity;
import androidx.core.app.ActivityCompat;

import android.Manifest;
import android.annotation.SuppressLint;
import android.content.ContentResolver;
import android.content.Intent;
import android.graphics.Bitmap;
import android.graphics.BitmapFactory;
import android.net.Uri;
import android.os.AsyncTask;
import android.os.Bundle;
import android.os.Handler;
import android.os.Message;
import android.util.Log;
import android.view.View;
import android.widget.Button;
import android.widget.ImageView;
import android.widget.Toast;

import org.opencv.android.BaseLoaderCallback;
import org.opencv.android.LoaderCallbackInterface;
import org.opencv.android.OpenCVLoader;
import org.opencv.android.Utils;
import org.opencv.core.Mat;

import java.io.FileNotFoundException;


public class MainActivity extends AppCompatActivity {

    private ImageView imageView;
    private Button in_b,re_b;
    private Bitmap bitmap1;
    public long handle;
    private String re_str;

    private final String TAG = getClass().getSimpleName();


    private BaseLoaderCallback mLoaderCallback = new BaseLoaderCallback(this) {
        @SuppressLint("StaticFieldLeak")
        @Override
        public void onManagerConnected(int status) {
            super.onManagerConnected(status);
            if (status == LoaderCallbackInterface.SUCCESS) {
                handle = DeepAssetUtil.initRecognizer(MainActivity.this);
                Log.d(TAG, "OpenCV 加载成功");
            } else {
                Log.d(TAG, "OpenCV 加载失败");
            }
        }
    };


    @Override
    protected void onCreate(Bundle savedInstanceState) {
        super.onCreate(savedInstanceState);
        setContentView(R.layout.activity_main);
        requestDangerousPermissions();
        imageView=findViewById(R.id.img);
        in_b=findViewById(R.id.in_img);
        re_b=findViewById(R.id.reg);

        in_b.setOnClickListener(new View.OnClickListener() {
            @Override
            public void onClick(View view) {

                //intent可以应用于广播和发起意图,其中属性有:ComponentName,action,data等
                Intent intent=new Intent();
                intent.setType("image/*");
                //action表示intent的类型,可以是查看、删除、发布或其他情况;我们选择ACTION_GET_CONTENT,系统可以根据Type类型来调用系统程序选择Type
                //类型的内容给你选择
                intent.setAction(Intent.ACTION_GET_CONTENT);
                //如果第二个参数大于或等于0,那么当用户操作完成后会返回到本程序的onActivityResult方法
                startActivityForResult(intent, 1);

            }
        });


        re_b.setOnClickListener(new View.OnClickListener() {
            @Override
            public void onClick(View view) {
                Mat m=new Mat();
                Utils.bitmapToMat(bitmap1,m);
                re_str=PlateRecognition.SimpleRecognization(m.getNativeObjAddr(), handle);
            }
        });

    }


    @Override
    protected void onResume() {
        super.onResume();
        if (!OpenCVLoader.initDebug()) {
            Log.d(TAG, "Internal OpenCV library not found. Using OpenCV Manager for initialization");
            OpenCVLoader.initAsync(OpenCVLoader.OPENCV_VERSION_3_4_0, getApplicationContext(), mLoaderCallback);
        } else {
            Log.d(TAG, "OpenCV library found inside package. Using it!");
            mLoaderCallback.onManagerConnected(LoaderCallbackInterface.SUCCESS);
        }
    }
        public void requestDangerousPermissions() {
        String[] strings = new String[]{
                //Manifest.permission.CAMERA,
                //Manifest.permission.RECORD_AUDIO,
                Manifest.permission.READ_EXTERNAL_STORAGE,
                Manifest.permission.WRITE_EXTERNAL_STORAGE};
        ActivityCompat.requestPermissions(this, strings, 100);
    }

    @Override
    protected void onActivityResult(int requestCode, int resultCode, Intent data) {
        //用户操作完成,结果码返回是-1,即RESULT_OK
        if(resultCode==RESULT_OK){
            //获取选中文件的定位符
            Uri uri = data.getData();
            Log.e("uri", uri.toString());
            //使用content的接口
            ContentResolver cr = this.getContentResolver();
            try {
                //获取图片
                bitmap1 = BitmapFactory.decodeStream(cr.openInputStream(uri));
                imageView.setImageBitmap(bitmap1);

            } catch (FileNotFoundException e) {
                Log.e("Exception", e.getMessage(),e);
            }
        }else{
            //操作错误或没有选择图片
            Log.i("MainActivtiy", "operation error");
        }
        super.onActivityResult(requestCode, resultCode, data);
    }


}
添加权限
<uses-permission android:name="android.permission.WRITE_EXTERNAL_STORAGE" />
<uses-permission android:name="android.permission.READ_EXTERNAL_STORAGE" />
还有一部分代码就不贴上来的,比较长。大家去下载吧!
关注公众号回复003即可下载
![]()

