imx6ull使用Unique ID配置网卡MAC地址
前言:
貌似不管用什么ARM处理器都会遇到一个问题,那就是MAC地址唯一性,如果是使用随机的,每次reboot之后MAC地址都会变化,如果是在代码里面固定死了,如果局域网里面有两个设备的话,路由又会有问题。其实最大的问题就是量产的不方便。
以前用stm32的时候,可以使用stm32的唯一ID来配置给MAC地址使用,后来使用的zynq并没有,然后就使用的是板子上的flash的以为ID。最近在研究imx6ull,也是同样的问题,查了一下datasheet之后发现这款CPU也有唯一ID。下面是datasheet里面的介绍:
接下来就切入正题了:
本篇blog不做过程分析,因为之前zynq已经分析过一次了,我已经知道需要在什么地方做修改了。所以接下来只把需要做修改的地方给大家分享一下,有需要看分析过程的朋友可以参考我之前写的blog:ZYNQ通过读取SPI Flash的唯一ID来做MAC地址使用。
首先依照惯例还是先介绍一下平台,这里使用的开发板是韦东山老师的100ask_imx6ull开发板,是真的便宜。然后u-boot和kernel都是百问网提供的。
然后说一下需要修改什么,主要是修改u-boot和设备树,跟kernel关系不大。
接下来先修改u-boot:
根据datasheet 《i.MX 6ULL Applications Processor Reference Manual》 2404页的寄存器介绍,可以知道只需要把这两个寄存器里面的ID读出来就行了。
然后这里会有两个ID,因为一共是64位,所以肯定采购一批IC的话,高32位因为是不会变的,所以我们需要知道哪个寄存器里面存的是低32位。因为我手里只有一张开发板,所以我麻烦了一下交流群里面的朋友把它的ID截图给我看了一下。
![]()
第一张的群里朋友的截图,第二章是我这边读出来的,所以可以确定我们应该使用OCOTP_CFG1寄存器里面保存的ID。
打开u-boot源码里面 ./cmd/fdt.c 找到函数 void set_working_fdt_addr(ulong addr) 将函数内容替换成
void set_working_fdt_addr(ulong addr)
{
	void *buf;
	/* patch by hlb start */
	#define B2L(x)	(((x & 0xff000000) >> 24) | ((x & 0xff0000) >> 8) | ((x & 0xff00) << 8) | ((x & 0xff) << 24))

	unsigned int off_dt_struct; 	 /* offset to structure */
	unsigned int off_dt_strings;		 /* offset to strings */
	unsigned int off_mem_rsvmap;		 /* offset to memory reserve map */

	unsigned int temp;
	unsigned int len;
	unsigned int name_off;
	unsigned char* str;
	unsigned char* node_name;
	int root_node = 0;
	int mac_cnt = 0;
	unsigned int ID0 = *((volatile const unsigned int*)0x21BC410);
	unsigned int ID1 = *((volatile const unsigned int*)0x21BC420);
	printf("\nID0 = 0x%08x\n", ID0);
	printf("ID1 = 0x%08x\n", ID1);
	/* patch by hlb end */
	buf = map_sysmem(addr, 0);
	working_fdt = buf;
	/* patch by hlb start*/
#if 0
	printf("addr = 0x%08x\n", addr);
	printf("buf = 0x%08x\n", buf);
#endif

	off_dt_struct = B2L(working_fdt->off_dt_struct);
	off_dt_strings = B2L(working_fdt->off_dt_strings);
	off_mem_rsvmap = B2L(working_fdt->off_mem_rsvmap);

#if 0
	printf("off_dt_struct = %d\n", off_dt_struct);
	printf("off_dt_strings = %d\n", off_dt_strings);
	printf("off_mem_rsvmap = %d\n", off_mem_rsvmap);
#endif
	off_dt_struct += (unsigned int)working_fdt;
	off_dt_strings += (unsigned int)working_fdt;
	off_mem_rsvmap += (unsigned int)working_fdt;

	do
	{
		temp = *((unsigned int*)off_dt_struct);
		off_dt_struct += 4;
		temp = B2L(temp);
		switch (temp)
		{
		case 1:
			if (root_node == 0)	//处理根节点
			{
				root_node = 1;
				off_dt_struct += 4;	//根节点没有名字,跳过
			}
			else
			{
				/* node name */
				node_name = (unsigned char*)off_dt_struct;
				//printf("node name: %s\n", str);

				int str_len;
				str_len = strlen((const char*)node_name) + 1;
				off_dt_struct += str_len;
				if (str_len % 4)
				{
					off_dt_struct += 4 - (str_len % 4);	//4字节对齐
				}
			}
			break;

		case 2:
			break;

		case 3:
			/* value len */
			temp = *((unsigned int*)off_dt_struct);
			len = B2L(temp);

			off_dt_struct += 4;

			/* nameoff */
			temp = *((unsigned int*)off_dt_struct);
			name_off = B2L(temp);
			str = (unsigned char*)(off_dt_strings + name_off);

			off_dt_struct += 4;

			if (strstr((char*)str, (const char*)"local-mac-address"))
			{
				unsigned char* pmac;
				pmac = (unsigned char*)off_dt_struct;

#if 1
				printf("Finding eth%d node name is: %s\n", mac_cnt, node_name);
				printf("Old local-mac-address value len = %d\n", len);
				for (int i = 0; i < 6; i++)
				{
					printf("0x%02x ", pmac[i]);
				}
				printf("\n");
#endif
				pmac[0] = 0x00;
				pmac[1] = 0x0a;
				pmac[2] = 0x35 + mac_cnt++;
				pmac[3] = (unsigned char)(ID1 >> 16);
				pmac[4] = (unsigned char)(ID1 >> 8);
				pmac[5] = (unsigned char)(ID1 >> 0);

#if 1
				printf("Use ID1 value!\n");
				printf("local-mac-address value len = %d\n", len);
				for (int i = 0; i < 6; i++)
				{
					printf("0x%02x ", pmac[i]);
				}
				printf("\n\n");
#endif
			}


			off_dt_struct += len;	//加上value长度偏移
			if (len % 4)
			{
				off_dt_struct += 4 - (len % 4);	//4字节对齐
			}
			break;

		case 9:
			off_dt_struct = 0;
			break;

		default:
			break;
		}

	} while (off_dt_struct);

	/* patch by hlb end */
	setenv_hex("fdtaddr", addr);
}
该函数里面主要是实现了解析设备树,然后找到MAC地址的属性,将MAC地址的低三个字节替换成UID的低三个字节。保存编译一下,到这里u-boot基本上就算改完了,然后接下来还要修改设备树,因为我这版设备树里面是没有MAC地址属性的。然后设备树解析这里也不详细赘述了,有兴趣的同学自行查阅资料,或者是去买韦东山老师的设备树视频来看一下。(其实这不是软文)
打开kernel源码 ./arch/arm/boot/dts 里的 100ask_imx6ull-14x14.dts 文件,找到:fec1 和 fec2 节点,然后添加:
local-mac-address = [00 0a 35 00 00 00];最后编译一下dtb,通过nfs文件系统把dtb文件拷贝到开发板 /boot 目录下就行了,注意一下名字不要弄错了。最后再烧写一下u-boot。开机就能看效果了!
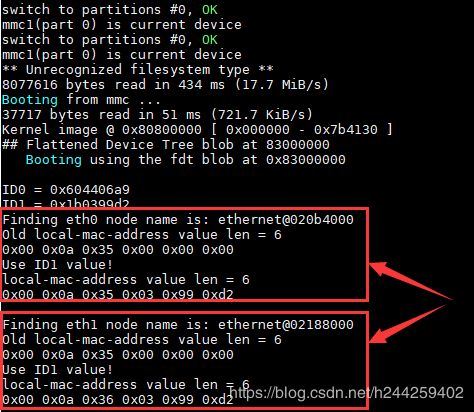
u-boot打印:
进入系统之后 ifconfig -a:
大功告成!
最后再罗嗦两句,第一个就是我是没钱买带TF卡版本的,所以我只有EMMC,然而用 mfg_tool 烧写EMMC的时候默认是 u-boot、kernel、dtb、rootfs 一起烧写的。然后这里只需要烧写 u-boot ,咨询了一下群里的老师,老师让修改一下烧写工具目录下的 ./Profiles/Linux/OS Firmware/ 里的 ucl2.xml 就行了。接下来查了一下资料,只需要删除一部分命令就行了:
大概就是把红色框框里面的东西删掉就OK了。具体语法不详细赘述了。
我把修改好的文件贴上来:
	Loading U-boot
	Loading U-boot

	Loading Kernel.
	Loading Kernel.

	Loading device tree.
	Loading device tree.


	 Jumping to OS image.


	Sending partition shell
	 Partitioning...
	 Partitioning...


	Sending u-boot.bin
	Sending u-boot.bin

	clear u-boot arg
	write u-boot.bin to sd card

	Waiting for the partition ready
	Formatting rootfs partition


	Sending kernel
	write kernel image to sd card


	Sending Device Tree file
	Sending Device Tree file

	write device tree to sd card
	write device tree to sd card


	Unmounting vfat partition


	Formatting rootfs partition


	Sending and writting rootfs
	Finishing rootfs write
	Unmounting rootfs partition
	Done


	Loading U-boot

	Loading Kernel.

	Loading Initramfs.


	Loading device tree.

	 Jumping to OS image.


	Sending partition shell
	 Partitioning...
	 Partitioning...


	clear u-boot arg

	access boot partition 1


	Sending u-boot.bin

	write U-Boot to sd card
	 re-enable read-only access
	enable boot partion 1 to boot
注意!注意!注意!我这里是使用的EMMC哈!
然后说第二点,通过上面的修改,两个网卡的MAC地址都应该是搞定了的。然而这里面还有一种情况,就是 u-boot 的环境变量里面设置了 ethaddr 变量,这种情况下u-boot会去解析设备树之后把我们修改好的值替换成这个变量的值。当然这里也是可以解决的,解决方法就在上文中提到的另外一篇blog里面写得很详细的,因为我实在是不想打字了,抱歉了。
最后依照惯例还是应该要说一下,本人毕竟水平有限。有什么问题就联系我吧!


