Android Material Design 系列之 CardView 开发详解
前言
Android 5.0 版本中新增了 CardView,CardView 继承自 FrameLayout 类,具有圆角背景和阴影的 FrameLayout,并且可以设置圆角和阴影,使得控件具有立体性,也可以包含其他的布局容器和控件。
本文章向大家介绍 Android CardView 详解及使用方法和实例,主要包括 Android CardView 详解及使用方法和实例使用实例、应用技巧、基本知识点总结和需要注意事项。
一、CardView 常用属性
| XML 属性 | 方法 | 介绍 |
|---|---|---|
| app:cardBackgroundColor | setCardBackgroundColor(int color) | 设置背景颜色 |
| app:cardCornerRadius | setRadius(float radius) | 设置圆角大小 |
| app:cardElevation | setCardElevation(float elevation) | 设置 z 轴的阴影 |
| app:cardMaxElevation | setMaxCardElevation(float maxElevation) | 设置 z 轴的最大高度值 |
| app:cardUseCompatPadding | setUseCompatPadding(boolean useCompatPadding) | 是否使用 CompatPadding 默认值为 false |
| app:cardPreventCornerOverlap | setPreventCornerOverlap(boolean preventCornerOverlap) | 是否给 content 添加 padding,来阻止与圆角重叠,默认值为 true |
| app:contentPadding | setContentPadding(int left, int top, int right, int bottom) | 设置内容的内边距 padding |
| app:contentPaddingLeft | setContentPadding(int left, int top, int right, int bottom) | 设置内容的左边距 padding |
| app:contentPaddingTop | setContentPadding(int left, int top, int right, int bottom) | 设置内容的上边距 padding |
| app:contentPaddingRight | setContentPadding(int left, int top, int right, int bottom) | 设置内容的右边距 padding |
| app:contentPaddingBottom | setContentPadding(int left, int top, int right, int bottom) | 设置内容的底边距 padding |
二、CardView 基础使用
1、添加依赖包
要添加 CardView 的依赖项,您必须将 Google Maven 代码库添加到项目中。在应用或模块的 build.gradle 文件中添加所需工件的依赖项:
dependencies {
    implementation "androidx.cardview:cardview:1.0.0"
}
这里顺便提一下androidx,很多朋友私信我为什么以前依赖 v7 包。简单理解为androidx是 Google 将之前的v4和v7包整理后的产物,以后所有的控件都要依赖androidx
2、创建布局
在布局文件中创建 CardView 控件,使用方法跟 ViewGroup 一致,可以在 CardView 中添加一系列的子控件。一般情况下,把 CardView 当做一个父容器,里面可以包含其他子 View,在 ListView 或者 RecyclerView 中充当 item 布局使用。
<androidx.cardview.widget.CardView
    xmlns:android="http://schemas.android.com/apk/res/android"
    xmlns:app="http://schemas.android.com/apk/res-auto"
    android:layout_width="match_parent"
    android:layout_height="wrap_content"
    android:layout_margin="5dp"
    app:contentPadding="8dp">

    <androidx.constraintlayout.widget.ConstraintLayout
        android:layout_width="match_parent"
        android:layout_height="wrap_content"
        android:orientation="horizontal">

        <TextView
            android:id="@+id/tv_name"
            android:layout_width="wrap_content"
            android:layout_height="wrap_content"
            android:text="Jaynm"
            app:layout_constraintLeft_toLeftOf="parent"
            app:layout_constraintTop_toTopOf="parent" />

        <TextView
            android:id="@+id/tv_time"
            android:layout_width="wrap_content"
            android:layout_height="wrap_content"
            android:text="2020-01-18"
            app:layout_constraintEnd_toEndOf="parent"
            app:layout_constraintTop_toTopOf="@+id/tv_name" />

        <TextView
            android:id="@+id/tv_title"
            android:layout_width="wrap_content"
            android:layout_height="wrap_content"
            android:text="一个移动端了开发者,对未来的思考"
            app:layout_constraintStart_toStartOf="@+id/tv_name"
            app:layout_constraintTop_toBottomOf="@+id/tv_name" />

    androidx.constraintlayout.widget.ConstraintLayout>
androidx.cardview.widget.CardView>
以上布局文件看这并不陌生,使用方式和其他 ViewGroup 没什么区别,只是 CardView 引入了三维坐标轴 z 轴,可以设置阴影和圆角效果,让你的布局像一张卡片,让 UI 界面看起来具有立体感,展示效果如下:
三、CardView 设置阴影效果
现在 Android 系统都已经到了 10.0,所以关于 Material Design 控件本文都以 5.0 以上介绍,需要适配 5.0 以下版本的朋友,需要对 CardView 其中属性建不同 layout 设置,这里不做详细区分。
app:cardElevation 或者 setCardElevation(float elevation)实现 CardView 阴影效果,直接贴上布局文件和运行效果。
<LinearLayout xmlns:android="http://schemas.android.com/apk/res/android"
    xmlns:app="http://schemas.android.com/apk/res-auto"
    android:layout_width="match_parent"
    android:layout_height="match_parent"
    android:background="@color/white"
    android:gravity="center"
    android:orientation="vertical">

    <androidx.cardview.widget.CardView
        android:layout_width="200dp"
        android:layout_height="60dp"
        app:cardElevation="0dp" />

    <androidx.cardview.widget.CardView
        android:layout_width="200dp"
        android:layout_height="60dp"
        android:layout_marginTop="30dp"
        app:cardElevation="10dp" />

    <androidx.cardview.widget.CardView
        android:layout_width="200dp"
        android:layout_height="60dp"
        android:layout_marginTop="30dp"
        app:cardElevation="50dp"/>

LinearLayout>
上面在 LinearLayout 中添加了 3 个 CardView,分别设置阴影 0dp/10dp/50dp,图片中可以很明显的看到阴影效果的展示。
四、CardView 设置圆角效果
XML 布局中设置app:cardCornerRadius属性或者setRadius(float radius)方法都可以设置 CardView 圆角效果。
以下图片展示的是分别设置app:cardCornerRadius属性值为 0dp/10dp/100dp 的效果。
五、CardView 设置 Ripple 效果
默认情况,CardView 是不可点击的,并且没有任何的触摸反馈效果。触摸反馈动画在用户点击 CardView 时可以给用户以视觉上的反馈。Google 为我们提供了一个很牛 X 的点击效果Ripple,也就是我们所说的水波纹效果,使用android:foreground属性添加 Ripple 样式。
1、系统自带 Ripple 效果
<LinearLayout xmlns:android="http://schemas.android.com/apk/res/android"
    xmlns:app="http://schemas.android.com/apk/res-auto"
    android:layout_width="match_parent"
    android:layout_height="match_parent"
    android:background="@color/white"
    android:gravity="center"
    android:orientation="vertical">

    <androidx.cardview.widget.CardView
        app:cardCornerRadius="0dp"
        app:cardBackgroundColor="@color/md_cyan_500"
        android:layout_width="200dp"
        android:layout_height="60dp"
        android:elevation="0dp" />

    <androidx.cardview.widget.CardView
        android:clickable="true"
        android:foreground="?android:attr/selectableItemBackground"
        app:cardCornerRadius="10dp"
        app:cardBackgroundColor="@color/md_cyan_500"
        android:layout_width="200dp"
        android:layout_height="60dp"
        android:layout_marginTop="30dp"
        app:cardElevation="10dp" />

    <androidx.cardview.widget.CardView
        android:clickable="true"
        android:foreground="?android:attr/selectableItemBackgroundBorderless"
        app:cardCornerRadius="100dp"
        app:cardBackgroundColor="@color/md_cyan_500"
        android:layout_width="200dp"
        android:layout_height="60dp"
        android:layout_marginTop="30dp"
        app:cardElevation="50dp"/>

LinearLayout>
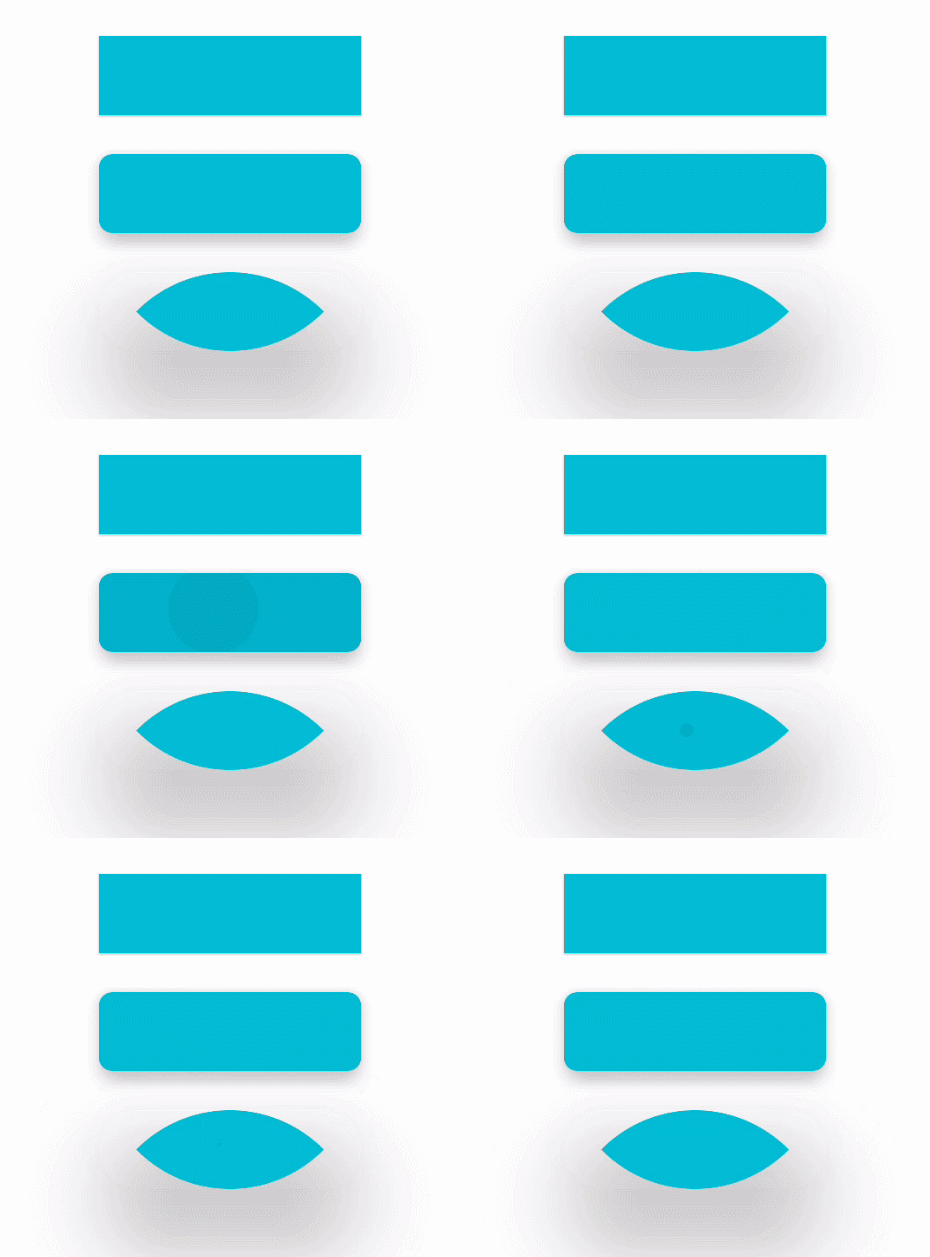
上述 XML 布局文件中,第 2、3 分别设置了系统自带的两种效果:
android:background="?android:attr/selectableItemBackground"水波纹有边界
android:background="?android:attr/selectableItemBackgroundBorderless"水波纹超出边界
注意:CardView 设置android:foreground属性后,还需设置android:clickable="true"才会有 Ripple 效果。
2、自定义 Ripple 效果
系统自带的 2 中默认效果在实际开发中基本上能够满足需求,但是往往会有奇葩的 UI 设计师,设计出自认为很炫酷的效果(本人觉得 Google Material Design 系列控件效果原生是最漂亮的)。这个时候就不得不根据设计师的需求自定义 Ripple 效果。
1、在 drawable 文件下新建一个item_touch_bg.xml文件,选择 ripple 标签
<ripple xmlns:android="http://schemas.android.com/apk/res/android"
    android:color="@color/md_grey_500">
    <item android:id="@android:id/mask"
          android:drawable="@android:color/white" />
ripple>
2、在布局 layout 文件 CardView 控件中设置android:foreground="@drawable/item_touch_bg"属性即可。
<androidx.cardview.widget.CardView
    android:clickable="true"
    android:foreground="@drawable/item_touch_bg"
    app:cardCornerRadius="10dp"
    app:cardBackgroundColor="@color/md_cyan_500"
    android:layout_width="200dp"
    android:layout_height="60dp"
    android:layout_marginTop="30dp"
    app:cardElevation="10dp" />
注意:水波纹效果也是 android 5.0 以上版本才会有效果,5.0 以下需要适配的朋友可以将 layout 和 layout-v21 分别设置。
源码下载 源码包含 Material Design 系列控件集合,定时更新,敬请期待!
六、总结
本文已经介绍如何使用 Android Lollipop 中引入的 CardView 和 RecyclerView 小部件。 您还看到了如何在 Material Design 应用程序中使用这些小部件的示例。 CardView 在现在开发 APP 中应用场景还是比较多的,如果你的项目中还没有用到,那就赶快尝试一下吧。
我的微信:Jaynm888
欢迎点评,
诚邀 Android 程序员加入微信交流群,公众号回复加群或者加我微信邀请入群。


